


Viking
-
Posts
5,290 -
Joined
-
Last visited
-
Days Won
6
Content Type
Events
Profiles
Forums
Media Demo
Posts posted by Viking
-
-
I missed this one first time round Alex, glad to have caught up with is now, it's great! I can see that it must have been quite a masking job, but you've done your usual excellent job.
Cheers
John
-
 1
1
-
-
4 minutes ago, billn53 said:
“Just” Mach 1? Hustler’s top speed was about M2.2 😆Yes, but its standing still! 😀
-
 1
1
-
 2
2
-
-
Bristol Beaufort Mk.IA w/Tropical Filters
ICM 1:48

The ICM Bristol Beaufort was released early last year, and I couldn't wait to get my hands on one! Mike reviewed it at the time HERE so I won't duplicate what he said.
It is a lovely kit that goes together with superb fit, and was a thoroughly enjoyable build. I went for the desert camouflaged build as shown on the kit box top, as befits the version with tropical air filters mounted above the engine cowlings, looking like a bit of a Heath Robinson addition.
Paints are MRP, with light weathering. I'm not keen on heavy panel lining and fading, I have put a wash on the heavy use areas such as the cowlings, and toned down the white '35' numbers as they were too bright for my liking.
On with the photos!
I'm not sure if those Yagi ariels should be Azure Blue like the rest of the underside, or some other colour. Perhaps someone can advise and I'll repaint them appropriately.
I purchased the Eduard 'Space' interior set to add a bit of internal detail, including a set of etched seat belts, as there is a lot visible under that glasshouse cockpit glazing.
Unfortunately all the detail in the Nav's section is lost from sight once the fuselage is closed up!
Better get the masking tape out! I made my own masks by rubbing an oversized section of tape on each panel, rubbing it down with a cocktail stick, and cutting around with a new scalpel blade.
I thought that some other finished models on the internet looked a bit 'leggy', sitting too high. So I put a bit of compression on the undercarriage legs by shortening & pinning them to reduce their height. I also sanded flats on the bottoms of the wheels.
Before and after. unmodified left, modified right. It's only a couple of mm, but improves the sit of the finished model.
An essential addition was the replacement set of Aeocraft Beaufort cowlings as ICM seem to have got confused with the Australian built Twin Wasp powered Beaufort II, as kit cowlings look just like them. The difference is very noticeable. Aerocraft cowling on the left, kit cowling on the right.
Aerocraft also provide a pair of leading edge oil coolers of the correct size, that are a good fit once you cut the kit parts away following the surrounding panel lines.
Thanks for looking,
John
-
42
-
2
-
-
Beautiful, looks like it is doing Mach1 just standing still!
Cheers
John
-
2
-
-
Incredible! so small and yet looking so real.
Cheers
John
-
1
-
-
Very original! what a great idea.
Cheers
John
-
Wow Mike, that is a real stunner! I think that camouflage looks amazing.
(As an aside, I believe that when the Americans captured the semi completed prototype and associated research, a lot of that knowledge ultimately went into the F-86 Sabre - you can see the family likeness, Also the Bell X-5).
Cheers
John
-
1
-
1
-
-
Wow, what an amazing result from the old Airfix kit! Beautifully made and rigged.
(What a shame the Wingnut Wings 1/32 kit never made it to the shops before they pulled the plug).
Cheers
John
-
1
-
-
Nice to see one of these appearing in RFI, lovely job as usual Dave, your brush painting is amazing, especially over those corrugations . It was really advanced for its day, and deserves a place in any WW1 collection.
Cheers
John
-
1
-
-
I managed to persuade Mike to let me build it, but have only just got around to posting it Here.
A bit later than I wanted, as I thought I had already posted it last year!
-
Fruit Delivery Van Typ 170V Lieferwagen
1:35 MiniArt
Oops, I finished this before Christmas last year and only just realised that I hadn't posted it here. I could have sworn I had, but memory and age must be catching up with me!
Anyhow, I like doing the occasional vehicle model, and this one really caught my eye. Mike reviewed it here.
It is typical MiniArt, being very well detailed with a lot of fine mouldings, and superb fit of parts. It was real pleasure to build, but was so fine that it needed a lot of care to to break things as construction went on!
The only thing I would have liked would have been some decals for the red circles on the wheel hubs. The wheel painting sequence was: Dark grey tyres, then whitewalls, then green for the hubs, then silver, then red, and finally silver again. A sequence of six colours with a lot of freehand & masking to paint on each one. Decals for those red bits would have really helped! (I've just noticed on the photos I should have pressed the bonnet/hood down a touch, it does fit nice and snugly. Oh well!)
A fun build, but I'm a bit done with painting all that fruit!
Fruit and more fruit!
During contrsuction, the engine & chassis are quite detailed.
Its quite small, for comparison with my Airfix Katy ambulance:
Thanks for looking,
John
-
33
-
-
Beautiful!
-
Incredible work as always Mike, flawless build quality, I love it!
Cheers
John
-
I fit all the struts at the same time, using a strip of clear plastic. Lay it on the underside of the top wing, mark each strut location and drill through with a 0.7mm drill.
Use it a a template in place of the top wing to line up all struts! The beauty is that you can see what you are doing. Leave everything to set, and fit the top wing when ready.
Example here of just about the most difficult subject, the Bristol F2.b The coins help to keep the template on.
HTH,
John
-
9
-
3
-
-
Nice one Tom!
Got to agree that is a great shame that BA got rid of the 747's, but I suppose it was inevitable with the newer more fuel efficient big twins coming along.
Cheers
John
-
2
-
1
-
-
Certainly looks good, It's a bit of a shame that the 380 came too late to wear any of the World schemes!
Cheers
John
-
1
-
-
It's more than reasonable Dave, it's a stunner! As always, it is seriously impressive that you brush paint, it looks flawless.
Love the prop too, and the base with the figure on it!
Cheers
John
-
1
-
-
Fascinating to watch!
-
1
-
-
I love the setting and appearance of this one, always a pleasure to see your builds Russ.
Cheers
John
-
1
-
-
Lovely model of an unusual subject. I've always thought that this would make an interesting theme for a collection of RAF trainers, along with a Magister, Tiger Moth etc,
Cheers
John
-
Another stunner, it's great to see these rarely made kits, especially when done so well.
Cheers
John
-
1
-
-
Absolutely beautiful, what di you use for the natural metal areas?
Cheers
John
-
1
-
-
Beautiful model! I used to live under the Heathrow flightpath and well remember the VC10's distinctive 'crackle' of the 4 Conways as they flew overhead and disappeared into the distance. You could hear them long after they had passed out of sight. (That, and the fact that every other aircraft seemed to be a 'boring' Trident. Oh how I'd like to see a Trident in the air now!)
Cheers
John
-
6 hours ago, Ad-4N said:
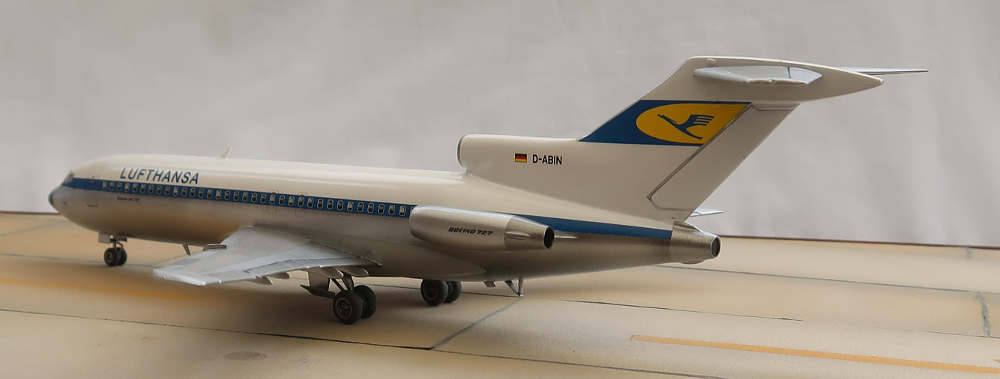
Respectfully, we may never know the truth of Lufthansa 727 delivery blue.
I have to agree with you there Ad-4N!
I do think that neither the DC-8 or 727 model has it exactly right, and in fact sitting on my shelf they don't look as far apart as they do in my photos above, which were taken in bright sunlight. I may post a separate RFI for the 727 at the weekend, but in the meantime here is another shot of it at the tail end. I've got a Revell Super Connie in the stash somewhere, with these markings. I'll dig it out and see how the decals compare. We'll probably have a 3rd shade of blue!
I appreciate your comments and enjoy the exchange of thoughts on this subject. 👍
Cheers
John
-
1
-


Kagohl III Gotha G.IV Serial Numbers on the May 25, 1917 Raid on England
in Aircraft WWI
Posted
Options A,B,C, & D on the Wingnut Wings kit instructions show 4 of them, HERE