

Mottlemaster
-
Posts
2,305 -
Joined
-
Last visited
Content Type
Events
Profiles
Forums
Media Demo
Posts posted by Mottlemaster
-
-
That's a very nice build Steve.
-
 1
1
-
-
On 29/12/2023 at 17:01, Thom216 said:
Thanks! Did you encounter any problem with the wing to fuse join? Seeing there might be some fit issues there.
Not that i can remember . maybe i was just lucky or my memory is like that of a member of parliament at the covid inquiry

-
1
-
-
This 262 has been sitting on the shelf of doom for around 3 years or possibly more . Dont know what happened in my life to cause the build to stall but i do know that this G/B is the perfect place to re boot the build and get her finished so she can sit next to my newly completed Super wings 1/32 He 219 .
I had started thinking while nearing the completion of the 219 what my next build would be . First thoughts , it would be small and relatively simple ,but im now confident i have the motivation to see this one through to completion .
I have a box of bits but no instructions or decals have been yet found . Sure they will turn up somewhere soon .
I think about 10% started . This one will be totally buttoned up , absolutely ready to take off . Maybe find a resin crew for it too .

Box with at least 3 years of dust
Contents of dusty box . They them self's are very dusty and will need a good bath
I am going to do a copy of Brett Greens 262 as looks a little different to anything i have done before and will make a nice contrast to the grey and blue squiggles on the 219
This is why im now going full buttoning
for the whole of 2024
Cheers Alistair
-
10
-
-
I am looking forward to seeing your build come together . I really enjoyed following your build in the go large G/B but the subject matter was outside of my experience and knowledge . If i could see the future im sure your 234 turned out to be a stunner . Did you get a revised set of transparencies as the early issued ones can be badly warped and cloudy .
Cheers Alistair
-
1
-
-
Great choice Thom . i built this kit many ,many years ago and i remember it going together like a dream . Will follow your progress .
Cheers Alistair
-
1
-
-
-
Phew , its finished . when i think about it ,this build could have easily been put on the shelf as a non finisher but luckily the thought of having to pick up the thread and finish at a later date was not one i could face considering how many hours have been invested .
My thoughts of the build and how it went , in no particular order
The largest , most complex kit iv ever attemted
Completely the wrong kit for this group build . Stretched my ambition to the limit should have gone with Revel Me 109 or similar
Group build timing did not work out well for me
During the build period have sold a house and gone from planning permission to completion of Building control on a new house to start Next Jan . There has just been so much red tape to deal with .which interrupted modeling brain space .
Ran into weather related problems of cold temps and very high humidity making spray times limited
Towards the end , the size of the aircraft and the number of fragile bits attached made moving it a problem (hence no under surface pics today as some parts only attached 10 mins before photos )
For my own personal satisfaction with the end result .... My best ever build that is not a conversion ! Its certainly not perfect but it ticks all the boxes i need to be very pleased .
My build of the Zoukei-mura 219 would not have taken place if not for this group build as i would never had thought the time right to pull it out from deep in the stash .
And im pleased its not another 109
")
Thanks Max for keeping this group build running over the extended time .
Just seen i need to clean my man cave window .
-
8
-
-
Fantastic result Ned . Yes i too have the urge to start something small .
-
1
-
-
like a new born giraffe , she has got up on her legs for the first time .
result ...not a tail sitter and is level etc .
now i can at long last get an idea on how much display space this will swallow up .
I am hoping the next update will be the final one before i post in the gallery .
-
8
-
-
13 hours ago, galgos said:
My Echelon Hunter build has been moved to the Work in Progress section. As co-host I WILL be keeping an eye on builds in this GB and all efforts to complete builds before the cut off date of 17 December, but I am no longer taking part as a modeller.
It has been a fascinating lesson in the techniques and thought process needed to transform a vacuum formed kit into a master piece.
Thanks for your time spent in helping keeping this G/B going, I am still ticking off construction stages of my He 219 and it will appear in the gallery. I couldn't bare the idea of falling at the last hurdle.
It has been a pleasure to have met you on this G/b
Cheers Alistair
-
3
-
-
1 hour ago, Mark said:
Also, some rather bonkers details, including cylinders, pistons and con-rods moulded into the inside faces of each engine half!! 🤪
Eduard do a set of piston rings and valve springs but you will need some good tweezers to stop the springs pinging away .
I am just finishing off the ZM 219 and that came with piston detail .
I did have an issue with strong glues eating deeper into some thin plastic parts than i would have liked but maybe ZM changed the plastic for this later developed kit .
I started at the beginning of this GB but it looks possible you may get this over the line before me
Cheers Alistair
-
4
-
-
Great result Stew. Don't these large scale twin engine aircraft become difficult to move around the bench as you get towards the finish line.
Good luck with the next one . I hope I find your build a little earlier
Cheers Alistair
-
 1
1
-
-
Thanks Alan and Max for your encouragement . i was probably just in with a chance of a finnish by the 19th but now with the extra month im confident this one will make the gallery , no im more than confident . It will be completed
")
I have had a concentrated effort to tick off all the little jobs that got left behind during the main construction such as wheels , undercarriage legs radar antenna etc .
The painting of national markings and codes has been done . Interestingly it seems possible that ZM called out the wrong color code letter for the aircraft i decided to go with .
Airframe Album No.1 Second Edition: The Heinkel He 219 'Uhu'
– A Detailed Guide to The Luftwaffe's Ultimate Nightfighter
by Richard A. Franks
ISBN 978-1-912932-18-4 suggests that the F is in green
This is what i decided to go with , so used Humbrol Brunswick green ,lighted with a touch of yellow .
I will get some pics of completed markings up latter .
I must say that the masks behaved impeccably .
Some pics of painting in progress
Yes i still have a very small area of squiggles to do ...dam it
Going to get some Rlm 66 on the canopy frames today to get that job ticked off .
Im at the stage now that i keep finding myself steeling a look at it and thinking , did i really build this . Feeling rather chuffed
Thanks again Alan and max
-
4
-
-
below the water line .
exhausts
Its going to be touch and go if i can finish this one in time , loads of snagging and finishing to do which im sure iv underestimated the work needed .
-
3
-
-
On 09/10/2023 at 08:34, Alan P said:
That looks superb, about the best rendition of the actual camouflage I've seen. Though @Iain Ogilvie did a brilliant job on his Revell one a long while back, his pictures have all disappeared...now you get the crown, Alistair! 👑☺️👍
Thanks Alan .I took a look at Ians build thread and could see that he received lots of praise for the build and paint job . A curse of the digital age with vanishing photos . wont belong before i reach my limit with Flikr and have to start deleting too .
This is where im at now .
Top camouflage now finished , thank god , became a bit of a slog but nice to have it behind me .
Not 100 percent consistent from back to front but its passed my test
Tomorrow the under surface or part of
Cheers
Alistair
-
7
-
-
Your build is head and shoulders above anything else in this G/B . In true Strictly style . AMAZING
-
1
-
-
The long And Winding Road pt 2
-
9
-
-
On 04/10/2023 at 08:44, trickyrich said:
that's one thing I have never gotten the hang of, and that's doing those really fine lines with an airbrush! How exactly do you do it, the the setup up compressor and paint wise.......have my glasses on and notebook ready!!!

I would never set myself up as a provider of useful airbrush techniques as my thin lines are at best average. In 1/32 it's a little easier but in 1/72 no way .
Ok now for what I did (not advice 😉)
Used enamel paint, well stirred and diluted around 40/60 paint thinners.
Air compressor set to 10 psi . I find it easier now I have a compressor with an air reservoir giving more consistent pressure ,also helps preventing compressor over heating. It has taken 2hrs to do 1 wing .
Airbrush. Iwata Hp/BH with 0.2 needle and crown type nozzle protector so you can get in nice and close and avoid pushing the sprayed paint around.
Choose the Goldylocks weather day .Not to hot or damp
Practice on some paint miles beforehand
Position area to be painted so you can spray at 90 degrees to surface . This I'm finding impossible to do with the 219 as it's so large
It is satisfying when it works out 😄
-
On 03/09/2023 at 19:20, galgos said:
So that’s all free-handed Alistair, I doff my hat to you! I found this:
challenging enough but yours is a whole new level! Amazing.This is how i lay down the pattern before i apply the paint .
I find that with a pattern like this i need something to follow as would probably go competently off course and get too large or small . I have even remembered not to completely finish spraying over the lines so i have an idea of what to sketch in the next session .
Its now that i am really understanding how large an area i have to paint . I would not recommend doing this scheme if your airbrush compressor doesn't have an air reservoir .
Probably going to take 4 to 5 sessions to get the top colors nailed .
-
3
-
-
Just a small update this week as hot weather halted spraying until the welcome return of Southwest drizzle and lower temps .
Halfords grey plastic primer applied . Next to get the pre-shading done but that will have to wait for a week as im away on holiday .
-
1
-
-
Please put my name on the list for this one .
Cheers Alistair
-
Looking fantastic. I can see the finished nose displayd behind a large magnifying glass .
-
1
-
1
-
-
18 hours ago, galgos said:
My apologies if you’ve already mentioned it Alister, but how did you achieve the authentic reverse mottling effect….a mask of some kind?
I should have taken some pictures of my preparation work Max but will try to remember when i start the next section and post some pictures of the outline sketch .
I firstly sprayed a coat of Rlm 75 and when fully cured very lightly sketched the Pattern with a white pencil . I had first practiced the pattern on paper to get the scale and shape that i could duplicate well .
Sods law that the first attempt had the spray width too narrow . It would have been perfect for 1/48 th . If i had attempted that it would have been too wide .
The main part is going too be harder as much larger and difficult to keep airbrush at right angles to the model .
-
2
-
-
You have certainly put the hours in with adding the super detail . How are things looking for meeting the deadline in Mid November ?
-
 1
1
-


Revell Level 5 Me262 B-1/U-1 Nightfighter
in World War 2 Twins Mega GB
Posted
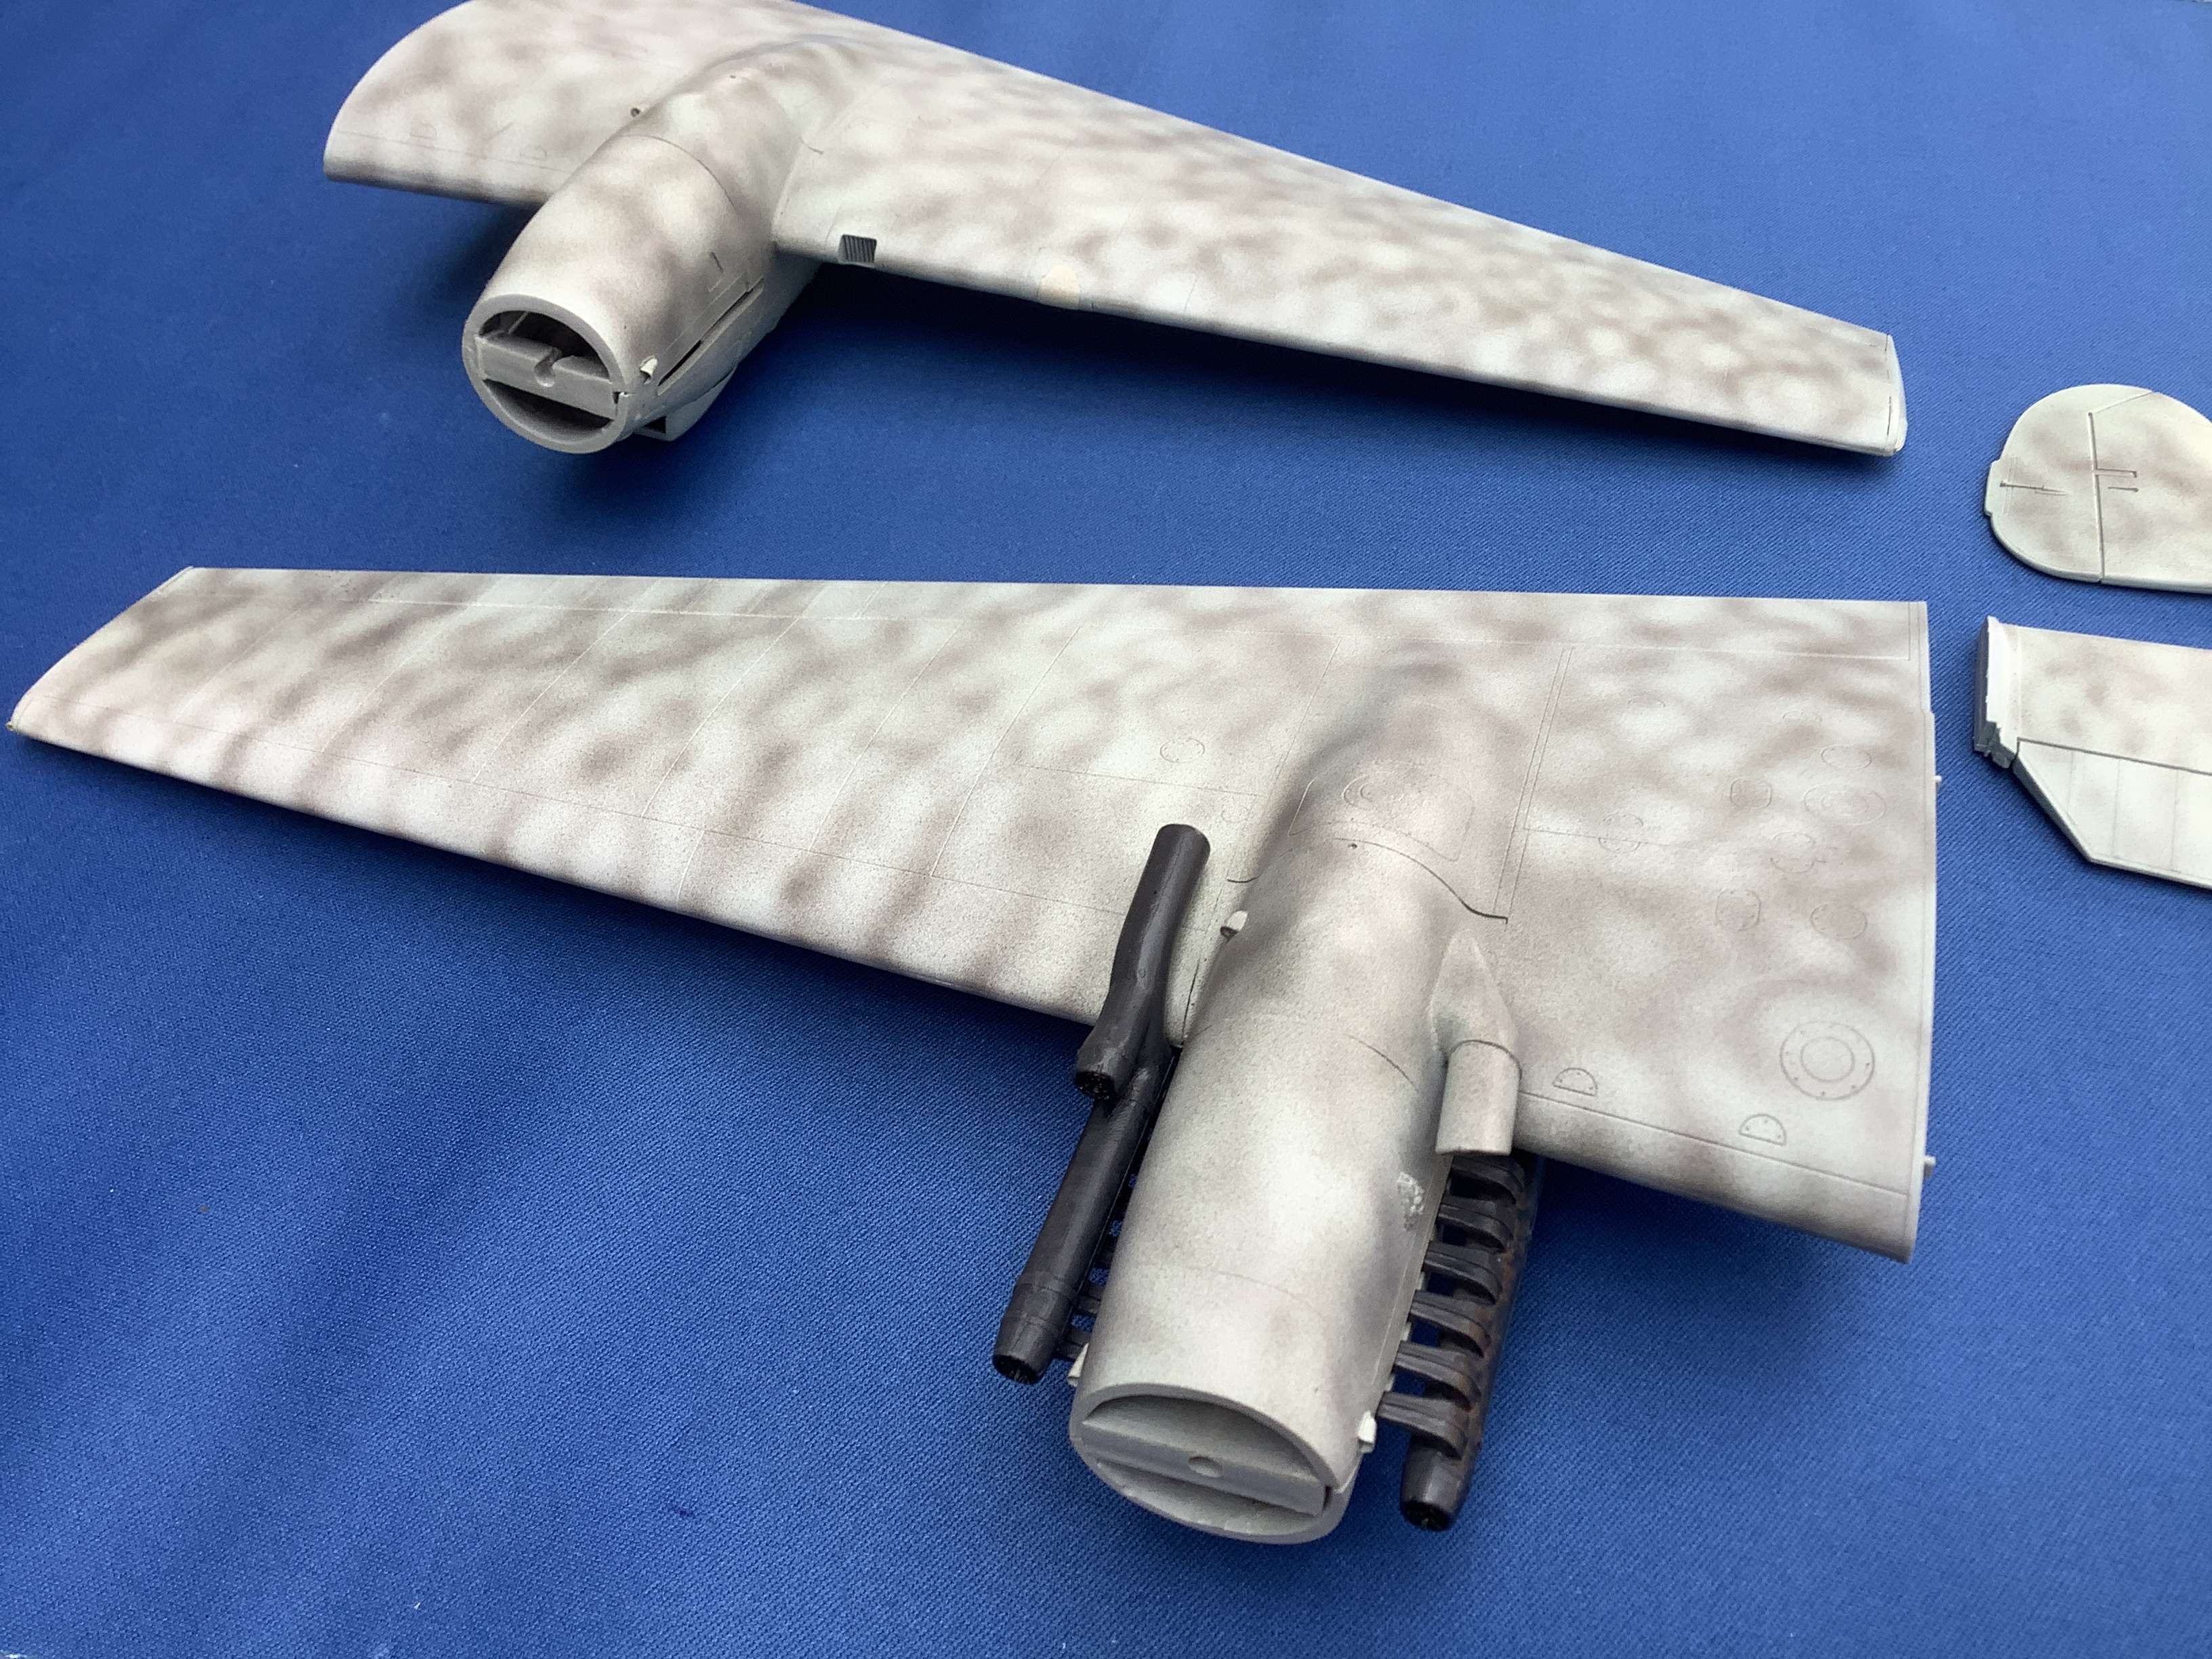
Its taken a little time to get back on course with the 262 . I was wondering why I had come to a halt on the project previously and I think I found the answer in some of my completed construction stages , i had started to rush .
It was lucky that for some reason i put it back on the shelf ( but not part 79 from sprue K ) which seems to have been swalled up into a worm hole . I do not know if it has gone into the future or back into the past , before it ever existed .
I have to go over most of my previous work and scratch build any missing parts .
progress so far
The wing assembly is straight forward with nice and thin trailing edges. I gave the wheel wells a black undercoat and then some aluminium as i guess by this date in the war any paint processes that could be missed out would be.
All cockpit interior parts painted rlm 66. The Revellinstrument decals whent on well . I applied some Christal clear to the dials .
Added some lead wire to back of instruments . Probably not yellow in reality but i think they stand out better .
This is work from my first session which i shall go over again and add some detail and weathering . Im hoping the lead shot is the correct amount to keep the nose on the ground .
Bothe engines ready to be attached to wings .
There is some great desighn of parrts construction in this kit and the wing enine desighn is , in my opinion , far better than that of the trumpeter kit .
Hopefully not as long a time gap before the next update as im now in the Zone")