


stevehed
-
Posts
1,036 -
Joined
-
Last visited
Content Type
Events
Profiles
Forums
Media Demo
Posts posted by stevehed
-
-
Hi,
Just thinking out loud here and adding to the to do file. The recent reissue by Airfix of the Harry Tate comes with Belgium roundels. As these aircraft were later refitted with Hispano Suiza engines I was wondering if anyone has attempted a conversion. I think they used the 150hp version and the few pictures I have seen suggest the front of a Spad V11 would be handy. Anyone aware of any pitfalls to trap the unwary and any photos of the real thing.
Regards, Steve
-
Hi Patrik,
Missing photos and posts are my favourite pastime. Fellow posters guided me through some of the pitfalls so that I could post individual pictures but I still can't post more than one per post. Hope you've solved any problems because I'm sure I'm not the only member that would like to see your Nighthawk.
Regards, Steve
-
Nice Triplane.
Good luck with the Bristol,I've tried it it twice over the years and it ended up in the bin both times

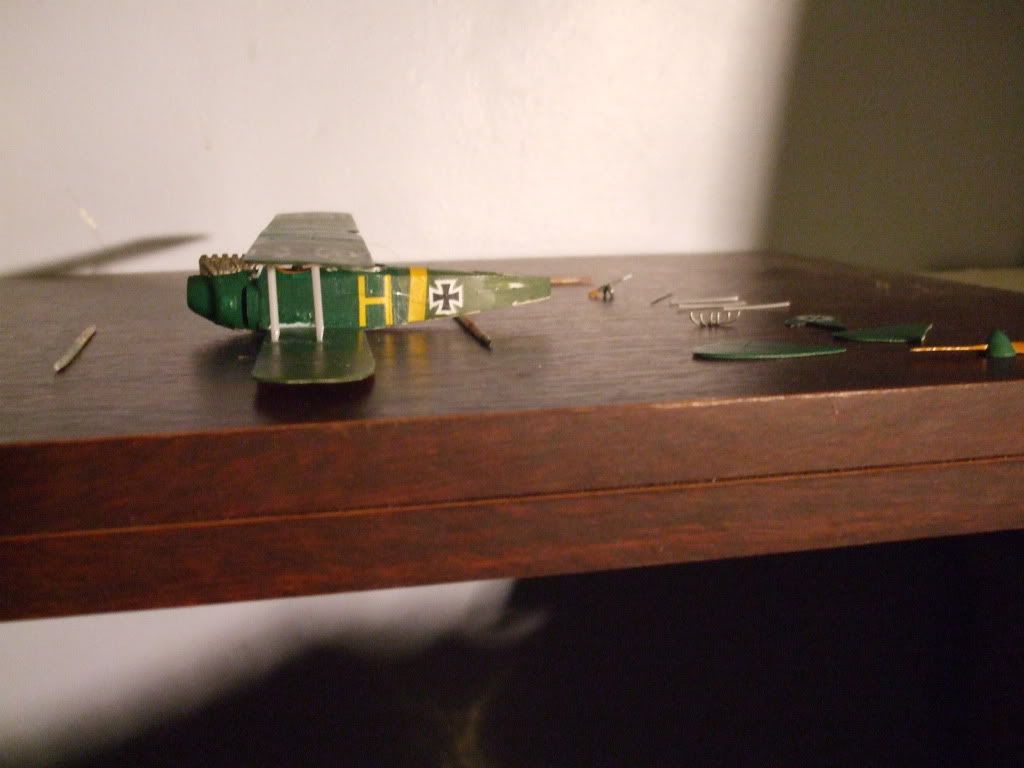
Aahh, don't be so cruel, the old Biff only needs a bit of TLC. I believe the original kit dates back to 1957 but take heart she's no monster. My only advice would be to make some card supports to hold the top wing up. I measure the wing gap, cut spaces in the card and glue a flat base onto the bottom. Make the spaces generous heightwise or you could pull the wings off when removing as I once did. Here's one I did earlier complete with nubbins. Regards, Steve
-
Thanks T-Tango, Got called away so here's the undersides a little late. The trapdoors are a piece of PE and the camera hatches are zero decals. The kit represents an early version with the ear type side mounted radiators. I'm rationalising the colour scheme by imagining that the pattern was trialled on an early model which was sent to the Eastern Front and relative obscurity. Enjoyed myself with this build although any suggestions on how to achieve seamless joins would be appreciated.
Regards, Steve
-
-
There's another two after this.
-
Hi All, Here's come pictures of the finished product. Certainly no masterpiece, I don't think I've got the nose right and I misread Dan San Abbot's DFW essays and got the colour scheme wrong by a couple of months or so. I decided to use as many OOB parts as I could hence the use many Hannover bits and pieces. So, here is my presentation of an " Airfix " DFW CV, or should that be C1V and three quarters.
Regards, Steve
-
Hi Crookedmouth,
I'm with you when it comes to rigging. Despite having been a fan of the biplane era for most of my life I cannot say rigging is fun, in fact it's downright tedious and that's from someone who only rigs the wings, and on larger craft, the tail. I think many of us drill holes and then try to tidy up afterwards. Last year I made the Airfix Bristol F2B more or less out of the box as a 1925 army coop type. An acetate windscreen was added, an undernose tropical radiator using card and rod and the rear gun ring was replaced by an Aeroclub Scarff set, otherwise it is as Airfix intended. For the rigging I drilled half way through the upper wings at an angle to match the cross wires. Invisible thread from Aeroclub was CA'd into the hole then, when dry, pulled through the lower wing and secured at the lower surface. Wires that are fixed to the fuselage have to have holes drilled through the upper wing so they can be tightened. Nail clippers removed the excess thread and CA and paint was my medium to try and fill in the visible holes with varying success. It must be to overcome this problem that Bobs Buckles came about. I'd like to see the buckle method in action as I can't work out how the thread is removed from the second attachment when it is tight. Heat and plastic don't go together very well for me as my attempts at stretching sprue will verify so I'd rather get the thread tight first time.
Regards, Steve
-
Sorry, this is what the last post should have been. Regards, Steve
-
-
Hi All, Not much progress but have managed to get the top wing into position. Rest of struts and rigging hopefully to follow over the next few days.
Regards, Steve
-
Third time lucky
-
IMG]http://i1038.photobucket.com/albums/a468/stevehed/PLANE.jpg[/img]
Try again. This was taken on a mobile, then e mailed to me, saved then transferred to photobucket and then hopefully here. If not, then back to the drawing board. Steve
-
IMG]http://i1038.photobucket.com/albums/a468/stevehed/PLANE.jpg[/img]
This is the state of play to date. Regards, Steve
-
Thanks T Tango, I'll do my best but since the first picture my camera has died, no power, no functions no matter what I try. Going try a phone camera and see how good the pictures are. As far as progress goes the wings are shaped with ribs and elevators scored on. Ear radiators, some nose panels, mg and windscreen have been added. Tail/rudder and stabilizers are complete and ribbed and the interplane and cabane struts are ready to use along with a prop/spinner and a parabellum for the observer. Colour scheme is dark green - olive green upper surfaces and fuselage with CDL under surface and most of the painting has been done prior to assembly.
Regards, Steve
-
Had a good ratch about the spares box recently and began to ponder the turnover of parts. Aftermarket bought with some distant project in mind usually see use fairly quickly as do struts,wheels and props. But some of the larger stuff like DV wings and various fuselages have lain for decades in some cases. It was this realisation that made me decide to try and find a use for some of the dormant material. This included a Revell DV11 fuselage and an Airfix Hannover fuselage. Having recently acquired a magazine from e bay that contained 1/72 plans for a DFW these parts seemed to have some potential for a kitbash. At the time I thought this would be my only chance to build this type as resin is too pricey for me and there didn't seem to be any vac forms available. Assuming the picture appears the fuselage is the rear of the DV11 blended into the cockpit section of the Hannover which was lengthened between the cockpits and the nose of an Airfix DV. Plastic card and filler were a must and the engine is a Benz from Aeroclub. The wings, tail unit etc will be 40 thou card but I hope to reclaim the rest. A masterpiece it will not be but hopefully it will look the part.
Regards, Steve
-
Last one. Thanks for humouring my efforts at photo placement. Regards, Steve
-
-
One at a time only for the minute.
-
Trying again.
Blast. That was supposed to be four pictures.
-
[/img]
i1038.photobucket.com/albums/a468/stevehed/BILD0128.jpg[/img]
Ditto/BILD0126.jpg[/img]
Ditto/BILD0125.jpg[/img]
Ditto/BILD0124.jpg[/img]
Ditto/BILD0151.jpg[/img]
Ditto/BILD0109.jpg[/img]
Thanks CarLos for the tutorial, and believe me I have tried but I cannot get my old Mac to deliver pictures to my post. I'm going to keep trying but if anyone is still interested the above gives a brief pictorial on the transformation process from Vimy to DH10A. What is not obvious is that the DH 10 has a narrower fuselage and the forward sections have to be reduced in width by a twentieth of an inch each side. Regards, Steve
I'm amazed. I did it and didn't know it. Now I have to figure how to send more than one at a time.
-
Hi, Still learning how to post pictures. Regard this as an experiment. Regards, Steve
-
Thanks Cliff and once again CPNGROATS. The last two pictures showing the tail and forward fuselage give a better idea to the processes involved in reshaping the O/400. As a matter of interest, practically everything plastic originated from Airfix or plastic card. The after products were all Aeroclub and were 2x Bristol Jupiters + 2 four blade props, 2x Scarff rings + Lewis' and 2 wind operated generators. Others more skilled than myself could make many improvements over my attempt. To this end I posted a review on SMAKR which I hope lays bare the traps I fell into. Regards, Steve
-
Steve; it's [/img]
HTH
Cheers,
ggc
Thank you, so very simple when you open your eyes. Going to be busy over the next few days so I'll try again later next week. Cheers, Steve


Belgian RE 8
in Aircraft WWI
Posted
http://www.wwi-models.org/Photos/Bri/RafRe8/index.html
Hi,
Answering part of my own question but I found this last night.
Regards, Steve