


Troy Smith
-
Posts
12,622 -
Joined
-
Last visited
-
Days Won
1
Content Type
Events
Profiles
Forums
Media Demo
Posts posted by Troy Smith
-
-
Some wrecks in France, the only ones showing this are one that look to be P serial, all the L and N (Hawker built) don't show this
Hard to tell what serial, but look to have a dark square in the right place

This is P serial, I have the details elsewhere
Again, Rotol prop, so P27** on
and before I forget
@Bigos @GrzeM And posts above, regarding a possible side formation lights on P**** and onto early Mk.II Hurricane.
-
 3
3
-
-
43 minutes ago, PeterR said:
So if similar to the Spitfire, incorporated into production around November 1940 and deleted in August 1941.
Considerably earlier, the pic P3166/VY-Q and VY-R are taken in July 1940.
43 minutes ago, PeterR said:However, I don't understand why there seems to be a lack of this light in photos of Hurricane internals, where these panels have been removed (?)
There is a square plate with a circular hole on the photo of P2617 at Hendon above, and the internals looks unrestored. It maybe that the bulb is naturally in shadow, and in the ones where it would be visible, there are people in the way.
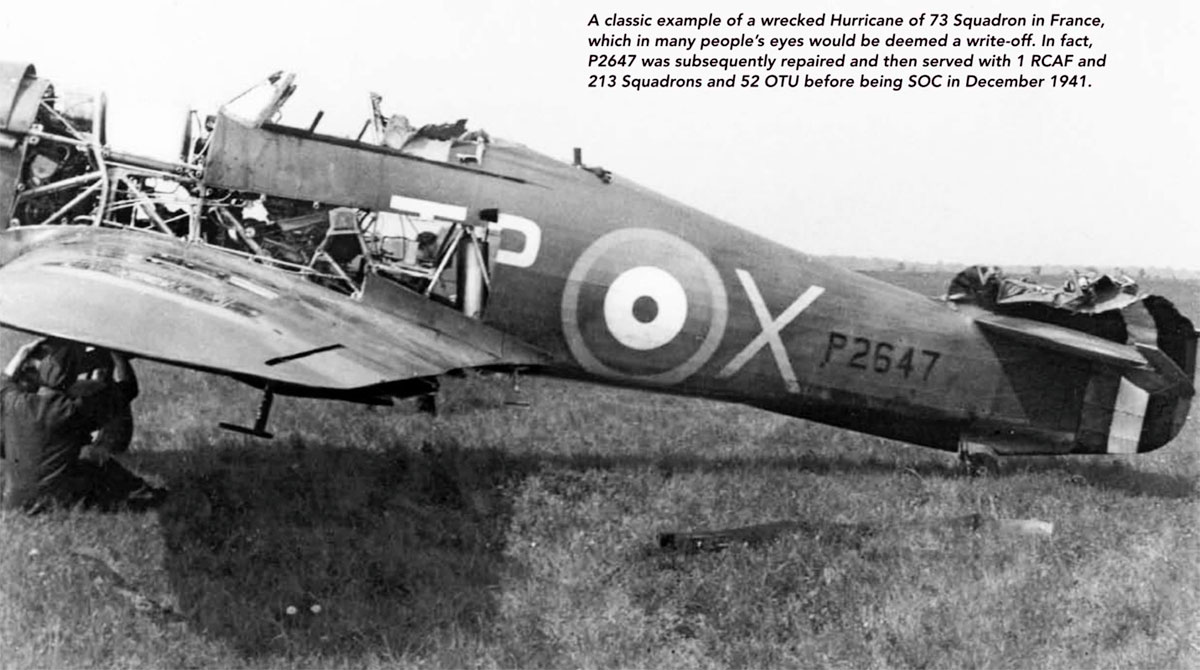
One place you see a lot of the internals of Hurricanes is in wrecked ones in France, there look to be a dark oval in this shot, and P2647 was delivered on 21 Feb 1940
more photo scouring to do then!
-
1
-
 1
1
-
-
15 hours ago, SashaGrace said:
I never considered super glue before,
It's very good for seams.
I have used it like tube glue for assembly, but you need to make sure it's in the right place! Very small dots can be used to 'tack' parts in place, easy to snap off, or the line bits up and then use the capillary action of liquid glue to fix in place.
3 hours ago, SashaGrace said:I’m not sure about weathering,
work from photos of the real thing, the rise of the superficially impressive youtube tutorial has led to model based on other models!
Usually less is more, and on airliners is more in the nature of leak streaks and a bit grime which gets cleaned off regularly.
Subtle weathering though breaks up the flatness of a model and makes it look less toy like, see here and the following posts for my take on a pretty clean airframe.
3 hours ago, SashaGrace said:let’s all cross fingers that bandana is OK and the paint hasn’t bled
As I use kleer as gloss coat, I will seal tape edges with it.
I don't know how viable a mist from a rattle can of the white would be to seal the tape up?
The tail masking has come out well.
Our civil aircraft section is not somewhere I often look, but this is an interesting thread
https://www.britmodeller.com/forums/index.php?/topic/235130437-question-on-windows/
Seems @Skodadriver would be a good member for airliner modelling info as it's one one of his listed interests 1/144th civil, and may have a few tips and tricks specific to the genre I know nothing about, which reminds me, the site search is poor, but adding Britmodeller into a google search works a lot better, and there is a staggering amount of information on here is you can find it.
HTH
-
1
-
-
5 hours ago, Toryu said:
printing drawings to scale
Not in this case, I have done this when I have access to Coreldraw, which I have never figured out how to get the older version to work on later windows... Apparently you can get to do this on GIMP, which I have not put in the effort to do.
I did print out the pic above as it shows where things are and relative sizes of them which really help adding detail parts
6 hours ago, Toryu said:Scratch-building cockpits,, drilling holes, deeping troughs etc. You do this very well!
Thank you, it's just practice, I was trying to some of these things 45 years ago!
Well worth looking through the work of @AdrianMF, who has a very good eye for cockpit building, a good tip if the canopy is closed is to see what can be seen through before going overboard, sometimes what you need is basic sketch.
Expect bits not to work, and it to take a few goes, and see how other folks tackle the process.
I have noticed that there are more modern modellers who have not developed these skills, who oooh and aaah over some quite simple techniques
")
Some of this is easier in 72nd than 48th as that demands a bit more detail.
If you have not seen it, one of the true pioneers of scratchbuilding was Harry Woodman, who did this book
scanned here https://rclibrary.co.uk/title_details.asp?ID=1216
while old it runs through many techniques and ideas, some are a bit old fashioned or more easily achieved with specific products but still lots of ideas. I got a 1976 Scale Models magazine where he was talking about making your own photo etch then!
Even had template drawing for useful WW1 /biplane parts in 1/48th so you could make your own parts made.
5 hours ago, AdrianMF said:Just wondering if you keep adding small amounts of future at a time to the hole area whether that might level it out eventually?
I did plug one hole, but it showed up clearly. My Krystal Kleer had gone lumpy, and I don't have any clear PVA, but I think the problem is different reactive indexes so hole still shows even when filled.
I packed the canopy with Milliput with a handle embedded, as I need to do some more canopy moulding are I put off doing one for my stalled Ryan PT build.
I also spent time trying to do the laminations on the prop. Neither very photo worthy.
Thanks for reading and commenting.
-
3
-
-
6 hours ago, APA said:
Thank you all. In the real world a satin sounds like a good approximation and yes I understand about scale however the reason I'm asking is for my 1/9 scale triumph 3hw motorbike. I'm assuming at that scale I have the canvas to play with the sheen? Perhaps a satin varnish cut down with matt to just give a hint of "eggshell gloss" 😂😉
Andrew
IIRC you are using Vallejo? Or have done? I find Model Color does not always dry dead flat, and one cured can be 'buffed' up, I brush paint, and little flow improver also gives it a slight sheen.
and I also find Windsor an Newton Galeria Matt does not dry dead flat, it has a very subtle sheen. To get dead flat for figures I now mix in a little talc.
So you may find that W&N Matt maybe give the effect you are after, as with every new technique, have a play on scrap first and see what works.
You can also mix matt and gloss varnish in varying proportions to get desired sheen, you can get satin, but if you have matt and gloss just mix your own, keeping note of the ratios.
HTH
-
1 hour ago, SashaGrace said:
I applied rather too much filler so did a lot of sanding back
At the risk of stating the obvious, as Milliput does not shrink you can do a lot of shaping while still workable to reduce sanding.
While it's great stuff i got sick of mixing it many years ago as I'm lazy, and look for quicker fixes. For large, or deep filling jobs it's great.
For small gaps like round the windows superglue can work really well, but needs sanding as soon as set, as once fully cured it's harder than the plastic.
A thicker and softer version can be made by adding talc. You can also use acrylic nail powder, it contains peroxide which acts as an acceleranyt, which dries hard and smooth's over, and is really good for building up parts,
All can be worked in minutes rather than hours.
Mr Surfacer 500 is also very good, it shrinks a bit but brushes on, and can be adjusted /wiped off with isopropyl alcohol.
Thin even gaps can be filled with strips of plastic sheet.
I bought myself a litre of MEK (Methyl Ethyl Ketone), its the hotter solvent in Tamiya Extra Thin, mostly as glue, and I presume is what is sold, or was, as MEK-PAK
A litre which is way more than I need, and it apparently has a limited shelf life I found out later! It does also thin Mr Surfacer, and with that amount you can make up a load of sprue-goo, scrap plastic dissolved in it, which is great for small filling jobs as it just turns back into plastic. You can just use liquid glue for this but that will work out expensive.
All the above have their time and place for use, and can ease or speed up filling or repairs.
As with anything new, have a play on scrap first!
I'm a big fan of new members who are prepared to learn in public, as it a great encouragement to other returnees and lurkers who are considering taking the plunge.
My interest in airliners is minimal, but an interesting back story and good to see something different and personal.
HTH
-
2
-
-
2 minutes ago, Admiral Puff said:
Does anyone have any thoughts on how difficult it might be to graft the Pilot Models two-hole nose (which doesn't look to be too bad) onto the Airfix fuselage. May save some faffing around ...
Or not.
First, it makes a 2 seater an expensive project.
Second, given the nature of the modifications being carried out above, a pragmatic approach would be try the correction, which does not that hard, and if unhappy, or it goes wrong, then try crosskitting.
Even on a quick read and photo comparison I would suggest cross kitting and making good would be as much work. A lot will depend on how well the nose cross sections match up.
At this stage, I will again mention that the old Aeroclub multimedia kit had separate pods and booms to make a FB.5, NF.10 and T.11
Which means there are leftover two seat noses out there is spares boxes.
THis is the only image I could find, I have one stashed somewhere ... quite possibly elsewhere or I'd pull it out.
13 hours ago, Bjorn said:The wing is thicker, and the leading edge too rounded. However, this is (at least to me) not as obvoius as the fillet and the outer wing shape. And regarding how difficult this would be to correct, I decided not to bother, apart from a little sanding on the front parts of the wings.
My suggestion would be to try scraping with a heavy knife blade or scraper, along the wing to reduce the bulge quickly, and then tidy up with a sanding pad.
The image above of the Aeroclub kit is from a Swedish auction site, and perhaps would be of interest to a Swedish member, @Bjorn @flarpen @Tomas Enerdal who wishes to delve further into comparisons?
https://www.tradera.com/item/180904/619652420/aeroclub-vampire-1-48
It has always been rated as very well shaped, and with a little work can be built into a good model, and is maybe the best way still to an NF.10 at present.
A final thought, I know the Hobbycraft Vampires have a bad reputation for overall accuracy, or lack of, but how is the nose of their T.11 kit ? Anyone know?
Note the HC Vampire kits are some of the Hobbycraft mould that didn't end up with Academy, but the Kitech-Zhengdufu in China, and were floating about cheap around 2010, and then disappeared. (Others are Sea Fury, Spitfire XIV, Seafire XV, Hurricane IIC, Do-17, not sure what else)
HTH
-
5
-
1
-
-
1 hour ago, Steve147 said:
Hi all
I've just started to build the Tamiya 1:48 Vought F4U-1a Corsair #61070. Among the list of suggested Tamiya paints are:
AS-8 Navy Blue (US Navy);
AS-19 Intermediate Blue (US Navy); and
AS-20 Insignia White (US Navy).
As I don't use spray cans for painting, I'm trying to find the equivalent paints as either acrylic or enamel. So far, I've come up with Tamiya XF-17 (Sea Blue), Tamiya XF-18 (Medium Blue) and Tamiya XF-2 (Flat White) respectively. AK do an Insignia White, AK1101(FS37875) -(a comparison chart gives Tamiya XF-2 as a 'suitable' alternative to this).
Is there an actual comparison chart anywhere of Tamiya AS Paints to Acrylic/Enamel (for future use), or has anyone done their own comparison chart or can give me alternatives to AS-8 and AS-19?
Thanks in advance.

Not really, but if you want accurate colors then you want Colourcoats enamels. Not sure anyone else does them, MRP maybe?
Tamiya just quote what nearest in their paint ranges. As with anything, ignore finding model paint 'equivalents' and find out about the real colors, and go from there.
There is frequently quoted mis information as well,
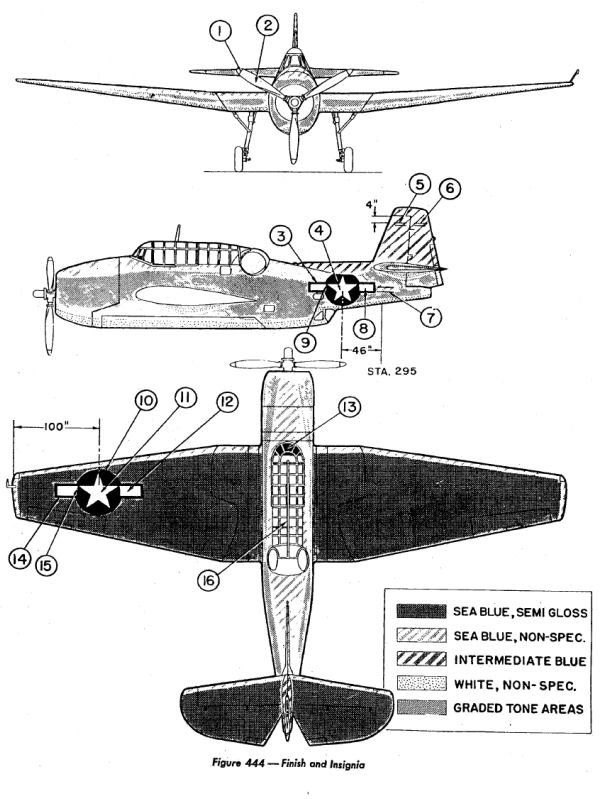
for example, the 'tri color' scheme is a 4 color
"The scheme is actually four colors - white, Intermediate Blue, Semi-gloss Sea Blue (atop the wings and horizontal tail), and Non-Specular Sea Blue (atop the fuselage and on leading edges of the wings and stabs). The last two colors differ in more than the gloss factor - non-spec is distinctly grayer and lighter than the semi-gloss. I generally refer to the scheme as 4-color to clarify the differences.
There was a later version where all of the paints were glossy - it wasn't seen often, but it certainly was a three-color scheme.
Cheers,
Dana"
see here for more
For mixes and more,
HTH
-
1
-
-
On 02/04/2024 at 03:32, Old Man said:
Damn. Looks like the unholy product of a tryst between a Morane 406 and a Spitfire....
James
It has been described as "The Czech Spitfire"
On 02/04/2024 at 10:22, Col. said:Nice subject choice Troy

Thanks
On 02/04/2024 at 19:30, Corsairfoxfouruncle said:Welcome to the build Troy, always nice to see what you choose. They're often very interesting examples.
I find this era of aviation fascinating, especially the also rans, and the smaller airforces. I don't know if you are aware that the development of the B-135 did actually see combat with the Bulgarians, that is what is on the cover of the MBI book.
Anyway,
2024-04-05_07-36-27 by losethekibble, on Flickr
Main parts cleaned up and test fitted. Overall very good, the nose panel needs work though.
Exhaust drilled out, and the gun troughs.
The black wash was so I could hold the parts up to the light and trace the external details internally with a pencil.
You can see the green stretched sprue added for the internal ribbing, The main structure is very like the internals of the Hurricane, a tubular braced frame
This I think is a B-135, but as far as I can see, the B-35 is very similar
I think I'll print the above, not sure if it's in the book, it's got some useful details, and saves knackering the book.
As, the kit internals are minimal, seat, IP, stick, rollover cage.
So, here you can see the green sprue as the internal ribbing, and grey thicker sprue as the framework over this.
to right is port framework.
I added a floor out of 20 thou, and a blanking plate above the radiator, these are just dry fitted.
IP painted black and dry brushed grey, I'll scratch in dials to the scratching back to the white plastic.
2024-04-05_10-31-17 by losethekibble, on Flickr
I was feeling rather pleased with all this, and thought I'd better check what I could see through the canopy, very hefty sprue gate on this which too some careful clean up, and then I noticed it was short shot in a couple of places.
I tried a Kleer dip which did fill the windscreen hole, but it's still very visible, you can see it on the photo. so making a new canopy is on the list.... One 'good' thing is a new canopy should be clearer and some details maybe more visible.
Seat needs work or replacing.
There is a certain satisfaction in scratching building cockpits, having grown up on model mags and kits with minimal cockpits....
I probably should have done the 1/48th MPM vacform, they are really well moulded vacs and I have an AM resin/etch cockpit for the AZ B-35.2 as well
Thanks for reading and commenting.
-
10
-
-
1 hour ago, Tigerausfb said:
Question from me, what's the little access port for? It's not on the first Hurricanes, I was looking lovingly at my freshly primed Airfix Hurricane and said to myself 'that's the model ready for paint then'. Thirty seconds later I saw that hatch. It looks to be glass or Perspex and clearly people were told not to apply paint over it as many a/c codes are applied around it. I don't see it on many models either. Is it access for a first aid pack? Thanks - Andrew
good observation.
First time I have seen mention of this @StevSmar ?
My guess is Oxygen bottle, a clear panel for a gauge?
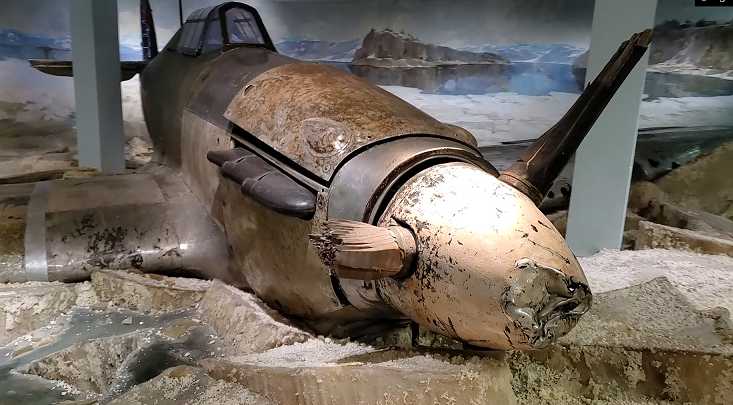
not on an N serial, the Finnish one
It is under the radio set
601 Squadron 05 by Сергей Кривицкий, on Flickr
504 Squadron 06 by Сергей Кривицкий, on Flickr
the first aid is further back
this image of P2617 (greatly enlarges) shows some kind of mounting in this position
Hawker Hurricane I ‘P2617 / AF-F’ by Alan Wilson, on Flickr
I wondered if a cutaway may help? Not really.
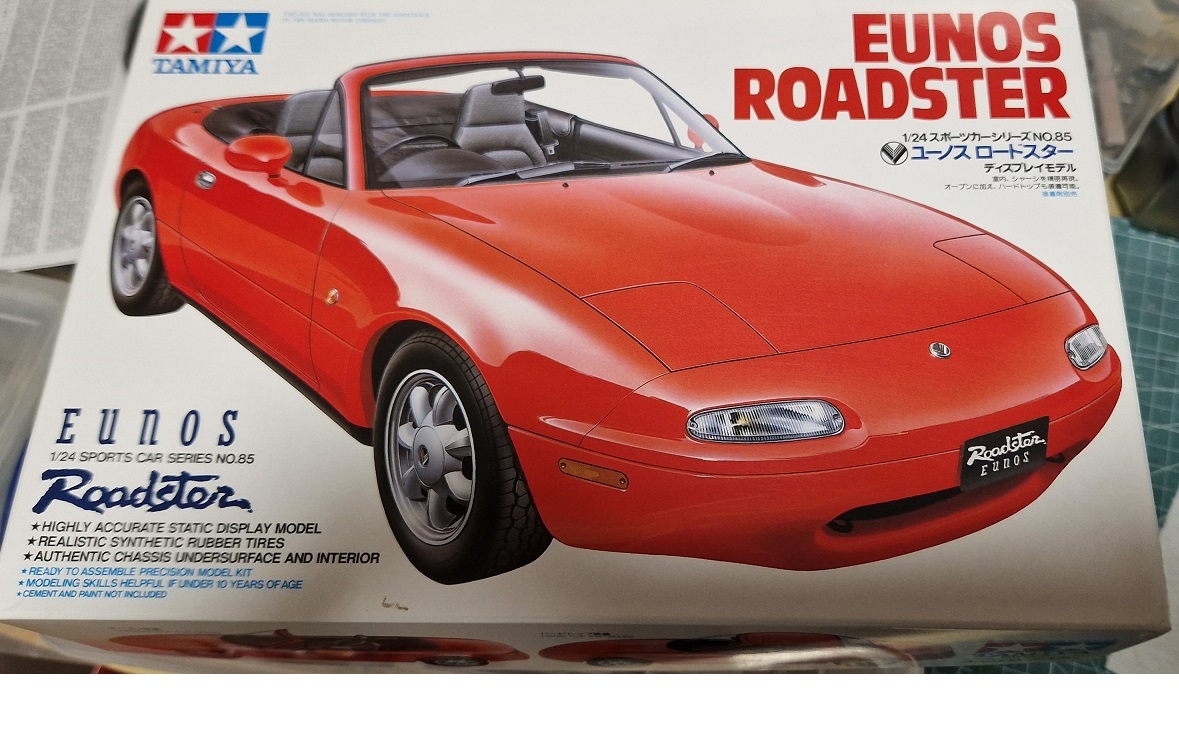
hmm.... 3 spoke wheels.... only 2nd time I have seen that, the other time was a warbird.... makes the Italeri inclusion even odder.
So, another detail to look for

-
3
-
-
On 30/03/2024 at 10:19, Sean_M said:
Anyone have any ideas
Dropped flaps on Hurricane photos are very rare, as they were meant to be retracted on the ground, and are often in shadow, so examples are nearly of crashes and wrecks....
This image, at Brooklands, site of one of the Hawker factories, suggest that at least at this point this was the factory applied scheme...
on Air Britain.
https://abpic.co.uk/pictures/view/1739709
I asked, and was given permission to post this by the scanner/uploader,
So, thank you.
this, again, looks to show white and aluminium
apparently 17 Sq, early fabric wing with inner fabric panel
These look aluminium, compare to wing structure and fuselage framework
P3300, lost in France May 40
I'd say these are aluminium dope
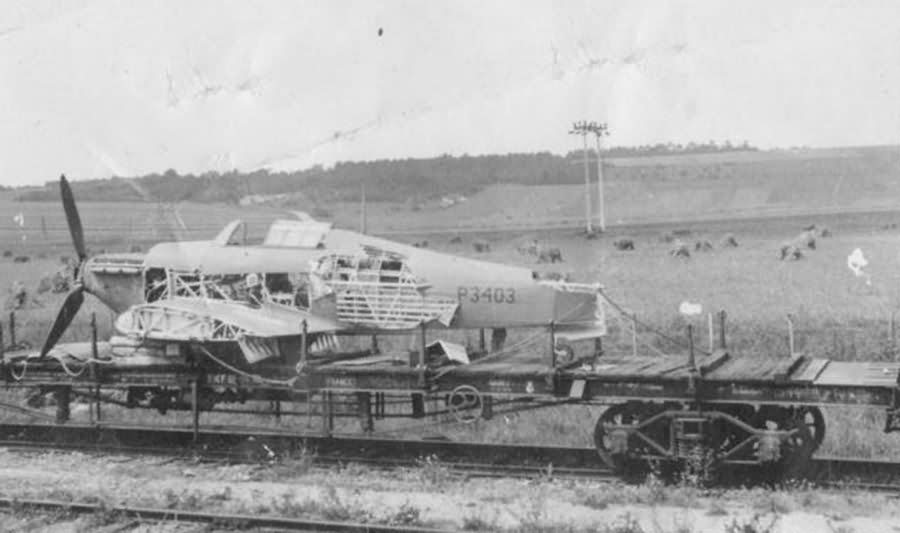
P3403 France
Aluminium
Aluminium
alu/white?
This, and the 274 image are the only two images I can recall seeing of a non crashed or wrecked Hurricane with dropped flaps, and it's a prototype of some kind
this Sea Hurricane of 804 Sq, with wedged down flaps (as in wooden wedges used to keep flaps open at an angle)
Hawker Sea Hurricane IIc, 804 Squadron, Fleet Air Arm, HMS Dasher, during Operation Torch, N Africa, November 1942 by rac819, on Flickr
Looks to have flaps in the underside colour.
IID nosed over
ROYAL AIR FORCE OPERATIONS IN THE MIDDLE EAST AND NORTH AFRICA, 1939-1943.. © IWM (CM 941) IWM Non Commercial License
Flight Lieutenant D S G Honor of No. 274 Squadron RAF poses by a Hawker Hurricane of the squadron at Gerawala, Egypt, on rejoining his unit following his rescue from Crete.
this 274 Sq image is interesting, as it's a Mk.I (note the scoured back to bare metal prop blades)
Did Hawker carry on doing the centre section on aluminium and the outer in wing underside colour?
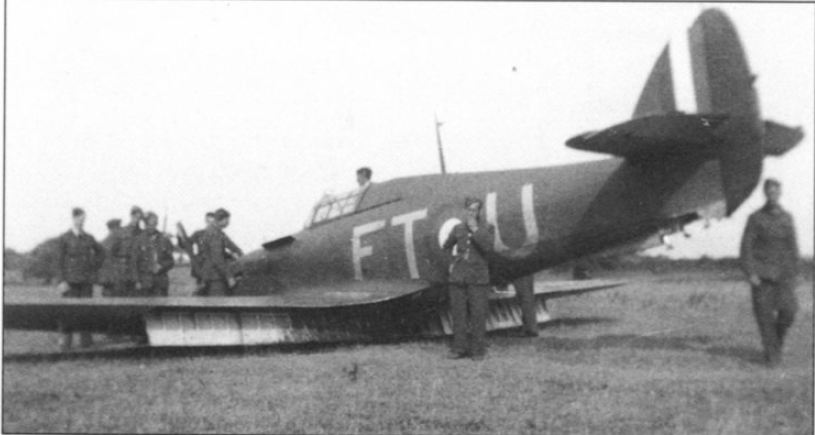
Hawker Hurricane I RAF 43Sqn FTU P3784 crash landing 20th July 1940, again, underside and aluminium, or just oil in the centre?
These look the underside colour....
These are Sky
as are these
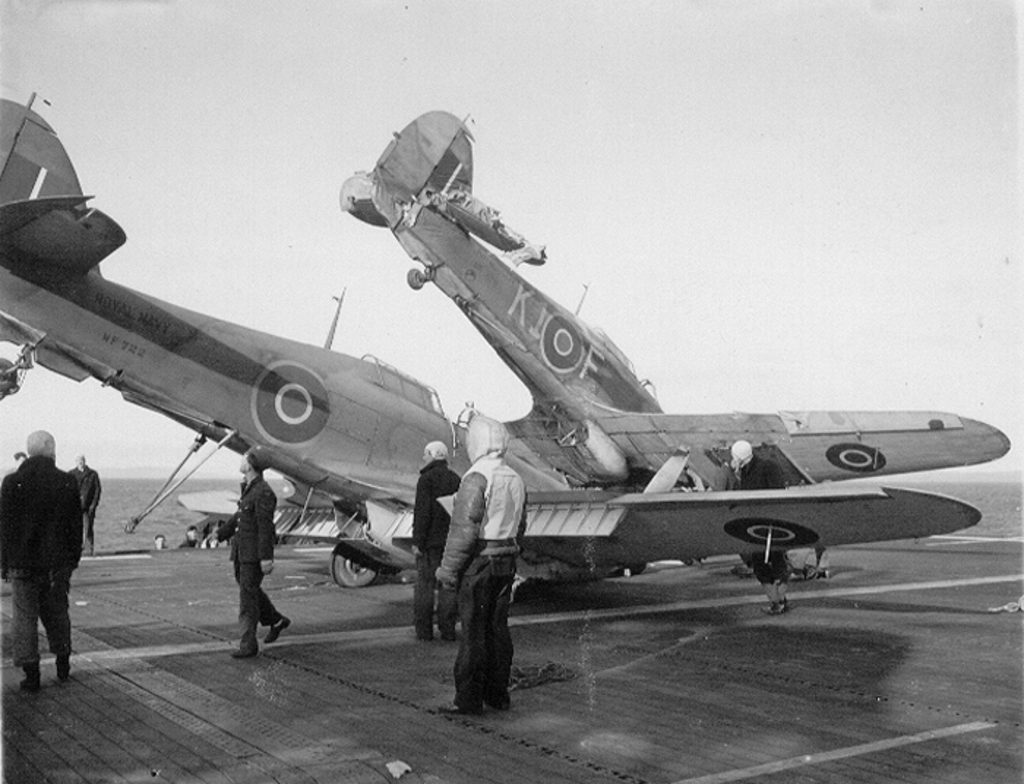
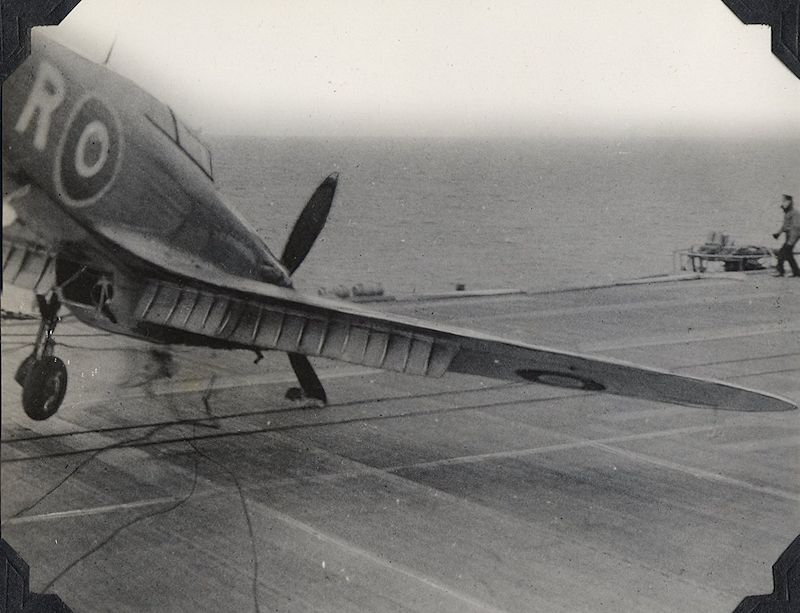
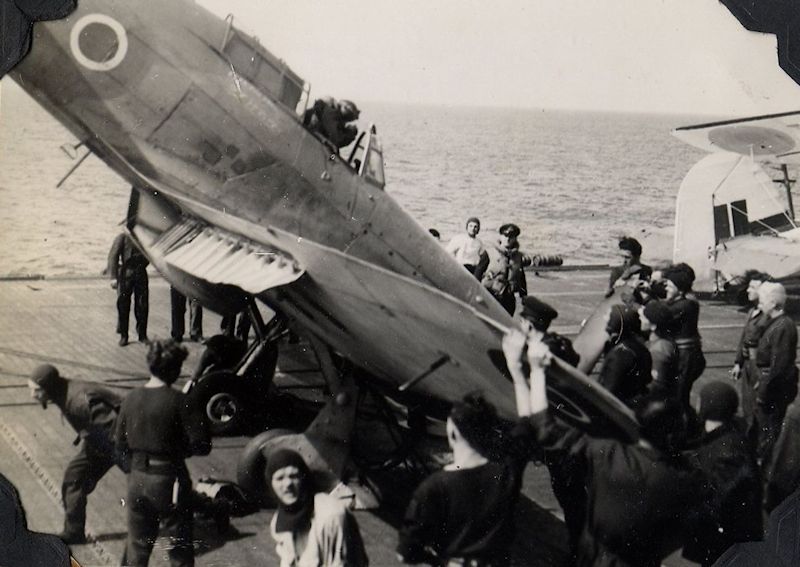
June 7th 1944 Sub-Lieutenant E.C. Godden in Sea
Hurricane Mk.IIc, NF674/R ; flies into the barrier after failing to catch a
wire .
Below: Another of 824 squadrons Sea Hurricanes ends up in the barrier
I'd suggest that later production uses the underside colour.
If this was resprayed in the underside changed I do not know.
3 hours ago, FatFlyHalf said:Park the aeroplane flaps up. Problem solved.
as stated in the aeroplane notes.
Hurricane I Pilot's Notes from 1939:
Hurricane II pilots notes
from
https://www.tapatalk.com/groups/hyperscale/hurricane-flap-question-t542721.html
-
3
-
3
-
-
5 hours ago, Bozothenutter said:
Just had a brainfart....
Bear with me...
Could someone with the Airfix Hurricane and the Arma Hurricane photograph the wing fillet area on both kits, to illustrate what Airfix got wrong?
Assuming the area is the same on a I and a II .
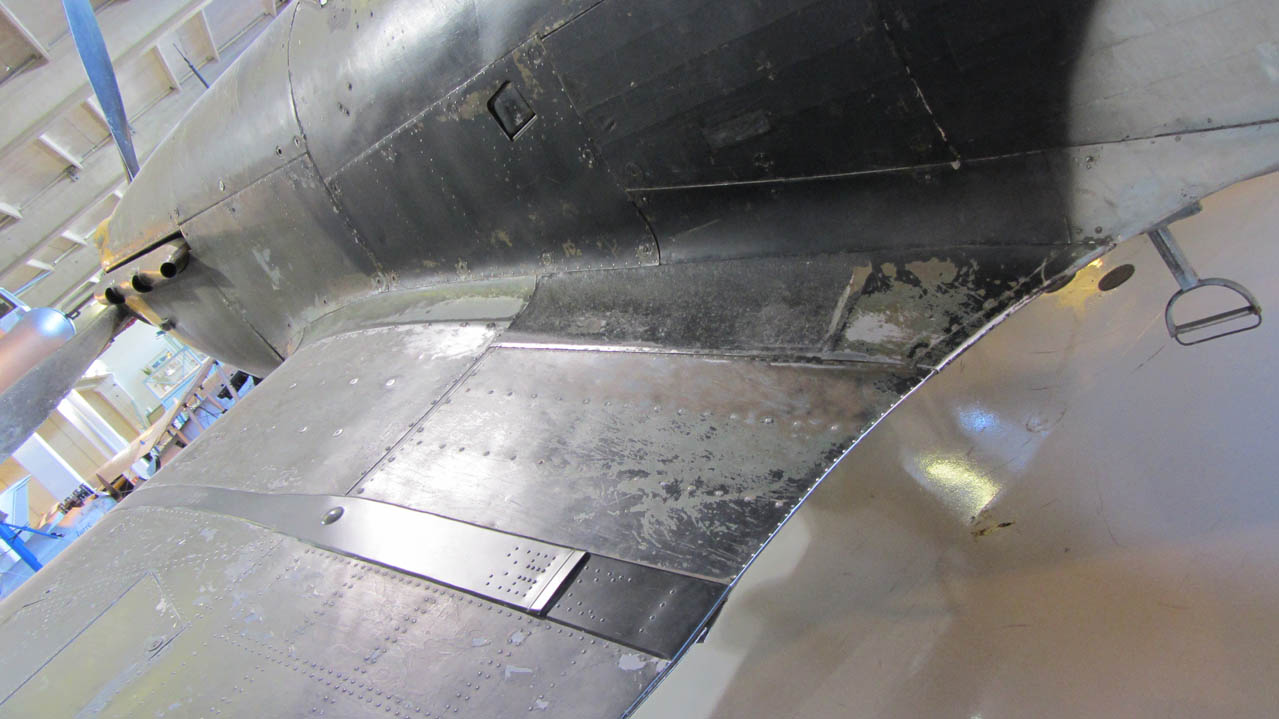
Airfix miss the flare of the the panels, not obvious in drawings, but once you know
as you can see the panels below and in front of the cockpit flare out slightly onto the wing, the above shows this well
Airfix have this as hard 90 degree angle
see here for more and a fix
15 minutes ago, Tomas Enerdal said:Are you talking about 1/48 or 1/72? ARMA and Airfix both have Hurricanes in both scales.
The new tool 48th Airfix scales up the error in 72nd fabric wing kit, so the issue is in both scales. The 48th kit also has the oversize tyres and rear fuselage length issue scaled up as well.
13 minutes ago, Tigerausfb said:You mean where they have the panels around the wing 'joint' straight (perpendicular to the fuselage sides) instead of flaring onto the wing?
yes,
13 minutes ago, Tigerausfb said:Andrew
PS. One gold star in my homework book for spelling perpendicular right!!
or a spell checker
")
-
1
-
1
-
-
36 minutes ago, 28ZComeback said:
Colin, I just discovered this color chart and have a basic question: on the chart, is the lighter color chip an example lightened by white? I am very interested in chip “C” which I believe is a close approximation of weathered earth. Thank you.
As in Light Earth?
No.
The chart is of MAP, Ministry Of Aircraft Production, colours.
Light Earth and Light Green were intended for use as shadow shading on biplanes.
as seen here
from
https://boxartden.com/reference/gallery/index.php/Camouflage-Markings/Gladiator-Gauntlet-Fury-Demon
You want to fade Dark Earth, look at period colour images.
this shows both heavily faded Dark Earth and Middlestone, with some patches of fresh paint
RCAF Spitfire V, 1943. by Etienne du Plessis, on Flickr
This is under harsh desert sun, and is about as faded as it would get in service
all the Spitfire colour images are here
https://www.flickr.com/search/?user_id=8270787%40N07&view_all=1&text=spitfire
-
3
-
-
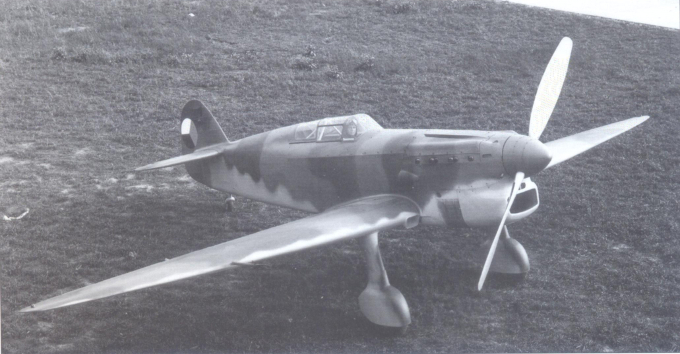
I presume this counts?
Pre war Czechoslovak fighter prototype.
https://en.wikipedia.org/wiki/Avia_B.35
designed as a replacement for the Avia B-534
this is as initially flown, with a 2 blade metal prop, and minimal markings
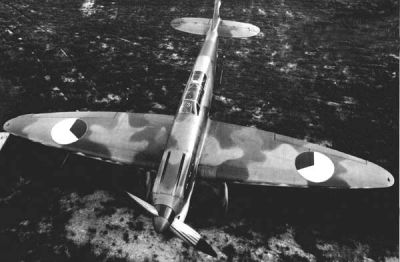
later a wooden prop was used and wing markings applied, as well as S3 fuselage code
An old kit by Kovozávody Prostějov, or KP
Scalemates says 1974
https://www.scalemates.com/kits/kp-8-avia-b35--131797
I have various 1/48th kits, a vacform of the B-35-1 and an injection B-35-2, and a built B-135, and maybe a vacform of it as well.
Anyway, enough interest to get the MBI book.
2024-04-01_11-16-00 by losethekibble, on Flickr
The KP kit was part of a job lot via ebay, which I'd seen listed on farcebook, hmmed and haaaded about, when I asked was told they were on ebay, and stuck in a bid, it was a whole box of kits which worked out cheap, maybe £3 each
The book gives FS595 'matches' for the colours, and as I have an FS595 deck, I went on a rummage and found ones that were pretty close for the uppers, and a simple mix for the underside. The bottle tips are over the relevant colours, apart from the grey, which has the mix. Given the FS595 are going to be the closest to the actual, I was looking for in right area.
The kit decals (in the zip bag) had yellowed badly, even 2 days is the sun has greatly helped, but the roundels are slightly misaligned and of poor colour, I have a FS595 listing for the blue and red, so another kit of the batch, and Avia C-2 (Czech built Arado 96) has sheet with several options, including ones that are about the right size.
The spinner was red and blue at one point. There is a replacement sheet for this,
https://www.hobbyshop.cz/shop/en/1-72-decals-air/17043-apcr72001-avia-b-35-1-72-decal.html
cheap, but I suspect the postage would make this more than I'd wish to pay. A check shows 7.59 euro shipping...
I may just go with tail roundel only, part depends on being able to do the wooden prop, in the pic above you can see the wooden laminations, so if they come out badly, I may default to the earlier. The 2nd prop does have the red/blue spinner though
The kit is simple, I've not compared to the plans as yet, and it looks the part. Canopy is thick and very rudimentary insides
neat build here
https://www.britmodeller.com/forums/index.php?/topic/235001944-avia-b35-172-scale-kp/
I'll do some checking on what can be seen, but will add some basic structure, the one in the link look like the photo's and drawings in the book so that will be my template.
RS Models do a newer kit as well.
-
10
-
-
3 hours ago, Tomas Enerdal said:
A strong marking candidate for my Hurricane IIb is GO-31 Z5236, 134 Sq. Vaenga USSR in 1941. Everybody suggests TLS with DG/DE on top.
Yes, see Z5252
3 hours ago, Tomas Enerdal said:-Is the serial Z5236 confirmed for this a/c? I have only found one pic, it's too dark to be able to read the serial.
The serial /code tie ups are well documented.
3 hours ago, Tomas Enerdal said:-Many marking instructions/profiles suggests Sky Blue as the underside colour. Others say Sky. I can understand the Sky Blue suggestion, as the underside looks rather light. But is anything known for certain? (or could it even be the Gloster factory light blue? I cannot find any info whether the Z5XXX were Hawker- or Gloster-built)
Gloster built.
Z5236 IIb Gloster 25-Jul-41, overseas date Russia 09-Aug-41
There is solid proof of the underside colour, but I've not seen good images of it.
Z5252 was part of the batch that went with 151 Wing, and was handed over Gen Kuznetsov.
https://lend-lease.net/articles-en/hawker-hurricane-iib-trop-z5252/
I'd say Sky
Some images must exist of the wing underside,
Again, look like Sky
Z5252 has been part restored and is on display presented in exposition “Falcons of the Motherland” in the museum of technology of Vadim Zadorozhny.
https://www.realhistoryonline.com/aviation/hurricane-z5252/
3 hours ago, Tomas Enerdal said:-Many marking instructions/profiles suggest Medium Sea Gray codes, a few others sky. The latter could be understood as RAF was just starting the transition to day fighter scheme, with sky codes. Again, is anything known for certain?
Medium Sea Grey is the best guess.
3 hours ago, Tomas Enerdal said:-Most suggest white for the Russian numbers, but also silver has been suggested. The numbers are lighter than the Squadron letters, but sometimes seem to be a little darker than the white of the adjacent roundel. Any ideas?
Exhaust staining of the roundel
Silver was commonly used for VVS numerals, but Z5252 look to be done in white.
Also, the 31 is freshly done, on a patch presumably over the old number
Bear in mind photos against snow cause odd lighting effects,
HTH
-
3
-
-
On 31/03/2024 at 03:12, Casey said:
It is not the best match of all the paints I've tried, but it is the best I could find using Tamiya Acrylics in XF range using XF-1 to XF-60.
FWIW @David H
After a lot of experimenting, and bearing this in mind
This is a quote from @Jamie @ Sovereign Hobbies who has made up paint samples from WW2 official specifications.
I'm going to point out some facts about real-life paint manufacture and either the reader will understand and "get it" or will not understand and are in no position to contradict me.
1) Usually camouflage colours are fairly low saturation colours because these blend in better with nature. They're seldom bright and bold. Low saturation colours are normally manufactured by adding coloured pigments to a base made from inexpensive white or white and black pigments.
2) Colour pigments are expensive. The expense varies depending on the specific pigment, but they're expensive.
3) The only way to over-saturate a colour so much is to substantially over-dose your base with the expensive colour pigments. I'm not talking about a few percent more or less - that causes minor differences which you only confirm the presence of with one swatch adjacent to another - I'm talking more in the order of a double dose to get something you obviously look at and think "woah".
4) In the case of colours like dark olive, these are mostly white, black and ochre (which is relatively inexpensive for a colour pigment) sometimes further tinted with a bit of red or green (which are often very expensive).
5) There can certainly be variances in a manufactured paint, but these tend to be greatly overstated, i.e. used as a ready made excuse for all sorts of mistakes. Ultimately, the only way a manufactured paint can end up so oversaturated is to have dumped in a vast amount of the expensive pigments, if not adding in new additional pigments in large quantities not expected in the recipe. Frankly, it's difficult to see how any manufactured paint could end up so drastically off target, particularly in the over-saturated sense, by any business that wasn't actively trying to bankrupt itself by roasting through obscene quantities of pigments like chrome green which were already expensive at the start of the war and in particularly short supply during.
6) I'd venture that most of the "there was a war on, you know" type apologists for such spectacular errors probably don't have any actual experience of what is and isn't possible when mixing different proportions of 2,3 or 4 pigments when 2 of those are usually black and white just to make your base to tint. You simply cannot end up with a Humbrol 30-esque bluish green using only the ingredients to make olive - i.e. you'd actually have to sabotage it by introducing if not blue then an obviously bluish green. Same goes for that bright green Spitfire above - you can't achieve that with black, white, ochre and a touch of red - you'd need to fire in a lot of bright green pigment in to get that saturated on an overly-light base. It would be more tan-like just using the basic olive green ingredients which only turns obviously olive when tinted enough with black. Put another way, with a fixed number of pigments in various ratios you WILL end up somewhere within a certain envelope, and usually when colours like this bright green are discussed it's because it's well outside that envelope.
The point of all the above? In essence it's harder to make a credible explanation for how such a colour might have been arrived at in a real-life paint manufacturing environment than it is to demonstrate that someone would have had to go to a lot of trouble to get it so far wrong. That is harder to rationalise than just getting it closer to correct.
I don't know what the pigments in ANA 623 were, but there black and white are a good proportion from looking at the chip/
ANA 623 20240401_155621 by losethekibble, on Flickr
The same mix, the phone camera has rendered this very differently, I spliced these together. Taken in sunlight this afternoon, and to my eyes the colour is darker and greyer on the chip and paint. Possibly too glossy as well.
The pics show the chip vs mix are closer than what I see BTW.
The mix is Tamiya
XF-1 Flat Black :5 parts
XF -2 Flat White :3 parts
X-3 Gloss Royal Blue :2 parts
X-16 Gloss Purple :1 part
I don't know if there are different pigments in the X gloss range, or just in different proportions? @Casey ?
The purple looks to have white it it, the royal blue looks to have some black.
Note I added 1 part white to my initial mix.
A larger batch would allow more care and tweaking of the mixture.
Hope of interest.
-
1
-
-
15 hours ago, Philly1860 said:
Can anyone recommend what would be a good kit(s) to practice on as I don't want to mess up my stash getting my techniques up to par,
Do you want ones IAC related?
I'm not up what will be easily available in the US, you likely want cheaper kits. But if you did models 40 year ago, the fundamentals have not changed.
There are more add ons, and modern kits often fit extremely well, so much so that if not cleaned up properly they don't!
A suggestion, find a kit, or kits, you did 'back then' that you enjoyed, have a search to see how it fares, and get those.
As a pretty fool proof building experience Tamiya are noted for ease and accuracy of construction, and older kits maybe available cheap, worth having a look on ebay or US model sites, Hyperscale Plane Trading has a large US membership, and you maybe able to get some now 'obsolete' kits to practice on, things now replaced by some wonder kit. The old tool Spitfire is a good example.
Or just don't worry, work on the principle a modern $20 or $30 kit is a small price to pay for the learning.
Speaking as someone who built up a vast stash waiting for the right moment and space etc, and ended up building a model in the kitchen aiming purely to get it finished.
It has it's faults, but I was pleased with how the washes and decal application went, and the oil leak. And it was finished.
15 hours ago, Philly1860 said:IAC colour schemes are quite simple and weathering won't be too complicated either or does it really matter?
Weathering can easily be over done, but some signs of use, and careful use of washes can make a model less toy like. But it's up to you.
This is why I have a sig line on what works for you, it easy to get intimidated by new techniques and materials, some are just fashion. (see Youtube, full of examples of this, superficially impressive models that are factually wrong)
Personally I use acrylic brushed, then use oil paint dissolved in lighter fuel for washes and stains, and pastel chalk for exhaust deposits.
I do use Kleer to dip canopies and a gloss coat, and like superglue. (it was very expensive in my youth)
The new tools I use compared to 'back then' are ones I mostly should have had 'back then' pin vice, tweezers, vernier caliper. foam backed sanding pads, though I also use 4 grade pad sold for doing fingernails. Mr Surfacer is useful.
I just did a pretty much OOB build of a retro Frog kit in IAC colours which may amuse.
The worst that will happen is that it will go wrong, and even then you will have a paint and technique mule to practice on, which are always useful, I'd say essential, as you really want to test out things on something that doesn't matter!
HTH
-
2
-
1
-
-
3 hours ago, FunkyChiken said:
Is there a reason why, when i follow the instructions to add an image, that i don't getvan image, i just get a link?
Open image in new tab, post that in.
I assume there is a way to do this, but might be imgbox want you to visit the page for the advertising.
-
3 hours ago, Alex Gordon said:
This image,originally posted by Edgar,will look very familiar to some folks,apolgies Troy I've pinched your URL for this one.
pinch away me old china, it's there to be used.
3 hours ago, Alex Gordon said:My best guess is that it would have been the same as the PR XIX.I don't remember where I found this photo so I can't give appropriate credit.
I think it's been debated, the image is of a Swedish PR XIX, from the Spitfires in Sweden book IIRC. One of those odd books that actually has a lot more useful info, in particular photos, than might at first be thought.
Build moving on well. Had too look up hinge drills. Interesting device.
cheers
T
-
1
-
-
11 hours ago, Andyh52 said:
I’m guessing they can’t all have the same markings…if so, where can I get/how can I source decals to match a squadron in 1939/40??
An example of variations possible, this shows the switch between smaller to larger codes
see https://boxartden.com/reference/gallery/index.php/Camouflage-Markings/Supermarine-Spitfire
Airfix do a boxing with
use a 35 inch roundel and make a T of the K
-
1
-
-
7 hours ago, Andyh52 said:
3 airfix MK1a spitfires…
Do you have the kits? You maybe able to adapt the kit decals.
For example, the starter kit used come with 92 sq, QJ-B
The B can easily be cut to make E, F, L, P.
Note RAF codes vary a lot in detail, often the generic code sheets are just not quite right!
-
1
-
-
11 hours ago, Seb.Ace said:
here's nothing in particular I'm focussing on beyond "just getting better" overall, maybe becoming a bit more steady and neater with the brush.
you may find this of use
in particular, using the upper/lower wing to make sure the front spar is in the right place, and then the rest of the UC well. You can wiggle in the UC legs later.
It build up well.
HTH
-
2
-
-
10 minutes ago, klr said:
Revell sometime quotes 378 "neat" for Dark Sea Grey, and sometimes suggests a dash of something else be added. So for example both this kit and the "new" Revell MR.3 are just 378, but for the "new" AEW.2 kit, it's 10% black and 5% Lufthansa blue. For some other kits (e.g. 1/72 Hunters), mixes based on other colours are specified. I will very likely just use 378 "as is". I did buy an extra tin of 378 some months back in anticipation of building this kit. Then I got a whole box load of unwanted Revell enamels, which would otherwise have been thrown out. Included in this were 4 or 5 more tins of 378, so I'm not going to run short. Then again, I also have the "new" Revell MR.3, and the Airfix AEW.2, so I will be needing lots of Dark Sea Grey in the long run.
I thought the colour was Extra Dark Sea Grey, Dark Sea Grey being used with Dark Green by the RAF.
I'm not sure how well Revell Aqua shades map onto their enamels, but this is an analysis of Revell paint colours, and what they are matches for, Revell Gunship Grey 36174 is a very close match for EDSG.
HTH
-
19 hours ago, Dunny said:
I thought this time I'd try something a little different, so I'm going to build this as a PRU version, specifically MA956 of 684 Sqn RAF:
where is the profile above from?
Note the profile has turquoise SEAC centres, which is wrong.
I have Eyes For The Phoenix out, there is profile of E, MA956, of 5 PRU, May 1942, India Command version of PRU Blue, Sky code and serial.
I haven't spotted a photo in the book showing the profile details. There is a pic on page 103, saying probably MA956, relegated to courier duties at Comilla in India in 1944, so there maybe a pic with the mission totals and AVM pennant somewhere, which the courier duties would explain, the image is from the rear starboard though.
HTH
-
2
-


-960.jpg?m=1608580349)


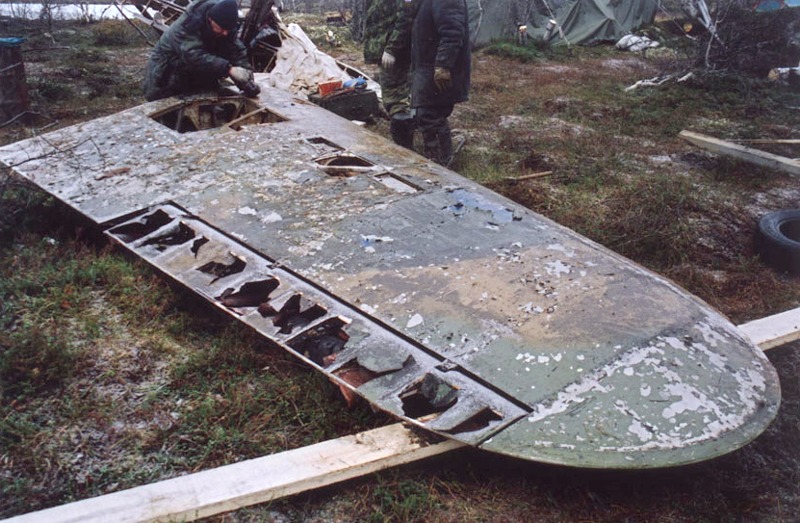


Hawker Hurricane flaps internal colour
in Aircraft WWII
Posted
Battle of France wrecks
Rotol prop
These look aluminium, compare to inside of fuselage and engine panel
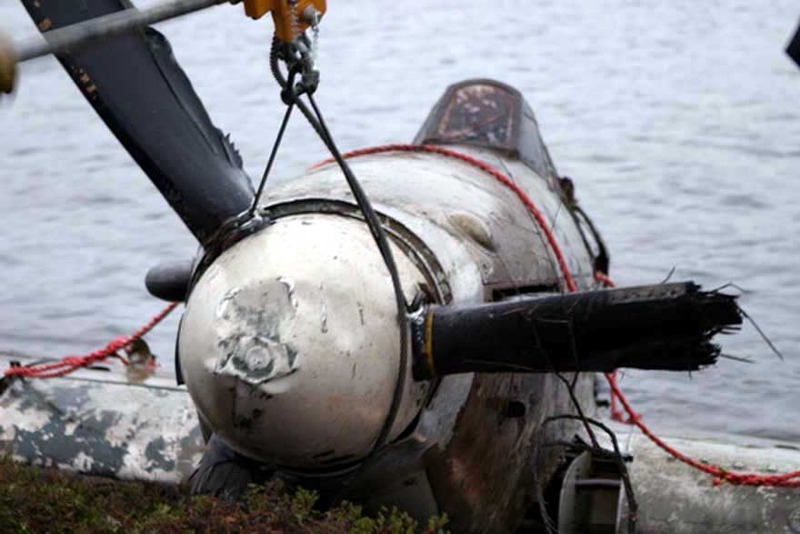
Meanwhile, these are Black/White, and I think it's a Rotol prop, does have the standard aerial
and these look white, centre maybe aluminium, Rotol prop.