

Alex Gordon
-
Posts
2,053 -
Joined
-
Last visited
Content Type
Events
Profiles
Forums
Media Demo
Posts posted by Alex Gordon
-
-
Hello again Chums,a little more to show.
Craig,James,thanks chaps.
I've acquired a near complete Hobbyboss decal sheet so we can have stencils after all.

The lettering is being refined to look a bit closer to presentable.
The wheels and legs have been painted
and some pipework made from copper wire added.
Thanks all for looking in,more soon.
-
 9
9
-
-
G'day again Chums,some twiddly bits.
Beard,cheers old fruit.This one's a pleasant boxful which doesn't need a lot of fettling to push it together.I've been using Butanone as the liquid glue to which this plastic responds very well.Hopefully this thread is of use and you enjoy your build.
Wings,tailplanes and rudders are on.
The wheelwells are going to be aluminium so I decided to fit up the doors before painting,cutting down on masking.
The same with the noseleg bay,the various cannon fairings
and the speedbrake bays.
The speedbrake doors were prepped for painting the inner faces.
Once the glue has set all the difficult to reach bits can be painted.I want the canopy on before painting.The front portion has a huge gate at its forward end which I will take a saw to hopefully avoiding cracking the thing.
More soon Chums,thanks for looking in.
-
16
-
-
G'day Chums,yet more "entertainment".
James,Gerard,Craig,thanks chums.
VP,cheers old fruit.I very nearly was but that wouldn't have assuaged my variety of CDO (let's get it in the right order) but I like your way of thinking.
Having had a second go at the lightning flashes,they're close but still not quite right,I decided to have a crack at some decalling.I had a moment or two with some masking tape setting out on the wings and fuselage where and how the Balkenkreutzen should go.
Some warm water was laid on and decals cut from the sheet.The first victims were the white outline crosses for the upper wings.The two coats of Klear didn't hold them together.Rightyho thought I in a manner not fit for polite company I'll try the wing underside full monty items.They did stay together but were oversized by far too much so I stopped the job and had a rummage through the spare decals bag.Hobbyboss to the rescue.
I gave the fuselage lettering a shot and it was no great suprise when they broke up too.Thankfully I'd only tried to work one of the pair so the other was together enough to attach to the back of a clear sheet and use to cut a stencil from masking tape stuck to the other.
This is only rough
but it was good enough to dot in some paint with a fine brush tip.
There will be some refinement of this bit and there ain't going to be any stencils unfortunately but I can only work with what I have to hand.
More soon Chums,thanks for looking in.
-
7
-
-
Hello again Chums,some more progress.
The cockpit went in easily and the nose has been glued together.While I was doing that I fitted the nose underside insert and the intake ring so that it could all be lined up while things could be moved about as a sanding avoidance measure.
The intake ring was slightly too small so I aligned it for best fit leaving a small joint to fill on the starboard side.
The rudder components were cut from the frame and fitted with no snags.
The tailplane locating holes had been enlarged a bit but when it came to fitting both tailplanes sat rather low.Shaving a sliver of plastic off the upper sides of the locating pins rectified the problem.
Thanks all for looking in,more soon.
-
14
-
-
Hello again Chums,yet more paint.
Craig,James,cheers chums.
I did a comparison with one of the reference photos and decided to add a bit more to the mottle.I then cut the port side lightning flash decal from the sheet,which seems to have been designed with the sole intent of making removal of any one individual item an absolute sod to do,and offered it up.
I'd overdone the mottle a little and the lightning flash was a little short in the vertical department.Out came the masking tape.
I've also just seen the second case ejection aperture under the forward fuselage so I now have to work out if it's the forward or aft one I should add
 .
.
Thanks all for looking in,more soon.
-
11
-
-
G'day Alan,you might find this thread useful https://www.britmodeller.com/forums/index.php?/topic/235133247-seafire-fr-46-station-flight-royal-naval-air-station-lossiemouth-scotland-1948/

-
G'day again Chums,a little more to show.
Craig,thanks old chum.
Having glued the exhaust nozzle onto the jetpipe the dryfit revealed that it was going to be in the way of a tricky to reach joint after the fuselage had gone together so I chopped it off.
The fuselage was put together and the joints aft of the cockpit aperture were glued.
The undercarriage mainlegs have been glued to the doors.They will be painted the same colour so this gets around not putting paint where glue is going to go.
Once the glue had set on the fuselage the glassware that goes into the belly was inveigled into place using a paintbrush handle as a pickup tool.The holes for this had to be opened up a little to get a decent fit.
The underwing tank joints needed a tickle with the sanding sponge before fitting the pylon bits.These were then set up on the wings to make sure they lined up properly before the glue sorted itself out.
More soon Chums,thanks for looking in.
-
13
-
-
Crumbs,that looks a bit 'orrible.Caustic Soda should sort that out.Make up a solution and drop the canopy in it,a few hours will see the paint dissolved without damaging the plastic.Should go without saying but don't forget to wear your Marigolds,Sodium Hydroxide won't do your skin any favours.Mr Muscle foaming oven cleaner will do the same job,it is caustic soda too.
Good work so far old fruit.
-
 1
1
-
-
G'day again Chums,there has been paint.
James,Craig,thanks chums.
Slats on,canopy masked
a first coat of Humbrol 252 RLM 82 was sprayed on.
This revealed a step at the aft end of the canopy
which was buried under some Milliput.A few other lumpy bits were picked up while I was at it.
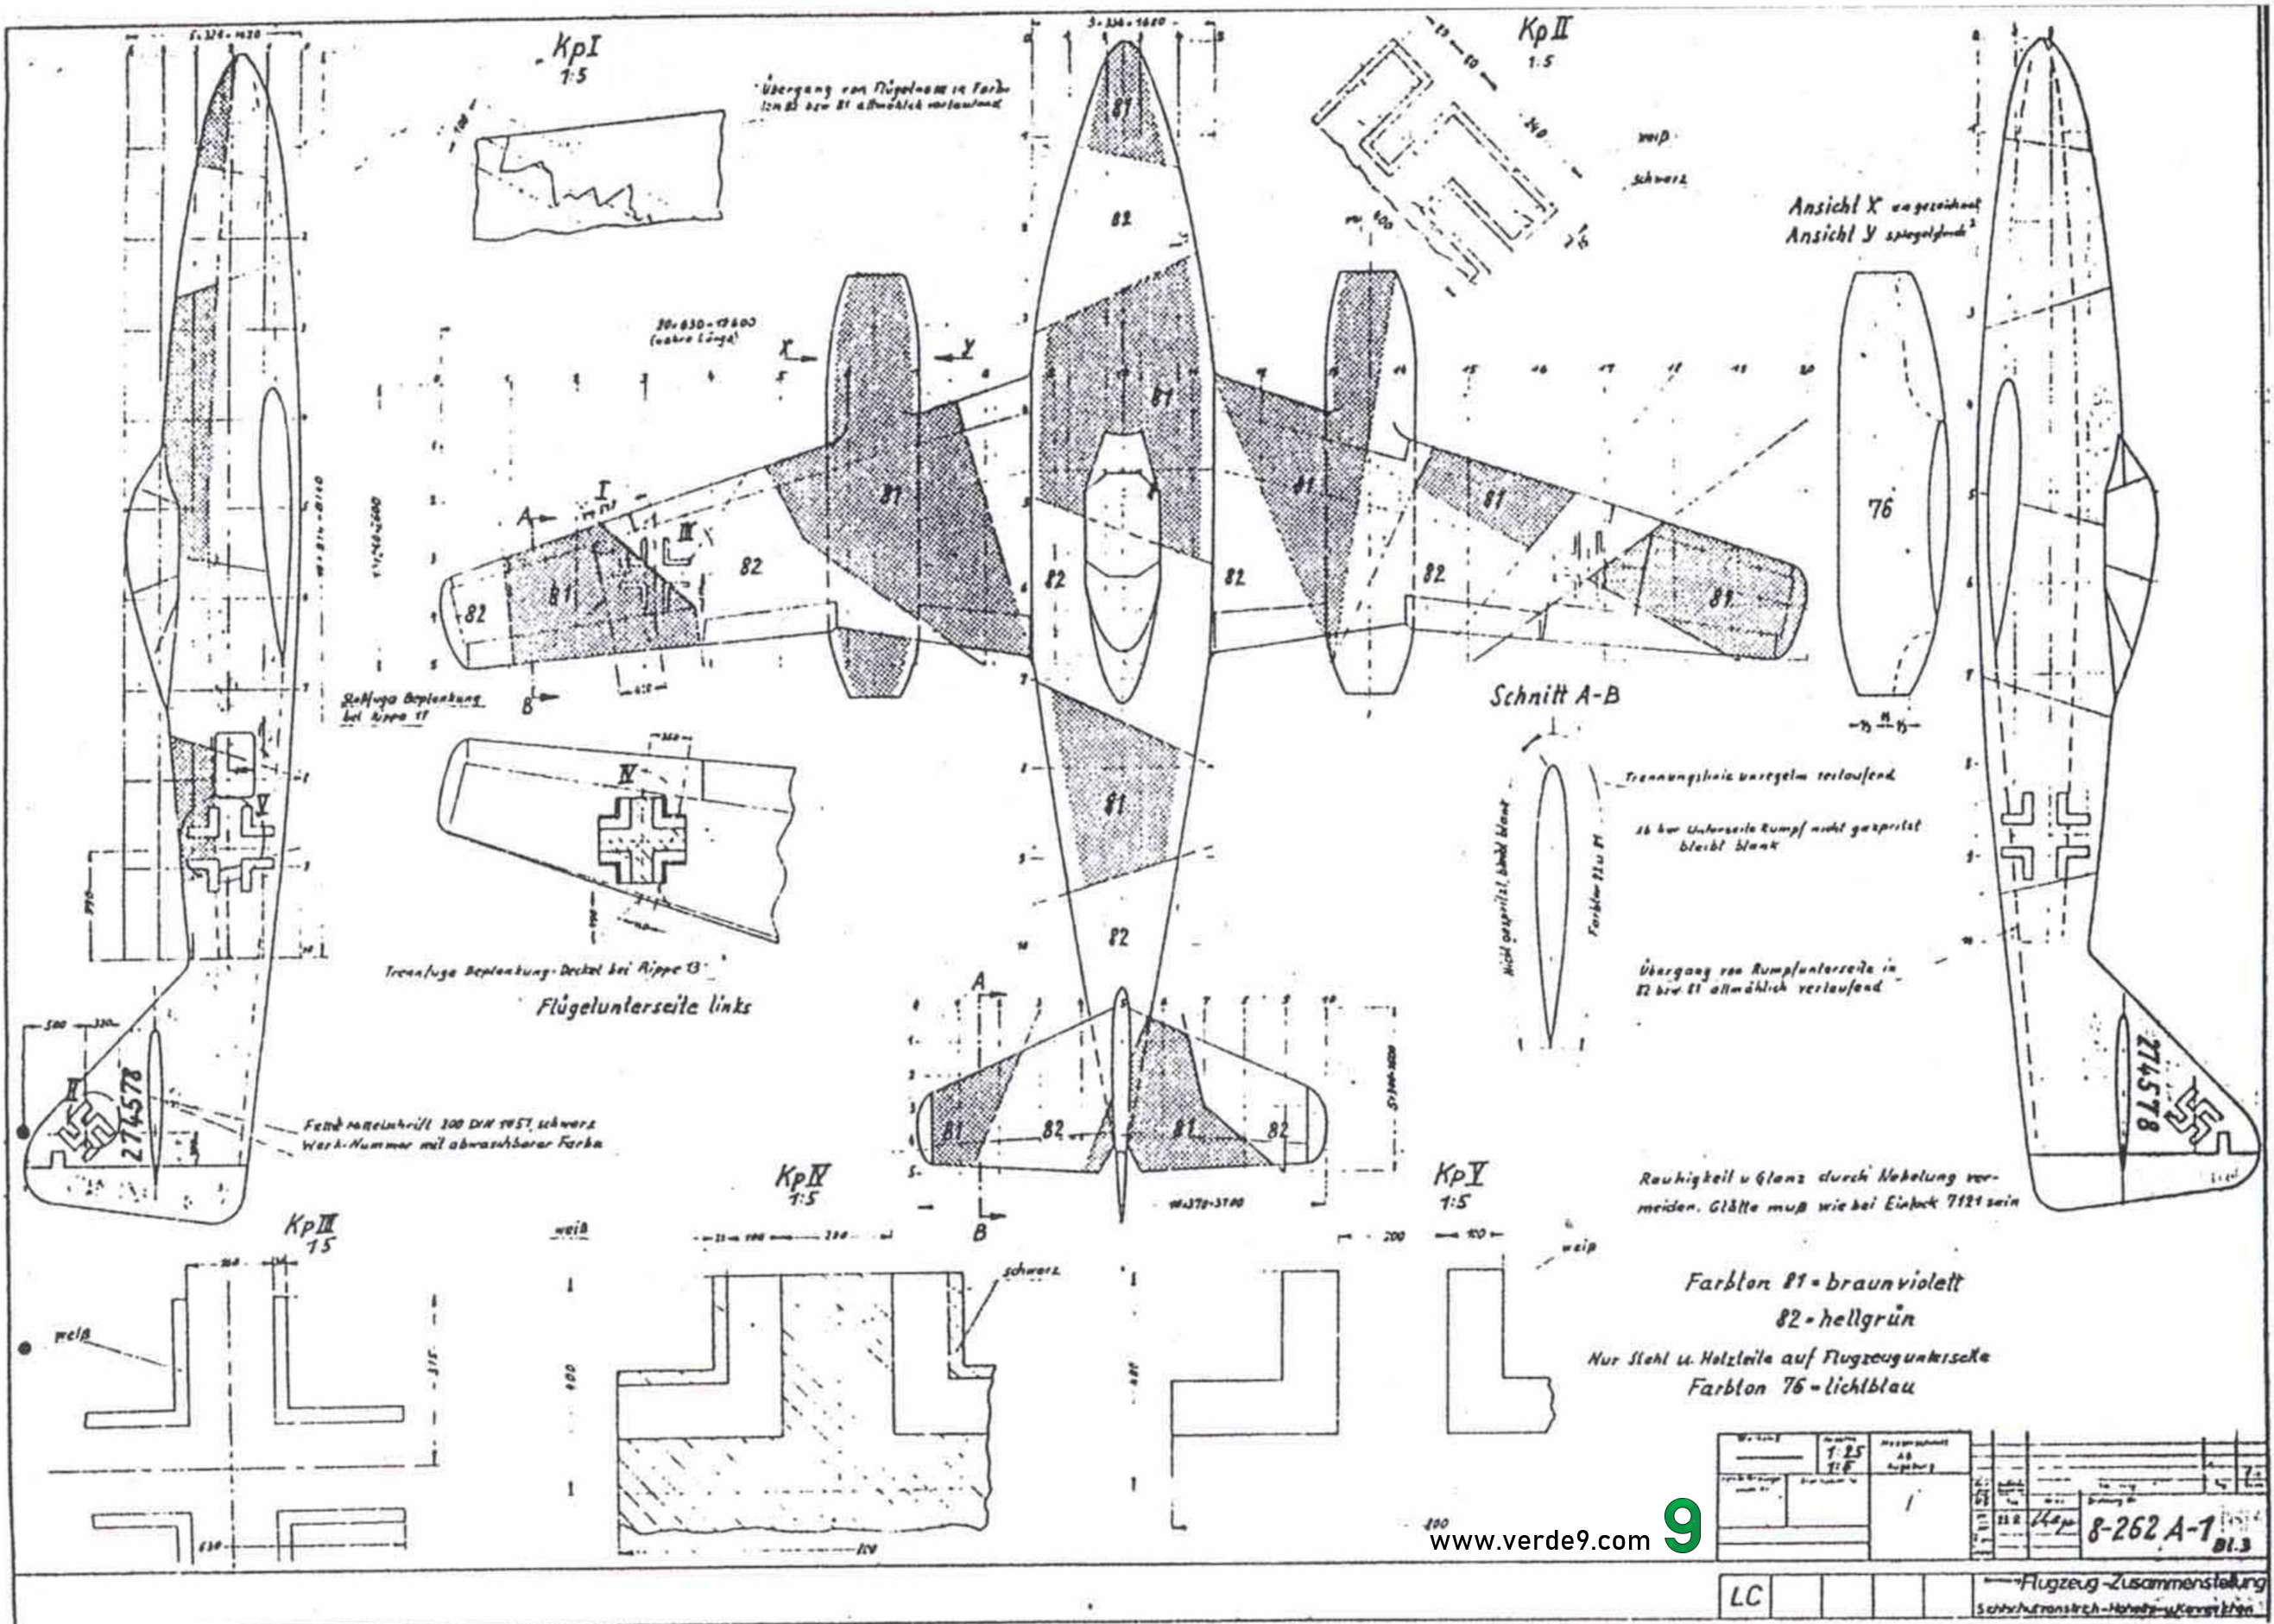
Someone at Mistercraft has done a bit of basic research.The paint diagram,while it calls for RLM 74 for the green,
is faithful to the wartime drawing found both here https://verde9.com/en/luftwaffe-original-camouflage-diagrams-archive/ and in Merrick and Kiroff.
I've only found two photos of the subject aircraft in all the digging for gen that I've done.
both of which look to me as though they are stills taken one after the other from a film sequence.This idea led me to yet more digging which while it didn't lead to what I was hoping to find,that would be too much to ask,did unearth this video
which was well worth the time spent watching.
Masking for the RLM 81,therefore,followed the kit supplied paint diagram.
A squirt of Humbrol 251 later saw the main part of the upper surfaces done.
Creating a convincing mottle in 1/72nd scale is a task some won't attempt.I've had a go a few times but I thought I'd try a different tack this time.Liquid latex masking was liberally applied where the mottle is supposed to go.
This was followed by a coat of Humbrol 247,RLM 76.The liquid mask was then removed giving me this.
Another thin overspray toned it down but didn't leave the finish that I wanted so,once dry,I resorted to thinned paint and white spirit to get me to this which is about as near as I'm going to get it.
More soon Chums,thanks for looking in.
-
11
-
-
Hello again Chums,a little progress.
Dennis,thanks old chum.
Cliff,cheers old fruit.I don't want to do the Vietnam option this time so it'll have to be the Soviet scheme,I don't have any suitable decals in the spares bag to work up a Czech,Polish or Hungarian one.
Luke,thanks old lad.You'll enjoy this kit.The fit is precise and I'm finding a lot of waiting for paint to dry before moving it along.
The cockpit decals are on which meant it could all go together.
The jetpipe inner and aft turbine have been painted.
Both sub assemblies were ready to go into the fuselage with the addition of 20g of noseweight.
The wing fuel tanks and their mountings were cut from the frame and the tank halves glued together.
The wheels could do with being painted.The map tells us that the rims should be aluminium but I always thought they should be green.
I had a cobble together to set up the noseweight.This is where I found out that the forward mounting peg on both tailplanes won't go into its hole.
Some lead sheet was cut,sufficient to hold the nose down plus a bit.
This was then chopped about and fitted into every spare space as far forward as it could be.
One thing I will say about the nose insert,careful manipulating before the glue has set,there are no locating pins on this bit,will yield one of the best joints I have ever seen.This one has had the merest swipe of a sanding sponge and has come up spot on.
Thanks for looking in Chums,more soon.
-
16
-
-
Hello again Chums,some more to show.
Craig,James,cheers chaps.
I filed the end of a piece of copper wire into a triangle and wrapped some thin wire around it
to make the mounting points for the seat harnesses.
The seat backpads have been painted with something suitably leatheresque
and fitted to the seats along with some painted masking tape harness straps.
A fuel triangle decal has been placed on top of the filler,it's probably the wrong one but it's the only spare one I had.
The canopy has been glued on.
It's soon time to turn attention to the undercarriage.
Thanks all for looking in,more soon.
-
10
-
-
In no particular order
Skybirds '86 Percival Prentice,first flight in 1946.
Revell reissue of the Monogram 1/48th F 102,first flight in 1953.
Revell 1/48th F 89 D,first flight in 1948.
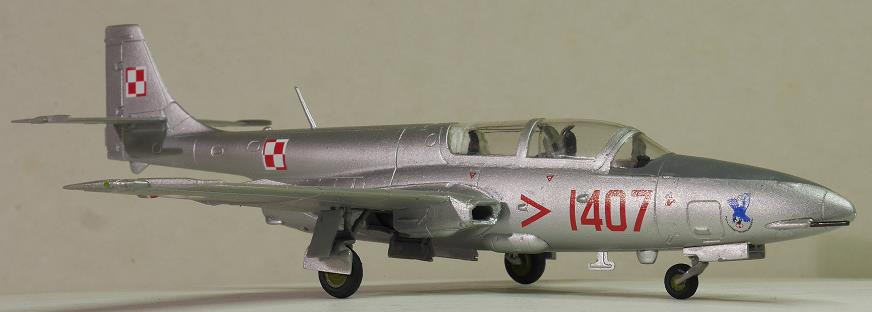
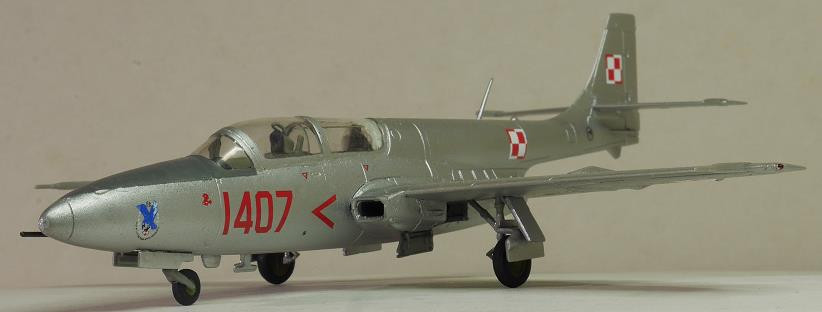
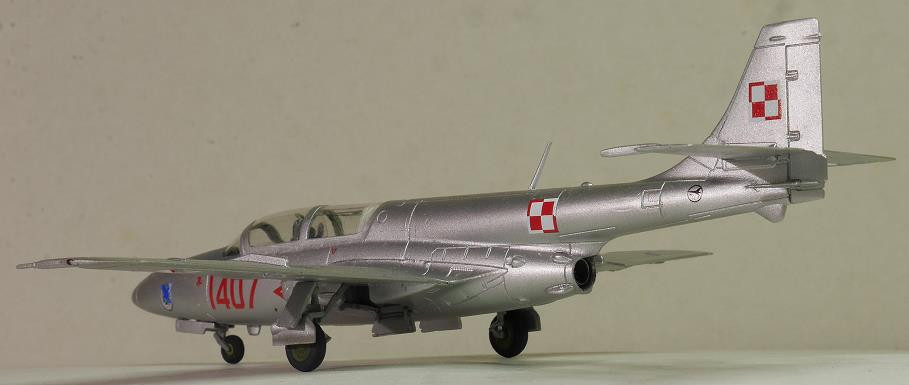
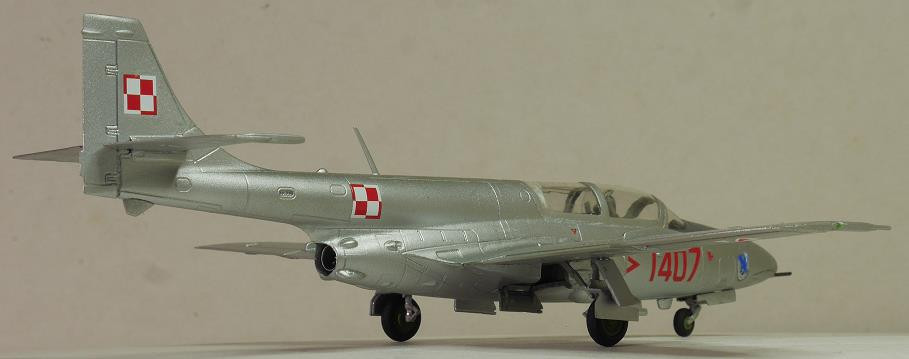
Hobbyboss 1/72nd MiG 15 UTI,first flight in 1947.
Italeri SNJ 5 in 1/48th as flown from Guantanamo Bay in 1956.
Monogram 1/48th F100,first flight 1953.
Airfix 1/48th Seafire 47,first flight 1947.
Cheers all.
-
10
-
-
G'day Chums,I'd like to join in with this one if I may.
Here's what's in the box.
The job starts with what appears to be a quite well represented cockpit.
The seat looks pretty decent.
There are two options for the jetpipe,speed brakes open or closed.I'm going with the open option.
The wings are going to have to go together sooner or later,might as well be sooner.
More soon Chums,thanks for looking in.
-
17
-
-
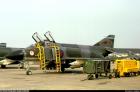
G'day Chums,here's my attempt at the Hobbyboss 1/72nd F 84 G,the build thread is here.
My thanks to Wez,Loren and Reini for doing their bit,Enzo for doing his and to all who chipped in and encouraged.
-
28
-
-
G'day again Chums,the vinegar stroke for this one.
Changing the rake on the noseleg meant that the retraction strut had to be extended.This was achieved by drilling out for an overlength piece of copper wire so that it could slide.
The leg was fitted in place and the strut slid to length and secured.This also involved cutting a new mounting slot aft of the original one so that the far end had something to fix into.The copper wire had a thick coat of paint which hid it well enough for me.
Things you need to know before you need to know them;don't get white spirit on Modeldecal decals.
The tip tank lamp glasses were fixed on with a drop of Klear.
I'm calling this one done.
I nearly got it right.
With the one I did in the last LTAT GB.
My thanks to Wez,Loren and Reini for doing their bit,Enzo for doing his and all who chipped in and encouraged.
-
7
-
-
G'day again Chums,a little more done.
Craig,James,thanks chums.
The control columns have been painted and fitted.
The canopy has been fished out.There are a couple of lumpy bits on the transparent portions but nothing too serious.
There are ejector pin stubs dotted all around the frames.They are all circular
and absolutely perfect for making the fuel filler point behind the aft cockpit.
A couple of seat back pads have been made from a couple of number tags off the frame.
More soon Chums,thanks for looking in.
-
8
-
-
Hello again Chums,a bit more to show.
The decals are now all on.One thing this kit lacks is a jetpipe,I thought I'd make one.
I started with a piece of self adhesive aluminium foil.I've got loads of the stuff that wasn't used on a sun tunnel,I might as well use it for something.
Using a length of runner as a depth gauge I set out where I wanted to fold the sheet
which was then bent using a suitable straight edge.
This was then rolled around a suitable paintbrush handle and cut off to meet up where it overlapped.
A check of the fit revealed the soon to be tube was a bit too big
so I came down a handle thickness and refined the fit.
The tube was then unrolled and the backing paper removed.A slip of foil was added to one edge of the join to hold it all together and its backing paper positioned at the other edge to hold things apart.
The whole lot was re-rolled and the joining slip inveigled into place.
The resulting tube was manipulated and refined to close up the joint and offered into place.A drop of matt black paint down the far end and it'll look just fine.
The inner maingear doors have been fitted and then the lamps added.
The noseleg could do with a bit more forward rake.
Thanks all for looking in,more soon.
-
4
-
-
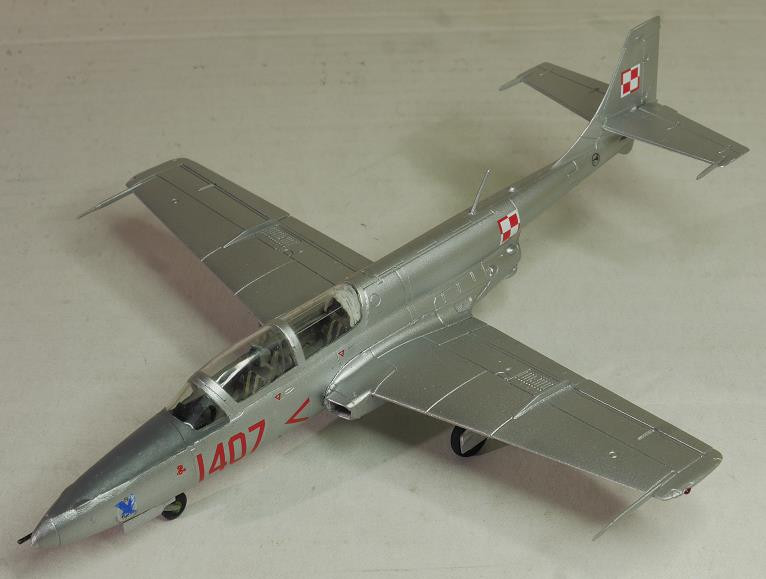
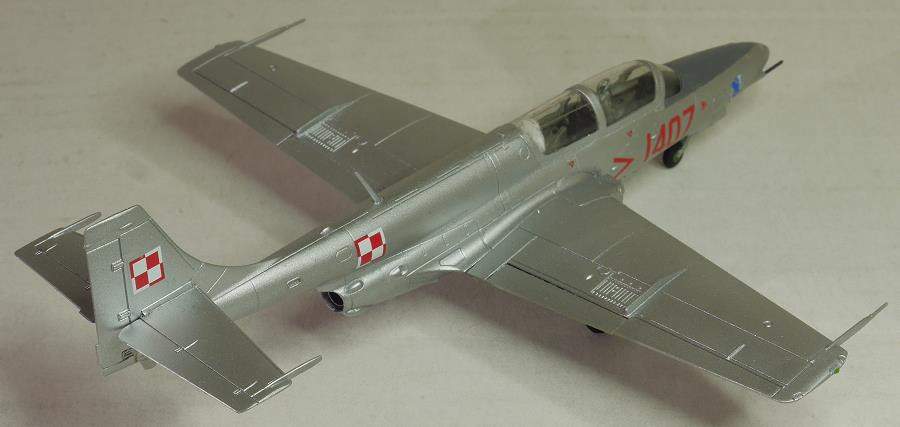
G'day Chums,may I present for your delectation the Basic issue of the Arma Hobby Iskra kit.I bought this from Black Mike Models to see what all the fuss was about.On first sight it looked very much like what you would find in a Hobbyboss 1/72nd box.The components were well moulded with a little cleaning up of part lines and a very respectable precise fit.There was no noseleg bay so I made one from lead sheet which also sorted the need for noseweight.There was no intake ducting either,some self adhesive aluminium foil was shaped to cure that one.The blind flying curtain in the rear of the canopy was made from folded fag paper and some very thin wire.The decals went on with no problems.
I enjoyed this one but I had to work for it,there will be another one of these crossing the bench somewhere along the line.
Thanks for looking in Chums.
-
25
-
-
3 hours ago, Admiral Puff said:
You too ...!
Three times a night man me.That's having to get up for a Pat Cash you understand.
-
 4
4
-
-
My bladder mostly.
-
3
-
7
-
 1
1
-
-
Hello again Chums,more progress to show.
James,thanks old chum.It's one of those things to put in the Things You Need To Know Before You Need To Know Them file.
The outer wings have been fitted
and there has been Milliput in the footstep holes and the wing leading edges under the slats.The slat slides have been made and fitted too.
The mainwheel wells were still looking a bit bare so I thought I'd add a bit of wiring,the cockpit is above it so there's going to be loads of it.
This brought me to thinking what colour the cabling would be,a bit of a google came up with https://forum.largescaleplanes.com/index.php?/topic/20390-luftwaffe-wiring-what-colour/ eventually.Humbrol 225 Middle Stone was sprayed on to a couple of bundles of some stretched very thin runner.
These were mauled about a bit and glued into place.That looks a little more convincing to me.
Thanks all for looking in,more soon.
-
6
-
-
G'day again Chums,We're soon going to have to think about putting the markings on this one.
I acquired one of Dick Wards finest,Modeldecal sheet 49,unsullied a while ago and there are two F 84 options on it.
This is the photo in the instructions but I've no idea whose it is.
I've already built an E so the G it will be.I'm a poet but I didn't know it.This option requires the tip tanks to be painted yellow,some masking and overspray prevention later gave me a bundle of plastic bag.
The yellow was sprayed first then the black trim was masked and hairy sticked.There was a bit of bleed under the tape but nothing that couldn't be sorted out with the tip of a fine brush and some white spirit.
While that was sorting itself out I turned my attention to the nose bay doors.As supplied they don't look quite right to me so I did as last time and made them a bit bigger with some plastic card.I also wanted to make some semblance of the hinges,yet more card and symmetrical placement.
Then I found a photo of the real thing and realised that I was going to have to do this differently.I started with some discs made with the largest diameter tool on the ever useful leather punch.
These were progressively cut,filed and mutilated to make the shape I wanted
and glued to the modified door panels.
As I was writing this I went looking for the photo I used for this but couldn't find it.Instead I found a clearer one
here https://ipms.nl/walkarounds/walkaround-jets/walkaround-f-84-thunderjet and I've got them all wrong.Never mind,they're going to stay as they are now and that'll do.
There has been decalling.The Modeldecal goodies performed perfectly,I've never used them before so it was a bit of a leap of faith,but the tip tank decals were too short by quite a way.
Photo found here http://www.frenchwings.net/combat/gallery/displayimage.php?album=19&pid=8#top_display_media.
Masking tape at dawn then and a spot more hairy stick work.
More soon Chums,thanks for looking in.
-
3
-
-
I'll just leave this here
-
G'day again Chums,some more done.
James,Craig,thanks chaps.
The lower wing section was as good a fit as I've ever seen
which meant that I could finish off boxing in the wheelwells.
Sooner or later I'm going to be putting on the decals.One thing I like about Mistercraft is the selection of finishing options they include in their offerings.Their decals aren't noted for their useability though.
I thought I'd try one that I'm not going to use.It was not the exception,Cartograf or Zancetti they ain't.A coat of Klear will sort it out.
More soon Chums,thanks for looking in.-
6
-


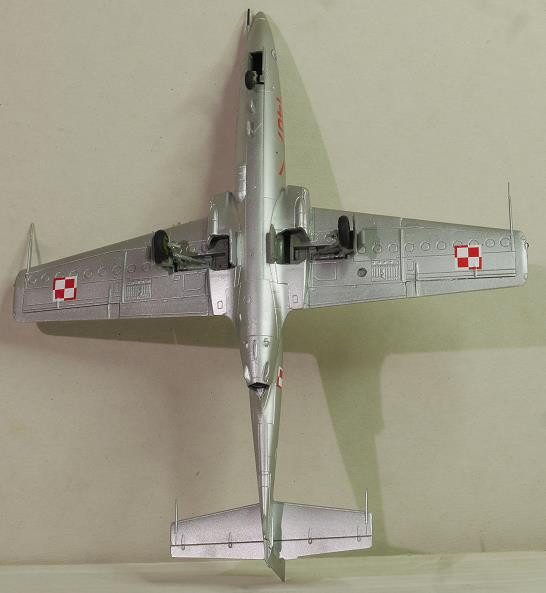


Airfix MiG 17 in 1/72nd Scale.Finished.
in Baby Boomers GB 1946-1964
Posted
Hello again Chums,glassware this time.
Cliff,Gerard,thanks chaps.
@Beard Something I forgot to mention last time.There was a bit of a snag fitting the wings.There is a fairly sustantial lump at the leading edge that plugs into the fuselage.
When I dry fitted before gluing I found that the wings sat slightly displaced,one upwards one downwards,so that the line of the leading edge didn't run through.A couple of swipes with a coarse file took enough material away from each offending side to cure it but it was quite noticeable.
The gunsight has been fitted and painted black.
There are two sliding canopies provided,one with a rear view mirror one without.I'm going for the one with as suggested by the map.
Dryfitting showed that it wouldn't sit down when closed.
There are two upright sticky out bits either side of the seat which foul the inside of the canopy
and,when shortened by a gnats,are no longer in the way.
Anyway the canopy is now on and masked and we're heading for paint.Thanks all for looking in,more soon.