


tom271282
-
Posts
173 -
Joined
-
Last visited
Content Type
Events
Profiles
Forums
Media Demo
Everything posted by tom271282
-
1/700 HMS Prince of Wales Flyhawk Deluxe
tom271282 replied to Gisbod's topic in Ready for Inspection - Maritime
Incredible, puts my KGV to shame. Wonderful modelling. -
1/48 RAF Jaguar GR1 (Kitty Hawk)
tom271282 replied to tom271282's topic in Ready for Inspection - Aircraft
Trevor, I fixed each half of the nose section to the respective fuselage half, to create a conventional kit then when all the gubbins was inside buttoned it up in the usual fashion. I think this approach helped to align the halves better, especially the arch behind the rear of the cockpit. Shape wise, I would say the overall model is pretty good. As previously mentioned, the pylons are the French sort so need butchering a bit and the noses blunted off. The air conditioning inlet is about twice the height it should be and so I filed that down to preserve the top line of the aircraft. Other than that, I felt it was pretty close to the drawings I had. Fit wise however, not good. The main issue is the fuselage halves which on my kit seemed warped and mishapen. Adding the vertical supports inside the fuselage as I showed above really helps to push and squeeze it into the right shape. Also added styrene strip inside to give a lip along the bottom join to assist, but still needed a lot of filling to get it level. The panels that you can display open are too small, so work is required to get them to fit right. Generally the fit is poor. Nothing really goes together simply, overall a big of a dog, but I almost prefer kits like this because I have to think about it, and come up with solutions. Maybe I'm just weird.... Thank you all for the really kind comments, coming from someone who rarely posts here, its lovely to get the support. -
1/48 RAF Jaguar GR1 (Kitty Hawk)
tom271282 replied to tom271282's topic in Ready for Inspection - Aircraft
Thank you - I muddle through most of the time - a quick build for me, just 4 months or thereabouts! Yes, the panels were a poor fit, though not awful and to be fair I could have done a better job with them. The main issue was the fuselage. I added vertical structural supports, which corrected the fuselage shape and also squeezed the wing roots in, which meant less filling and sanding. Still a lot of filling and rescriving overall though, and I could have done more but just wanted to get it done. -
1/48 RAF Jaguar GR1 (Kitty Hawk)
tom271282 replied to tom271282's topic in Ready for Inspection - Aircraft
Thank you. Edited now, should be bigger.... or simply click on the image for full size. -
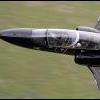
Hi Everyone, Little while since I last posted. But anyway thought I would share this completed 1/48 KittyHawk Jaguar GR1. The kit is well documented, but needless to say there were fit issues. The instructions were useless (some parts not even called out so I think I may have missed a couple of bits on this build) and the smaller decals broke up. Anyway, it looks a bit like a Jag, so I am happy with the result. I used aftermarket decals, drop tanks and sidewinders from Flightpath, a new seat, new pitot probe, and I also modified parts that didnt look right, like the massive air conditioning inlet. I'm sure I did some other stuff too, but I can't remember. Painted in Tamiya colours, mixed to get a 'correcter' shade and finished off with generally matt Alclad varnish as I wanted it to look war-like. Hope you like it.
- 29 replies
-
- 60
-

-

-
You nailed that Julien.
-
Spent ages getting a super smooth gloss white finish on a 1/144 Concorde, and was very pleased with the result, having left it to cure for 2 weeks, due to the fragile nature of the gloss white. Masked the fin for spraying BA Landor logo, and decided to wrap the rest of the model in cling film to protect from overspray. Left the model for a week or so, come unwrapping time, all the gloss white had bubbled due to the exceptionally humid environment in Hong Kong! I have to admit the model got a bit broken and ended up in the bin. I do still have the completed engine pods though,... every cloud....
-
That sounds rather strange, as I think they are superb and have never had an issue with them. What brand acrylic do you use them over? Do you spray thickly or thinly? I use over Tamiya, and get superb results every time.
-
Hello, Just a little update on my paint situation. In the end, I decided against using this particular LifeColor colour. I didn't want to risk ruining the model with a lumpy paint finish. So, with the help of my better half (I think she can see colours better than me!) I mixed up, by eye the correct shades of colour. About 98% white with a couple of drops of blue and a drop or two of RAF Green. This gave the correct shades (to our eyes). All in my usual Tamiya, so went on like a dream. I'll post some pics in RFI when its done and you can see if I got it right. Surprising how little colour you need to add to the white to get the subtle Cathay shades. In conclusion, I would consider using LifeColor again, just because so many people swear by them, however in this particular shade (RAAF Sky Blue) I'm afraid its a 'no go' for me. TTFN
-
Hello all, Thank you for the kind replies. Mark - I thoroughly cleaned the airbrush prior to use with warm water and soap to try to ensure that everything was free of thinners or anything else that the paint could react with, but still have the same problem. I don't like blaming the product, but in this case (RAAF Sky Blue, a very light colour) perhaps the paint is behaving in a similar manner to the white that Kev mentions. I shall try thinning with future, as I have two pots, one of which is still as bought so to speak, so Klear might settle it down a bit. Its slightly frustrating as I got the paint especially for a Cathay Pacific A340 I am doing. Looks like I might have to try and mix my own using the Mk1 eyeball instead! I'll keep you posted on any developments. TTFN
-
Hi All, I know there have been a few threads about this, but I cannot get on with this paint at all! I have airbrushed all sorts in the past and I haven't really had a problem, even xtracrylix have been mastered. The paint comes out 'lumpy'. It seems to have bits in it, which may be air bubbles which means the paint doesn't lie flat, and looks rough. I have tried adding flow improver, I have thinned it, and I have tried high or low pressure, but whatever I try, I cannot get it to lie flat! What am i doing wrong?! Cheers Tom
-
1/32 Revell Lynx- Conversion to AH-7
tom271282 replied to Lynx7's topic in Ready for Inspection - Aircraft
I don't normally like helicopters, too many moving parts for my liking. However.... this one is superb. Great detail, love it!! -
Really superb modelling, and terrific seascapes. I am very tempted to have a go, but will not get results as good as you have.
-
Airfix 1/48 Canberra PR9 1PRU RAF Wyton mid 80's
tom271282 replied to tom271282's topic in Ready for Inspection - Aircraft
I used araldite to fix the main gear in place, which makes it nice and secure. That coupled with brass rods to attach the hubs to the gear makes it stable enough. That said it still weighs a ton! Thank you for the few kind comments, although I build for myself its also nice to get a modicum of recognition for ones efforts. -
Most unusual, I like it!!
-
Hello folks, Here it is the one you have undoubtedly been waiting for. In the making for over 3 years, having survived moves from Cambridge to Oxford, back to Cambridge, and finally completed here in Hong Kong. This has been a very lengthy build, some of it due to moving about, and probably most due to my own procrastination and silly mistakes. Overall it was an enjoyable build, but sometimes I lost interest when I seemed to do lots of work and no progress was being made. The work in progress is here: http://www.britmodeller.com/forums/index.php?/topic/234919457-airfix-148-canberra-raf-pr9/ however progress was so glacial that almost everyone lost interest! Anyway, the build; it’s a 1/48 scale Airfix Canberra PR9 of 1PRU RAF Wyton circa mid 80’s. What I wanted to create was something like this: http://www.airliners.net/photo/UK---Air/English-Electric-Canberra/1600302/L/&sid=e1f9a0e44ea2365c9f06358982cb3aec The kits flaws are well known, but I wanted to make it as accurate as I possibly could. This involved numerous changes and modifications plus aftermarket items to make it look right. The main effort was to remove the vast majority of the overly prominent panel lines, which you cannot see on the prototype (unless exceptionally close) due to the Canberra having a very aerodynamic fuselage. This was the most time consuming part: filling, sanding and priming and repeating until it all looked good. Canberra’s of this time look remarkably shiny and well looked after. Consequently weathering is very light indeed, mostly on the lower light grey surfaces. The kit misses several parts or models them incorrectly; consequently the other corrections and modifications are listed below: · Fill panel lines · Re-scribe underside and rudder · Fill strange lines on the rudder · Replace vortex generators on the fin · Add pairs of vortex generators on underside main wings · Add numerous pitot tubes, intakes etc. to fuselage · Add HF antenna · File down oversize upper wing surface vortex generators · Correct intakes on engine pod sides (Airfix have them on opposite sides) · Correct navigators windows · Scratch build cockpit · Re-profile base of fin · Add brake lines to main gear · Mask and spray roundels (mainly as it was impossible to get decals to conform over the VG’s) · Add fuselage strengthening plates · Add beacons · Add loads of nose weight (the total of the model is about 480g) · Strengthen main and nose-wheel axles with brass rod · Finished in Tamiya and Xtracrylic paints with Alclad varnish Aftermarket: Pavla ejection seat Masterclass PE flaps CMK (I think) wheel bays – these are superb, although I didn’t use the nose gear bay as the fuselage was together by the time I got them. Xtra Decal and Aviation Workshop transfers Well that’s about the lot, here are some pictures. I apologise for the quantity, but I have been experimenting with RAW images and a basic Canon photo editor. I hope you enjoy them. Next on the bench is the Kitty Hawk Jaguar. I’m setting a 6 month time limit on this build!!
- 26 replies
-
- 42
-
-
Gloster Javelin. 33 Sqn RAF.
tom271282 replied to (ex)Sgtrafman's topic in Ready for Inspection - Aircraft
Beautiful. One to add to the growing list of 'wants'! Great job! -
Fantastic. I'm not usually a fan of these older type of aeroplanes (at least in kit form) but you're doing a superbly neat job on this! Can I ask you to explain to me how you achieve the wood effect on the plywood sides please?
-
Hello folks, just a text update this time, as I don't want to spoil the final reveal of this build which is finally coming close! I have completed the decalling, which took a very long time as I estimate there to be 200+ decals and stencils to apply, using the model alliance and extra decal sheets. I had to spray on the top surface roundals, as there was no way I could ever get the decals to sit over the vortex generators and still look reasonable. Actually, I am chuffed to bits with the sprayed roundals. Having added the rudder actuator (not on the kit) on the port side, the decal supplied again would not conform, so the fin flash also had to be masked and sprayed. I am currently sorting out the undercarriage, and debating weather to strengthen/reinforce the join between the undercarriage and the tyre, as I have added quite a bit of weight to the model to try and avoid a tailsitter. Anyone with any experience of this kit know if it is necessary to reinforce this particular joint? Additionally I am painting the PE replacement flaps, and will be applying some very slight weathering to the overall model (PR9's of this period were kept really shiny) so I mustn't go overboard. Once this is all done I just need to add a few probes and aerials, the rigging and all the other bits and pieces before a coat of Alclad Light Sheen varnish (super stuff) and I'll be posting in RFI very soon with a full breakdown of all the bits and pieces done to (hopefully) enhance the model.
-
Much better:
-
Hello all, a little update today. Removed all of the masking from the underside, an I am pretty pleased with the results. Only a tiny amount of over spray on the nose area. Also painted the RWR/PWR in a sort of tan colour that represents what I have seen in pictures (XF-52). I think it will tone down a little once I have applied the gloss coat. You can see on this shot the rudder actuator that I made from milliput (its missing on the kit for some reason, yet its quite prominent on the real thing). Also you can see the rescribe of the fin, and the replacement vortex generators that I feel are much more to scale than the kit originals. Here you can just make out the aft fuselage strengthening plates I added: Over spray on the nose (easy fix) and also the scratchbuilt replacement air intakes and nose camera arrangement, in addition to the small pitot mounting: Overall, the masking has come out well: The PE flap certainly add a nice amount of detail to this area, they still need to be painted white. Its big! I'll now crack on with touching up the over spray, and then a couple of coats of Alclad gloss so I can start the large decalling job. TTFN
-
I know Warboys well, I used to live in Brampton prior to moving to Hong Kong, and completed my EFT at RAF Wyton. Great fun station. Had a look at your build. Very nice indeed, I notice you have been somewhat quicker than me (3 months as oppose to 3 years!). Big old model isn't it?!
-
Hello everyone. Sorry for dragging this topic back from the dead, but I have made some progress on this one, and want to generate some interest before its finished for the RFI section. I won't list all the corrections I have done here, I will list them when its finished. At the moment I'm just in the painting stage and have the aircraft light grey (X015) on the underside done. Then I masked it which took quite a while. Its now had its dark grey (XF-53) and RAF green (XF-81) applied with an airbrush using blutack and masking tape. This is the first time I have used this technique and so I was a little nervous as the finish really makes or breaks this one. There are a couple of areas I need to touch up, namely on the stbd horizontal stab and the stbd aft wing root, but overall I am happy with the result. Also, I knocked off one of the small air intakes below the canopy, so I will need to re fix that. Please feel free to post any questions! PS.... Just a few teaser shots, as I dont want to give too much away before I gloss and decal it.
-
Do NOT wrap models with cling film as a mask!
tom271282 replied to tom271282's topic in Modelling Tips
Well, firstly, I left it on for much more than 24hrs, and secondly, the environment here in Hong Kong is exceptionally humid despite the use of Air Con etc. Guess its all good learning, though right now I'm a touch annoyed! -
Do not do this!! I have just ruined a Concorde that I spent ages getting a pristine white finish on, because I used cling film to mask most of the body whilst painting the BA Landor motif on the tail. Due to the humidity, water must have ingressed the gloss paint (despite leaving it in the open to cure for 3 weeks) and caused the skin to bubble. This is doubly annoying as believe it or not, it is the second Concorde I have ruined! The first got warped when I used the wrong glue, and now this one is ruined due to using cling film. So please don't repeat my mistakes, and use another (breathable) material for your masking!! Cheers....