


tom271282
-
Posts
173 -
Joined
-
Last visited
Recent Profile Visitors
1,597 profile views


tom271282's Achievements
")
New Member (2/9)
118
Reputation
-
1/700 HMS Prince of Wales Flyhawk Deluxe
tom271282 replied to Gisbod's topic in Ready for Inspection - Maritime
Incredible, puts my KGV to shame. Wonderful modelling. -
1/48 RAF Jaguar GR1 (Kitty Hawk)
tom271282 replied to tom271282's topic in Ready for Inspection - Aircraft
Trevor, I fixed each half of the nose section to the respective fuselage half, to create a conventional kit then when all the gubbins was inside buttoned it up in the usual fashion. I think this approach helped to align the halves better, especially the arch behind the rear of the cockpit. Shape wise, I would say the overall model is pretty good. As previously mentioned, the pylons are the French sort so need butchering a bit and the noses blunted off. The air conditioning inlet is about twice the height it should be and so I filed that down to preserve the top line of the aircraft. Other than that, I felt it was pretty close to the drawings I had. Fit wise however, not good. The main issue is the fuselage halves which on my kit seemed warped and mishapen. Adding the vertical supports inside the fuselage as I showed above really helps to push and squeeze it into the right shape. Also added styrene strip inside to give a lip along the bottom join to assist, but still needed a lot of filling to get it level. The panels that you can display open are too small, so work is required to get them to fit right. Generally the fit is poor. Nothing really goes together simply, overall a big of a dog, but I almost prefer kits like this because I have to think about it, and come up with solutions. Maybe I'm just weird.... Thank you all for the really kind comments, coming from someone who rarely posts here, its lovely to get the support. -
1/48 RAF Jaguar GR1 (Kitty Hawk)
tom271282 replied to tom271282's topic in Ready for Inspection - Aircraft
Thank you - I muddle through most of the time - a quick build for me, just 4 months or thereabouts! Yes, the panels were a poor fit, though not awful and to be fair I could have done a better job with them. The main issue was the fuselage. I added vertical structural supports, which corrected the fuselage shape and also squeezed the wing roots in, which meant less filling and sanding. Still a lot of filling and rescriving overall though, and I could have done more but just wanted to get it done. -
1/48 RAF Jaguar GR1 (Kitty Hawk)
tom271282 replied to tom271282's topic in Ready for Inspection - Aircraft
Thank you. Edited now, should be bigger.... or simply click on the image for full size. -
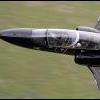
Hi Everyone, Little while since I last posted. But anyway thought I would share this completed 1/48 KittyHawk Jaguar GR1. The kit is well documented, but needless to say there were fit issues. The instructions were useless (some parts not even called out so I think I may have missed a couple of bits on this build) and the smaller decals broke up. Anyway, it looks a bit like a Jag, so I am happy with the result. I used aftermarket decals, drop tanks and sidewinders from Flightpath, a new seat, new pitot probe, and I also modified parts that didnt look right, like the massive air conditioning inlet. I'm sure I did some other stuff too, but I can't remember. Painted in Tamiya colours, mixed to get a 'correcter' shade and finished off with generally matt Alclad varnish as I wanted it to look war-like. Hope you like it.
- 29 replies
-
- 60
-

-

-
You nailed that Julien.
-
Spent ages getting a super smooth gloss white finish on a 1/144 Concorde, and was very pleased with the result, having left it to cure for 2 weeks, due to the fragile nature of the gloss white. Masked the fin for spraying BA Landor logo, and decided to wrap the rest of the model in cling film to protect from overspray. Left the model for a week or so, come unwrapping time, all the gloss white had bubbled due to the exceptionally humid environment in Hong Kong! I have to admit the model got a bit broken and ended up in the bin. I do still have the completed engine pods though,... every cloud....
-
That sounds rather strange, as I think they are superb and have never had an issue with them. What brand acrylic do you use them over? Do you spray thickly or thinly? I use over Tamiya, and get superb results every time.
-
Hello, Just a little update on my paint situation. In the end, I decided against using this particular LifeColor colour. I didn't want to risk ruining the model with a lumpy paint finish. So, with the help of my better half (I think she can see colours better than me!) I mixed up, by eye the correct shades of colour. About 98% white with a couple of drops of blue and a drop or two of RAF Green. This gave the correct shades (to our eyes). All in my usual Tamiya, so went on like a dream. I'll post some pics in RFI when its done and you can see if I got it right. Surprising how little colour you need to add to the white to get the subtle Cathay shades. In conclusion, I would consider using LifeColor again, just because so many people swear by them, however in this particular shade (RAAF Sky Blue) I'm afraid its a 'no go' for me. TTFN
-
Hello all, Thank you for the kind replies. Mark - I thoroughly cleaned the airbrush prior to use with warm water and soap to try to ensure that everything was free of thinners or anything else that the paint could react with, but still have the same problem. I don't like blaming the product, but in this case (RAAF Sky Blue, a very light colour) perhaps the paint is behaving in a similar manner to the white that Kev mentions. I shall try thinning with future, as I have two pots, one of which is still as bought so to speak, so Klear might settle it down a bit. Its slightly frustrating as I got the paint especially for a Cathay Pacific A340 I am doing. Looks like I might have to try and mix my own using the Mk1 eyeball instead! I'll keep you posted on any developments. TTFN
-
Hi All, I know there have been a few threads about this, but I cannot get on with this paint at all! I have airbrushed all sorts in the past and I haven't really had a problem, even xtracrylix have been mastered. The paint comes out 'lumpy'. It seems to have bits in it, which may be air bubbles which means the paint doesn't lie flat, and looks rough. I have tried adding flow improver, I have thinned it, and I have tried high or low pressure, but whatever I try, I cannot get it to lie flat! What am i doing wrong?! Cheers Tom
-
1/32 Revell Lynx- Conversion to AH-7
tom271282 replied to Lynx7's topic in Ready for Inspection - Aircraft
I don't normally like helicopters, too many moving parts for my liking. However.... this one is superb. Great detail, love it!! -
Really superb modelling, and terrific seascapes. I am very tempted to have a go, but will not get results as good as you have.
-
Airfix 1/48 Canberra PR9 1PRU RAF Wyton mid 80's
tom271282 replied to tom271282's topic in Ready for Inspection - Aircraft
I used araldite to fix the main gear in place, which makes it nice and secure. That coupled with brass rods to attach the hubs to the gear makes it stable enough. That said it still weighs a ton! Thank you for the few kind comments, although I build for myself its also nice to get a modicum of recognition for ones efforts. -
Most unusual, I like it!!