

AndyP
-
Posts
235 -
Joined
-
Last visited
Content Type
Events
Profiles
Forums
Media Demo
Everything posted by AndyP
-
So shall we begin with the obligatory 'out of the box' shots Just mocked it up to give an idea of size and to show some of the PE i have for the kit, i also have the paint masks but before i get any furthor i need to figure out the lighting system so gonna spend tomorrow working out what lights i need and finding the best options for that You see all those itty bitty teeny windows? yeh i need to mask off ALL of them Im using the Nacelles from an older version of the same kit which is not made from clear plastic since the nacelles probably have the most 'lights' in them and will be easier to light proof this than the clear plastic these allow me to hide the cables which run up the pylons to the Nacelles These replace the Phaser Strips and Transport Transmitters Replacement bridge and ten-fwd windows So there we have it i assure you this is going to be a LONG build, dont expect this done before feb if at all till next time
-
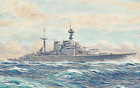
you could pick up one of these for about £6 http://www.britmodeller.com/forums/index.php?showtopic=57649 a much later ship than the victorian era, but if you paint her up right no-one will know, and will really add a sense of scale to the Tripods, i used a KGV CG model in that picture i posted back in the pre-build chat
-
Love the ole Aurora's. 2nd fav ship in B5, after the Omega's, i built one of the Warp Resin Omegas a few years back, never did a Fury tho, maybe ill have to go check out the ebay.... (oh and i vote for 'Free Mars') http://www.parallax3d.com/html/babylon5/wingart.html
-
Actually i think the 6ft model was about 1/350 i shall post some kit pics in a wee bit
-
you should see if they do a 1/600 or 1/1200 IJN Mikasa kit and do it up as Thunderchild looking forward to seeing how this comes out , might go put the album on now actually
-
True Mark, but the science bit can trip people up, for example a WWII Avro lancaster Bomber painted in say Imperial Japanese colours might not qualify as sci-fi, but is certainly 'what if' BUT an Avro Vulcan Bomber painted up in the same with a story about how it hit a time vortex and ended up in Japan would :)i think thats the clarification don was asking about
-
No, (lol tho i do have a 3ft long 1701 model) during TNG they had 3 studio models, the largest of which was 6ft Long (the other was 4ft and had more detailing and a small 2ft model) the reason i say the 6ft model is i prefer the smooth lines of the ship http://www.mutara.net/Christies/EnterpriseD.html that is what im attempting to make (tho the 1/1400 model i am making is still gonna be pretty big heh)
-
Thanks Don! yeh i pretty much had something like this from the start, remember that picture way back on Page 1? i think the thing that helped with the bow wave was adding the water cascading over the sides before hitting the breakwater, i did that by pulling out really fine pieces of coton and gently dabbing some clear varnish to help keep them in place, i might still tweek the "wet water" over the fo'castle however. Once i added the masts and rigging it really was like crowning a king, it just suddenly set the whole thing off, and i have to say this, after all the stress about rigging, once i got into the swing it was probably my most enjoyable part of the whole build! really therapeutic and looks fantastic and given me the confidence to get back to finish HOOD I dunno about winner tho, i know a certain Aleutian island Diorama i wouldn't want to bet against might do ok if we have categories for ships/aircraft/tanks tho thanks again man!
-
So, made a base over the last week for the ship (with help from me dad ) just out of of some exterior ply and some Ronseal deep mahogany stain aaaaaaaaaannnnd Shes Done!, couple of minor touch ups to do, and i need to add the flag decals etc, but yeh, pretty much done I wanna get a little plaque made up to bolt on the side Really enjoyed the build, and being part of the group build, many thanks to everyone who cheered me on through the dark sides, sorry the updates kinda tailed off towards the end but it was all lots of fiddly bits which wouldn't change much in the overall apperance but its gotta be done anyway im gonna go have a drink and clear the desk before starting on the next build which will be the USS Enterprise in the Sci-Fi group build if anyone has any questions, or wants any close up pics of anything in particular just lemme know till next time!
-
YAY! Finally! im still dead impressed with this one mate, think u did a really nice job and the weathering is spot on still would like to see those chains all added looking forward to whatever your next build is (or rather whatever build you finish next )
-
SO, Rigging, How 'tis done firstly i shall direct your attentions to the work of Messers Jim Baumann over at ship model forum who is far far far more talented than I http://www.shipmodels.info/mws_forum/viewt...f=4&t=37536 few free tips i can offer however PE-Yards - Dont bother with them, OR attach them to either the plastic part or some brass rod, otherwise any tension you get on the rigging will simply distort the PE (which brings me to another thing about not having to use ALL the PE on a fret, think about what ure gonna see and how it will be presented and dont bite off more than u can chew, dont feel u need to use everything and you will enjoy the build more) so yes, anyway build your masts and get your yards in place then you need to make some stretched spru as pre Jim Baumanns guide above (i use some black plastic spru from an old airfix lanc which gives me nice black lines once you have some spru cut it down (do NOT cut it to length cut it longer) I affix 1 end of the stretched spru to the fore yard with a teeny tiny dot of matt varnish, i do these for all the lines going across the masts, and i have something that looks like this I let that dry for about 30 mins and then do the same to the aft yard, do not worry about pulling it taught, just get it to its more or less straight across the ship, dont worry about any over hang just now, you should have somthing like this now for the genius bit (all credit to Messers Phil Reader for this tip) heat a scalpel blade with a lighter for a few moments (it doesnt need to be red hot or anything) and WITHOUT TOUCHING THE RIGGING hold it under the stretched spru, and the lines will magically become taught! it might take a few goes to get them properly nice and straight and if you touch the spru its going to break and your going to get sweary, but you can just replace the line you should now have this you can use the same technique for the lines going from the deck to the yards, just be careful when trimming the excess you doing accidentally cut the other rigging , i have to say its pretty sturdy again as with most of the things on this build its the first time ive evr attempted it and im really thrilled with how its come out any questions let me know ill be happy to answer, all thats left on KGV now is a few fittings and a base, ill post some better pictures tomorrow showing the ship with her rigging and possibly a White Ensign if i can get it on properly
-
Hola folks Just thought I'd start the thread now, wont be starting the build till i've finished my pacific War Build, but took a picture of the Box at least This is the Round2Models 1/1400 NCC-1701-D a re-issue of the old AMT kit however it comes in Clear Plastic to encourage you to Light the thing....so yeh muggins here will be attempting to Light this. my goal is to re-create the 6ft Studio model and once complete post a Composite picture of the ship Ive already purchased the DML part PE phaser strips and Transporter Receivers and the Paint masks, im just deciding on whats the best Lighting solution, im also aware im going to end up masking about a bazillion windows not to mention sanding back all the horrendous raised panel lines anyway will start this properly once KGV is finished, Till then
-
just for you Don I deliberately accidentally on purpose broke some of the main rigging giving me the perfect opportunity to take some pictures as i Re-Rig its insanely difficult to take pictures as im doing it but once ive done ill upload a few pics with a explanation of what ive done so out of interest what Battleship you getting from santa
-
Yeh I'm with Don, B sounds cooler (and probably a bit easier heh)
-
The Thousand Mile War - Amchitka, Spring 1943
AndyP replied to Bertie McBoatface's topic in Work in Progress - Aircraft
I have to say Don, the filled spinner is really effective, certainly more so than i thought it would be, it really give the impression of the engines going at a rate of nots, and the guy with his arm out is really effective, its really come together nicely, i cant wait to see the next step, sorry I've been quiet, im not dead or anything, just work gets in the way (as u no) also im rigging KGV which is really tedious and bloody time consuming hehe keep on course buddy, fight the good fight! -
That is pretty damn awesome mate, your best yet IMHO! got to be the Ark next, iirc you havnt done a carrier to date, and lets face it, what ship is more iconic for 'Force H' than the Ark eh;) plus i wanna see you scratch building 2 dozen string bags top work!
-
SHUSH YOU! i already have 3 ships on the go and an eye on a 1/350 Dreadnought! (not to mention the 1/200 Hood lol) ah well *le sigh* better go clear some more space in the stash
-
Im gonna wait for some PE and Wood Decks to be released but yeh ill be picking one up, gonna do her in Neutrality Patrol, maybe a Diorama of the Grand Harbour at Malta...
-
Id say pick a ship your interested in and do that any of the kits will make a nice models if your willing to put the time and the PE into it, but if you arent really interested in the subject eventually you loose interest and it starts slipping down the pile, heres an example of an Airfix Warspite which has been done up really well also included a OOB picture of the kit http://www.modelshipgallery.com/gallery/bb...pite-index.html
-
Sci Fi and Space and Super Heroes GB
AndyP replied to AnonymousDFB1's topic in Future Group Build Archives
tHanks guys, yeh frankly i think the Tripods were the only thing they got right in Spielbergs version, they looked and 'sounded' right, one day ill make a proper version of the book complete with HMS Thunderchild BTW a suggest for a stand-in HMS Thunderchild is the 1/350 HIJMS Mikasa kit by Hasagawa, its a Pre-dreadnaught battleship and with little tweaking (or even just the right paint scheme) can be made to represent a British pre-Dread (i know the Book says Thunderchild is a Torpedo-Ram, but i prefer to think of her as a Pre-Dread ala the Jeff Wayne album heh) a /1700 would work even better if u wanna really have the Tripod lord it over the Ship....dammit now you got me wanting to do one too! No my Enterprise will be enough to cost me my sanity -
Sci Fi and Space and Super Heroes GB
AndyP replied to AnonymousDFB1's topic in Future Group Build Archives
I did one way back when http://andy3e.deviantart.com/gallery/4379161#/d135yl4 course thats CGI not plastic and i dont thing that counts heh -
The Thousand Mile War - Amchitka, Spring 1943
AndyP replied to Bertie McBoatface's topic in Work in Progress - Aircraft
You know whats the most impressive thing, and its all very impressive, but the MOST impressive thing? its how damn organised you're tools seem hehe, those cockpit are works of art all by themselves, and the P-38 is looking splendid! quick question, what is the stuff you used to mask over the canopies? and other clear bits? i remember it looking like some kinda PVA glue, im gonna be tackling a subject with a LOT of windows next and i dont fancy cutting out a bajillion masks out of tape -
Thanks Chris, Don, the photos really dont do it justice, ill try to take some beter ones tomorrow as for me being brave to do this in public, well to quote Monty Python and the Holy Grail its been great learning all this stuff while sharing the techniques as i go along, i cant wait to get Back to Hood and do the waterbase for her (shes at anchor however so the waves wont be so dramatic till next time oh and we all need to Convince Tinners to enter his new HMS Repulse into the Build, C,mon Jas!
-
Sci Fi and Space and Super Heroes GB
AndyP replied to AnonymousDFB1's topic in Future Group Build Archives
I have a 1/1400 USS Enterprise -D ive been wanting to build as the studio model with Lighting, Really enjoyed the Pacific GB so i think once KGV is done ill give this a whirl, not i need to go order a Lighting kit and start drilling windows ! -
Hola all well i has not been idle over the last week, been working on the water and the 'splash' to see what i could get. My good Friend Jason (Tinners) came over on the weekend and we did some experimenting and this is the end result, i have to say the pictures really dont do the water justive, when you see it in person and if the light catches it just right it looks really convincing! the wave itself is cotton wool which i combed down to sheets then sprayed it with clear lacquer to give it some rigidity to allow it to be shaped a little, but still retain the fibrous qualities which suggest 'spray' no the deck we added some watered down acrylic gel medium and then using an airbrush 'chased' the gel back to the breakwater, i have to say this looked even better when it was drying with the white-tops which really suggested water churning over the deck, im gonna try drybrishing over this to get some of that back, it also allowed some of the gel to fall between the railing and over the side which looks really good in the end im pretty happy with what i got, please remember this is my first attempt at anything like this ever, so largely its been a case of try and see heh might be some more tweeks here and there, im currently building the 18 flipping AA machine guns and all the repetative fiddly bits before moving onto the masts till next time