

tc2324
-
Posts
1,450 -
Joined
-
Last visited
-
Days Won
3
Content Type
Events
Profiles
Forums
Media Demo
Everything posted by tc2324
-
How to mix fun and terror when building a kit........,
-
Spent an hour experimenting with ideas on how to get the rain water staining done on this and the idea I went with was mixing some Tamiya Rust from one of their weathering kits and watering it down. I then put a drop on the panel I wanted to look a little weather beaten and let gravity do it`s thing. Once dry, this was the result. What do you think?
-
Admittedly not much done on the kit as such, but I have revisited the base for a better look using a new bit of fur and a nicely sized frame.
-
Another weekend update with more details added including the painted on roundels and blue cross.
-
A weekend update on the Harrier dio. It`s starting to come together although I would say that even at this early stage I regret no putting in enough `bend` on the fin. It really should be more a right angle. Oh well, can`t get everything right so it will have to do. Still lots to do.
-
A series of shots showing the progress so far. The last two shots show the choice of the spray paints used as the base colours. These will all be weathered down in due course to better represent faded and sun bleached paint work. If anyone has ideas for fading out the roundel decals, then I`d be happy to hear your ideas/suggestions. More soon.
-
Yuri Geller`s ghost came to visit last night.......... 😉
-
Managed to grab a bit of time yesterday and this morning working on the seat and cockpit areas making them look weather beaten and worn. Drilled some holes for missing instruments and chipping to look like the primer or paint looks worn away. Anyway, ...... see what you think? More soon.
-
Great choice doing the `J` in 74 stripes. 👍 Depending on which airframe you do, note that ZE350 did not have the RWR on the sides of the intakes like all the others and research which aircraft kept their original US shade of grey. The link below may be of some help.
-
Not going to bother filling all the rivets goggsy, far too many and I could imagine that that kind of job would be soul destroying. 😉 I can live with then and hopefully the dio itself will take your eye away from the issues. Majority of the base completed today starting off with cutting the board to size and adding strip`s of double sided sticky tape........, ....... which in turn led to the fur being placed on the board then the the operation moving to the garden for spraying. Thank god I`m using `grass green` paint, SWMBO didn`t notice a thing.....! Once dry the base ended up looking like this......, ....... and with the `kit` in place, these following pictures may give you a better idea of what I`m trying to achieve. More soon.
-
Coming back to the Harrier dio, this morning I took delivery of some grass green spray paint, a A2 cut of teddy bear fur and some wood board in preparation of making the base. Never used teddy bear fur before, but I hear it can give you a great result if you want to simulate long or uncut grass so it will be an interesting experiment. Just need the weather to cooperate before moving forward with it.........
-
Spent the last couple of days looking after the missus while she recovers from her 4 hours and 40 minutes London Marathon triumph, so in between ice packs and cup of teas/coffee`s, I`ve managed to do the odd bit here and there. Photo update in no particular order....., I`ve started work on the seat using plasticard to make the seat a reasonable representation of the real thin as well as drilling holes on a few places to represent missing panels. The engine blades are dirty and weathered and the wing section with dropping flaps are mostly done. You will notice that I`ve pretty much painted everything black and that`s simply because when your looking inside these wrecks, everything comes across as black and the black will add to the darkness of the inside of hulk in the finished article. More soon.
-
Had the day off today so managed to crack on with a few things and experiment with some ideas regarding this build. First though I apologise for the high number of photo`s in this update but felt it necessary to highlight what I`m trying to do and it may also help or inspire someone else who may be in the middle of chopping up a 1/24 Harrier...... So as mentioned in the previous post, drill, drill bit, file and plasticard were put to good use to create the little intake doors around the main intake. (really should find out what they are called....) It`s all a bit rough and ready at the moment, but I`ll tidy up the edges in due course and this is just to give you an idea of how I`m getting it done. Next are a series of pictures showing how I`m getting the tail to bend at a right angle. Luckily this kit comes with a tail unit for the AV-8 variant show I have used this as a test subject. First mark up the cut line and cut the half that`s the direction of the bend, starboard in this case. Then score a line on the port half but don`t cut all the way through. Next trim about 4mm off each of the starboard cut line half`s.......... ....... and then stick everything together so you end up with something like this....... You now have a tail fin that can bend to the required angle and after a bit of filler and a bit of paint, it`s a reasonable representation of what I`m after. Like I said this is all very experimental and done of a budget, so I`m open to suggestions before starting on the real parts. more soon.
-
Thanks chaps. Peter, I was informed, (not confirmed though), that airframes are not burnt anymore at Manston, something to be with environment issues in the area. They have one of these huge metal aircraft looking containers for the fire practice. I believe they use smoke bombs on the actual airframes to simulate fire. Most airframes, including the huge Nimrod, are just sitting there in the elements doing not a lot. Spent last night looking over the main issues that need to be planned and action. 1. Cutting off the nose, check. (Not a perfect fit admittedly but the great thing about wreck diorama builds is that you can get away with certain things. In this case the nose is hanging off so I don`t need it to fit perfectly). 2. Internal engine plastic all needs to be taken out. As seen in the photos the nozzles are missing and it`s just 4 big black holes. 3. Got to think about the tail bend to a near right angle. I have an idea so hopefully will be able to post the result tomorrow. 4. Intake intakes(?) need to be opened up. Requires a drill, drill bit, file and plasticard. Hopefully over the next couple of days I`ll be able to post the results. More soon.
-
Needing a break from the Norwich project, I have chosen to start one of my 1/24 projects. This will be a first for me and a long term project, something to work on between Norwich builds but hopefully ready for display at the 2019 Newark Cockpit Fest. I obtained this kit quite cheaply, £25 IIRC with the original plan to build this alongside a 1/24 Hurricane and Typhoon and then display all of them in flight on a central plinth. It was at this point that the drugs wore off and reality set in as to where the hell I would store such a display A centerpiece for the dinning room table would no doubt mean future dinners being eaten on our laps and SWMBO giving me `that` look for possibly years to come. So I have held off getting the Hurricane and plan to build the Harrier and Tiffie as separate entities. I`ll discuss plans for the Tiffie when the time comes as this thread concerns the Harrier GR.3. So first a couple of pictures and this gives you an idea of the scale, 1/24 v 1/72 in the first photo and then the 1/24 Tiffie v 1/24 Harrier. It was quite surprising to see that the Harrier and Tiffie are quite similar in size and makes you realise how large the Typhoon was and how small the Harrier GR.3 is despite the 20 years that separate both designs. So what exactly am I going to do with this Harrier. As mentioned I originally had the idea of an in-flight, bog standard build, possibly dropping a bomb or recreating a Falklands War ejection scene in 1/24 adding the aftermarket detailing sets and really going to town on as much detail as possible. It was when I googled said aftermarket sets that I realised that I would be paying out possibly 5 times the amount I spent on the kit itself! While I love modeling as a hobby, I refuse to take out a second mortgage on it. So plan B sprung into action and while it was a plan B, it`s more a Plan A- as it`s a modelling challenge right up my alley and far more cost effective....., kinda. (Dio base and bits will have a cost implication). So last September I was lucky enough to get a visit to the Manston Fire School to view the various airframes, especially ZE360. But I was also quite intrigued with the other residents and always thought this Harrier, (XW768), would make for a decent diorama. It was one of three Harrier GR.3`s delivered to Halton as the last flying examples in the RAF and used for airframe training before ending it`s days as an non destructive airframe for the fire school. I`m assuming non destructive means they can not burn it?? More soon.
-
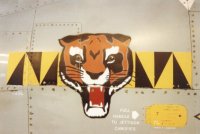
Calling this done....., ....... what Su-27`s leased by the UK from the Ukraine might look like in the Aggressor role operated by 74(F) Tiger Squadron, circa 2020.
- 1 reply
-
- 13
-

-
1/144...??? you trying to make me go blind....??
-
No particular action Nick, I just used codes that are known to have been used on aircraft at the time. Luckily it is documented that serial numbers were painted over for a short time so that saved me a little bit of extra research. Malan is well known to have flown `A` a number of times and regarded it as his personal mount, although other senior pilots did fly it on occasion IIRC. Well done, your the first to notice the roundel size isn`t completely accurate and the Sqn used the 35 inch size which was the size below the one`s depicted here. This build was on a tight budget so used the kit`s roundels to keep the cost down. Happy to hold my hands up to that one. By August 1940, 74`s Spitfire undersides had been changed from the black/white to Sky, so again, this is a little open to interpretation by the viewer. Thanks again all for the great feedback.
-
2mm clear rod with cotton wool attached in layers. (The rod attaches to the missile and gives the cotton wool something to hold on to). Hair spray to stiffen it all up and then a quick puff of rattle can grey spray to give it a smoke effect. Very basic and I`ll still learning.
-
Michael, the rod is clear acrylic which you can obtain from a number of suppliers, (mine was from eBay). This rod was 4mm x 300mm for the 1/72 Spitfire`s and I very carefully drilled the holes into the model once the main build was completed by prior to painting. Hope that answers your questions? Again, thanks all for the kind comments. tc
-
Thank you again for the kind comments all.
-
That`s correct, based out of Tengah in Singapore.
-
I`m afraid my Photoshop skills are not that good but happy for someone else to try. Thank you all for the comments.
-
Final display for this years 74 Sqn Association reunion to go with the `J Cabriolet` and `Red Top` builds depicting Sailor Malan and `A` flight breaking into a dive to intercept bandits during the Battle of Britain. (The prop blur is courtesy of some basic photo editing)
- 38 replies
-
- 83
-
-
