

zaxos345
-
Posts
297 -
Joined
-
Last visited
-
Days Won
1
Content Type
Events
Profiles
Forums
Media Demo
Everything posted by zaxos345
-
 Thank you very much sir, no time to make an in progress build then haha, but i am to for the next one!! Really appreciate, John
 -
stage of weathering... Not the best presentation... Hope you like it!! John
-
Aluminium paint, preshade and 2 stage chipping (i wanted to try it out!!) Gloss varnish (MRP) and decals on ....
-
closing the fuselage... I fixxed in position the vector resin wheel wells and glued the wing upper and lower halves!! Later i cut out the ailerons in order to place in position the resin ones! And some riveting... ....
-
Fuselage work... Regarding the cockpit i totally changed the sidewalls, following photoes, and using Eduard PE ans some scratch build items. ....
-
Good morning gents, This is my latest build. It was a parallel build to my 1/32 A-7H Corsair So it took me some time to finish it!! The basic kit is the Hasegawa one including some goodies to make it better as: - Ultracast 48169 - Curtiss P-40N Seat - Ultracast 48157 - Curtiss P-40N Wheels, Diamond Tread - Ultracast 48153 Curtiss P-40E-N Flared Exhausts - Vector VDS48-107 - P-40E/N Wheel Wells with Canvas (for Hasegawa kit) - Vector VDS48-109 - P-40E/N Control Surfaces (for Hasegawa kit) - Eduard 49333 interior - Master Barrels straight pitot tube and aiming pin - Spare Fundekals insignia - Exito decals for the Mary Lou - HGW canopy masks I started by changing some fuselage details not suitable for N model!! As you will later notice, after closing the fuselage, I also drilled new position lights based on some really good drawings by Jumpei Temma. I used the same ones for riveting!! .....
-
1/32 Trumpeter A-7E converted to Hellenic A-7H
zaxos345 replied to zaxos345's topic in Ready for Inspection - Aircraft
Thank you very much for your nice words!! John -
1/32 Trumpeter A-7E converted to Hellenic A-7H
zaxos345 replied to zaxos345's topic in Ready for Inspection - Aircraft
Thanks a lot Viper! John -
1/32 Trumpeter A-7E converted to Hellenic A-7H
zaxos345 replied to zaxos345's topic in Ready for Inspection - Aircraft
Thanks a lot Terry!!! John -
Thanks Bruno! John
-
Amazing outcome!!! How were the decals? Have you noticed any problem with the resolution of the printing after pealing them off? John
-
Mirage 2000-5F & Mirage 2000D - 1/32 Kittyhawk
zaxos345 replied to rom1's topic in Ready for Inspection - Aircraft
Amazing!!!!!! Jaw dropping builds!! John- 48 replies
-
- 1
-

-
- Mirage 2000
- Kittyhawk
- (and 1 more)
-
1/32 Trumpeter A-7E converted to Hellenic A-7H
zaxos345 replied to zaxos345's topic in Ready for Inspection - Aircraft
Thanks a lot Malcom!!! Next is 1/32 Tamiya P-51d 😃 And unfortunately I did not!!! John Thanks a lot!!! -
1/32 Trumpeter A-7E converted to Hellenic A-7H
zaxos345 replied to zaxos345's topic in Ready for Inspection - Aircraft
Thanks a lot!!! I am very sure you would have loved it!!! Especially the low profile!!!! 😃 -
1/32 Trumpeter A-7E converted to Hellenic A-7H
zaxos345 replied to zaxos345's topic in Ready for Inspection - Aircraft
Thank you all for your nice comments!!! -
1/32 Trumpeter A-7E converted to Hellenic A-7H
zaxos345 replied to zaxos345's topic in Ready for Inspection - Aircraft
Thanks Selwyn! John -
1/32 Trumpeter A-7E converted to Hellenic A-7H
zaxos345 replied to zaxos345's topic in Ready for Inspection - Aircraft
Thanks a lot!!!! John -
1/32 Trumpeter A-7E converted to Hellenic A-7H
zaxos345 replied to zaxos345's topic in Ready for Inspection - Aircraft
Thanks a lot!! John -
1/32 Trumpeter A-7E converted to Hellenic A-7H
zaxos345 replied to zaxos345's topic in Ready for Inspection - Aircraft
Thanks a lot Kevin!! John -
1/32 Trumpeter A-7E converted to Hellenic A-7H
zaxos345 replied to zaxos345's topic in Ready for Inspection - Aircraft
Really appreciate your comments guys!! Thanks a lot!! John -
1/32 Trumpeter A-7E converted to Hellenic A-7H
zaxos345 replied to zaxos345's topic in Ready for Inspection - Aircraft
Thanks a lot Giannis, for your comments and help!! 😀 -
1/32 Trumpeter A-7E converted to Hellenic A-7H
zaxos345 replied to zaxos345's topic in Ready for Inspection - Aircraft
Thanks a lot for your nice comments!! John -
1/32 Trumpeter A-7E converted to Hellenic A-7H
zaxos345 replied to zaxos345's topic in Ready for Inspection - Aircraft
Thank you very much!! It is a real engine access panel from the rear part of the fuselage screwed down to a wooden base!! John -
1/32 Trumpeter A-7E converted to Hellenic A-7H
zaxos345 replied to zaxos345's topic in Ready for Inspection - Aircraft
Thank you very much!! Yes, everything that zacto had prodused for the model!! John -
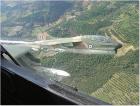
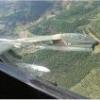
Good morning guys, my latest build. A project that i have been working on for about 7 years came to an end!!! I think the only 1/32nd scale A-7H ever made! (that means a lot of minor but distinguished differences from both A-7E and -D) My ''ride'' for almost 14 years, 2000 hours in her cockpit!! Dedicated to 345BSqn, my second ''family'' Hope you like it!! John
- 39 replies
-
- 76
-
-
