


HBBates
-
Posts
187 -
Joined
-
Last visited
Content Type
Events
Profiles
Forums
Media Demo
Posts posted by HBBates
-
-
I thought this deserves it own post ..particularly on a UK site because its very interesting
I found this on a website of a UK Injection Moulding company today... was this the hold up?.. so much for the issues being shipping
Airfix went with a new uk vender to do the molding?..(And I highly commend Airfix bring job back to their home country.. may this kit be a big seller)
=================================================================================================================
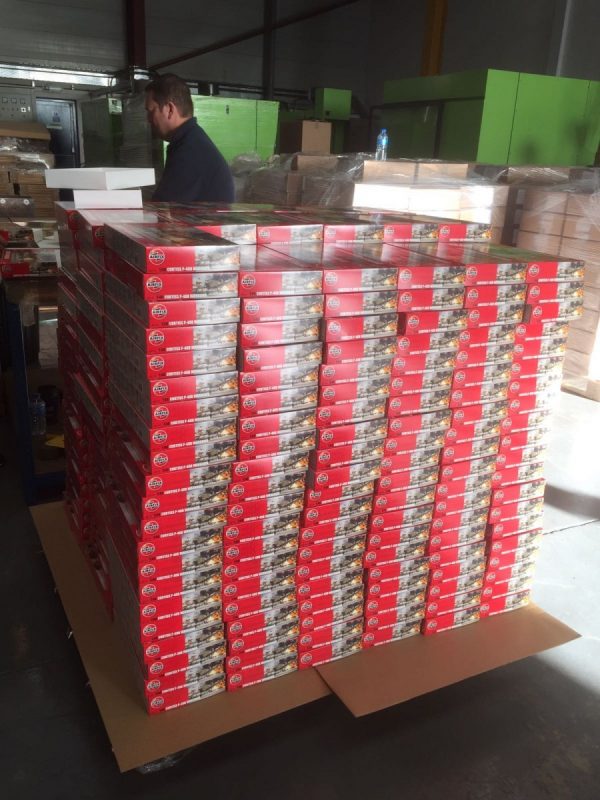
Curtiss P-40B Warhawk – Ready to Fly!
We are the proud manufacturers for Airfix of the new 1:48 Curtiss P-40B Warhawk! The first Airfix glue kit production in the U.K for fifteen years.
The kits are all boxed and ready to fly out the factory!
http://www.plastch.com/curtiss-p-40b-warhawk-ready-fly/
-
 10
10
-
-
On 10/21/2016 at 0:59 PM, Nick Millman said:
Hi Hume
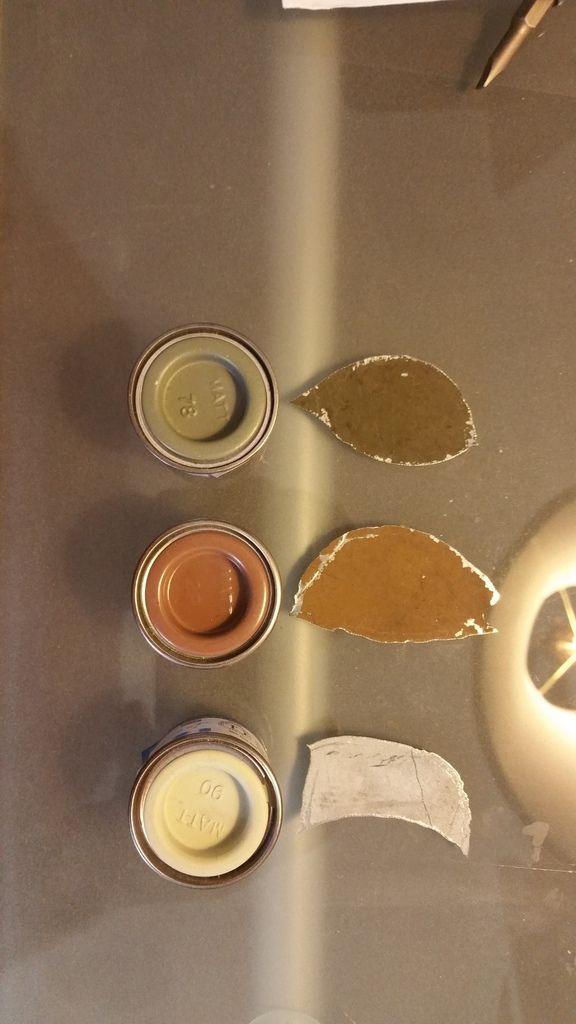
To measure the paint colour a sample about 5cm x 5cm is sufficient but it will depend how much surface variegation there is as it might then be necessary to have several samples. Better to have the paint film still on the substrate if possible with any underlying primer intact rather than scrapings.
Regards
Nick
Nick I got skin samples of original Tomahawk skin, this is one that was recovered out of Archangels some years back they are still in original color. I really wanted to get more but this is the best I could do I don't know if these samples will work.. I can mail them to you if you email me your address I would like to get them back when you're done if possible...
note these are from the stabilizer skin and in speaking to the gentlemen I got this from he was actually at archangel and recovered the part and described it as laying on the ground with the light sky side up all those years and even he thought this sample was bleached out grey and didn't show the blue green he had seen on other pieces
-
5 hours ago, Nicofigueira said:
Hello, can anyone help me with reference about this plane, I need photos, in special from the cockpit, blueprint, etc.
Thank you
Actually you are correct in calling it a P40B Warhawk...
Tomahawk was the UK name for the Curtiss H81 and Kittyhawk was the UK name for the Curtiss H87
In US service the Curtiss H81 (P40 to P40C) and H87 (P40D to P40N) was a P40 Warhawk.. The US never use the UK Tomahawk or Kittyhawk names for a P40
As for a reference, first stop is free.. go online to the Google Life photo archive http://images.google.com/hosted/life
search Curtiss
http://images.google.com/hosted/life/6b152ab6413c3e6d.html
and Curtis
http://images.google.com/hosted/life/6cfc0832ed0fee24.html
on both look to the right and click on the Related images:
If you looking to pick up a book, Dana Bell's Aircraft Pictorial No. 5 - P-40 Warhawk is a good start
https://www.amazon.com/Aircraft-Pictorial-No-P-40-Warhawk/dp/0985714948
and your welcome look in my photo bucket
http://s225.photobucket.com/user/humebates/library/
PS I see your from I Urugury..I loved it down there...I did some computer network work three years ago at what was Four Season Resort in Carmelo Uruguay(oddly it was over the US 4th of July week, coldest 4th I've ever spent). I just wish I brought back a Mate cup
-
2 hours ago, Nick Millman said:
Hi Hume
To measure the paint colour a sample about 5cm x 5cm is sufficient but it will depend how much surface variegation there is as it might then be necessary to have several samples. Better to have the paint film still on the substrate if possible with any underlying primer intact rather than scrapings.
Regards
Nick
Well I will see what I can get --if anything-- as I never asked for any parts yet...I'm assuming the under-surface color is the big thing as that seems to always be the big debate
I might be able to get a whole skin panel from under the tail and send to you to test (see photo below.)..If its not destructive of the physical part and I can get it back (I think they they use as replacement skin templates )
As you can see from the photo below.. it would be a nice large sample with paint film still on the substrate, underlying primer intact . You can seen that paint is applied to skin with that famous Curtiss "blue tint medal" .. so you should be able to get a good idea on the whole finish process
-
On 10/3/2016 at 6:17 AM, Nick Millman said:
Tomahawks were delivered in TLS but most received Sky spinners and fuselage bands (as required from 12 Dec 1940). As most of the squadrons were designated Army Co-Op they remained in that scheme for longer than Fighter Command's day fighters which has caused some confusion. Only the aircraft of those squadrons committed to initial offensive operations over France (26, 239, 268 and 400) and temporarily detached to Fighter Command for tactical training were re-painted in DFS and the majority of RAF Tomahawk squadrons which were still part of Army Co-Op Command remained in TLS until the spring of 1942, only then being gradually re-painted to conform to DFS by Aug 1942. The relevant period AMOs and DTDs are ambiguous as to the Lysander-replacement "fighters" serving in Army Co-Op squadrons.
Monochrome photographs are not a certain method to differentiate DFS from TLS but the tone of the codes sometimes provides a clue.
In November 1942 an emblem for all RCAF squadrons operating overseas (e.g. outside Canada) was approved but it cannot always be spotted in photos. It was an 8" diameter roundel with a half-inch outer circle of dark blue and an "RAF blue" centre containing a red maple leaf. It was to be applied on the port side of the fuselage forward of the leading edge.
Nick
Nick
I'm going to be seeing my buddy with the all the Tomahawk parts still in original colors... I know you spoke of being to analyze the color from samples ...If I can get some skin still in original color... what do you need.. how big?.. or would paint scraping do?.. or photos with some kind of color control sample ?...fyi.. these Tomahawk parts are from the first Russian recovered airframes.. so should be Curtiss colors ..not RAF repainted
-
6 hours ago, Fernando said:
Hi, HHBates,
One more thing: from the pictures you attach... the canoe in the B/C really looks deeper. Though the attitude of the planes is different (the B/C looks to be just a bit off away to the viewer; the E looks more in a straight side view) the extreme rear looks almost the same; at the wings trailing edge just a bit deeper; and at the front, definitely deeper (in the E, it looks almost in line with the u/c fairing, while in the B/C -nothwithstanding the apparent "banking away"- it looks in line to the open u/c doors)
Regards
Fernando
With regards to the Keel (belly) fairing "the canoe" as you call it on the B/C really looks deeper....it not that the problem with the Mk1 eyeball..
After looking at in for some time I was sure that was not difference but could not prove... then BS_w found prove on the Keel (belly) fairing blueprints notes
On the blueprints notes for any given parts.. the will note the models that part is used on ...the Keel (belly) fairing blueprints have note showing early longnose and later shortnose useing the same Keel (belly) fairing parts
ar 2
Now be sure..when I talk of the Keel fairing the is that part that cover the under wing fuel tank bay ..back ..from web/spar2
The radiator outlet and fuselage gun shell shoot fairing ...the area forwarded of under wing fuel tank bay at web/spar2 to the radiator outlet...
This is unique to the early longnose ...vs .....the later short nose v1710..
But that same are is also unique on later short nose v1650 merlin version ... vs the short nose v1710..and vs the early longnose
-
9 hours ago, Fernando said:
Hi, HHBates,
Not going to argue the technical data you bring. Most impressive. However, most of it concerns the change from Model 75 to 81, and, as such, is irrelevant to the discussion exception made as precedent.
But the change is not just a power egg. The fuselage is deeper (at cockpit frames) in the B/C than in the D and subsequent. I mean "the distance" (or "fuselage height") between the cockpit lip and the top of the karman fairing. It is the same in the Allison Mustang when compared to the Merlin ones (except one experimental plane I have seen a picture; I seem to remember it was a British conversion). I wouldn't mention the quarterdeck windows because it can be considered a "cosmetic" difference (nevertheless a difficult one to reproduce in plastic!)
You acknowledge that change when you say: "... with basically a Hawk 75 fuslage to clean up up that waste space (and remove the now out of date fuselage guns ideas) .. with moving the engine down, we move the top engine mount down and take the opportunity to cut down the fuselage at the firewall.. this is above the fuselage datum line ..also the max width of the firewall is reduced 1 inch .. (again in got this from from my Curtiss Hawk war-bird rebuilder that has fuselage jig in his shop to build all three Hawk 75,81 and 87 fuselages.. an in face had both a Hawk 75 87 fuselages in the jig being built last time i was there )"; and then "Now yes there is a major change in the hawk 75/81 to Hawk 87 fuselage but, excluding the Power egg firewall forwarded...
Is it that much more then a P51 B/C to P51D? or a Spitfire fuselage cut down to a bubble top?"
Well, yes, it is much more. ALL the forward fuselage top is taken down, and basically redesigned (cockpit floor remained the upper wing surface) The "height" of the fuselage is shorter. That was not altered not moved in neither P-51 or Spit when the REAR fuselage was "cut down".
Even the Wiki acknowledges the difference in fuselage, saying (rather cryptically!): " With a new, larger Allison engine, slightly narrower fuselage, redesigned canopy, and improved cockpit,"
Yours,
FErnando
Fernando I would not use Wiki as a reference
You say the "The fuselage is deeper in the B/C than in the D and subsequent.".. ok I agree..
But just saying " fuselage is deeper" is very general... how was it "deeper"? ...what was changed? ..what stayed the same?... ...
Look at the blueprint overlay I posted from BS_w ... look for what really was changed.. and what stayed the same
(rule about engineers and manufacturing business.....they don't like to "clean sheet" from scratch anything... when they can made a modification of whats in production all ready...the tried and tested... to get what they need.. and they do it with the minimum modification necessary ...so it least change and the cheapest to do )
If you can see the parts that was changes.. the frame that was moved lower that made "deeper" "less deep" at the cockpit lip...
Then you can also know the parts that stayed the same for the whole line
So I can in fact use the parts the stayed the same on all model as a reference for all models... correct?
Understand I am trying to give a reference point to build an accurate H81 ... from the H81 kits out there
And he the problem with all the H81 kits out there.... is not that they are that bad in the nose (power egg) ..or in that "deeper" cockpit area...
The problem with all the H81 kits out there is they are really bad in the areas ..that are common to any model P-40.... wing, tail, lower fuselage .. and the biggest most common.. wing to lower fuselage location
Let me show you what ware im talking about with an old Hasagawa hack I did... because the Hasagawa wing shape, tail, lower fuselage, and wing to lower fuselage relationship are correct for any P-40
It this area that im using Hasagawa P40E parts that is really bad on the Trumpeter and HC kit.....
That why I say use a good P40E that as you reference because it the common P-40 areas that need the most work on the Trumpeter and HC kit...
Also below are some photo and blueprints of that "deeper fuselage"...
The photos and blueprint drawing below and all Original Curtiss Wright factory photos and blueprint drawing
Note: The top photo is the UPPER fuselage framing ..(as you can see in other photos the fuselage was build in upper and lower hafts .. that split / joint between upper are lower is also the fuselage DATUM line... that upper lower datum line seam is on most kits .. and it the seam use above as the joint in the Hasagawa Trumpeter hack)
See in the top photo of the upper fuselage framing... an upper "box beam" frame (its the top lip of the fuselage gun bay) that runs from firewall to middle of back glass scallop .. and see the cockpit lip built up above the upper box beam
That box beam is the pickup point for upper engine mount..
Its this upper engine mount and box beam that was moved down on the later model.. and the cockpit lip cut down to level with the new lower beam...
=======================
To give a better idea of the upper "box beam" frame that was moved down in the later model.. see Below
This is a photo I took of a Hawk 75 fuselage being build while still in the jigs (there was a Hawk 87 fuselage being build right next to it)
The upper "box beam" frame is the two green stringer ..before a cap plate is put on to tie together in to a "box"
===
Also note you correct about there being a slightly narrower fuselage difference between the Hawk 87 and Hawk 75/81..
I ask the guy building the Hawk 87 and Hawk 75 in the photos while I was there.... the difference is ...one inch... at the firewall..(it taper back to nill at next frame)...
One inch in 1/48 is.. 1/48 of an inch.. that 1/96 of an inch wider each side of the fuselage at firewall ...
Im a rivet counter but im not that much a rivet counter
I don't think any model builder can built with paint and sanding glue seams and seam cleanup and clamping together while the glue sets.. a fuselage within a max 1/96 of an inch wide tolerance at the firewall..
-
1
-
-
12 hours ago, Fernando said:
-----
But I disagree with the concept that a B/C is so similar to a later D/etc. one. The fuselage is entirely different (exception made of some section aft of the cockpit windows, and that not counting the fuselage extension of later marks)
Personally, and going back tothe original question, I would go for the corrected Hobbycraft.
Fernando
Hello Fernando
On the "fuselage is entirely different" (Early vs Late P40) I'm going to strongly disagree with you on that.. but let me offer some clarification (and let me offer that I base my opinion on having both Curtis blueprints and service manuals for the Hawk 75 & Hawk 87.. along with incomplete bits for Hawk 81.. along with talking to a warbird restorer that has rebuilt all three
First ...im excluding the "power egg" firewall forwarded
The Curtiss Hawk 75,81,87 line was an early form of modular engine... so I always exclude "power egg" firewall forwarded when refer to the fuslage
The Curtiss Hawk 75 in production had two different engines that could be used R1820 and R1830.. both different firewall forward
And with the Curtiss Hawk 75 of the R1820 version there was two different setup firewall forward with different thrust lines, engines mounts and accessory arrangement..(these two different R1820 version are very clear in the blueprints)
This is related to it being a fix gear vs retractable gear for balance and engine also early R1820 engine cowl with no cooling cowl flaps and later R1820 engine cowl with cooling cowl flaps
A fix engine cowl with no cooling cowl flaps had to be bigger for max cooling air flow then a engine cowl with cooling cowl flaps that can vary the cooling air flow.. that per my understanding a Curtiss Hawk warbird restorer, that also does early late B17 rebuilds (again R1820 cowls with/without cooling cowl flaps) and is building a fix gears Hawk 75 and has done most or some of the work on the Hawk 75 and hawk 81 out there.. and in talking to him as to why two different setup in the blueprint for the R1820 Hawk 75
So with the Hawk 75 we already have three different production power eggs
Then we have the V1710 C inline engine .... most accept that starts as an a Hawk 75 air frame with a V1710C inline engine
So we have a fourth Hawk production power egg... in fact with production radiator setup V1710C under the engine not on the air-frame..it is very much is just another modular engine power egg in the Hawk line
But with the production V1710C aircraft we have and evolution of the air-frame itself ... changes in the landing gears, fuel and oil system, air frame details, stabilizer and elevators, belly keel faring, etc.
This become the Hawk 81 we know as the P40,B,C, Tomahawk (oddly the P-37 truly a very different air frame was also known as the Curtiss Hawk81)
So now we move on the next new engine/ production power egg in the Hawk line... V1710E
Now what odd is you would not think the V1710C & V1710E would be that different .. but the one change V1710C to V1710E .. the reduction gear.. changes the engine thrust line higher and engine reduction gear shorter (hence long/short nose) .. that requires moving the engine down (if i recall..3 inch's relative to the fuselage datum line) and forward.. and that requires new engine mounts
Now the problem is we all ready had put an inline engine in air-frame that started life as an air-frame for a radial engine.. look at the Hawk 81 we have alot of waste space above the engine
So with basically a Hawk 75 fuslage to clean up up that waste space (and remove the now out of date fuselage guns ideas) .. with moving the engine down, we move the top engine mount down and take the opportunity to cut down the fuselage at the firewall.. this is above the fuselage datum line ..also the max width of the firewall is reduced 1 inch .. (again in got this from from my Curtiss Hawk war-bird rebuilder that has fuselage jig in his shop to build all three Hawk 75,81 and 87 fuselages.. an in face had both a Hawk 75 87 fuselages in the jig being built last time i was there )
My buddy BS_w did an overlay of this change from Hawk 75 Hawk 87 blueprints on another thread
Now yes there is a major change in the hawk 75/81 to Hawk 87 fuselage but, excluding the Power egg firewall forwarded...
Is it that much more then a P51 B/C to P51D? or a Spitfire fuselage cut down to a bubble top?
It not a clean sheet design.. it a modification and clean up in specific areas ... the fuselage station are the same.. fire wall to rudder post.. the fuselage to wing station the same relative to the fuselage datum line.. fuselage below datum .. same (minor internal dif) .. good part of cockpit that same upper fuslage back of rear glass near same (the radio hatch is a bit smaller on short nose because they simplified frame 10 construction) .. the firewall station same the same relative to the wing spar (station 1 on wing spar 1)..wing shape the same,, stabilizer elevator, rudder(minor change in trim tab link) and fin..the belly keel faring, wing spar 1 back.. all the same Hawk 81 to Hawk 87..
These fundamental relations (wing, fuselage and the relation) are constant in the Hawk 75,81,87 line.. and the problem in all the Hawk 75,81 kits..and all the drawing is these wing, fuselage relation are all way off total out of wack.. ..
This goes back to the Paul Matt drawing on the early 60's who got the wing shape and tail shape wrong and the fuselage station relative to the wing wrong .. the Paul Matt drawing seem to be the starting point for ever Hawk 75 81 kit and drawing out there.. and they repeat his errors... and add to them
Remember I am trying to point to a good modeler reference point as a start for a good Hawk 75 or 81.. and the H 87 kits (the Hasgawa kit P-40e is in NO way based on the bad Paul Matt P-36 drawing)... the Hasgawa kit P-40E look to had gone to original Hawk 87 blueprints and so the kit inherently had the correct basic wing shape, fuselage station and wing, fuselage relation that apply to the whole Hawk 75,81,87 line
(by the way going back to the modular power egg idea in Hawk 75,81,87 line you also have the Merlin V1650 P40's..
so for this one air frame we have production version with R1830, R1820, V1710C, V1710E and Merlin V1650 engines.. ..and all version fought in WW2... that might be the record for different engines on "same" combat aircraft .. only other contender would be the 109 family if you include the Czech and Spanish versions.. and that different wars )
-
4
-
-
I will give this advice.. if you want to try and correct any of these kits.. get the Hasagawa P40E as your best reference and even if you want as part donor..most of these kits problem are not it the area unique to the early long nose P40.. but in the areas common to ANY P40 early or late.. things like, wing shape, tail shape wing to fuslage location, fuselage length firewall back, cockpit below the datum line.....
There are are other problem in these kits that are unique early P40.. (spinner shape, engin cowl and radiator outlet, wing gun access hatches, cockpit) but correct the error common to any P40 early or late.. and you fix 85 to 90% of any of these early P40 kits problems... that what frustrating ...they're not just bad early P40 kits...they're bad ANY version P-40 kits
The early and late P40 are not completely different planes...the late P40 is a modification of the early.P40 just as and early P40.is a mod of the P36.. there is a fundamental constant in the airframe...
Just as a Spit Mk1 to Griffin engine bubble top Spitfire Mk 14 still has fundamental airframe shape in common....thing like Wing shape, firewall to rudder post length Wing location on fuselage..etc
Everybody "Overthinks" the early P40.. just start with a good late P40. ( and work backwards to add the early P40 bits.. they're not that different.. ..A good P40 D or E is the closest jumping off point to a good P40 B or C..
-
Hi....to be honest never got people obsession for the monogram kit or where the idea it's the most accurate comes from ..it really not.. its proportions are all out of whack to the point I really dont think you can get to an accurate P40 from it.. so if you do monogram just build it to please your own visual sensibilities..
And if you can not wait for Airfix is Bronco an option?
I got to look at the Brinco kit in the box.. and it looks be then Trumpeter 1/32 scaled down with "some" errors seem to be corrected...mostly the wing shape and location ..
Of your three Trumpeter is the most hackable to get to an early P40.. but it a lot of work
And if you really no going for accuracy but just something to make it look good to the average eye.. the just build whatever one you think looks best
But again why cant you wait on airfix?
-
1 hour ago, Artie said:
No that is not a primer
If you go through the Google Life archive of Life photo shoot of the Curtiss factory, in the color photos you will this patter of pre-painting the dark earth some parts on the otherwise unpainted Hawk 81A2
-
2
-
-
2 hours ago, Nick Millman said:
Thanks. The other things to note are that the Tomahawks were (also?) being painted with Berry Bros Berryloid paints and the Dupont 71-021 Sky Gray colour is almost identical to the US Army Spec 3-1 Supplement colour No.323 Sky Gray. It photographs like light grey but in real life it can be seen not to be a light grey and the greenish tone is very apparent.
Be careful with the production photos not to confuse primer paints with top coats. At that time, for example, the RAF were specifying four different primer paints - grey, light grey, a special light grey for magnesium rich alloys and red oxide (which was actually a reddish brown colour)
Nick
Your right about the sky greenish tone is very apparent in real life...
...Story on get the color photos of DuPont paint
Ive become very good friends with Tom Wilson of the Hawk Factory in Ga .. Tom has done a majority of the early P40/Tomahawk rebuilt and recovery mission...
He has a Semi trailer and two car garage shed full of recovered early P40/Tomahawk parts
I spent all day last year at ihis shop digging through this .. all kinds of Tomahawk parts still in original pant.. not little parts but whole stabilizer or wing section.. also cockpit parts
I found some underside bits that oxides to near white... but on large parts like the whole stabilizer sky greenish tone is very apparent .. just like you said
It was funny day
Because after all this years looking for the smallest scrap of these color ..
I got home from there that night
And had original Dupont 71-021 Sky Gray, Dark Earth 71-035 & Dark Green 71-013 paint all over my jeans
-
1
-
-
54 minutes ago, Nick Millman said:
Hi Hume
Sorry, I should have been clearer. I meant that the Sky spinners and fuselage bands were painted in the UK after delivery.
The spinner colours were reported to be either Dark Earth or Black as delivered. The bottom photo in your post is very interesting as it appears to show a light painted spinner on the production line but what happened to the colour?
Regards
Nick
I do have a full color version of that photo.. I just have to find it......(found it)
)
While I have see US P-40 with light color spinner( Pearl Harbor aircraft) ..
This photo is a UK Tomahawk.. ( Square back seat on wing, no US gun site reflector on front glass..and just the fact it otherwise unpainted as I state above export (UK) Hawk 81 are mostly left unpainted during the build US Hawk 81 are fully painted during the build ) .. this photo is also interesting because the seat is a dark green
-
2
-
-
3 hours ago, Nick Millman said:
Tomahawks were delivered in TLS but most received Sky spinners and fuselage bands. As most of the squadrons were designated Army Co-Op they remained in that scheme for longer than Fighter Command's day fighters which has caused some confusion. Only the aircraft of those squadrons committed to initial offensive operations over France (26, 239, 268 and 400) and temporarily detached to Fighter Command for tactical training were re-painted in DFS and the majority of RAF Tomahawk squadrons which were still part of Army Co-Op Command remained in TLS until the spring of 1942, only then being gradually re-painted to conform to DFS by Aug 1942. The relevant period AMOs and DTDs are ambiguous as to the Lysander-replacement "fighters" serving in Army Co-Op squadrons.
Monochrome photographs are not a certain method to differentiate DFS from TLS but the tone of the codes sometimes provides a clue.
In November 1942 an emblem for all RCAF squadrons operating overseas (e.g. outside Canada) was approved but it cannot always be spotted in photos. It was an 8" diameter roundel with a half-inch outer circle of dark blue and an "RAF blue" centre containing a red maple leaf. It was to be applied on the port side of the fuselage forward of the leading edge.
Nick
Hi Nick
0
Just fyi from Curtiss factory photos.. it shows that Curtiss painted the spinner ..at the factory... first in Dark Earth (I assume "Dupont 71-035") and later in Sky ( again I assume "Dupont 71-021")
...The photos below were in my photobucket for something else... but show the export (UK) Hawk 81 spinner color.. (on the otherwise unpainted aircraft)
Curtiss seems to have follow very different painting practices on US vs export (UK) Hawk 81
The US Hawk 81 are fully painted during the build.. (per photos)
But the export (UK) Hawk 81 are mostly left unpainted during the build with only some parts pre-painted (like the spinners) ... the export (UK) Hawk 81 seem to only have got there FULL camo paint job just before break down to crate up for shipping to the final destination
-
1
-
-
Last year I had the opportunely to see and photograph recovered Tomahawk parts in original color.... Im sure they used the DuPont UK colors
-
3
-
-
Those photos are from the Google Life archive... there's actually a lot more
If you do a search in Google Life doing a search spelling Curtis (one "s") and Curtiss (two "s'") you'll get diffrent photos.. there's a lot of photos out there they alse include P-36 Hawk 75 factory photos
Also note those photos at the Curtiss Factory has a mix of US P-40's and UK Tomahawk.. the unpainted silver ones are destined to be UK Tomahawks
-
1
-
-
On 9/20/2016 at 4:14 AM, John said:
Airfix have put their expected arrival date back to 29/09/2016.
John
So does anyone know the reason for the ongoing delay on the release of this kit?
-
6 hours ago, 48-Alone-Is-Great said:
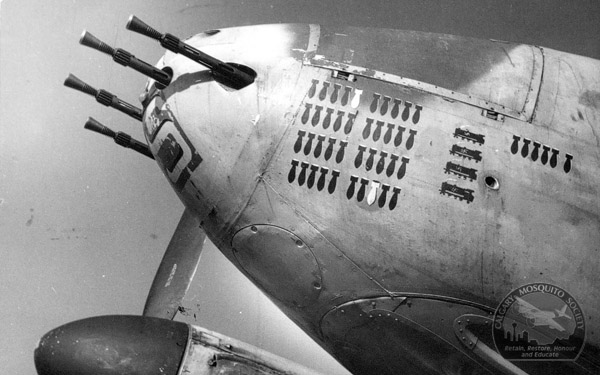
Thanks, book's on my list. Are those 'fins' perhaps caps?
No the "fins" on barrel tip end of brit .303's guns is something commonly seen. (see de havilland mosquito photo below with "fins" on gun barrels just behind the flash guard )
I think it started as something needed as extra cooling or spacer to center guns in a blast tube in a wing leading edge and then it was just easier to make it standard ...
==========================================================================================================================
I've only seen the random mixing of "fin" and non "fin" gun barrels on the same aircraft with the Tomahawk ..and the random mix of gun barrels types on the RAF Tomahawks seem to be very common
-
1
-
-
6 hours ago, 48-Alone-Is-Great said:
Aircraft Pictorial 5? No, not (yet). Does it have drawings of the bottom wing for all the gun versions?
Not drawing .. photos from the manuals..I have them too but don't like to post because it was Dana that gave me copys of all his files for his book (Dana an I exchanged information I have a credit in the book)...
Below is some my own stuff
-
19 hours ago, 48-Alone-Is-Great said:
Thanks. Do you have drawings like this for the bottom wings, showing the ammo doors etc for the 2 and 4 gun versions?
I don't see how else the empty weight difference between B and C can be explained but by two extra wing guns.
It's a bit irrelevant though, because my guide for a model will be a photo itself (showing 2 or 4 guns) and not its caption (stating it's B or C or whatever).
Do you have the Dana Bell book?...
-
The defining characteristic of the P40 and P40 G vs the P40B,C and export Tomahawk is the fuselage fuel points
The first model..the P40cu was only use by the US.. and what's unique is the fueling points ( no through the glass fuel point) and also unique in having one wing gun
All model after, P40 B,C and export H81Tomahawks.. had through the glass fuel ports and two gun wing
The P40 G was a P40cu fuselage retrofitted with a two gun wing
-
1
-
-
On 9/14/2016 at 7:11 AM, 48-Alone-Is-Great said:
I'll definitely get one, and paint it white and grey with red stars.
However, they call it a P-40B, but it has the wing guns of the P-40C and the nose guns of the P-40. Minor issues, especially if you want a P-40C.
Cheers.
There is no diffrence between the B C wing guns
The P40...had one .30 gun per wing.. the P40B & C had two .30 guns per wing
As for the nose gun ..it long blast tube and short blast tubes... the kit has both ... the length of the blast tube do not have anything directly to do with what model it was
The blast originally were long.. then early in service s problem was found with the long blast tubes barrel oscillating at the end and being damaged by .50 caliber rounds exiting... so a field service order went out for the blast tube to be cut down to the shorter length
-
Hello Hume, how are you
In the different manual service P40, P40B, C and G it is wrote "walkways: linoleum covered walkways are provided..." it was cemented on the skin
on the picture of wreck, as you wrote, the binding strips are lost but we can see the holes of screws along the edges of walkway.
Another interesting, on this a/c, the camo paint covered the walkway
Hello Sosthene ..Im doing fine, just moved to Las Vegas in June, near Nellis AFB, how are you?
What manual service were you finding that in? I was looking through mine and not finding. Do you have the TO number and page?
-
P36 : non skid paint, contains carborundum powder
H75 french, H87, P40 : Linoleum (Green "AeroFloor", 1/16 thick)
P51B & C: non skid paint
Hawker Typhoon: rubber sheet (Wondergrip rubber), from 42 the walkways was (over?)painted " A satisfactory painted on walkway has been developed at Langley and tested in service. This is now applied to all production Typhoons"
Hampden : Wondergrip
MS 406, D520: rubber sheet(Wondergrip)
While not the best ..this crashed Tomahawk wing photo gives some idea of the material applied.. in this case not a paint to but a strip of material applied ( per BS_W post a Linoleum Green "AeroFloor", 1/16 thick)..to the wingtop.... also note mount points for the medal strip around the edge


 )
)


1/48 - Curtiss P-40B Warhawk & Tomahawk Mk.II by Airfix - released - new Tomahawk Mk.II boxing in June 2024
in The Rumourmonger
Posted · Edited by HBBates
Hey to the guys that get this kit first..please check this thing first... the firewall and fuselage gunbay step is there....if you look at the photos of the real thing the firewall has a distinctive step forward at gun gay ...
On the test shot photos.. it just had a straight line firewall with no step . That really stood out to me and I think they fixed it but I haven't seen it
Even if they didn't fix it ....
As long as the firewall and the wing are in the right position ....if its just the upper gunbay line wrong..then it's a simple rescribe
The downfall of every early P40 kit has been the wing in the wrong position relative to the firewall and the fuselage datum line....
However...I belive Airfix has this right and will be the first to have the firewall and the wing in the right position and it's just the gun bay line issue.
The Airfix kit while it will surely have some new issues to be fixed...but it was a clean sheet kit with a major load of new validated correct info from a lot of big sources (even a bit via Edgar Brooks) and included real Curtiss blueprint for the P-36 and early P-40 ... so should not have the same old crap errors
Below is some Tomahawk cockpit information from Edgar to me some years back that was forwarded to Airfix when they started this kit
Note: These cockpit photos shows both early and late details that would not be in the same cockpit at the same time.. that why two fire bottles.. so read the notes below