

Ghostbase
-
Posts
923 -
Joined
-
Last visited
Content Type
Events
Profiles
Forums
Media Demo
Everything posted by Ghostbase
-
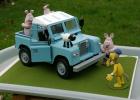
 The Vought F-8 Crusader was nicknamed the "Mig-Master" thanks to its exploits in the Vietnam War, she was also known as the "Last of the Gunfighters". There have been several 1/48th scale offerings of the Crusader from Aurora and Lindberg however it fell to ESCI to produce the first 'modern' F-8 Crusader kit in 1978 with an F-8E version. Monogram followed with their F-8E in 1988, then Hasegawa in 1996. The ESCI kit was reboxed several times but was only produced over five years. I have been intending to build a Crusader for years but never got round to it I decided that I wanted to try out two techniques; scribing and weathering, so the old ESCI kit seemed a good choice. It was! IMGP4273 by Ghostbase, on Flickr I decided to use the original kit decals to complete her as BuNo 150675 / 'DR-00' operated by Marines squadron VMF-312 "Checkerboards" out of MCAS El Toro, CA in 1974. IMGP4278 by Ghostbase, on Flickr This is the first kit that I have almost completely re-scribed. With the exception of the nose area around the four cannon ports I used a dental tool to replace all the raised panel lines. IMGP4274 by Ghostbase, on Flickr I applied AK Interactive FS 16440 Light Gull Gray over a base of Halfords grey primer and black lines. This was when I was still having problems applying acrylic paints via airbrush (now resolved) and I had to apply several coats which rather defeated the black lines! The undersides of FS 17875 White were applied with Halfords Appliance White from a spray can. Detail colours were from Vallejo, metallics were from a Lifecolor metallic paint set. IMGP4277 by Ghostbase, on Flickr Weathering was a learning experience. I started by mixing a drop of dark grey acrylic paint with acrylic thinners and I applied this to the scribed panel lines with a brush. I gave it a couple of minutes then wiped it with a kitchen roll in the direction of the airflow and this generally worked well especially on the top of the wings. It didn't work so well on the forward fuselage especially around the four 20 mm cannon, the "00" decals broke and had to be repaired. I also tried a couple of Tamiya weathering kits (normally used for AFV builds) and found that sand neatly simulated hydraulic fluid leaks, I might have overdone the cannon muzzles with Tamiya soot though! IMGP4280 by Ghostbase, on Flickr I also got creative with the armament! The weapons contained in the kit were pretty basic so I decided to take four AIM-9B Sidewinders from a Hasegawa weapons set and mount them on those very distinctive Y shaped fuselage pylons. In the real world of 1974 it is unlikely that any underwing stores would have been carried additional to four Sidewinders, the drag would have been prohibitive. However the F-8E was wired to carry the AGM-12B Bullpup so I added two of those also from a Hasegawa weapons set. The underwing pylons in the kit are best described as a work of fiction and I had to cut them back quite drastically. IMGP4279 by Ghostbase, on Flickr The verdict? I really enjoyed completing this old kit and the scribing and weathering definitely paid off. She now sits on the display shelf and looks every inch a hunched-up naval fighter jet about to roll onto the catapult then to be flung off the carrier to tangle with the enemy MiG-17 fighters. When you're out of F-8's, you're out of fighters! 💓 Michael IMGP4281 by Ghostbase, on Flickr
- 6 replies
-
- 18
-

-
Good to hear that I am not the only one 👍 I am just finishing an ESCI F-8 Crusader which has come out a lot better than I expected, yep I rushed some of the basics and don't they show! Good work with the oil paints. Michael
-
The "Lead Sled"- Monogram 1/48 Republic F-84F Thunderstreak
Ghostbase replied to Ghostbase's topic in Less Than A Tenner GB
Sadly, to the tune of Hot Gossip's "I lost my heart to a Starship Trooper"... I lost my scale modelling heart to an F-8 Crusader! I started this build with good intentions but I also had three more advanced ongoing builds, including an ESCI F-8E Crusader, but I never really built up any momentum for this 'Streak. This is where I am today, the last day of this Group Build:- StreakOne by Ghostbase, on Flickr StreakTwo by Ghostbase, on Flickr StreakThree by Ghostbase, on Flickr I did try to catch up this weekend however I am 172 miles away from my man cave and the much needed tube of Perfect Putty filler so best wait until I return and can do a better job. On the positive side the major parts are cemented together and she is starting to look the "Lead Sled" that she was. I have also decided to finish her in aluminium finish, maybe USAF or West German markings. I will post her when completed, probably this autumn. Thanks to the Group Moderators, we cannot do this without you. Michael -
Italeri 1/48th RF-4C/E "Photo Phantom II"
Ghostbase replied to Ghostbase's topic in F-4 Phantom II STGB
Yes I did however maybe the dental tool I am using isn't strong enough for the job, a razor saw might be a better option. At the moment I am 172 miles away from the 'man cave' however I hope to pick this build up again this week. Michael -
I am finding your Italeri build of much interest and very impressed with the new decal sheet. Have just taken a quick look at your photos and compared them with the 2005 boxing and the same issues are clearly visible there, the old ESCI mould must have taken quite a beating over the years! Am very interested in how you add detail to otherwise sparse cockpits and wheel wells, keep the photos coming 👍 Michael
-
Italeri 1/48th RF-4C/E "Photo Phantom II"
Ghostbase replied to Ghostbase's topic in F-4 Phantom II STGB
A week has passed by and I really need to get started. I have already primed all of the kit parts with Halfords grey primer which helps me to see what needs attention. One thing that does bug me is that on this kit the BLC vents on the top and underside of the jet intakes are depicted by decals. I decided to try scribing these vents using an old dental tool, maybe they will look better? This photo shows the underside of the intake, I have marked the lines of the vents with a fine CD marker pen, the dotted squares are the areas to be scribed:- 20210827_114357 by Ghostbase, on Flickr And the same for the topsides of the intakes, just a little bit more complex... 20210827_114218 by Ghostbase, on Flickr On to the cockpit. This really isn't the most detailed of kits and accuracy isn't great either! This is a basics look:- 20210827_131636 by Ghostbase, on Flickr What are my options? I was intending to build this kit with the cockpit closed up so I could just go for the OOB option using what is in the box. If it is closed up, realistically, what can you see? Option 2 is to replace those awful ejection seats. I do have a couple of the Eduard edition Academy F-4 kits which have replacement resin ejection seats so I could liberate the original kit seats and add them here. Or, I could order a pair of Aires seats for one of my Hasegawa kits and recycle those kit seats here. Option 3 is to purchase a complete resin cockpit for one of my Hasegawa kits and drop the Hasegawa cockpit in here. I don't know, suspect the OOB option will be the one that I follow. Hopefully more this weekend... Michael 20210827_131844 by Ghostbase, on Flickr -
I have that exact kit in the stash and it still makes me smile when I look at it 😎 The odd thing was that the same kit had most of the main parts needed for an F-4C, maybe a D; being the rounded USAF wing pylons, shorter burner cans, and the IR sensor/probe under the nose cone. The stabilators were slotted but they could be sanded smooth quite easily. I will be interested to see whether Bertie's kit contains these or not. The Italeri 2005 rebox did. Michael
-
Yep, I believe that's derived from the original 1980 ESCI kit, will be interesting to see what is inside the box when it arrives. The decal sheet looks huge! I have built three of the ESCI kits over the years and personally I really like them. The last one I put together I added a spare Hasegawa cockpit and seats and that made a huge difference. I am sure that an "objet d'air" connoisseur like yourself will be looking at the rather sparse jet air intakes, 'burner cans, and main wheel well detail. The only real down of the ESCI moulding is the canopy which can be very difficult to fit. Oh, it should have recessed panel lines which back in 1980 was very advanced indeed. Good to have some company in the Old Kit Section 👍
-
Italeri 1/48th RF-4C/E "Photo Phantom II"
Ghostbase replied to Ghostbase's topic in F-4 Phantom II STGB
A little bit more about this build, I don't know when I purchased this kit but it was probably an eBay special fifteen years ago when you could pick up something like this for under £5 and that was including P&P! It is of the era before Hasegawa raised the standard with their 1/48th Phantom series of kits, the main competitors would have been Monogram and ESCI. The kit's weak areas are as follows:- * BLC vents on intakes depicted by decals * Completely inaccurate cockpit and ejection seats * Windscreen and front canopy out of proportion * No hinge details for an open cockpit * Inaccurate wing tanks and skinny centreline 'gasbag' * Raised surface panel lines Now, I *could* spend a lot on aftermarket however I prefer to raid the spares box as well as 'pirate' spare items from other kits. The ejection seats are the worst parts by far; I was thinking of maybe purchasing a pair of resin seats for one of my Hasegawa kits and using the displaced seats out of that kit. Maybe... Michael -
This is going to be a very interesting build! I love the sheer amount of choice that the AirDOC decals give on just the one sheet too. Michael
-
My entry for this GB, the Italeri / Testors 1/48th scale RF-4C/E "Photo Phantom II" kit #810 which was first issued in 1981, a mere 40 years ago! I like building old kits and, with airbrushing, modern acrylic paints and after-market decals, it is satisfying to make something that is far better than I could have done all those years ago. I have almost finished an F-4S from the same stable and I hope I can learn from that build and apply it here. On to the kit:- 20210819_174510 by Ghostbase, on Flickr The traditional sprues shot:- 20210819_175052 by Ghostbase, on Flickr Decals and instructions:- 20210819_175246 by Ghostbase, on Flickr At the moment I am minded to complete her as a USAFE RF-4C operated by the 38th TRS out of Zweibrucken AB in the mid 80's, with wrap-around SEA camouflage, using decals from the AirDOC 'USAF Phantoms in Germany Late F-4E / Gs and RF-4Cs Markings' sheet. However I have plenty of time to change my mind 😉 20210819_175620 by Ghostbase, on Flickr This is a very basic kit, especially compared to the modern Academy and Tamiya offerings, and it has a long list of faults. I am hoping that I can overcome some of these faults, more about that in a later post. Anyway, good to be here 🙂 Michael
-
Testors or Italeri? 1/48th F-4S Phantom
Ghostbase replied to Ghostbase's topic in Work in Progress - Aircraft
Thanks Ron, it is information like this that is absolutely priceless! 👍 I was going to paint the both the Sparrows and Sidewinders main body in FS36375 grey; the AIM-7 guidance fins in FS36118, and the AIM-9 head in metallic black. I got this colour reference from the Furball decal sheet 'Bombcat Weapons Set' however I do like the AIM-9 all blue missile body so I think I will revisit this. The missiles that I am using are from the spares box. The Sidewinders are pretty good however the Sparrows are definitely not good so I might source some from a Hasegawa Aircraft Weapons set. Then again, when the model is completed very little can be seen of the Sparrows tucked away in their recesses beneath the fuselage. The Sidewinders definitely deserve some detail as they will be very visible. Just a week to the F-4 Phantom Group Build on this forum, I am very minded to build the 1/48th Testors / Italeri RF-4C learning from the mistakes that I have made here. Michael. F-4SAAM by Ghostbase, on Flickr -
Testors or Italeri? 1/48th F-4S Phantom
Ghostbase replied to Ghostbase's topic in Work in Progress - Aircraft
Some more progress today, getting so close to a completion... All the kit decals are on 👍 I then applied a coating of Humbrol Acrylic Varnish Satin 135 to all painted surfaces to seal in the decals and give a consistent finish. The next stage was to turn the model over and start to attach parts to the underside:- 20210811_212805 by Ghostbase, on Flickr At this point I had attached the belly tank, the three undercarriage legs and the main doors. This is supposed to be an F-4S which is a sub-type of the Phantom that I have not built before. How accurate it it? I am not sure however the kit does provide quite a lot of underwing detail for the slats as seen here:- 20210811_212831 by Ghostbase, on Flickr Not so much change from this viewpoint however all the fuel tanks are on, also most of the undercarriage and doors, and missile pylons. The AIM-7 and AIM-9 missiles are painted but not decalled. Cockpit canopys are ready. Stabilators just need one metallic application. 20210811_220432 by Ghostbase, on Flickr Will be nice to have a 'completion' 🙂 Michael -
Testors or Italeri? 1/48th F-4S Phantom
Ghostbase replied to Ghostbase's topic in Work in Progress - Aircraft
Continued working yesterday on this 'interesting' old Testors / Italeri F-4S, have completed the paintwork by adding Lifecolor Exhaust Metal to the area just above the jet exhausts, and Lifecolor Dark Aluminium to the area around the horizontal stabilators and the inboard sections of the stabilators themselves. Again the paint airbrushed on smoothly and easily. 20210805_125443 by Ghostbase, on Flickr The next stage is to make a decision regards which decals to apply to the model. I was going to complete her in the markings of VF-103 however, I have to be honest, this isn't the best of kits or builds and with the recent release of the Zoukei-Mura F-4S I anticipate that some of the Hasegawa F-4S kits might become available at more reasonable second-hand prices. I have decided to save the Superscale decals and instead use the decals from the kit. 20210805_125420 by Ghostbase, on Flickr I decided to complete her as a Marines VMFA-321 bird, I have always liked the 'Hell's Angels' markings and the subtle way that they turned the 'slime lights' on the tail fin into a trident. The decals must be upwards of 30 years old however they separated easily from the backing paper and applied quite well. I had to be careful to wash them in the water before applying them because they had some sort of residue on them. 20210805_160639 by Ghostbase, on Flickr All considered this is going well and I hope to have the model completed next week. Michael -
The "Lead Sled"- Monogram 1/48 Republic F-84F Thunderstreak
Ghostbase replied to Ghostbase's topic in Less Than A Tenner GB
At last, started! Out with brushing a first coat of Humbrol Acrylic 226 Interior Green in the cockpit and the main gear wheel wells. Humbrol 11 Silver via aerosol can for the jet air intake and the nose gear wheel well. 20210727_204125 by Ghostbase, on Flickr I am quite impressed with this kit which was originally released in 1984. The surface detail is good although it does have raised panel lines. These don't bother me but it might deter other modellers. This is a detail shot of the lower wing and main gear wells:- 20210727_204151 by Ghostbase, on Flickr A nice straightforward build, the jet air intake and nose gear well consists of two parts which are cemented together as shown here, I really should have spotted that large ejection pin mark on the inside of the fuselage however it won't be obviously visible. The cockpit consists here of the tub and the ejection seat is made up of three parts plus a red head rest. The kit instructions stipulate Olive Green as seen here, I have checked with photos on the internet and they appear to be largely correct. 20210727_204137 by Ghostbase, on Flickr More to come. Michael -
I would like to take part in this Group Build please, I still have memories of my attempting to complete an F-4C in 111 FIS markings in the last Phantom GB years ago. Somewhere in the stash I have the Revell 1/32nd F-4E kit of the early 90's, I got it from a liquidation store in the USA for about $10 USD! It has decals for the New Jersey ANG with the Rhino markings on the nose and I would love to build it as a QF-4E target drone with the glossy red tail and panels over a very weathered Hill Gray camouflage scheme. The downside is that I would be building OOB and don't have the QF-4E modifications available. Still, four weeks to go which is enough time for me to change my mind at least 28 times 😉 Michael
-
Testors or Italeri? 1/48th F-4S Phantom
Ghostbase replied to Ghostbase's topic in Work in Progress - Aircraft
A quick update today, I have applied the remaining two TPS colour scheme paints, being FS36320 Dark Ghost Grey, and FS35237 Medium Grey. Again applied with my H&S Ultra airbrush using medium nozzle and acrylic paints from the Vallejo 'Air War' color series "US Navy and USMC Colors From 70's to Present". This took a lot of masking however I am happy with the final results:- 20210718_182806 by Ghostbase, on Flickr I kept to the mixing ratio of 10 parts paint / 1 part retarder medium / 2 parts airbrush flow improver / 2 parts thinner. 20210718_182819 by Ghostbase, on Flickr The Vallejo acrylics have gone on really well and should look good once I apply the decals and some weathering. The masking went well though I can see a couple of areas that need attention. I outlined the pattern that I wanted using a very thin "Artist Curves" vinyl tape and then masked around that using scotch poster tape. I had left 24 hours between coats and I had no problems with paint lifting under the tape. 20210718_182959 by Ghostbase, on Flickr So, I am a happy scale modeller 😊 Eighteen months ago I was ready to give up with all the problems that I was having with airbrushing acrylics paints, now I think I have overcome them. Onwards! Michael. -
Testors or Italeri? 1/48th F-4S Phantom
Ghostbase replied to Ghostbase's topic in Work in Progress - Aircraft
Ron, I love the F-4E / F-4J combination, an 'MG' coded F-4 is high on my 'want to do' list one day. Thanks for the motivational comments 🙂 I broke out the airbrush yesterday and experimented with the paints. I started with AK Interactive AK 2057 Light Ghost Grey on one of the underwing drop tanks. Maybe I got the thinning wrong but the paint settled on the primed plastic like an aerosol and stayed like that; I thought "been here before" and cleaned it off with running water and returned the bottle to the pack. I then tried Vallejo AV70615 which is marked as USN L Ghost Grey (as well as 'Surface Primer'). I am using a H&S Ultra airbrush with medium needle and head and a relatively weak portable air pump. I settled upon a mix of 15 drops of paint, 1 drop of vallejo retarder, 2 drops of flow improver, and 3 drops of thinner and I am happy with the application which can be seen in this photo: 20210716_180925 by Ghostbase, on Flickr I have decided to load her with four AIM-7 Sparrows and four AIM-9 Sidewinders. I understand that the TPS painted F-14 Tomcats of the same era as this Phantom carried toned down weapons and these were painted in FS36375 Light Ghost Grey. The AIM-9 Sidewinders that I using here came from the spares box and look like either the AIM-9L or M variant however I have no idea whether a line unit like VF-103 used these versions of the Sidewinder in the early 80's or not. Next colour to be applied will be FS36320 Dark Ghost Grey. Fingers crossed! Michael -
Testors or Italeri? 1/48th F-4S Phantom
Ghostbase replied to Ghostbase's topic in Work in Progress - Aircraft
One year and eight months later! What happened? The F-4S has been sitting on the shelf of shame (in fact it is a wallpaper pasting table) along with several other kits in varoius stages of completion; an F-14B, an F-105G, an F-8E, an F-84F, an FJ-4 and a P-40B. I make no secret that I encountered huge problems with learning to airbrush acylic paints around 18 months ago and this F-4S was the worst affected of my builds. 20210714_102056 by Ghostbase, on Flickr I still want to complete this F-4S as BuNo 153872 in the low visibility TPS colours of FS35237 Medium Grey, FS36320 Dark Ghost Grey, and FS36375 Light Ghost Grey, operated by VF-103. I originally used AK Interactive paints from their 'US Modern Aircraft 1' Air Series and these are the colours that can be seen on the model. To my mind there was very little colour difference between the Medium Grey and the Dark Ghost Grey. I have since acquired the Vallejo 'US Navy and USMC Colors From 70's to Present' Air War Color Series set so I am going to give that a try. It feels like I have done most of the hard work on this build already. More to come. Michael 20210714_102412 by Ghostbase, on Flickr -
That is a very nice result indeed and good to see an early British jet. I found that the kit went together very well but the join of the two tail booms to the main aircraft was a challenge, you did much better than I did! Michael
-
Hi Orion, The problem that I had was the acrylics paints were drying inside my H&S Ultra and also clogging up the spray tip. I used too much thinner to overcome this and the paint consistency was like water, it literally ran as soon as it touched the plastic (despite using a primer first). I looked at several scale modelling forums and found that a fine nozzle airbrush can be very susceptible to blocking/clogging so I bought a new medium nozzle and needle for the Ultra and that seemed to work better. I also read that a "retarder" helps stop the acrylic paint drying inside the airbrush, I use Vallejo Retarder Medium and the mix ratio is no more than 5%. It is a bit like a silicon gel! I have also bought some Vallejo Flow Improver but I have not tried that yet. I also made the mistake of forgetting that the Hataka acrylics were mixed for the airbrush so I was over-thinning them as opposed to the standard Vallejo Colour paints that I am used to. I use a portable low pressure diaphragm air compressor and that didn't help either. I mix the standard Vallejo Colour acrylic paints at 10 x paint / 8 x thinner / 1 x retarder. I mix "airbrush ready" paints at about half that ratio. I have found that there are no hard rules, it really depends upon the airbrush, the brand of paint, and the air compressor. There are a lot of posts on this subject on several scale modelling discussion boards. Caracal Decals have sold out of CD48143 USAF F-105F/G "Wild Weasels" however Hannants do still have them in stock. All the best "Ghost" aka Michael
-
Thanks 👍 I think initially I just got lucky with the main landing gear however the model is definitely wobbly on it's gear now, have to be very careful with picking it up and setting down. Superb read! Have you got to the chapter where Court flies with Major Ted Frederick in the F-105F out of Tahkli yet? Michael
-
The last operator of the Republic F-105G Thunderchief was the Georgia Air National Guard 128th TFS / 116th TFW based at Dobbins AFB in Marietta, GA. They took on the 'Wild Weasel' SAM killing mission that had originally started during the Vietnam War and kept the F-105G until the summer of 1983 when the venerable 'Thuds' were traded in for the F-4D Phantom. Several of the aircraft were painted in a wrap-around SEA camouflage scheme and I decided to take an old 1/48th Revell / Monogram F-105G kit out of the stash and finish it in this colour scheme, courtesy of a recently released Caracal Models decal sheet. It wasn't an easy build (more later) however the end result looks like this:- 20210620_133806 by Ghostbase, on Flickr The kit itself is excellent, way up there with the other Monogram 'Century Series' aircraft kits, and I was surprised with how well it went together. Very little filler was needed and in fact I was able to attach the complete wing sections to the fuselage after they had been painted. The Thunderchief was a huge aircraft and that really shows in this kit which measures 44cm x 22cm. 20210620_132826 by Ghostbase, on Flickr I used the weapons supplied with the kit, these being a pair of AGM-45 Shrike air-to-ground anti-radiation missiles that locked on and homed onto ground based tracking and fire-control radars, as well as a single AGM_78 Standard which is a passive anti-radiation missile with a range of 24 km. 20210620_132928 by Ghostbase, on Flickr The challenge lay in the painting of this huge kit. I used the Hataka Hobby USAF Paint Set (Vietnam War Era) #AS-09 and initially I started with applying the tan paint, it applied very well and the colour looked correct as well as the satin finish. However the two greens consistently clogged up my H&S Ultra airbrush and when they did spray the finish was splotchy and uneven. When I oversprayed a previously applied coat the paint would sort of atomise into its constituent parts! To cut a long story short I found that a replacement medium nozzle and needle on my airbrush worked wonders as did using a retarder as well as less thinner. The end result turned out ok anyway. 20210620_132556 by Ghostbase, on Flickr The decals come from the recent Caracal Models CD48143 F-105F/G "Wild Weasels" sheet which is well-researched and the decals are of a very high quality. As soon as I saw this sheet I knew I wanted to make this aircraft. 20210620_133106 by Ghostbase, on Flickr I am reasonably happy with the final result. It is a very large and impressive model and despite the painting heartache it looks good. Next time I might just add some wash to the major panel lines, also use a darker exhaust colour on the afterburner petals. Michael 20210620_132614 by Ghostbase, on Flickr 20210620_133219 by Ghostbase, on Flickr
-
I was just curious how much work it would take to convert the early 80's vintage 1/48th scale Hasegawa U.S. Navy F-4J Phantom II to a U.S. Air Force F-4C using the contents of the spares box. The end result was this:- 20210620_171217 by Ghostbase, on Flickr Now an F-4 Phantom expert will immediately spot some omissions however I think I managed to factor in the main differences. Most of the donor parts came from an Academy F-4B kit which contains a lot of parts for different versions. I started by taking the Hasegawa slotted tailplane and sanding it down to eradicate the slots and that worked well. Keeping with the rear end I also replaced the longer jet pipes of the F-4J with a set of shorter pipes from the Academy kit. I had to cut the Hasegawa jet pipes and graft the Academy burner cans onto them, to my eye they protrude just a little bit too much. 20210620_171416 by Ghostbase, on Flickr Looking at the front of the Phantom I have removed the F-4J antenna from under the nose cone and have added the large IR sensor that applied to most F-4C and D models, again sourced from the Academy kit. From the same source, the nosewheel forward facing gear door. The sharp-eyed will spot that I forgot to remove the antenna from beneath the air intakes! 20210620_171233 by Ghostbase, on Flickr Although not visible in this photo I replaced the F-4J main wheels with those from the Academy kit. The weapons pylons also had to be replaced with the 'rounded' USAF types, I think I had these left over from an old Italeri or ESCI kit and they look a little bit skinny. The Hasegawa missile rails didn't quite fit to them and I would have to do this better next time. Also note that my masking for the gloss black nose cone was just slightly off! 20210620_171449 by Ghostbase, on Flickr In the cockpit I replaced the USN RIO's front panel with that from the Academy kit. That is one thing that I really like about the Hasegawa F-4 kits, the ejection seats look 'proper' chunky and they do fill the cockpit space nicely. 20210620_171509 by Ghostbase, on Flickr I have had a nightmare the last year with learning how to apply acrylic paints by airbrush. for this build I used paints from the Vallejo 'Air War Color Series' set 'USAF Colors "Gray Schemes" from 70's to Present' set and they went on really well; I got the mixing right, found the correct air pressure for my Harder and Steenbeck Ultra airbrush, used a retarder and I am really pleased with the result. 20210620_171353 by Ghostbase, on Flickr Finally, the decals which depict F-4C 64-0748 which was a Vietnam era Mig Killer, operated in 1989 by the Arkansas ANG 188th TFG / 184th TFS and wearing special artwork by Don Spering. These were sourced from the Speed Hunter Graphics 'USAF Phantom MiG Killers - Part II' decal sheet. 20210620_171311 by Ghostbase, on Flickr Overall I enjoyed this build, especially the research beforehand of differences between the F-4C and F-4J models, and it was nice for the painting and decalling stages to go well for once! The Hasegawa kit is very dated now but it still goes together well and I appreciate that. Not my best build, I know I can do better, however it has been a morale booster and just every now and then I need one of those 😊 Michael
-
HURRICANE MK I revell 1/32
Ghostbase replied to red baron 5's topic in Ready for Inspection - Aircraft
That is a very nice result! I have this kit in my stash and it gets taken out from time to time and then gets put back again - too difficult! You have proved otherwise, thank you. Michael
