

phantom61
-
Posts
291 -
Joined
-
Last visited
-
Days Won
1
Content Type
Events
Profiles
Forums
Media Demo
Posts posted by phantom61
-
-
On 4/14/2024 at 8:29 AM, Bruno P said:
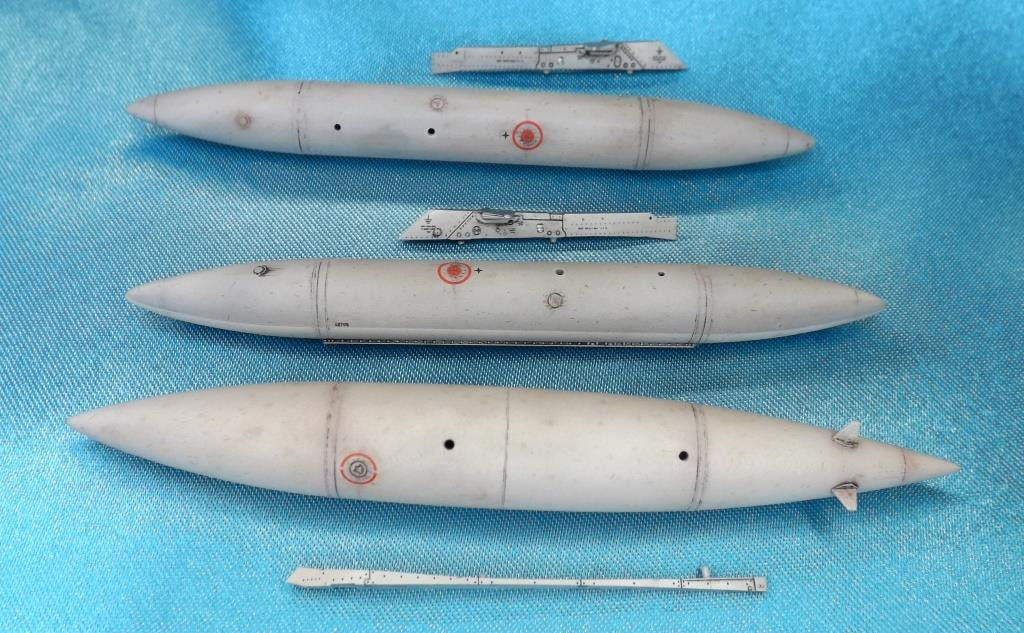
The last subassembly are now ready:

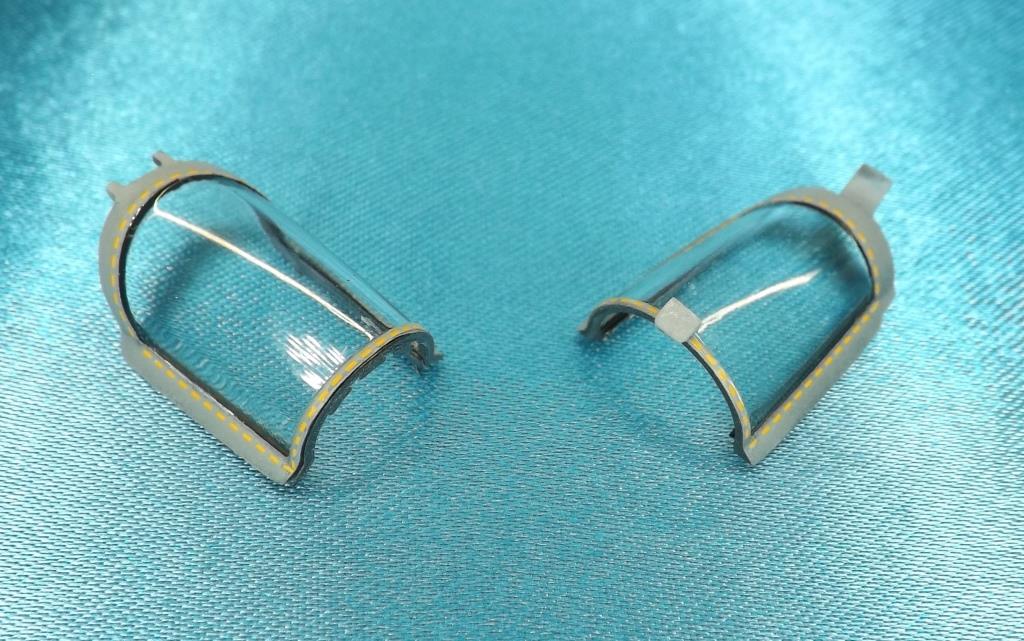
Airfix does not supply airbrake feedback jacks and the WSO's rear-view mirror which were therefore home-built.
Seal cables have been added to the front protections of the Sidewinders.
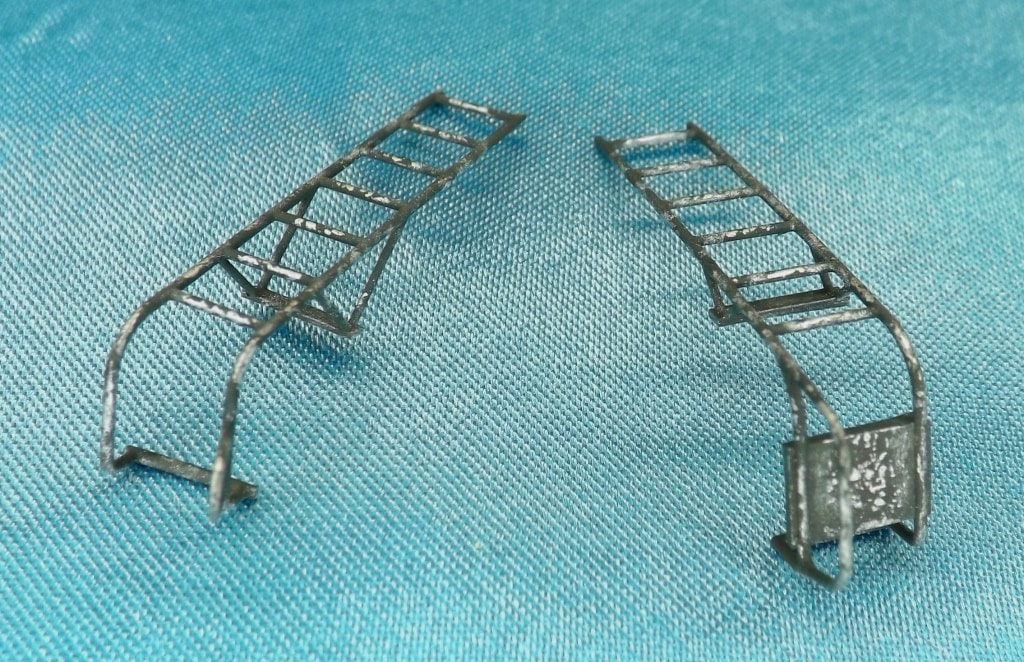
The access ladders are those by LP Models.
Now the final assembly.
great job Bruno...
a few little things... I'm a Phantom UK Phanatic...
the crews ladders were all with square sides... look at the photos...perhaps only the UK F-4Js used the American ones...
in the photo you posted the cannon is mounted on the plane... so don't put the central tank, but I would find an SUU-23try looking at this wip from several years ago... you will find ladders and cannon...
https://www.flickr.com/photos/92879412@N06/albums/72157632748312744/with/8466554920
ciao e ottimo lavoro...
Silvano
-
 2
2
-
-
Hi Bruno...
I will follow you with interest...
ciao
Silvano
-
1
-
-
23 minutes ago, wadeocu said:
This is superb! If you don’t mind telling us, where did the accessories come from? The pilot figures are especially nice! How about the base itself; did you paint it or was it printed? Congratulations on this masterpiece!
no secrets... 🤣🤣🤣
- P.P Aeropart ladder Crew
- PJ Production Pilot RAF
- Ground Unit Houchin 25KVA Videoaviation ( Italian manufacturer )
the diorama is totally in Scratch
ciao
Silvano
-
 1
1
-
Beautiful...
very nice ...
😍
ciao
Silvano
-
Giampiero...
you are my favorite modeller (senior)🤣🤣🤣ciao
Silvano
-
1
-
-
Well done...
good job,
I started the same subject in 2019, during the time between Covid and other things... it ran aground...
I plan to pick it up again soon to complete it...
surely having seen your finished one increases the incentive to finish mine
ciao
SilvanoAttached is my wip always on BM...
-
On 11/20/2023 at 2:36 PM, giemme said:
Start planning....
 (comincia a informarti per i voli
  )
)
Ciao
flights...
Giorgio, we rent a motorhome and leave with models inside...
😂😂😂
-
 3
3
-
-
On 11/18/2023 at 6:26 PM, Fritag said:
ou and G over for the show Silvano?, now that would be good. Especially if we got to see some Silvano masterpieces n'all!
no Steve...
we weren't there...
hopefully next year...ciao
Silvano
-
2
-
-
8 hours ago, Fritag said:
As I was given licence to stay over at Telford for Scale ModelWorld this year I thought might as well bring the Hawks along and sneak them into the competition. Well you never know.
Anyways, Valley Hawk proved a bit too introverted to attract attention, but it's more outgoing sibling - TWU Hawk pushed himself forward a bit more (bully). So, many thanks to those nice people at Airfix:
Oh, and My older chippie and JP 5 - making their way to Telford for the first time - were also a bit guilty of attention seeking behaviour:
The Darrell Burge Trophy is for any Airfix kit of pre-2007 vintage.
As always, it was a pleasure to meet any such fellow BM'ers as weren't quick enough to avoid me...
congratulations Steve...
I received photos of your models present at UK National...
recognized immediately...
who knows... maybe next year....
congratulations again... you remain a source of inspiration even if G. told me that at 48, you are very strongciao
Silvano
-
1
-
-
great work Giorgio...
you are the phantom man...You know that this plane, especially the UK version, have a special place in my heart...
ciao
Silvano
-
1
-
-
On 3/26/2023 at 11:08 PM, Fritag said:
The great god Amazon has just delivered unto me a modest little foldable mini photo lightbox with built in LED lights.
Seeing as it’ll probably be a little while before I’ve another build to photograph
 it seemed like a good idea to try it out on the Hawks
And so, here’s a fresh batch of piccies - in the unforgiving light of the LED.
You can Judge for yourselves if they survive the extra illumination
Valley:
And TWU:
And finally:
It’s still just iPhone photography - but I reckon the little LED lightbox will prove useful.
I also took the photo’s through the middle of an LED ring light. The ring light’s day job is iPad Teams/Zoom video calls; but it’s also useful for BM type stuff.
great work Steve
I'm proud of you...🤩
ciao
Silvano
-
2
-
-
Steve.... 😍
what to say ... there is not much to say ...
great work, which unfortunately, I followed at times...
great work for competence ... for completeness, for attention to detail and for execution ...the 5.0 research of the new 3D printing techniques, open up a new model-making scenario and increase the limits of those who will not be able to take advantage of it...
chapeaux...
ciao
Silvano
-
1
-
-
On 1/6/2023 at 4:30 PM, giemme said:
Happy New Year everybody!
Here's my latest off the bench, completed in December 2022 actually:
A few words about the aircraft, before going into the model details: F-4ETM 68-0403. 112th Sqn "Seytanlar", TuAF, Eskisehir 2011 - this specific bird was delivered to the Turkish Air Force from the 110TFS, 131 TFW Missouri ANG in 1991, under Peace Diamond VI operation. It was the first of 16 F-4Es to be upgraded to the F-4ETM "Simsek" (Lightning) standard in 2010. I could gather very few info about this upgrade, which has nothing to do with the TERMINATOR version; I did found an article form a Turkish aviation journalist mentioning that this upgrade mainly consisted in integrating digital avionics with analog instruments, so very few differences were noticeable in the IP layout. I couldn't find any photos, though, so I just kept the original F-4E instruments panels.
About the model: this was part of a double build, together with a Finemolds F-4EJ kit that I converted (well, still in progress, actually) to a Hellenic Air Force F-4E. The idea was to complement the Hasegawa build with parts copied form the FM offering. The WIP thread can be seen here:
Aniway:
KIT: HASEGAWA F-4E Phantom II "Phabulous Phantom", #00790, 1/72, kindly donated by my friend @Gene K
Aftermarkets:
- Aires Exhausts
- Master brass pitot tubes
- Eduard #73201 PE set, for cockpit and airframe
- Quickboost resin seats
- HI-DECAL dedicated decals set HDL 72058
Scratch-building and improvements:
- resin outer wings, cast and adapted from F-4F Revell kit parts (original parts kindly lent by Silvano @phantom61
 )
)
- seamless intakes, @Gene K method
- door 19 area (the "hunch"), resin copy cast from the corresponding Finemolds part
- resin splitter plates, again cast from the original FM parts, since they offer an incredible detail in terms of the thousands of holes beautifully reproduced. I had of course to adapt the overall shape to fit the Hasegawa kit, but I think they came out good
- tail fuel dump, from brass pipes
- AoA probe, from brass rod
- slime lights, from aluminium tape and spare decals
- RBF tags, printed on regular paper using an EDUARD set as a template
- tail chute, from styrene foam
- drop tanks joint, using copper wire
- various cabling ad wiring using copper wires, in the cockpit mainly
- canopies opening arms, from steel rod and brass pipes
- drooped ailerons, cutting through the kit plastic and manually bending them
- fuselage pressure gauge. from clear sprue and a leftover decal
- canopy masks, cut with my Silhouette Curio but from design provided by @Gene K
Painting: Lifecolor paints for the camouflage, airbrushed. Tamiya acrylic Flat Black was used as primer/base. AK Extreme Metal, MM metallizers and Vallejo Metal for the various metallic hues. Lifecolor again for the interiors, both airbrushed and brush painted
Weathering: kept to a minimum, since the only pic I found of the real thing shows a well kept airframe. I used black tempera washes for the wheel wells and a few other areas, and oil washes for the panel lines (black, dark grey and light grey according to the base color)
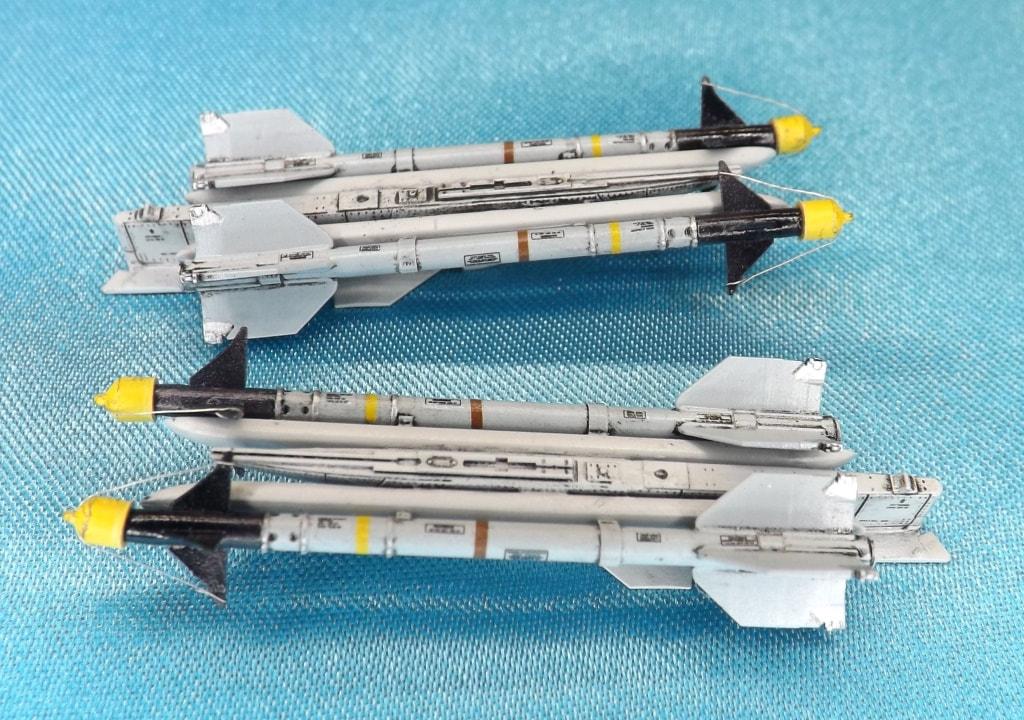
Weapons: this aircraft was used in the Air Defence Role, normally equipped with AIM-9 L or P; I opted for using two AIM-9Ls, leftovers from an Airfix Harrier kit
I'm pretty sure I forgot something, but enough blah-blah. here are the pics:
Here you can appreciate the detail of the splitter plates, with the holes showing up only when viewed from close distance, just like the real thing - hat's off to Finemolds for brilliantly reproducing that detail!
Tail chute detail
Seats
Cockpit details
Tail and exhausts details
Seamless intakes
resin outer wings
Ordnance and drop tanks
Underside:
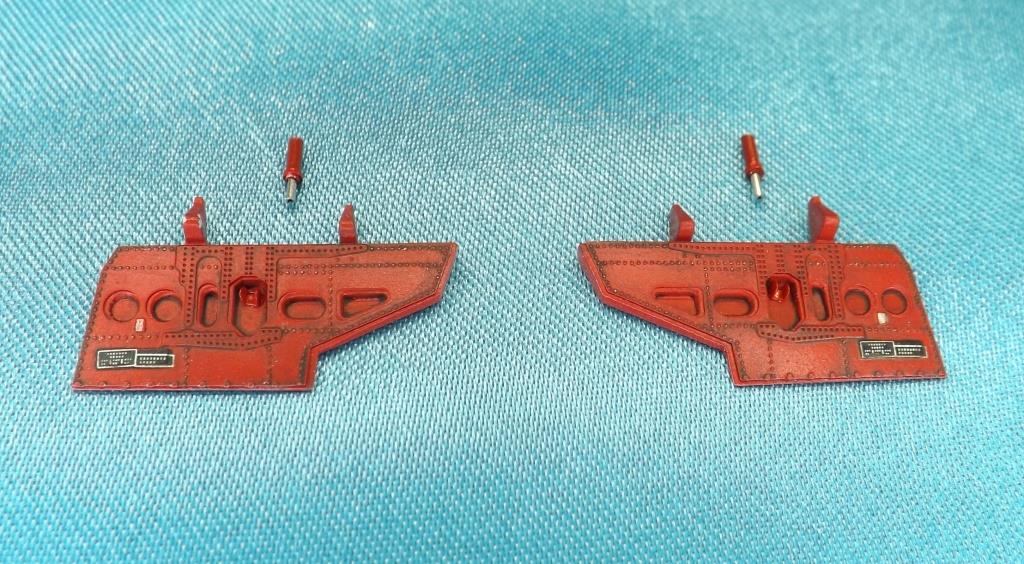
The drooped airbrakes are from the Eduard PE set, with scratch built actuators (from copper wire and its plastic sleeve, which happened to be red
)
The Auxiliary Air Intakes (the two small rectangular doors in the middle of the bottom fuselage) were instead cut off and scratch built from styrene sheet, using my Curio cutter.
Exhausts detail
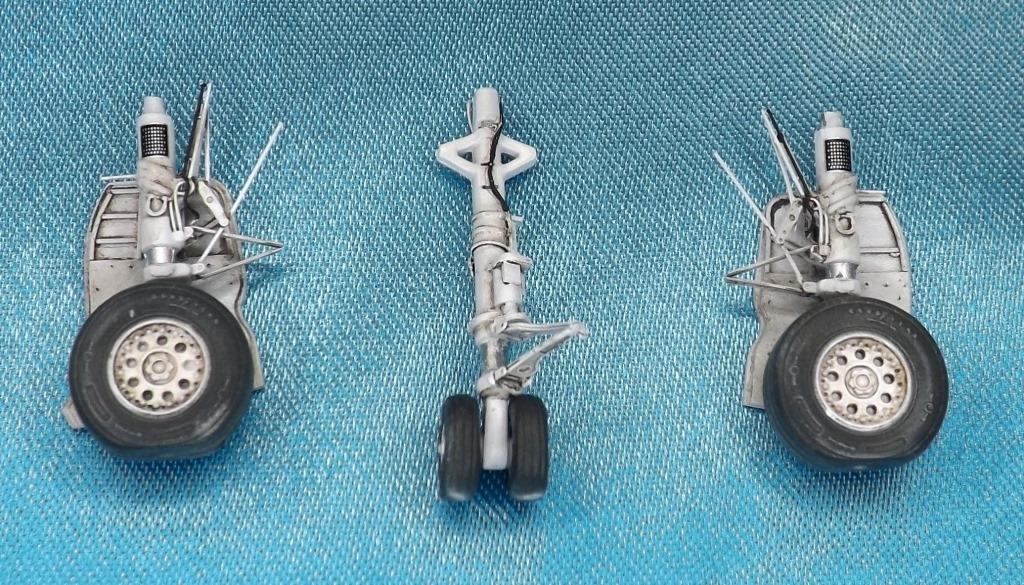
Nose U/C bay
Some bonus pics "in full sunlight"
All comments welcome
Ciao
Great work G.
another Phantastic Phantom 4 your collection.
bravooooo....
Silvano
-
1
-
-
17 hours ago, Fritag said:
My old eyes are feeling the same. One of the problems of bringing CAD and printing late to the build is that I didn’t have the opportunity to design in positive locators to the legs/stupid little doors that attach to the legs. It’s a case of little blobs of gator’s grip followed by a wishful thinking attachment of a stupid little door followed by removal of the stupid little door and cleaning-up of the gator’s grip followed by [repeat] finally followed by a tiny drop or two of UV cure resin and a blast with the UV pen light. And then the privilege of repeating the exercise with the next stupid little door.
Maybe, Neil. Maybe not. Who knows?
I see wot you did there Strickers
") But we are a terribly self-important lot and so tend to capitalise the Bar
But we are a terribly self-important lot and so tend to capitalise the Bar ")
Chippie was first serious model for donkey’s years and I benefitted from considerable assistance from the BM hive; it was a great introduction to the community wot we are. I also got a boll**king from Bill @perdu and have steered clear of black panel washes ever since. My motto has since then always been do what Bill tells you to do.
I collected a couple of Hasagawa’s and some aftermarket resin and bits and bobs (master brass pitot tube was a must) but I’ll probably now print at least some of the stuff I’ve aftermarketed. Anyways it’s all safe in the attic. Somewhere. I’ve also got a matchbox jag somewhere too. I’ve got an Airfix 1/48 Jag but I started 1/72 so I’d better finish at 1/72; although to get the set I’ll have to get an F16 C & D Block summat or other (40?) sometime too.
Not guilty. Some imposter. Maybe a namesake who’s mates were equally unimaginative in the deployment of nicknames but could actually spell in German…
I think there’s measurable continental drift wot has occurred during the life (weary existence?) of this thread, Andy; ain’t that long enough?
OMG. The thought. I’ll have therapy and quick-builds will be the thing of the future. You just wait and see.
I’m ex and getting old; so definitely not OK
. I do like the thought of maybe once having been a ‘habitual accelerator’ tho’. We did gain great satisfaction from getting very quickly to the bar and achieving inebriation in a short timeframe. Does that qualify, Steve?
And we charge by the hour don’t forget

Here’s some stupid little printed doors post attachment:
They need dirtying up a tad.
And here’s some leg restraints carelessly wrapped about the stick by a habitual accelerator who had to get quickly to the bar
Fed up of Hawk undercarriage doors.
Steve...
I looked at the last 5 pages...
what to say...
perfectionist
accurate
clean
with 3D a new frontier for the modeller...you make me want to make a new Hawk...
Fritag aftermarker... obvious😉
un caro saluto
Silvano
-
3
-
1
-
-
5 hours ago, giemme said:
Thanks Alan
It also shows a detail that is no longer there, to wit the fin pitot: somehow I managed to knock it off and I couldn't find it anywhere  Replacing it isn't a big deal, but it was the beautiful FM aftermarket brass part, and that's quite annoying...
Glad if I can be of any help, Bill
Thanks Terry!
The outer wings are indeed copies of the Revell F-4F parts - I have to thank again Silvano @phantom61 for lending me the original parts so that I could use them as a buck for a casting mould.
Thank you Steve, much appreciated!
Way too kind, Bill, but when it comes to modelling magic, you're second to none

Ciao
My friend...
about the phantoms...
G... asks
Phantom61... provides🤣🤣🤣
-
2
-
-
On 11/16/2022 at 8:05 AM, Giampiero Piva said:
The model came out in 2000, and I bought it immediately, given my insane passion for particular and definitely not beautiful aircraft. It is the typical 'short run', with all its flaws. The work to be done in the fuselage is considerable, as the internal surfaces of the kit are smooth, while in reality they were wavy, which requires extensive self-construction. Many small details, both internal and external, must then be refined or reconstructed, in particular as regards the external surfaces of the fuselage and the wings.
The model represents a Junkers W34 hau of the FFS A/B 121 flight school, based in Straubing in the summer of 1940.
The 'animal' is painted, as always, entirely by brush, in total RLM 63 (mixture of Humbrol Enamels).
A detail.
Hope you like it.
Thanks for your attention.
Giampiero PivaGreat job Giampiero...
😍
ciao
Silvano
-
1
-
-
beautiful work G
accurate as usual...ciao Silvano
😍
-
1
-
-
21 hours ago, Fritag said:
Didn’t. Not saying which was better neither
Waste of money. It’s a self-prolonging thread. (Why does that phrase sound a bit orf?)
TWU Hawk can rest a bit after that heady dash of the last week or two.
Haven’t really got any progress to post. So in lieu of that a nice piccie of a pre-wings young Fritag wobbling about in close formation in a Valley Hawk.
It’s not even the aircraft I’m modelling. No excuse at all really
What a dazzling smile tho’

Actually. I’ve just done a delicate task on Valley Hawk.
Having faired the windscreens in so carefully, I realised that they didn’t look quite right without some sort of panel line demarcating the windcreen and the fuselage.
Cue careful (very) use of the Tamiya scriber.
Results later; once I’ve made the paint good.
I know; not really worth a post or your time reading it was it. Sorry. But hey.
Steve
denotes a great attention to detail ...
I have twice as much time to read and translate...
🤣
ciao
Silvano
-
1
-
-
On 9/2/2022 at 4:03 PM, phantom61 said:
Steve ...
I am delighted with your works ...
I decided ... I'll go to the tank🤣🤣🤣
Steve ...
done ... in a week off work ...
you can also do something interesting ...
Zvezda 1/72
Scale figures 75
ciao Steve
🤣🤣🤣
-
12
-
-
5 hours ago, Fritag said:
Ha; thanks Jon, but I think I'll be leaving that to the proper print-meisters like Alan and Tony. I think I'll be sticking to home-brew after-market type accessories for the foreseeable.
How about seemingly inexhaustible excuses to avoid committing to paint....
Typically great insight and info Tony.
...
Equally typically unavailable for Macs...
Anywaysup.
Holibobs to Shetlands now over
 - although I'll bore you with a few piccies if I may (it's my thread innit)...
We took the 15 min flight from the Shetland Islands mainland to Foula (pop. 35) in one of these (this is it landing at Foula to take us back again):
Landing on the way out was delayed slightly whilst the sheep were cleared off the runway (true).
Foula is a fabulous (if hilly) place for a walk.
With terrific views- in this case from half way up Hamnafield looking southwest to Da Noup; Mrs F probably wondering why there had to be a valley in between the two necessitating two climbs instead of one!
A PBV-1A Canso (Catalina) crashed on Hamnafield in bad weather in 1944, with only one survivor; and there's a touching memorial. We didn't know about the crash in advance and so it was a sort of sombre delight to come across it.
In other aviation related matters, the coastguard put in an appearance in the centre of Lerwick, delivering a casualty to hospital.
I think there are a couple of these impressive beasties based at Sumburgh.
And the Shetland Mainland reminded us that great scenery abounds up there...
Been back home since last Sunday and in between real-work I've done summat on the hawks.
The canopies are now basically finished (save for weathering - which I'll do at the same time as the airframes proper).
TBH they're not quite as good as the picture I had in my head of what I was aiming for; but I've probably reached or more probably exceeded the limits of my talents in 1/72 scale. The techniques I've been attempting are probably better suited for larger scales - 1/48 at least. But I'm ok with the result.
When I designed the internal structure I built in a 0.3mm groove as a locator for a representation of the internal blast shield (unlike me to think ahead); and I also printed a template for the blast shield thus:
Which I used to cut out a couple of blast shields from OHP film:
I also decided to print the rear view mirrors.
I had some aftermarket PE mirrors; but printing them meant I could make them in pairs with a bit of support structure making it (a lot) easier to paint and attach them.
Blast shield and mirrors in situ:
The blast shield of course is see-through so isn't visible half of the time. Waste of time maybe, but I know they're there...
And some external views:
At leats the saga of the canopies is over. Unless I manage to drop one or spill something on one or otherwise ruin things with clumsiness.
Steve ...
I am delighted with your works ...
I decided ... I'll go to the tank🤣🤣🤣
-
1
-
-
On 7/21/2022 at 9:53 PM, Fritag said:
Succumbed to the temptation to produce my own main undercarriage doors as well. Probably cos I haven’t had the chance to do any ‘proper’ modelling since hols - but can generally sneak some computer time when I should be doing legal type stuff….
The port inner door is fully worked up; the outer two sections are still in the initial stages.
They doors are a compromise shape; aiming to be as accurate in outline as is possible whilst still looking like they’d fit in the kit wheel wells.
Port inner door:
Rushed out some test prints whilst purportedly doing real-world work. Somewhat surprised how well they came out as I (thought) I hadn’t built in sufficient supports yet.
To my mind a real improvement over the Airfix parts (and also the aftemarket resin ones I picked up yonks ago).
These are the last sub assemblies to fabricate.
Steve...
sin palabras
ciao Silvano
-
1
-
-
Great Giampiero...
I following
ciao
Silvano
-
1
-
-
On 4/7/2022 at 8:31 AM, Ettore said:
Hello Silvano
Great work !! In this days I started same kit and I search right colors for camouflage, can you tell me what colors you used and their Fs code and the brand code?
Congratulazioni !!
Ettore
ciao Ettore,
I have been using only Acrylic Gunze for a long time ...
in this case I used:
dark green H-330 Aqueous Hobby Colors BS381C / 641
dark sea gray H331 Aqueous Hobby Colors BS381C / 638
both colors have been desaturated to make them slightly lighterSilvano
-
1
-
-
On 1/20/2019 at 2:02 PM, phantom61 said:
Hi guys,
some photos of my SWIFT FR5, Airfix 1/72 built for my friend...
box model with added Eduard photo-etched dedicated.
ciao Silvano
Hello Mates...
sorry for delete image...
ciao Silvano
-
2
-


F-4 Phantom FGR.2
in Work in Progress - Aircraft
Posted
Hi Bruno...
great job... I love It...
I hope to see him soon in some exhibition in Italy
ciao
Silvano
ciao Silvano