

Pascal
-
Posts
487 -
Joined
-
Last visited
Content Type
Events
Profiles
Forums
Media Demo
Posts posted by Pascal
-
-
The last 2 photos were found online (build log of the F40 BPR spec). I used to have a very large amount of reference photos (taken by a very kind F40 owner in the US), but lost nearly all of them when my PC crashed a couple of years ago. Sadly the owner has sold his F40, so that source is gone.
I took a couple hundred photos myself, but those are of the F40 Beurlys.
THE number 1 reference is the "back to life" DVD, made by the german who rebuild a crashed F40.
Sincerely
Pascal
-
 1
1
-
-
Hi Wayne,
I think that your collars are to long and the stems of the eyebolts are to short, that's why to look a bit strange.
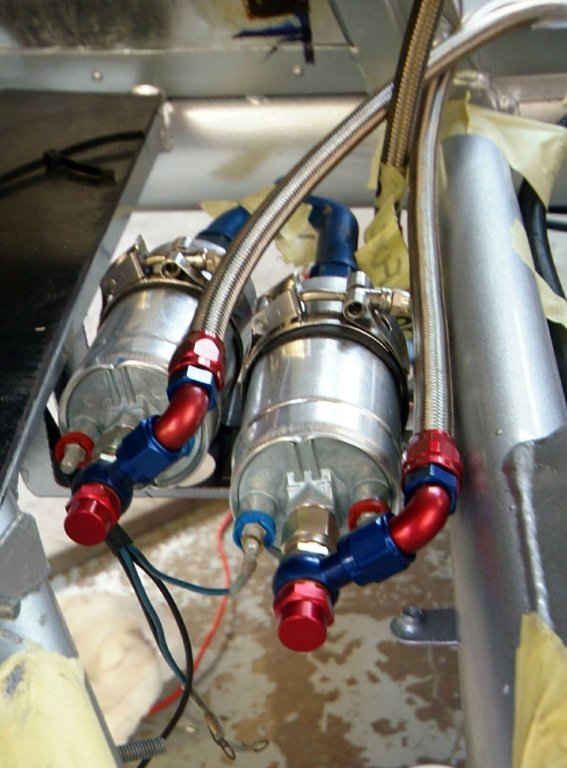
A reference pic :

Those hoses are not attached to the turbo's, but look at the length of the stems on the eyebolts.
This pic shows the "eye-bolt" lines attached to the turbo's, same thing here, the stems of the eyebolts are quite long :
Sincerely
Pascal
-
1
-
 1
1
-
-
Hi Wayne,
If you need to install small bolts and nuts in tight spaces, there's a way to "fake it". Don't use a bolt and a nut, but use a piece of threaded rod and 2 nuts. Use tweezers to hold the first nut in place (at the back of the flange), screw the threaded rod into the nut, put on the other flange and screw on the second nut.
Sincerely
Pascal
-
2
-
1
-
-
Stunning work Serkan.
The drawings / templates that you made, would be a great help for anyone trying to do the same conversion. Are you planning on selling your drawings ?
Sincerely
Pascal
-
1
-
1
-
-
Your last photo is visible.
-
1
-
-
Good luck Dan.
Great work !
Sincerely
Pascal
-
For the muffler, I recommend Vallejo Metal Color 77.723 Exhaust Manifold.
-
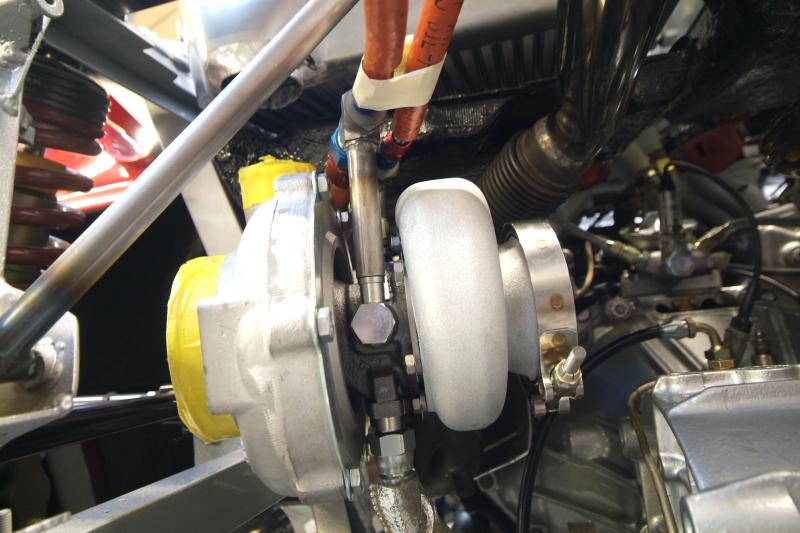
Hi Wayne, here are some pics.
The muffler :
Turbo's :
The Pocher F40 is a "non cat , non adjust" F40, meaning that it has none of both.
Here's a pic of a cat F40 :
Sincerely
Pascal
-
1
-
1
-
-
Hi Wayne,
Very nice work !
Dont worry about the solder on the muffler. The 1/1 scale F40 mufflers have some weld seams that are quite visible. Will post some pics later today.
Sincerely
Pascal
-
1
-
-
4 hours ago, larchiefeng said:
...
I really wish I could find a larger size of the aeroquip fittings for the larger braided hoses. I just don’t like having to cut brass collars in half for the ends. They don’t look correct on all the hoses; some but not all.
Pascal, I don’t suppose you have any idea where we can get those do you?? Thanks everyone!
Hi Wayne,
I guess the size of the hex nut from Autograph is 2 mm ?
It will be very hard to find larger ones like 2,5 or 3 mm. But there is a way to make them yourself.
If you have a lathe (or know someone that has one), buy a hexagonal rod of the desired diameter. With a lathe is easy to cut one end so that it is tapered, then drill a hole in the middle.
I think you can do the same with plastic hexagonal rod and a dremel, but it will be hard to drill the hole dead center.
PS : I'm pretty sure that Uli had them made for the transkit (don't think he made them himself), maybe you can ask him the name of his supplier and contact that supplier to ask if he has bigger sizes.
Sincerely
Pascal
-
You can also find those at scaledetails and Knupfer. In the Knufper webshop they are Imitateschrauben. The acorn nuts are Hutmutter.
Sincerely
Pascal
-
4 hours ago, Schwarz-Brot said:
...
@Pascal thank you for the hint on the eyebolts / Augenschrauben. Stupid me works with large sized ones quite often but was too dumb to realize they exist under the same name down to watchmaker sizes. "Betriebsblind", as we say in Germany.
Hi Schwarz-Brot, I've done some extensive research on miniature eyebolts / Augenschrauben. These are some of my findings :
* the M-size (M2, M3, ...) always refers to the diameter of the thread of the bolt. Where as us modellers are more interested in the diameter of the eye and the hole.
* there's basically 5 different types : 1 : with a circular piece (bund) under the eye, 2 : without the circular piece, 3 : with thread, 4 : without thread, 5 : with a stem and partial thread.
* about 90% are made / available in Germany.
* there's a lot of difference in quality, especially the roundness of the eye.
* they're expensive.
But I found a very nice alternative that is cheap as dirt. Sofar I've only found 1 size, but I only paid a couple of euro's for 100 pcs ! Tomorrow or thursday, I will take some photos and give the website where I bought them.
Sincerely
Pascal
-
A true work of art Harvey. Absolutely stunning !
Sincerely
Pascal
-
1
-
-
Thx guys.
My castings are far from perfect. I estimate that each body requires about 1,5 hours of putty, shaping and sanding.
I started to cut out the openings for the headlights, I hope I'll be able to make the small "boxes" that will hold the headlights.
Sincerely
Pascal
-
3
-
-
Hi Wayne, I'm glad you found the eyebolts. If you do a google search with "augenschraube M3", you'll find lots of places that sell the ones that I showed in the photo. For example Amazon and Conrad. There's a couple of versions (diameter of the eye, diameter of the hole, etc.) , which gives you multiple options.
Sincerely
Pascal
-
Hi Wayne,
I use eyebolts like these :
Cut off the threaded part, insert the stem into the braided hose, use a piece of alu or brass tubing to attach the eyebolt to the braided hose and fix the eyebolt to the turbo with a hexagonal bolt.
I've checked my transkit catalogue, the parts that I mentioned above are not in the transkit.
I'll look for the autograph cable set when I get back, but I'm pretty sure that those parts aren't in that set neither.
Sincerely
Pascal
-
1
-
1
-
-
I checked my references, sofar I've found 2 photos that show where the braided lines (the ones you marked orange in the drawing) connect to :
That last photo also shows where the green and purple hoses connect to the turbo.
I don't think that autograph made the connectors for these lines, but they can be easily made with eyebolts and hexagonal bolts.
I'll be on holiday from monday till friday, but I'll look for the F-40 video and the autograph braided line set, when I get back.
Sincerely
Pascal
-
1
-
-
If I recall correctly, the total number of transkits that Uli sold is between 450 and 550. There were 2 versions (Speedline street and OZ-racing), the difference between them being the wheels and tires. There was also a seperate set with braided hoses and attachments. That set might have the parts you need to attach the braided lines.
I'll check my references when I get home tonight. I should be able to give you the partsnumbers of the missing parts.
Sincerely
Pascal
-
19 hours ago, larchiefeng said:
...
I made a lot of mistakes and had to redo a few things. In this case, I didn't put bungs in, I just added the bolt heads. I also only put two on the top of each header instead of two on the top and two on the bottom. Each header has four which I go back and correct. Anyway, I don't mind showing my mistakes; this transkit is a real learning experience so, there's a lot of doing things over to get it right. Part of what makes this slow going is trying to think steps ahead and taking into account that if I install this part now, will it be in my way in the next step or two steps ahead. I spend a lot of time thinking about whether or not I'm ready to permanently ready to attach something.
Nice to see you back Wayne.
You dont make mistakes, you just make things better the second (or third) time around.
Remember : you are one of a handful of modellers that actually BUILDS this transkit, instead of letting it gather dust.
Keep up the good work mate !
Sincerely
Pascal
-
1
-
-
Very nice work mate.
-
1
-
-
Stunning work Neil. You've created a real beauty.
Sincerely
Pascal
-
Been a while. I've tried a different type of resin from the brand Resion. This hardens in 90 minutes, instead of 7 days for the other resin that I used.
Sofar I've casted 9 bodies, 4 with the clear resin, 5 with the white.
These are 4 of the white bodies, the one on the left didn't come out well, cause I left the mixture harden to long :
The white resin give a much smoother result then the clear resin :
There's still a lot of refining to be done :
But I'm having tons of fun experimenting with resin and that's the most important thing.
Sincerely
Pascal
-
8
-
-
Been busy this weekend making the mould.
First part of the mould :
Second part :
And the first test shot :
I'm quite pleased with the result. There's very few air bubbles and most of the details are present on the test shot.
Before I cast a second shot, I'll do some clean up on the mould cause there's a couple of spots were the rubber has formed 2 layers in stead of one.
The mould could have been a bit wider, I'll take that into account for a next mould.
I took out the first test shot (after 24 hrs) before the resin had fully cured. According to the instructions the resin is fully cured in 7 days (!)
Should be able to cast the second shot on thursday or friday, will take photos of all angles when the resin has fully cured.Sincerely
Pascal
-
3
-
-
This will be a slow build. I want to try to make a rubber mould and cast resin.
The kit that I'll be using is this one, a cartoon, cute version of the Porsche 962 :
The brand is Mitsuwa (long time out of production, company doesn't exist anymore), the kit is one from the Mid Racer Collection series.
It's a "no-scale" kit, the finished model is +/- 9 cm long (which puts it in the 1/43 scale category I think).
Basically it's a toy that has a "pull-back" spring-loaded motor so you can make it run. In it's hayday Mitsuwa even produced a track to run these kits on.
Sadly these kits have become hard to find and are quite expensive for a toy. I bought mine years ago for 8 euros, now they go for 40-60 euros.
I have another kit from the same series. It's boxed as a Porsche 956, but it's the same kit as the 962.
In the box you'll find very few parts, the kit kan be snapped and screwed together :
Now what I want to TRY is : add some details to the body - like opening up the NACA ducts, fill the inside of the body with clay, make a 2-part rubber mould and cast resin copies of the body, have a go at vacuforming the windows, and build
some cute 956's and 962's.
Why ? because I'm very fond of these cute Porsches and I want to build a bunch of them.
Inside of the body :
Topside :
First thing I did was remove some unwanted plastic and open up the naca ducts and openings for the radiators :
Had to take a few photos with the body on the tires. Oh yeah, real CUTE :
I think that I need to remove the large wing at the back before I make the mould ?
The rubber and resin products have arrived today, I'll post some photos later.
Was thinking of making a box with Lego's.
Please feel free to comment. I've never used rubber nor resin for casting before, I need all the help I can get.
Sincerely
Pascal
-
2
-


Pocher F40 with Autograph Transkit 1:8
in Work In Progress - Vehicles
Posted · Edited by Pascal
Nice to see another F40 with the transkit being build. Good progress sofar.
The small tube that you mentioned is not a drain. It is an oil bypass tube that leads oil from the forward part of the gearbox to the back of the gearbox. On the F40 diagrams and on "showcase" F40 engines, this tube is cut off at the bottom and leads nowhere. But it should be connected to the back of the gearbox. I'll check my references and hope to be able to tell you where exactly it connects to the gearbox.
Sincerely
Pascal