

Pascal
-
Posts
487 -
Joined
-
Last visited
Content Type
Events
Profiles
Forums
Media Demo
Posts posted by Pascal
-
-
I can highly recommend the Motip spray cans.
Very nice work on the engine / gearbox. Love the tiny scratchbuild details that you added.
What paint did you use to get the rough finish on this part ? :

Sincerely
Pascal
-
Been very busy the last week. Everytime that I modifie a piece, the same has to be done to the other 8 Bburago F-40's.
My workbench is littered with parts :
I removed about 5mm from the front part of the frame. Before :
After :
I finally cut all the struts from a U-shaped brass profile. Took me couple of hour. Sorry for the lousy picture :
The struts are sanded on the top, so that the piece of plasticard fits nicely :
I'm using this part from a Kyosho F-40 to make some details that will go on to the back of the piece of plasticard :
Kyosho made the air inlet tubes like this :
This is a first test on one of the Bburago frames, I might want the alter the shape of the hole a bit because now the tube gets squashed :
I hope that the tube will look like this when done :
Sincerely
Pascal
-
 5
5
-
-
Hi guys,
I broke one of the wheels of my 1/18 UT Models Porsche 911 GT1. I have a wheel insert from S.M.S., that I want to use to make a rubber mould.
Do you think it's possible to make a mould with this insert ? And can you explain how to do it ? :
Any help and tips are welcome.
Sincerely
Pascal
-
Nice project ! I'm very happy to see another modeller giving some "TLC" to a diecast model.
There is 1 manufacturer (that I know of) that makes decals in 1/12 scale. He does this set for your model. It costs $56 :
The manufacturer is pattos place, located in Australia : http://members.optusnet.com.au/pattosplace/home.html
If you want / need to detail the interior I highly recommend self-adhesive aluminium tape.
Sincerely
Pascal
-
1
-
-
2 hours ago, JeroenS said:
Wow Pascal this is some project you have going here. That's a good bunch of them! If I may ask, is there a reason you're doing so many? Or is that just the old "because I can" modelling thing? 🙂
Hi Jeroen, there's a number of reasons why I'm building between 9 and 11 F40's at the same time. First of all the Bburago model is very cheap, I originally wanted to modify a couple of Kyosho F40's, but they go for crazy prices. Second, though the Bburago model is a decent model for its age, it's also bad in some areas, so that leaves a lot of room for improvement. Third, I'm 100% sure that when I'm done with these Bburago F40's, I'm never gonna touch one again, so it's basically : build them while I can.
Sincerely
Pascal
-
2
-
-
@ Codger : how are you mate ?
Thank you for your kind words. Yes I do know a lot about Ferrari, but I also know a lot of italians and germans. My italian friends are the real Ferrari affectionados, for them Ferrari is a holy as the Vatican, and Michael Schumacher is a god.
They tell me time and again how much italians adore Vettel and the things he does for the workers at the factory. For those italians Vettel is a much italian as he is german.
My german fans are of course big fans of Vettel and Mercedes, wich leads to very interesting conversations about Ferrari and Vettel.
PS : Funny that you mention my Ferrari models, this week I continued with my F40 production line (after a 5 year break 😪) :
-
 2
2
-
-
I finally put this project back on the modelling table.
Nine of my 11 Bburago F40's will go to the production process. Some pics of the F40 graveyard :
A couple of years ago a friend of mine made about 30 of these with his CNC milling machine :
The goal is to make a frame like this one from a Kyosho F40 :
That's were this project got stuck. I had no idea how to turn those A's into a frame, untill about a week ago : TATAAAA, I have an idea. First step : glue a piece of plasticard - in a shallow angle - on top of the frame :
Step 2 : connect the A's with some scrap plastic :
First dryfit shows that there's some tweaking left to do, but the idea seems to work :
The Kyosho will serve as a donor for a lot more parts, here's a couple of them :
Sincerely
Pascal
-
4
-
-
Vettel is a bit overrated ?
Vettel brings his mojo to a team. He works very hard off the track, is loved by the team and by the workers at the Ferrari factory. He's not as good at it as Michael was, but his personality brings a lot to Ferrari.
Alas Ferrari F1 management isn't what it used to be. The days of Ross Brown and Jean Todt are long gone (Vettel would have fit perfectly with those two). It's clear that Vettel misses the relation he had with Christian Horner and he gets more respect from Toto Wolf then from his own team boss.
That's why he's leaving Ferrari, a bit the same reason why Michael retired.
I'm sure that Vettel will get hired by a german manufacturer. It might be the Mercedes F1 team, or DTM, or even a new Mercedes Le Mans team. Vettel is a very big name for german motorsport.
It would be interesting if he were to race with the Mercedes F1 team, next to Hamilton (now there's a driver that's overrated). Hamilton is not loved by his team (Toto Wolf calls him a cry-baby) and brings very little to the table for the team and for german motorsport.
Look at Nico Rosberg, he's a big asset for Mercedes since he's retired from F1. I dont think Vettel will retire from F1, but he will definitely continue to play a major role for german motorsport and for german car manufaturers.
-
1
-
-
Thank you gentlemen !
Spent a lot of hours fiddeling ...
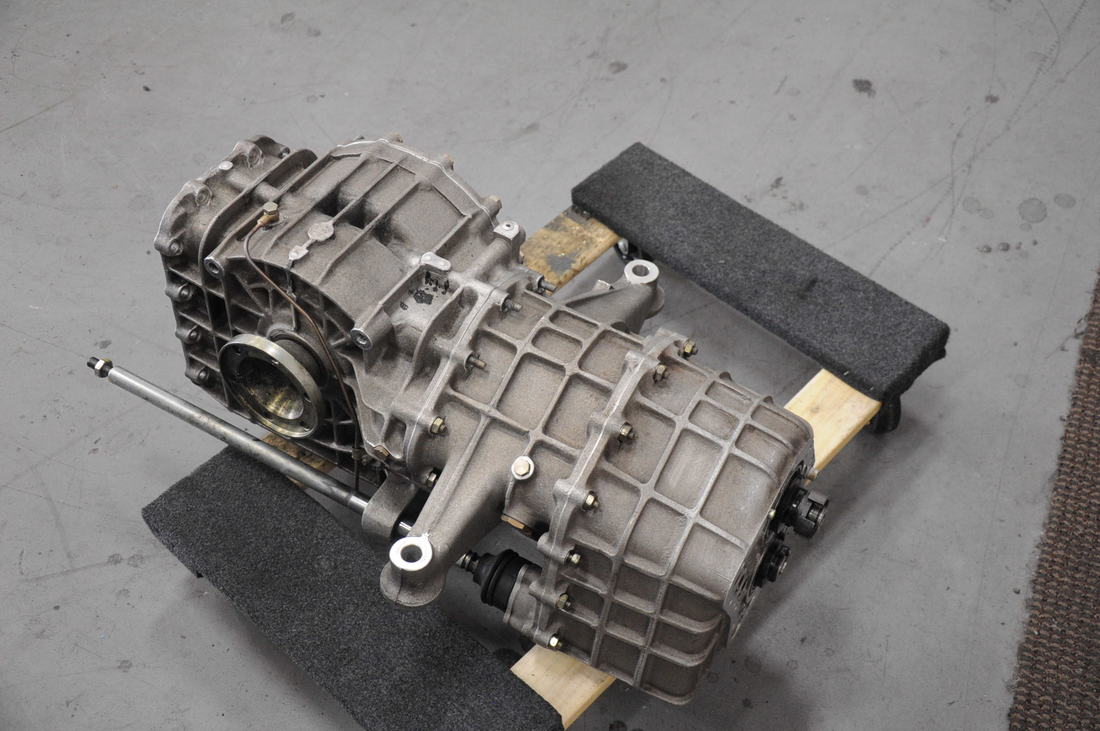
After endless dryfiting, I found the solution to the problem : I moved a hole in the gearbox a bit more to the front :
Lousy pic, but it shows the old and new hole (barely)
A copper tube will be fitted in the new hole, this will serve as an attachment for a piece that's part of the suspension :
I added some tiny parts to the gearbox (triangles, strips, circles, etc) :
Made 4 of these with the lathe, they will attach the exhaust tubes to the exhaust :
Dryfit :
It was a lot of work, but I'm happy that it went well.
Sincerely
Pascal
-
2
-
-
I use this glue. Why ? :
It doesn't stain the belt material. You can use it to glue plastics, metals, leather, fabric, glass, etc. Apply a very small amount of this glue with a toothpick to both sides of the fabric, let it dry for 30-60 seconds and press the two sides together.
-
1
-
-
You're a bloody genius Harvey. I very much enjoy going thru your wip and seeing your magnificent masterpiece coming together.
Whenever I'm stuck with one of my projects, I study one like this and get inspired to go back to my workbench.
Thanks so much far sharing your excellent work.
Sincerely
Pascal
-
1
-
1
-
-
Nice project.
Having stripped quite a few diecast models, I can highly recommend using a paint-stripper-product. Get the strongest one you can and remove all the plastic parts before you use it as it will eat the plastic.
Legende miniatures has a large choice of upgrade parts for 1/18 scale cars, cheap PE-sets can be found at Tremonia.
Sincerely
Pascal
-
2
-
-
In order to close the bonnet properly, you have to remove the tabs (U-shaped with a hole near the round part of the U) that are on the left and right side of the bonnet opening.
But I agree with Cooper645, remove the body from the chassis and cut away the parts that prevent the body from fitting over the chassis.
I recommend sending an E-mail to Revell department X, with the photos of the warped body. They might still replace your faulty kit with a new one. It's worth a try.
Sincerely
Pascal
-
Update :
After months and months of headscratching, I've finally found a way to attach the kidney shaped parts to the gearbox.
They need to be fixed to the gearbox at exactly the spot where there's a hole for the screw that attaches the gearbox to the chassis.
I've trimmed a plastic part of an old aircraft kit so that it fits in the hole, the copper tube will hold that part in place while I drill the holes :
Here I've drilled the first hole and inserted a piece of brass tubing that will hold the kidney shaped part in place :
Dryfit :
Not a lot of clearance between the diagonal torsion bar and the suspension arms, but the real car looks exactly the same :
I'm really happy that I've finally found a solution, now I can move on with this project.
Sincerely
Pascal
-
2
-
-
I can only imagine how many hours of head-scratching it took to get those pipes done.
Those outer pipes are really hard to get right, they're shaped like a question mark.
This would be a nice alternative, but I doubt that you can find these in the correct diameter :
Sincerely
Pascal
-
1
-
1
-
-
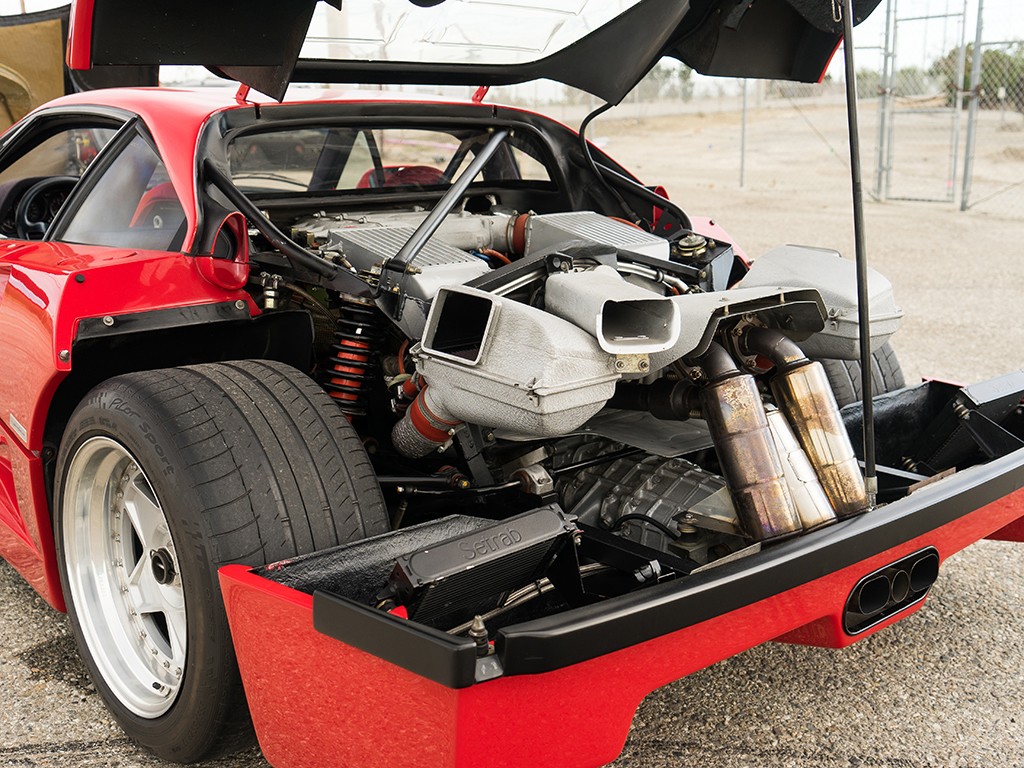
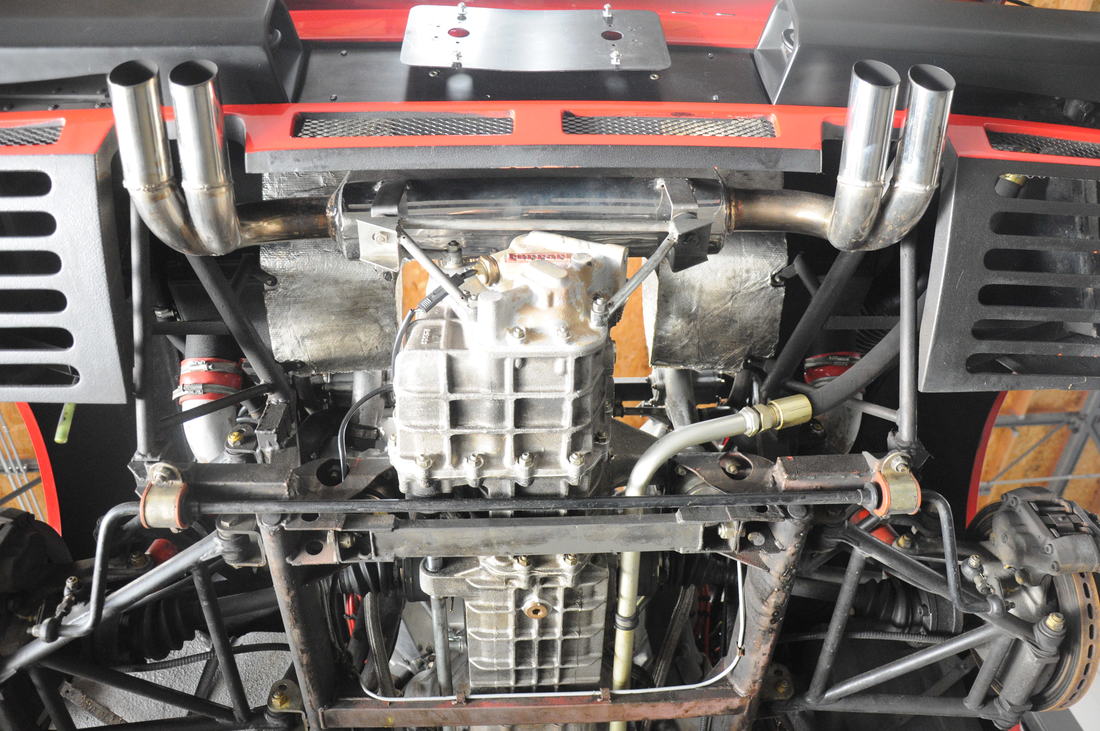
This is an original Ferrari F40 LM exhaust system. Upside down to show you the front end of the pipes :
This photo gives you an idea how the pipes bend towards the turbo's :
For reference only
And of course Michael Sheehan's website has great pics like this one :
From Ferraris-online.com, for reference only
-
1
-
1
-
-
The pipes will make a nice difference. Are you going full naked pipes ? :
This site has some very nice photos : https://rmsothebys.com/en/auctions/pa19/paris/lots/r0085-1987-ferrari-f40-lm/740406
Or more a tubi style exhaust ? :
-
2
-
-
You're getting there Wayne. Have you tried a smaller diameter sleeve / collar ? Judging from your photos I think you have some mm's to spare at the moment.
-
Nice to see another Hasegawa / Revell 962 build.
Perhaps the biggest flaw with this kit is the shape of the fenders above the front wheels. They curve inside too much, where they should be more or less parallel with the sides of the body.
Sincerely
Pascal
-
29 minutes ago, larchiefeng said:
...
So, Pascal, what ever happened to your F-40 Barchetta in 1/8 scale, did you ever finish it?
...
Sadly no. It's safely packed in a couple of plastic boxes. During the build, I ran into a big problem : I thought that the engine, gearbox and rear suspension were attached to a tubular chassis like on a normal F-40. But the F-40 Beurlys doesn't have a chassis at all, it's basically a carbon fibre bathtub (with some steel frame inside I suspect, but that's not visible) to which the front and rear suspension, engine and gearbox are attached. I found that out while I was building the model (the real car had a major overhaul and that gave me some very nice reference pics) , but had no idea how to make the construction strong enough to carry all that weight. So I paused the build and it's been like that for a couple of years. But I will pick it up again one day, have had a number of ideas how to solve weight problem. First I have to get the whole silicone / rubber / resin thing sorted out (with my cute Porsche project), then I have to learn how to vacuform parts. When that is done I can finish the 1/18 scale Ferrari builds that I have going on, and then finally it's back to the 1/8 scale F-40's.
-
Nice work Wayne,
An alternative for tubing (to replace or modifiy the turbo tubes) is solid alu rod. It's cheap and much easier to bend then hollow tubing. I order mine from a flowershop, where they are used to decorate pots and plants.
-
Update :
All the bodies that I've made sofar have 1 big problem : the area around the windshield and windows.
They have to be really thin to allow the 1 part windows to fit, but that makes them very fragile.
I hope it will get better when I'm able to vacform the windows, but that's something I've never done before, so that will be another first.
This photo shows the problem area :
The body from the kit looks like this :
So I made another mould (the "male" part this time). The rubber needs to harden 8 hours, fingers crossed that it will turn out all right.
Good news :
I've been fairly succesful in casting the rims / wheels. At the moment they're not all the same height, the will be corrected when the tires are done :
The details came out pretty nice :
But I'll need to make a new mould (with a harder rubber) to cast the other version of the wheels. Some tiny pieces of rubber broke off after 2 castings :
I wasn't succesful in making a mould for the rubber tires, so I used my lathe and made the front tire from a nylon rod, the rear tire from a alu rod.
I made the diameter a little bigger so that they fill the wheelopenings a bit more :
Will make the mould for the tires this weekend, I hope that all goes well.
Sincerely
Pascal
-
Been busy at work, but I have a couple of days off.
Wasn't happy with the castings, figured that the reason was that the female part of the mold wasn't large enough.
This caused the sides of the castings being to thick and bending outwards.
I ordered some new silicone rubber and made a new female part, using the male part of the mold and some lego.
Here it is after 8 hours :
The new mold is a lot bigger, specially on the sides (doesn't show very well on this photo) :
So far so good, but I made a couple of errors. The silicone was seeping through the lego blocks because I didn't put in pieces of cardboard or tape to line the inside.
Took me almost 2 hours to get the mold out of the lego blocks.
Then I decided to cast the first body, but forgot to spray the mold with a release agent.
This was the result :
And I spend the next couple of hours picking small chips of resin out of the mold.
But there's good news !
I cut some excess rubber away from the male part of the mold, on the left the last casting from the old mold, on the right the first from the new :
Old mold with all the imperfections on the side of the body :
New mold (this is the broken body, glued together) :
And this is the second body from the new mold, after some clean up :
Still not perfect, the area at around the windshield needs some work. I think some modifications on the male part of the mold will help.
Sincerely
Pascal
-
1
-
-
I've checked my references, had to go thru my 288 GTO and 288 Evoluzione photos to find the answer.
The tube is not attached to the gearbox, but runs straight down (as you mentioned earlier). Took me some time to find what the tube does (I don't know a lot about engines / gearboxes).
The tube is part of the gearbox breather system. A breather prevents pressure from building up inside the gearbox. Without a breather the pressure can cause oil leaks.
The breather allows hot air to escape and fresh cooler air to come in. The breather is the part that looks like a hexagonal bolt (attached to the top of the gearbox housing).
These photos are from a 288 GTO, but they show the breather and the tube :
Sincerely
Pascal
-
2
-


Ferrari 250 GTO (Airfix 1:24)
in Work In Progress - Vehicles
Posted
Looks like a nice kit of an iconic Ferrari.
Mike Sheehan has some nice pics on his website : https://ferraris-online.com/cars/1962-ferrari-250-gto-3387/
Some info on the 250 GTO : https://www.topgear.com/car-news/classic/ferrari-250-gto-everything-you-need-know
Sincerely
Pascal