


Ints30
-
Posts
37 -
Joined
-
Last visited
Content Type
Events
Profiles
Forums
Media Demo
Everything posted by Ints30
-
Next up is the Ferrari F50, which comes in yellow again. This is the second model in a five model build. In addition, a photo ets kit has been purchased. The assembly has already reached the point where the body shell has been painted and has received a clear coat and is waiting for polishing.
-
Mustang Shelby GT500 "Eleanor" 1967 USCP/Revell 1/24
Ints30 replied to Ints30's topic in Work In Progress - Vehicles
Thanks for the kind words, but I have to find a better solution for the wires of the hood clamp cables, they are too strong and should be softer. -
Mustang Shelby GT500 "Eleanor" 1967 USCP/Revell 1/24
Ints30 replied to Ints30's topic in Work In Progress - Vehicles
More recent pictures of the assembly and pictures of the finished model. After applying the clear coat, polishing has been done on the car body shell. The hood nose mounts work like the real thing, very small clips for that.- 10 replies
-
- 13
-

-
Mustang Shelby GT500 "Eleanor" 1967 USCP/Revell 1/24
Ints30 replied to Ints30's topic in Work In Progress - Vehicles
Time has gone on and the design of the model has also moved forward a bit. Next, the door side panels had to be replaced at the cabin, the original panels had to be removed and new panels put in their place. PLA plastic had to be used to keep the new panels in place. With the panels in place, it turned out that the seats did not fit in place. It was too narrow to fit the seats, and the solution was to make grooves on the outer ends of the new panels to get a little more space. This was helpful and the seats went into place as they should. More carving and matching was the making of the hood attachment points, 0.9 copper tube and 0.7 pin and 1.2 mm copper sheet were used, the sides of which were twisted together for strength. -
Greetings from building trails again. This time, my choice is the Shelby GT500 "Elenanor" 1967 from the well-known movie "Gone 60 in Seconds" (2000). The body shell and the parts necessary for it are a resin product. Metal ets parts have also been added to add detail. The product is Ukrainian USCP (Ukrainian scale car production) The donor is Revelli's Shelby Mustang GT350 H. The resin parts are easy to process, but they seem to be fragile. The color is Pepper Gray from the Zero paints. Mold marks marked in black to be sanded off and panel gaps made deeper. The hood mounting hinges were poor and makes them metal which makes for better opening. The edges of the hood also need to be improved a bit, the gaps with the body of the car are a bit too big. (A bit hard to get a picture). Fitting the muffler. At the ends of the exhaust, cuts had to be made on the bottom of the body at the wheel wells, and the resulting holes were filled with pieces of PLA plastic. The muffler pots fit better with the bottom, I made small bumps on them. Until the next posts 😉
- 10 replies
-
- 16
-
-
My Fare Lady - a Revell 1:24 Austin FX4 Taxi re-imagined
Ints30 replied to Neddy's topic in Work In Progress - Vehicles
interesting build and I like the color combination 🙂 -
Greetings, I haven't posted anything here for a long time, but I've been keeping an eye on the builds here. The model of this theme is nicely assembled and found a place on the shelf. See you at the next exciting builds 🙂
- 27 replies
-
- 10
-
-
I am following the topic and assembly with interest, I once assembled the same model myself. 🙂
-
Newer post in the topic. The body was polished and the result can be satisfied. The interior was also painted and came in two tones. The floor and side panels were painted white, and the seats and armature were painted a light blue. The rear glass had to be cut out separately and fitted properly. One more fitting had to be done with the seats, as the backrests of the seats were tilted too far back and protruded a bit from the rear window, then by keeping them in hot water, they could be bent forward. Now you are positioned better in relation to the rear window. Now the model is almost assembled and the lower part is completely together, there are still glasses and protection bars waiting to be attached. The side glasses must be cut to the correct size before installation.
- 27 replies
-
- 14
-
-
You expected that there would be something with red color or something of a different color. When looking for color options on the Internet, the choice remained in the shade of blue. The construction is based on a found car that I liked and is in blue color. I also like the color of this model, black and chrome play well with this choice.
-
🙂
-
Mercedes 170 Va "Lieferwagen" - Finished
Ints30 replied to harti20's topic in Work In Progress - Vehicles
I like the imitation of a wood floor, it has been well done. 🙂 -
Italeri Land Rover Series III 109 - Safari Conversion
Ints30 replied to Slackbladder's topic in Work In Progress - Vehicles
The paint job is well done and looks nice and clean. -
Assembly continues and the bottom shell was completed with custom exhaust end pipes. All of the Revell pieces went into use. The fuel tank was also upgraded and I added a filling pipe. The placement of the ends of the rear bumper has been corrected and now fits better. inside the cabin, a part intended for the ceiling was cut to the appropriate length. Assembly has come down to filling small putty and sanding down. Body shell washed several times and dried. The body shell is ready to move on to painting and was put on the trailer. Until the next paint job posts. Ints
- 27 replies
-
- 13
-
-
I will try to follow and do these useful tips. I am also searched for such a model for my vw collection. I got this from Hiroboy's website. Yesterday and today there was also a wave of assembly. Today was a lot of drilling and fitting. To fit the cabin pan, you have to cut off part of the rear seats. For a better opening position of the rear hatch, a deeper groove must be made at the rear end of the box base so that the hatch will sit better when open. next I fit the spare wheel clamp in place with the lug. The resin attachment points, where the wire clip attaches, must be drilled through, the correct places are visible but not through. I used a 0.6mm drill for this. I also bent the end of the wire a little, to overhang the wheel, to attach the clamp. The mounting bracket also had to be shortened by 0.5 mm because it was too long. In order to get a bigger gap between the wheel and the wall, I cut a bit of the resin attachment points. Next, a solution must be found, how to place the muffler in the bottom of the box, made according to another model. There was also a bit of a lack of fit, the ends of the rear bar do not fit well and need to be adjusted to fit better. Until the next posts. Ints
- 27 replies
-
- 13
-
-
Nice build and successful color choice.
-
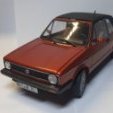
If one model moves to the shelf, the desire to build and assemble something again. This time, the vw caddy resin model made by C1 Models came into the range. The box contained the body and the necessary pieces. The Revell VW Golf 1 GTI kit is also needed for assembly. The color will be snapper rocks blue from the bmw C1G zero paints option. This is the first time building a resin model like this and it will be interesting. I like challenges. I started by cleaning up the marks from the resin casting and fitting the pieces together. Body panel gaps were made deeper. The difference with the door panels, on the left not done and on the right, the gaps are deeper. The missing bottom part comes from a Revell piece that needs to be cut to size. I had to adjust the resin model a bit to make the engine cover fit better. I had to do the same with the other pieces a bit. The resin model is very good to build and the pieces fit together well with minor corrections. What kind of glue to use for resin parts of this model, one possibility with super glue maybe.
- 27 replies
-
- 12
-
-
"Back To The Future" De Lorean 1/24 Aoshima
Ints30 replied to Ints30's topic in Work In Progress - Vehicles
Thanks for the kind words and removing the molded in wires was not a tedious job , they were carefully removed. -
"Back To The Future" De Lorean 1/24 Aoshima
Ints30 replied to Ints30's topic in Work In Progress - Vehicles
We update the topic and add new stories and pictures. The piece going down to the bottom of the rear also had the plastic wires replaced with real wires. I also painted in the right colors. The body shell painting went well and the paint was applied to a gentle matte layer where I used Tamiya X-22 clear coat as a base and a few drops of Tamiya X-35 semi clear. This resulted in a gentle matte layer and gave the correct metal color. It also protects the paint so that it does not come off when cleaned or touched. To paint the front and back, I covered the gray and black parts with semi-matt black. For the rear lights, I used such a solution, where I put the decals in place on the body and painted the clear light glasses. When I put clear glasses on top of the decals, the result was poor. When used together, the result was better. Before, you should have tried clear light glasses and vapor stacks together. They come away from the thickness of the clear light glass. The clear glass thickness of the rear light sockets must be deepened. The last thing left to do was the power hook. The plastic part didn't fit anywhere, so it was remade. The hook was made from wire of the correct color and given the appropriate shape. The base where the rod attaches was cut off. I glued it to the back of the car, in its place. To connect the hook and the back of the car, I used a desoldering wick. Finally, pictures of the finished model.- 32 replies
-
- 15
-
-
"Back To The Future" De Lorean 1/24 Aoshima
Ints30 replied to Ints30's topic in Work In Progress - Vehicles
Thank you for the kind words and I am also satisfied with the interior result. A little bit was done today and the fabric of one detail has to be changed, it has to be completely black. -
"Back To The Future" De Lorean 1/24 Aoshima
Ints30 replied to Ints30's topic in Work In Progress - Vehicles
Haven't posted anything for a long time, but work has been going on with the model. The base was painted matte black and then masked to paint the desired areas with silver. then the wheel carriers were painted silver and assembled with the bottom. some parts attached to the body have also been painted It took the most time to make the interior of the cabin, a radio was added, which was otherwise missing, and other details that made it more realistic. I have never painted with this type of paint before, so in the beginning I ruined the result of the paint in a hurry and it was impossible to fix the mistake. I removed the paint from the body and it is going to be painted again, and to be sure, I would cover it with a clear coating. I made test color samples for the spoons and covered them with three different clear coatings from the Tamiya range. The choice was clear coating, semi-clear coating and matte. The use of a semi clear coating would be more suitable, it will change the final result less. Until new next posts. -
What CAR/BIKE kits have you recently bought 2?
Ints30 replied to shood23's topic in Vehicle Discussion
At the beginning of the week, a package arrived containing the next long-desired resin model Shelby GT500 Eleanor -
"Back To The Future" De Lorean 1/24 Aoshima
Ints30 replied to Ints30's topic in Work In Progress - Vehicles
Since I didn't like the gaps in the wheel arch between the body and the bottom, they were closed with pla sheet. The result was much better. The gaps in the panel were also made deeper, with earlier models there were difficulties in bringing them out after painting. And added a bit more wiring. While the body is waiting for paint, now move on to building the cabin. -
"Back To The Future" De Lorean 1/24 Aoshima
Ints30 replied to Ints30's topic in Work In Progress - Vehicles
Greetings after a long time. The construction of the model was delayed a bit because it was Christmas and I was also sick. Now I can work again. The topic has found an interesting discussion about this model, whether there is also a standard version, which is interesting to read on your own. Time was also spent searching for wires with suitable dimensions. The thicker wire is 1.0 and the thinner ones are 0.1mm. Finer wires are painted with Tamya paints. Three thin and one big black wire should run from the side. I also looked for a solution to this and AMMO MIG-8217-Stainless-Steel-(ALC115) turned out to be a suitable choice, which is more similar to reality. The regular alclad II was too dark. https://www.pk-pro.de/AMIG-8217-Stainless-Steel-ALC115-30mL_1 I managed to remove the pictorial wires from the body nicely, without causing much damage. The bottom wire protection cover had to be recessed on the back side and on the body so that the wires fit nicely. Some details were also improved a bit, three thin wires go into the white and a black wire goes into the gray. Somehow I will try to put the whole thing together with wires and then I will have a better overview of what was done. -
nice build 🙂
