

Ngantek
-
Posts
1,162 -
Joined
-
Last visited
-
Days Won
1
Content Type
Events
Profiles
Forums
Media Demo
Everything posted by Ngantek
-
 I know this is rather late to the party, but beautiful work on that wing fold. The scratch work is so sharp and detailed, and I think the highlighting has brought it out beautifully. Andy
 -
1/48 Swordfish K8864 HMS Warspite 1941
Ngantek replied to iang's topic in Ready for Inspection - Aircraft
Stunning work. I'm intrigued by the scheme and how you've managed to bring that metal paint back to a kind of dulled weathered version? It's always hard making metallic paint not look like a painted model, but you've achieved it here beautifully. Andy -
Looks characteristically sharp Mark. Turning into a great collection of captured mottles. Perhaps it's my dodgy memory, but I'm not sure I remember you preshading in this style before (as opposed to adding variation after the uniform base coat)? Andy
- 102 replies
-
- 1
-

-
- Eduard 1:48
- Bf109F-4
- (and 1 more)
-
Oo shiny, I'm pulling up a seat. Really enjoyed your interpretation of that odd overpainted Banff mossie a while back. Bit busy crying over the shelf of broken dreams at the moment, but possibly I might find a minute in the new year to join you guys on this kit, if of course you aren't finished by then! Cheers, Andy
-
Hi Alistair, this is looking fantastic. Not usually overwhelmed by the poor old wimpy, but throw in some white/TSS and all kinds of jubbly yagi aerials and whatnot, and I'm all over it. It's all looking very sharp and tidy. I've been reading Boffin by Hanbury Brown recently (in which there's a fair amount on ASV radar development), in preparation for an imminent (i.e. in the next 7 years) build of a Whitely with a similar installation, so nice to see this one done properly! You've done a great job on the internals too (blimey Airfix weren't messing around were they!?) Having buggered off the forums for a while, I'm entirely unsurprised to see you've built about 50 kits in the intervening period to lots to catch up on! Cheers, Andy
-
Hi Chris. Sorry I somehow fell out of the habit of following and posting on BM of recent, but the upside is that I have a lot of catching up on this thread to look forward to. Your Seafire III looked like a real cracker. Those Merlins have gone on beautifully, seems whenever I make these kinds of conversions, it takes all of three swipes with a file and suddenly there are gaps everywhere and props pointing off at all funny angles. Did I hear Gannety noises somewhere? Andy
-
1/72 Dallachy Beaufighter TF.X - Finished
Ngantek replied to bigbadbadge's topic in Work in Progress - Aircraft
Hi Chris, I've been looking forward to your long promised Beau, and suddenly there are 2! Looking forward to it, I've had one sitting in the stash for a while also earmarked as probably a Dallachy machine, and would be very keen to join you and Roger if there was any chance of me actually finishing it this side of 2050! Hope you enjoy the parallel build. I always find it interesting how differently two of the same kits can go together sometimes. Andy -
Nice to catch this one in person, but also happy see it made the January issue of Airfix Model World. Well deserved! Andy
-
SS Fushimi Maru - Japanese Steamer - 1914-1943
Ngantek replied to Courageous's topic in Work in Progress - Maritime
That framing looks perfect Stuart. This build has come a long way since I last looked in, looking forward to reading back and catching up. Those telegraphs also look great, and lovely creative use of PE for the ventilation gratings. Cheers, Andy -
Harbour Defence Motor Launch 1943 by Neomega 1/144
Ngantek replied to Faraway's topic in Work in Progress - Maritime
This is looking great Jon. I found myself hovering around the stand at Telford trying not to look. The paint has come out very sharp (as always!). This embossed plastic looks interesting, I must do some reading. Currently have blobs of all kinds of different foams, clays, gels and whatnot sitting around in the hope that one day I'll sit down and really learn to do sea bases, but no progess other than to make the room look like a building site. Good luck with the remaining jubbly bits. Does the base allow you to omit those horrific looking prop shafts? Andy -
This is looking great Jeff. Always love your whiff builds and creative techniques to alter hull shapes. Like Sam, my thoughts ran straight to HMS Agincourt. I like the idea of this extended "destroyer dreadnaught leader" concept. Will be following this with interest. Where are you planning to plonk this.. erm.. P? turret? Andy
-
Just to weigh in on this, I believe the push broaches (the chisel ones) are not for pushing per se. The chisel and hooks are used in the same fashion, that is dragging across the plastic to scribe, with the blade pointing away from the direction of scribing. I'm pretty sure this is the intended use as evidenced by dspiae's website. You can use the larger ones as chisels, although I tend not to purely because I have the nice trumpeter ones, and changing the bits in the dspiae handle is a bit of a performance. They (the push broaches) are really nice, sharp scribers that give a very sharp square profile and build up the depth gradually with repeated applications. They do however like to 'walk' so you need to prescribe with a more well behaved tool. As for comparison with the hooks, I'm afraid I don't have the latter so can't compare. As for widths, the 0.1mm is very fine and I tend to find is swimming in existing panel lines, and thin enough to be a bit marginal to still be there when you get round to washing it. I use the .15mm a lot. The next one up, 0.3mm, is up in 2010 era airfix land. The larger ones I never use, but really should use as chisels for parts cleanup and scratch building if I remembered were there, since they're sharp and well made. The handle is fine, one needs to unscrew the black lid then use the tiny allen in the chisel set box to lock in the bit; it's a little labourious and I imagine designed as such so that you buy the nicer handle with the magnetic lid and chuck head. hope this helps Andy
-
Thanks for posting this, it's gold dust.
-
HMS Teviot K222 River Class Frigate : Starling Models 1/350
Ngantek replied to Faraway's topic in Work in Progress - Maritime
Looking forward to it. I was going to make a start on the 700 version soon. Something about the various RN design frigates and sloops. The gentle rise and fall of the superstructure is particularly pleasing to the eye. -
Eagle Gurney-Weslake GP Belgium 1967
Ngantek replied to Tomasz Zamiara's topic in Ready For Inspection - Vehicles
Fantastic! It looks astonishingly good. I love all the cars from that season, but the Eagle really is lovely. -
Always love to see a Sea Vixen. Great start, it's a lovely fitting kit isn't it? I believe the wheel wells, flaps, wing folds were light Admiralty grey. I can't vouch for the info but found it here near the bottom. @TheBaron's wonderful scratch build there's some very learned discussion of using a red protective compound called PX7 on the wing folds, starting from here. And 5-7g I think is wildly optimistic! The revell suggests 25g. I used rather more owing to the use of a resin nose, but that turned out to be plenty. Some discussion here for example. Hth Andy
-
1/35 - Supermarine Spitfire Mk.Vb by Border Model - released
Ngantek replied to Homebee's topic in The Rumourmonger
I'm no Spitficionado, but the cockpit 'floor' is a real headscratcher for me. Why make a kit in such a 'showcase' scale and get that kind of thing so wrong? The lack of a spar on such a large heavy plastic wing full of weapons gubbins also seems to be an odd decision; perhaps the uppers have some spanwise support, but even so it's hard to imagine how the dihedral is going to come out well. It'd be interesting to see the market research and sales data on Border's 1/35 aircraft push; I guess it's mostly armour modellers who want some diorama material (thereby being somewhat independent of the aircraft market??), but at at time when Kotare and Airfix have recently produced excellent kits, I really don't quite get where they're going with this one. -
Fantastic work at such a small scale. I too have this very boxing but no chance of such a great finish. I know how MKM can be a bit of palaver to get together nicely, so you've done a great job getting them so clean.
-
I've seen that photo attributed to a lot of different things. I get the feeling (off top of my head) that it's actually HMS Eskimo and not on PQ18 but (possibly] Pedestal... I've got a better quality photo somewhere, will have a look layer. All of this is of limited help of course in identifying the other ship but perhaps narrowing the event and adjacent ships will yield a convoy diagram or something Andy EDIT: reading a little closer the caption in the link suggests Eskimo is the nearer and Ashanti the one obscured.
-
HMS Sheffield, Gibraltar & the Med, Sept 41
Ngantek replied to ArnoldAmbrose's topic in Southern Europe GB
Nice work Jeff, it's coming along really well. The horror of dealing with thin dowels attached to the sprue by fat gates halfway along the length is something we can all related to. Add to that flash, mould seams and misalignment, and it'd be amazing if you've ended up with 12 things that even moderately resemble barrels, but these look very nice. -
MISC Freelancer Max: a limited edition, 3d printed kit
Ngantek replied to Robert Stuart's topic in Above the Karman Line GB
Oh yeah, well done for digging those up! They're very nice about spares as I'm sure you know, so it's easier to just have a go in the knowledge that the parts can be replaced if it all goes pear shaped. IIRC the underside of the cargo bay had quite a lot of sag on the DUR, and the upper part needed liberal clamping and working in to place to remove the wobble. -
HMAS Vampire (1917); Tamiya 1/700 (continued from SSD GB)
Ngantek replied to Ngantek's topic in Work in Progress - Maritime
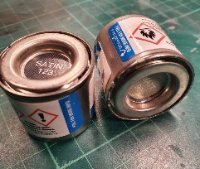
Cheers Jeff. Yeah that's a good way of looking at it, failed or marginal experiments are generally better learning experiences that successes anyway! Thanks Rob. So much fuss out of a little weekender kit! Thanks Stuart. Yeah despite being way out of scale at 700, I tend to think they improve the look overall. All that fuss has made them rather wonky though. Thanks very much! It's very shonky compared to all the great builds on here, but glad to be learning bit by bit! Very little progress as always, but did manage to do some rigging. It's largely guess work, it's hard to make out from photos and the V&Ws had all diverged significantly by this point it seems. This is all ammo 0.01mm superfine, on that horrible card bobbin that renders 95% of the line unusable. I've started moving the this stuff onto old 14ml enamel pots in the hope that it won't all get stuck and tangled and whatnot. It's really not ideal material to get the 'sag' on the looser halyards but I've had a first go at it here, along with trying out a new method of sticking by applying CA to the wire itself before holding it in position. This seems to (sort of) work actually, and is rather less blobby that my last attempt, but also a lot more fragile! A few first attempts at a modular sea base are going rather badly in the background! Otherwise for this model, a bit of oil for wear and some little figures and hopefully done. Andy -
MISC Freelancer Max: a limited edition, 3d printed kit
Ngantek replied to Robert Stuart's topic in Above the Karman Line GB
Yeah, I'm not generally a fan of dunking canopies in clear, but with the small size and difficulty of access for a good sand and polish, I did with these. Off the print stands: After some not very thorough sanding After 'klear' (in this case I suspect it was halloway house quick shine) I hope I'd do a better job next time. My DUR has been sat mid paint strip for a year or so now, one day I'll get back to it. The print lines weren't quite gone and it just showed up too much for me with bare metal finish.- 34 replies
-
- 4
-

-
- Star Citizen
- JRDF
- (and 1 more)
-
MISC Freelancer Max: a limited edition, 3d printed kit
Ngantek replied to Robert Stuart's topic in Above the Karman Line GB
Nah, I've got far too much other stuff on to do it justice. Might squeeze in a quick build it time allows, or even a wee 500 scale 'lancer. Looks really good. I think JRD+F have gradually upgraded their processes as yous say. The clear parts look maybe a tad clearer than they were on mine, but suspect could still use a good polish.- 34 replies
-
- 1
-
-
- Star Citizen
- JRDF
- (and 1 more)
-
Looks great Chris. As you say, you're 'over the hump' once you have the fuselage buttoned up. Careful with sprue goo and resin though, the interaction will be different and won't 'amalgamate' in the same way as styrene. Probably worth a try on a bit of spare print stand just in case or you may find CA or CA-talc works better. Cheers, Andy