
- Popular Post


MicTroy23
-
Posts
207 -
Joined
-
Last visited
-
Days Won
4
Content Type
Events
Profiles
Forums
Media Demo
Posts posted by MicTroy23
-
-
Greetings, colleagues!
I have finished building a prototype of a French dragonfly flyer, the prototype of which I accidentally stumbled upon on the net. As it often happens with such futuristic projects, the device never took to the sky, and was "successfully" broken in the aerotube during tests, but left its mark in the history of aviation. Now its fuselage is in the Aviation Museum in Angers and is being restored.
The model is made of various ersatz modelling plastics, sprues and some suitable off-the-shelf parts, paper clips. The cockpit glazing cap is made of transparent plastic, a stand is made (the model is fixed because of the shift of the centre of gravity, falling on the tail). In the cockpit straps and "helm" from MicroDesign.
Paint and varnish brushes: urethane-acrylics GSI Mr.Color, GSI Mr.Metal Color, acrylic PC88, varnish Tamiya, + simple pencil.
Enjoy your viewing!
-
 18
18
-
-
10 hours ago, TallBlondJohn said:
No pictures any more?
TallBlondJohn, photos with angles are enough for viewing and evaluation ..! Or will their number increase (among colleagues) interest in my models ..?
-
Greetings, colleagues!
A little history of the prototype from the column What If?In accordance with the decision of the CM of 25 May 1940 and the NKAP order of 31 May that followed it, the director of plant No. 1 was ordered to stop production of the BB-22 and to deliver 125 I-200 (MiG-1) fighters by the end of the year. At the end of October 1940 the first MiG-1 machines of the installation batch began to leave plant No. 1. In the same month, by the decree of the Council of People's Commissars of the National People's Commissars of 24 October 1940, it was decided to promote the aviation industry in the sport direction. In November of the same year, work began on a racing machine, mainly consisting of substandard modified assemblies and parts, not to the detriment of production. Another unprecedented step of this project, with a look back and study of foreign machines of this class, was the construction of a sports hydroplane. In the process of works, the fuselage underwent some changes: the gargrotte on the place of the rear part of the lantern was increased, the air intake was installed in the bonnet part instead of cannon ports, the height of the radiator fairing under the cockpit was reduced. The propeller was made individually and for experimental purposes with a four-bladed propeller to compensate for engine power when taking off from the water surface. By April 1941 the machine was ready for testing. The first trial "runs" to debug the engine, propeller and other systems were carried out on a specially made trolley under the floats at the test site of the plant. In May, the aircraft began to undergo tests at the Khimki Reservoir. In parallel, a "land" racing variant (No. 2 "Meteor") based on the updated MiG-3 was also tested. The work continued with varying success until autumn. In October 1941, the Stalin Plant No.1 was evacuated to Kuibyshev on the territory of Plant No.122. MiG-3 production was transferred there first of all. In that period and lost traces of these racing machines.
P.S. Fiction from the rubric What If...? woven into the real story).
A little about the construction. A broken kit from Zvezda was taken as a basis. From scratch made: cockpit, lantern, garrotte, stabilisers, expanded fuselage, bonnet geometry, all bonnet air intakes, exhaust pipes, propeller, floats + struts with struts, radiator.
Colouring and varnishing with brushes: urethane-acrylic GSI Mr.Color, acrylic PC88, varnish Tamiya, +simple pencil.
Enjoy your viewing!
-
23
-
 2
2
-
-
-
Greetings, colleagues!
Finished another self-made on the theme of cruise missiles. A little scanty history on the secret prototype. Hypersonic Experimental Launcher (HELA), long-range cruise missile. The development of the X-90 missile was carried out in the ICB "Raduga" (Dubna) together with TsAGI in the 1980s. The design of the X-90 missile was created and tested in the late 1980s - early 1990s. According to the data, the first and only flight tests of the X-90 prototype took place at the Engels airbase in early December 1987 (tests were successful!). Bench tests SPVRD for GELA, designed for a martial speed of 4.5M, successfully completed in October 1988. Work on the project X-90 was terminated in 1992. For the first time in public GELA apparatus was demonstrated at the MAKS-1995 air show in Zhukovsky.
The model is built from photographs and printed projection drawings, from different plastic. Stitching on the plumage is cut, on the fuselage is simply drawn. Fantasised with colouring and all sorts of technical stuff. Nozzle of the marching engine on the motifs.
Paint and varnish brushes: urethane-acrylic GSI Mr.Color, acrylic PC88, varnish Tamiya, + simple pencil. Stand NOVO.)))
Enjoy your viewing!
-
29
-
-
Greetings, colleagues!
I am presenting the next addition to my squadron of MiGs. It so coincided that both plans and decals came together on the prototype of this unorthodox and controversial in the colouring of the consoles. For decades now, some have been pulling for a red wing, others for a green wing. I don't want to debate on this issue..... Let everyone decide for themselves what colour to paint the wings in....The prototype was a plane from 12 GvIAP, 6 IAC of Moscow air defence, Vnukovo, 7 March 1942.
I will say a little about the kit. I assume that FROG has tried to improve the quality of its products, which can be seen in the striking convergence of parts. What can not be said about the geometry, configurations and poor and simplified detailing, remained in the style of FROG. The spirit of the time so to speak.
I will list the working points. Made homemade: -cab, -propeller, -vhvlopnye spigots, -vozduhozaborniki, -stoke antenna, -PVD, -machine guns, -nishis chassis, -stands and chassis flaps, - landing headlamp, -directing rockets, -some little things, water radiator. Refined: -configuration of the bonnet, -rear chassis, -spreading and riveting.
Paint and varnish brushes: acrylic GSI Mr.Color, varnish Tamiya, + simple pencil. Decals are native, a little thick, but excellent quality!
Enjoy your viewing!I will demonstrate some moments of the construction...
-
36
-
2
-
-
Colleagues, thanks for your attention and for the appreciation!
-
1
-
-
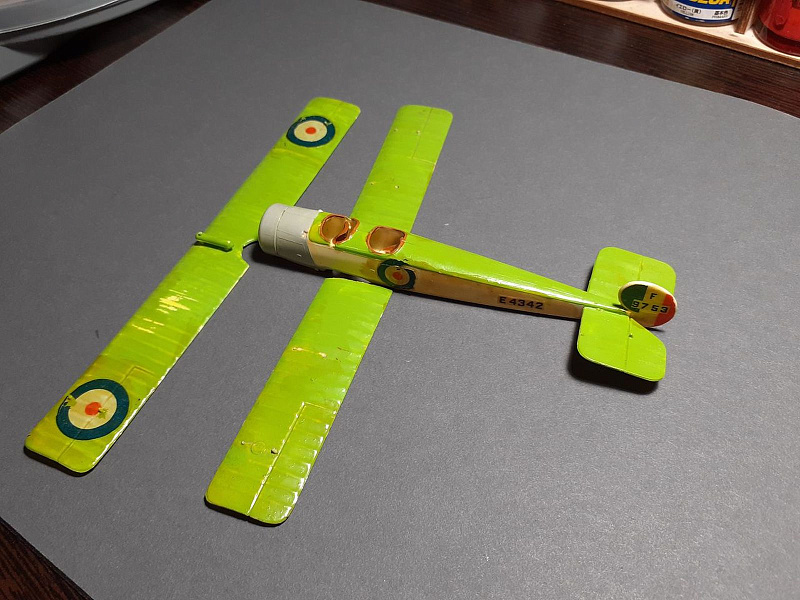
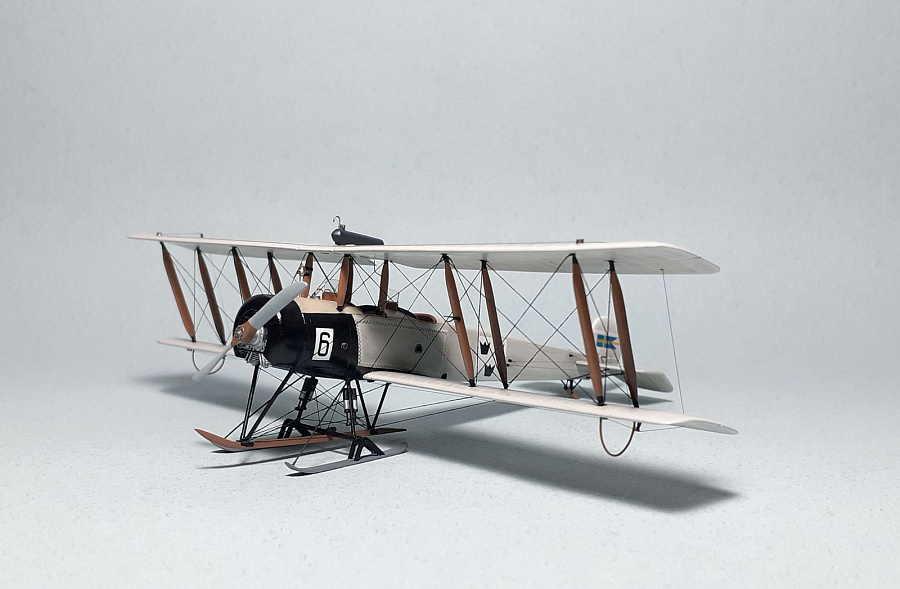
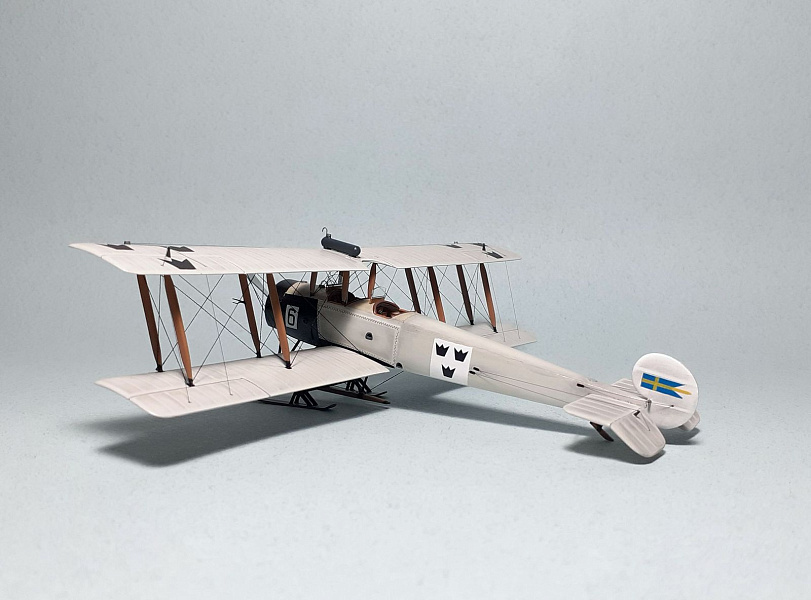
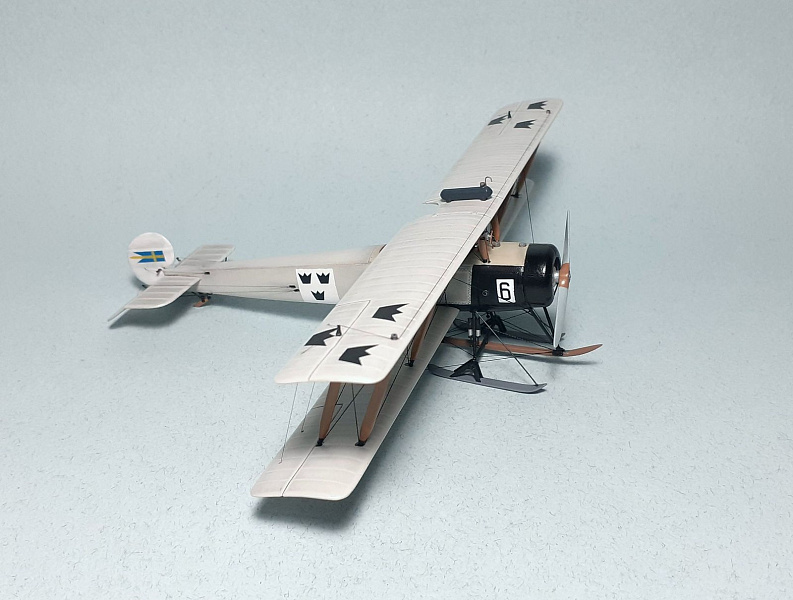
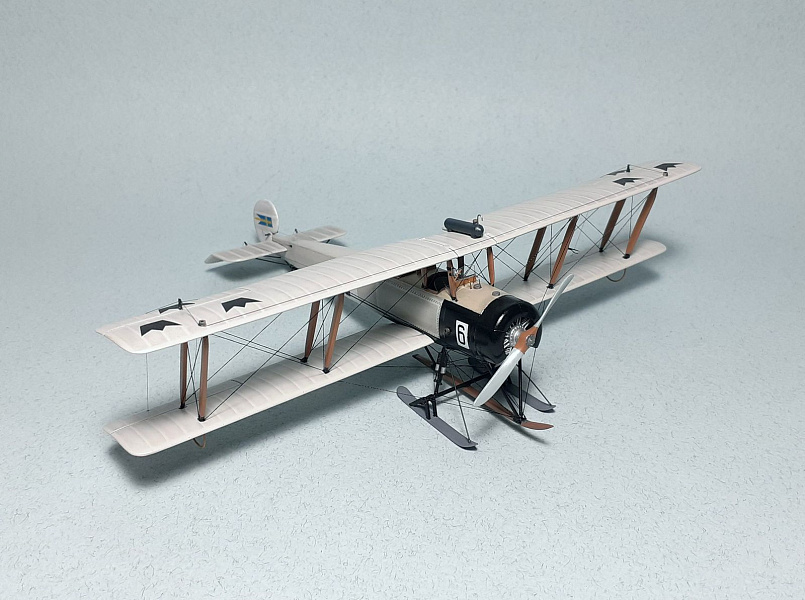
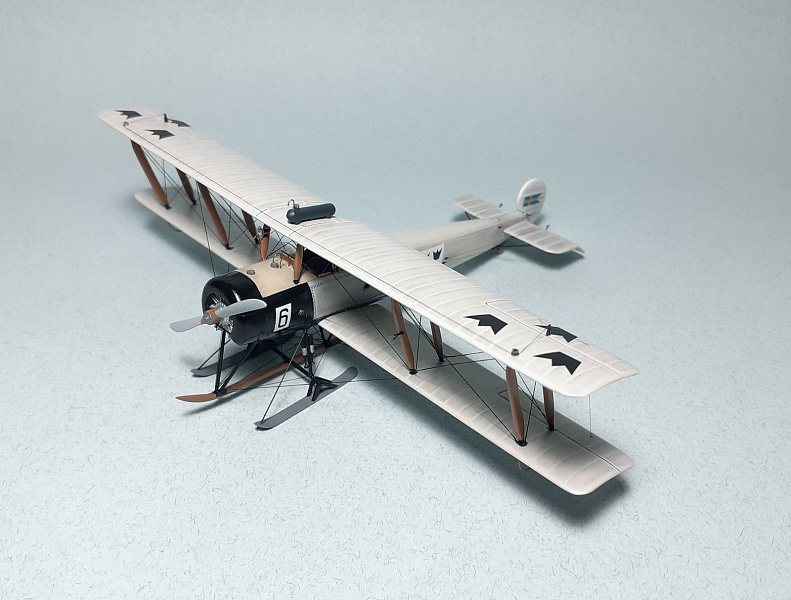
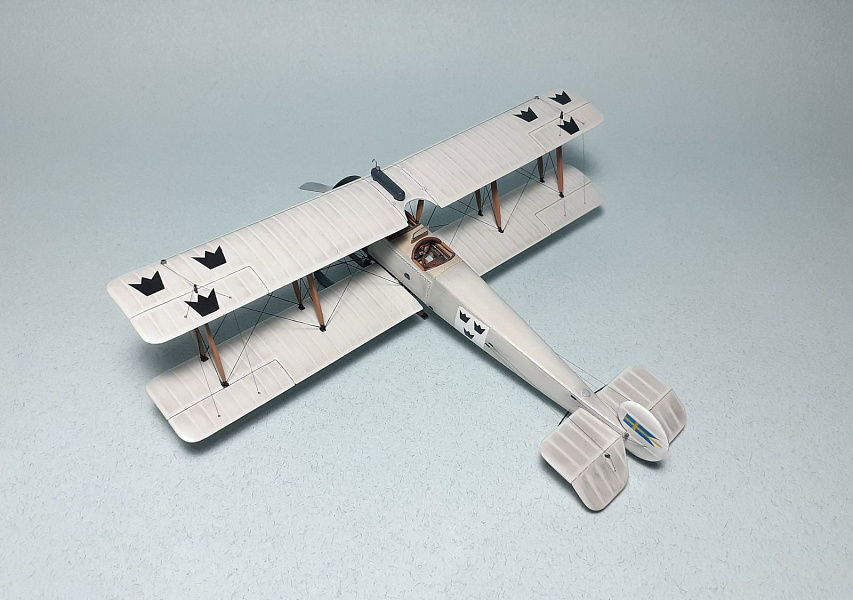
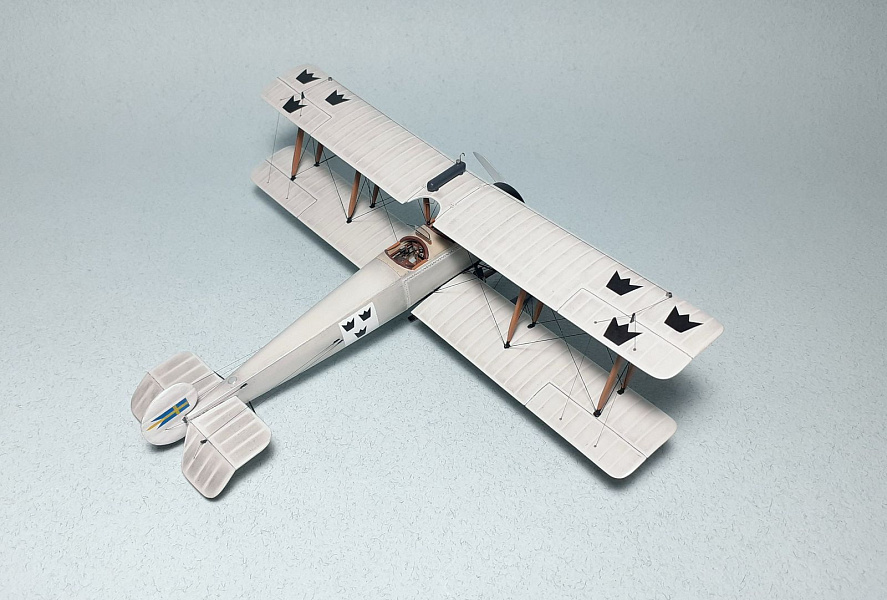
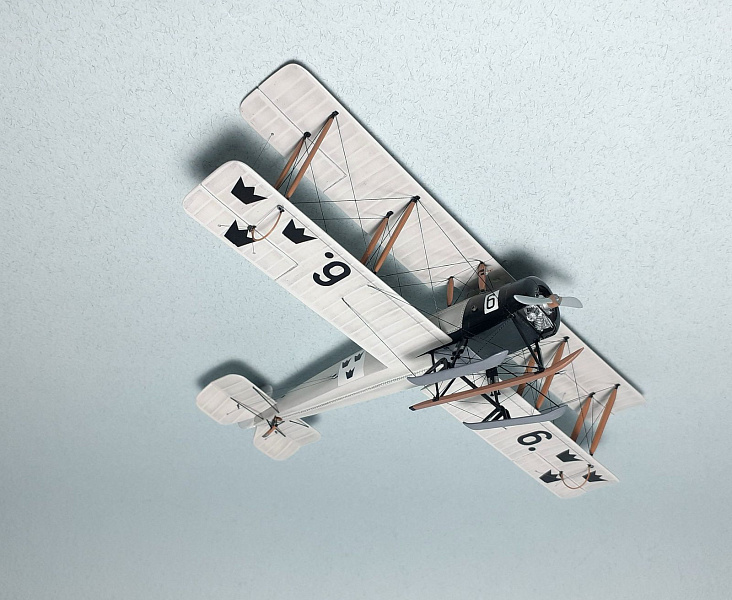
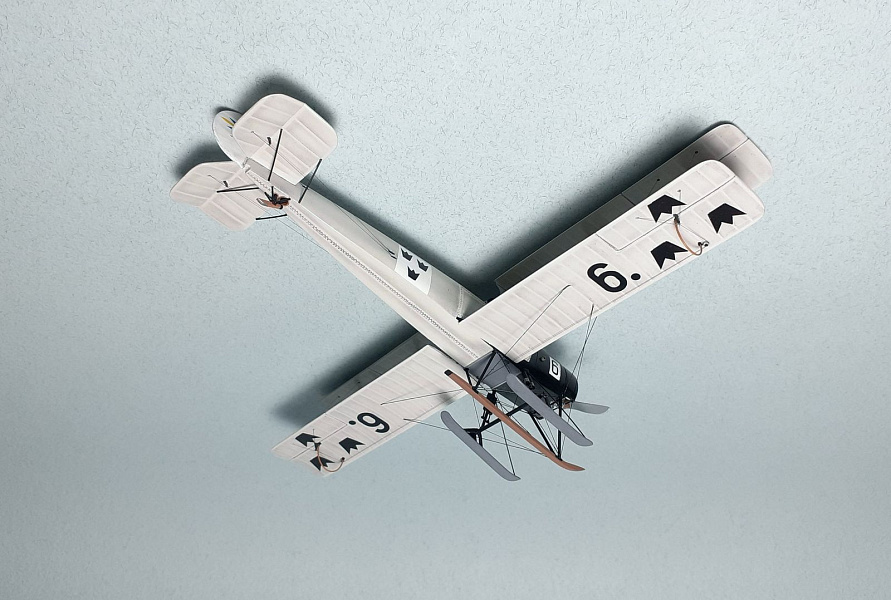
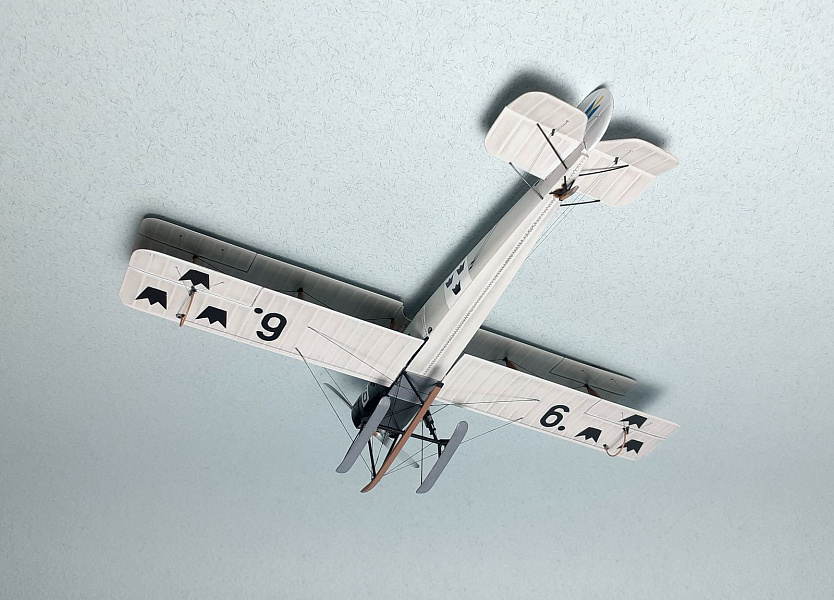
Hello colleagues!
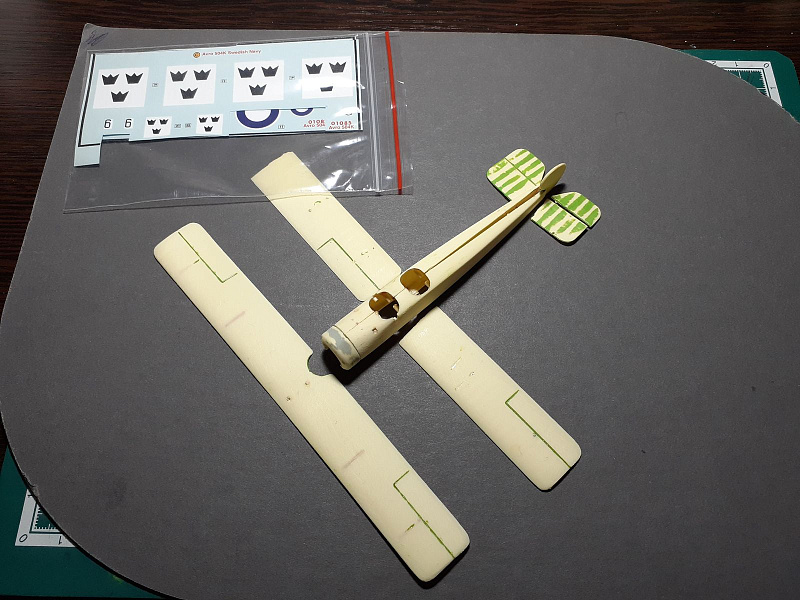
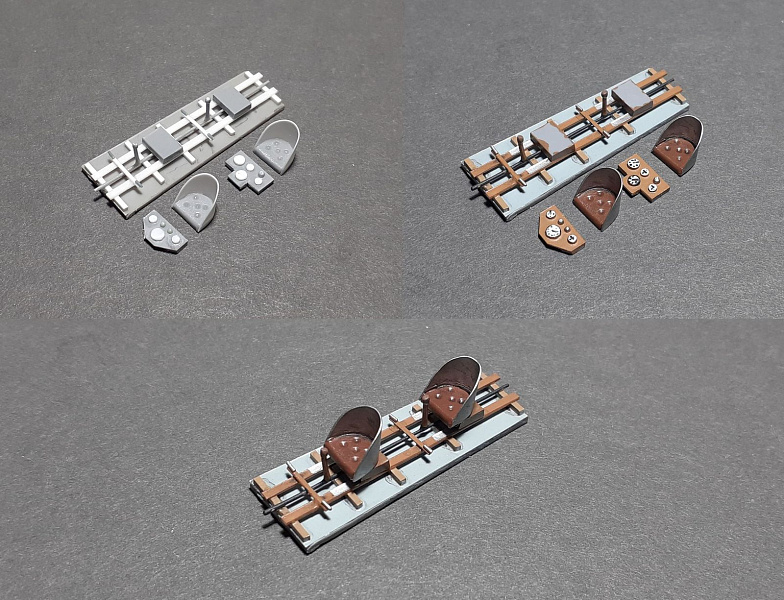
I got this broken aeroplane from an ancient Airfix kit for spare parts. But, apparently, I was lucky, the rebirth happened! ) The decal was found (under the Swedish prototype) and in general it's quite nice and rare in modelling (I have to build it).... Initially it was painted probably with car paint, because it was difficult to dissolve with strong solvent. And it dissolved together with the plastic. So I had to remove everything with emery cloth (together with the web sags on the wings and stabilisers). In the end, I mastered the imitation of webbing sag by retouching with a brush with slate powder. As you can guess, everything visible and not visible (except for the main elements of the kit) is homemade (except for the propeller and tank)). I used different diameters of kapron thread (thicker strings, thinner rods). Stands from bamboo skewers. Flags on the keel homemade.
Paint and varnish brushes: acrylics GSI Mr.Color and Mr.Hobby, varnish Tamiya, + simple pencil. Airfix decal.
Enjoy your viewing!
Such a broken model I got for spare parts....
Then a little bit of the building process...
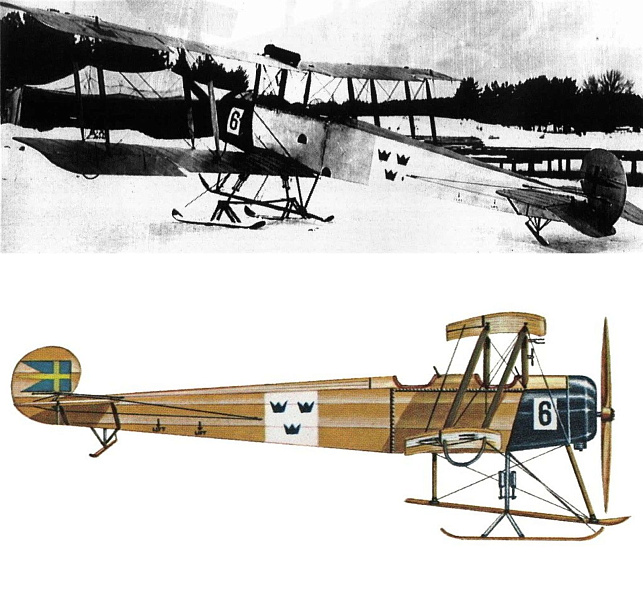
The prototype was Marinens Flygväsende, school at Hägernäs, January 1924 (Code 6).
-
65
-
8
-
-
On 1/26/2022 at 1:28 PM, John R said:
It looks like the thing Luke Skywalker had in Star Wars. I wonder how good it was at avoiding obstacles - bushes, fences, livestock or boats if it was only used over water.
Does anyone know the purpose of that 'comb-like' devices ahead of the wing? Could they eject air at high speed to enhance lift when starting off?
John
John R, Thank you!
The screen glider could fly over any surface: snow, earth and water. It needed space, so it could not go around obstacles sharply, it was designed for fast, direct travel.
The comb-over devices in front of the wings are the air jets blowing under the wing. There was another engine in the nose for blowing air. In the stern (garrotte) was a marching engine. -
22 hours ago, Alan P said:
Thanks for the building pics, really well done 👍
21 hours ago, Jackson Duvalier said:Retro-futurism at its best! 😎
Thanks for sharing the in-progress shots.
18 hours ago, GiampieroSilvestri said:Beautiful SM-4!
Saluti
Giampiero
Thank you colleagues for your attention and appreciation!
-
19 hours ago, Alan P said:
That's lovely, really well constructed and finished. What did you use to build it?
Alan P, Thank you!
Used all sorts of model plastics and sprues...
16 hours ago, Lightningboy2000 said:Wow! What a strange looking machine!
Never knew that existed. I thought it was a what if kit bash until I saw that b&w photo.
What a crazy craft!
Martin
Martin, Thank you!
Yes, such a machine existed and flew very well. )
-
3
-
1
-
-
Greetings, colleagues!
I present another homemade model from the range of experimental screen-planes of Alekseyev design.
Painted with GSI Mr.Color urethane acrylic, Tamiya lacquer, + simple pencil.
Pleasant viewing.
-
19
-
1
-
-
On 1/7/2022 at 10:21 AM, Jackson Duvalier said:
You've certainly polished that old kit to a high gloss.
I particularly appreciate how the prop cuffs and prop blades have different colouration, most modellers miss that.
On 1/7/2022 at 1:48 PM, GREG DESTEC said:Superb modelling 👍
Very well done.
Cheers Greg
On 1/7/2022 at 3:47 PM, Wulfman said:A remarkable job on the old Frog, excellent modelling !
Wulfman
Greetings colleagues, thanks for the visit and feedback!
-
1
-
-
16 hours ago, Spitfire31 said:
What an excellent Jug! Again, I note that raised panel lines have a tendency to look good on (under…) a NM finish.
Were the flaps and elevators separate in the kit, or did you prform some surgery? Anywas, they elevate the overall impression a lot.
Good modelling!
Kind regards,
Joachim
Spitfire31, thank you! Flaps and rudders cut out.
16 hours ago, junglierating said:Thats hoofin mate ...BZ to you
15 hours ago, tonyot said:Wow,... that is rather special,..... brilliant job mate.
8 hours ago, Marc the Builder said:Wow, that is some awesome result on such an old kit. I love how it turned out.
7 hours ago, RMCS said:What a scheme
Colleagues, thank you for visiting and appreciating!
-
2
-
-
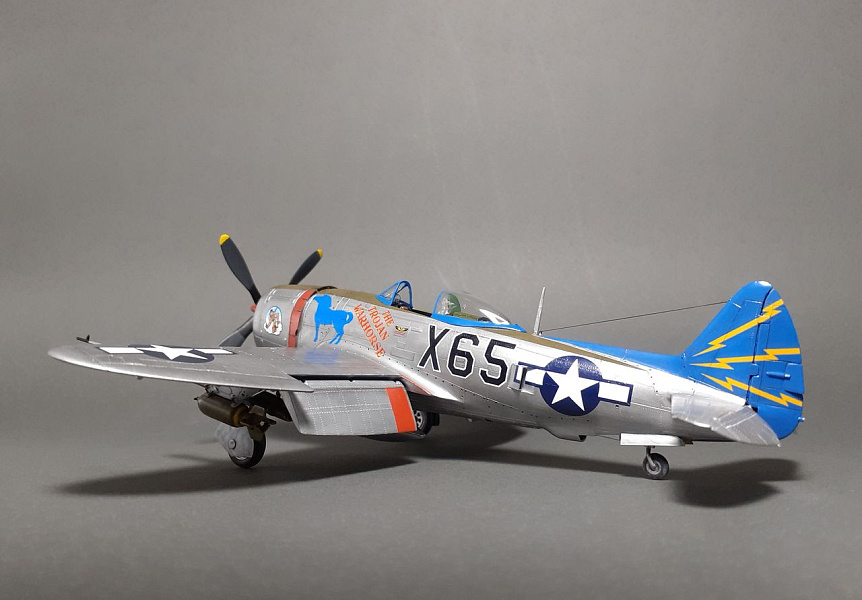
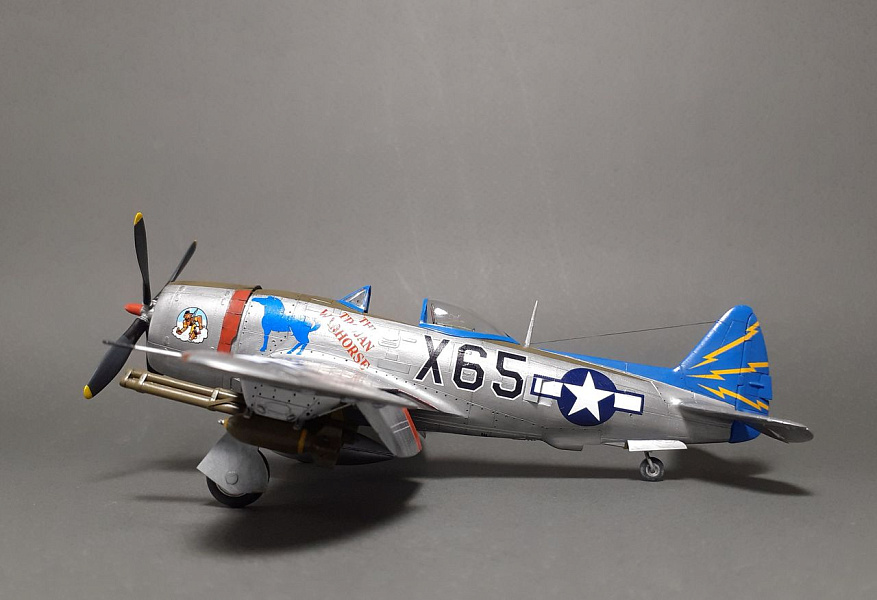
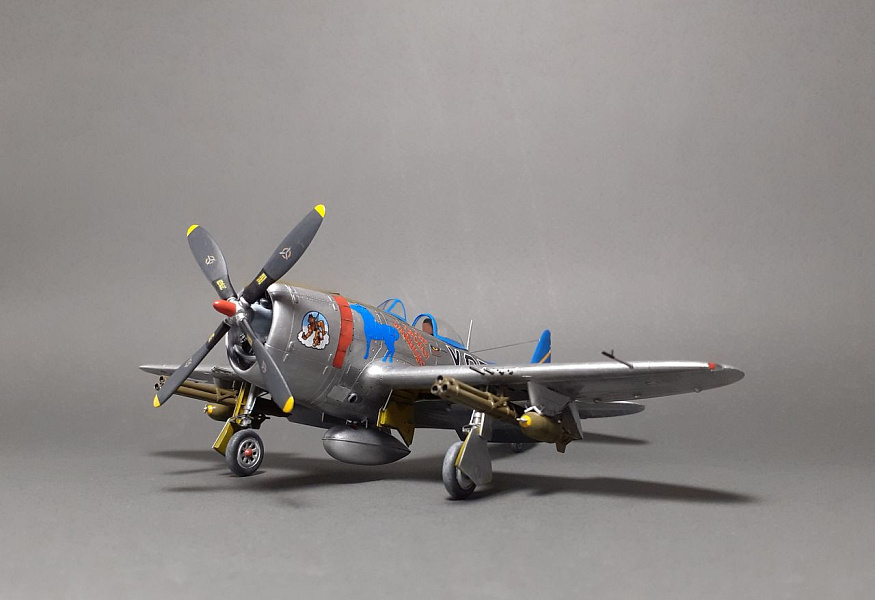
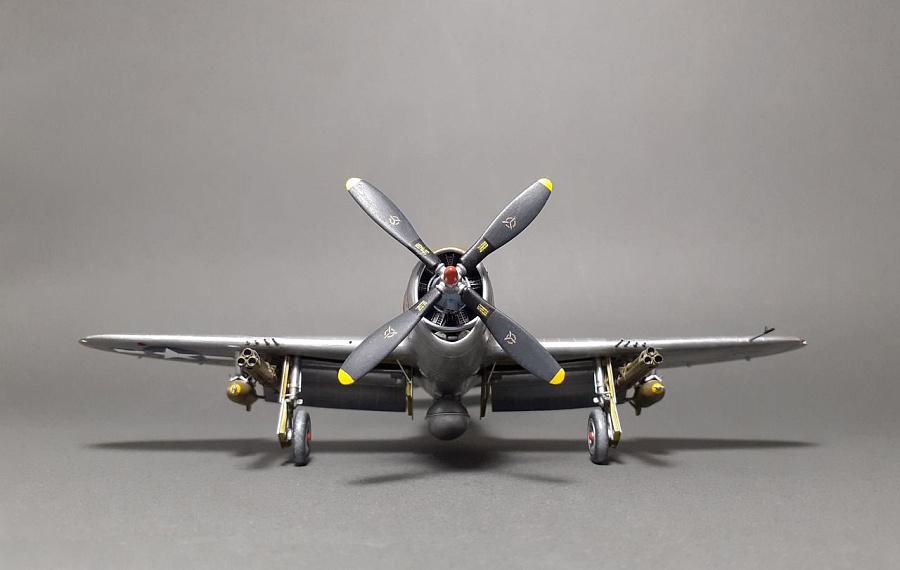
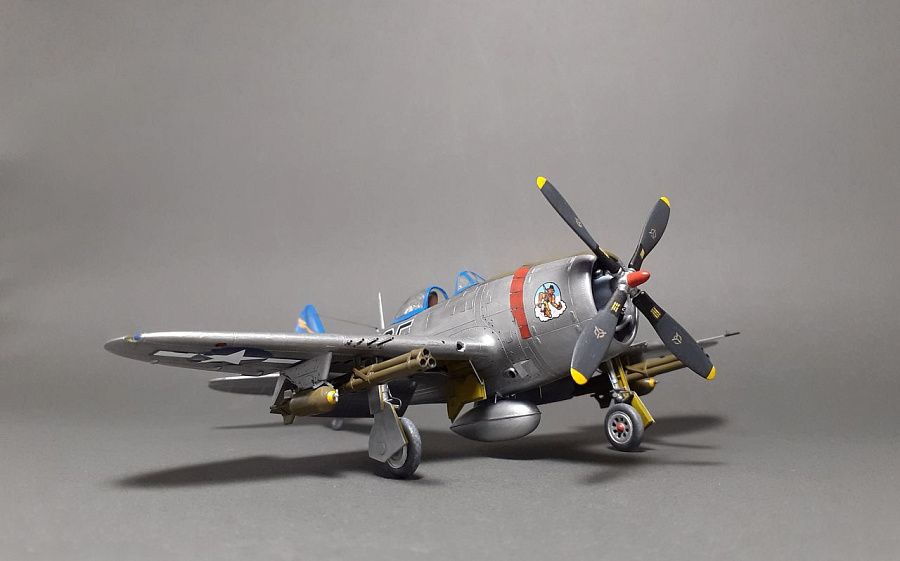
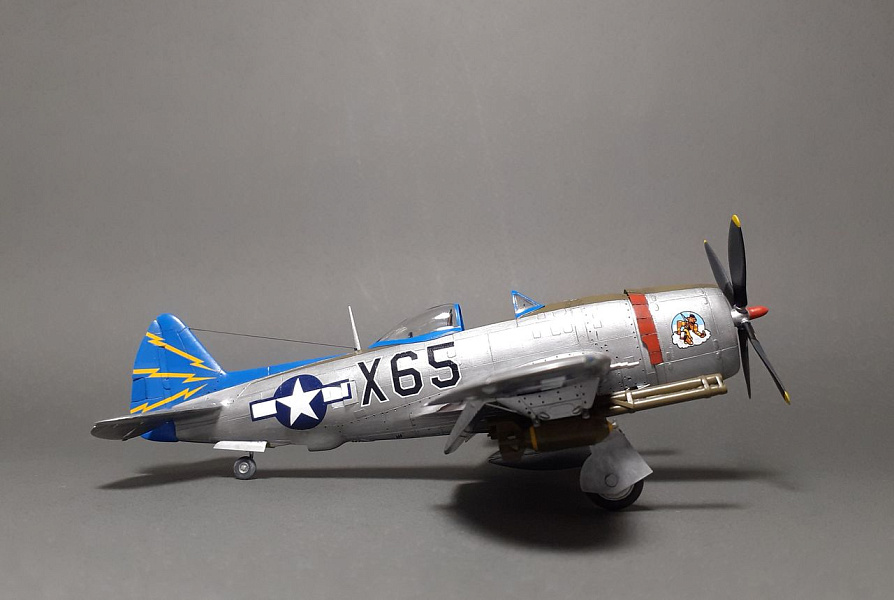
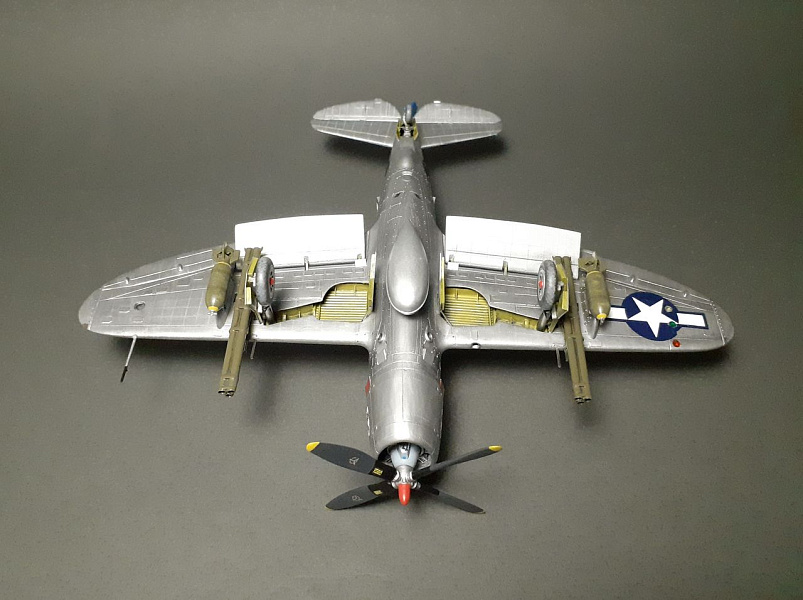
Greetings, comrades!
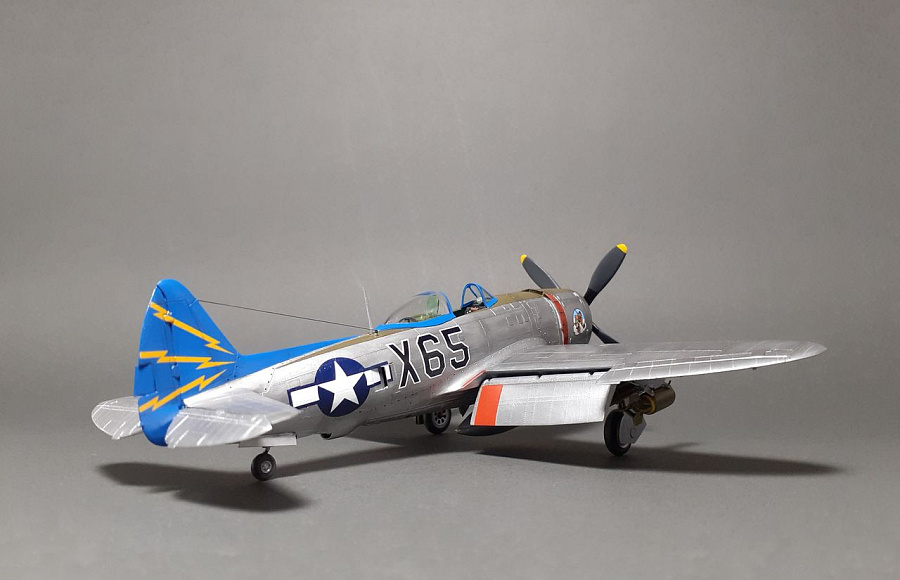
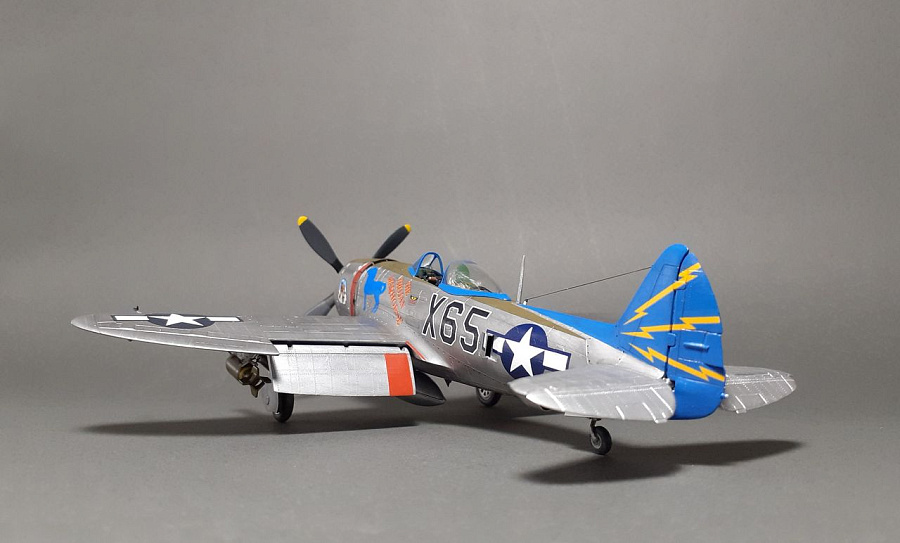
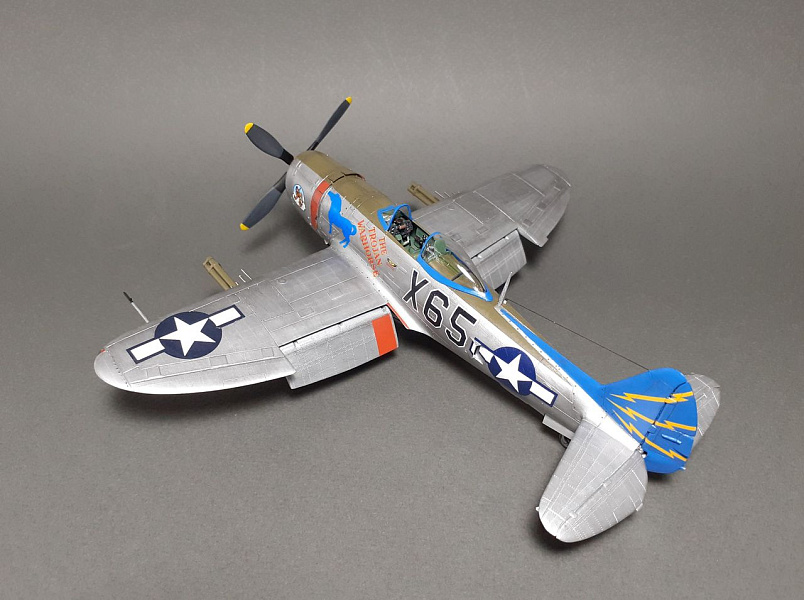
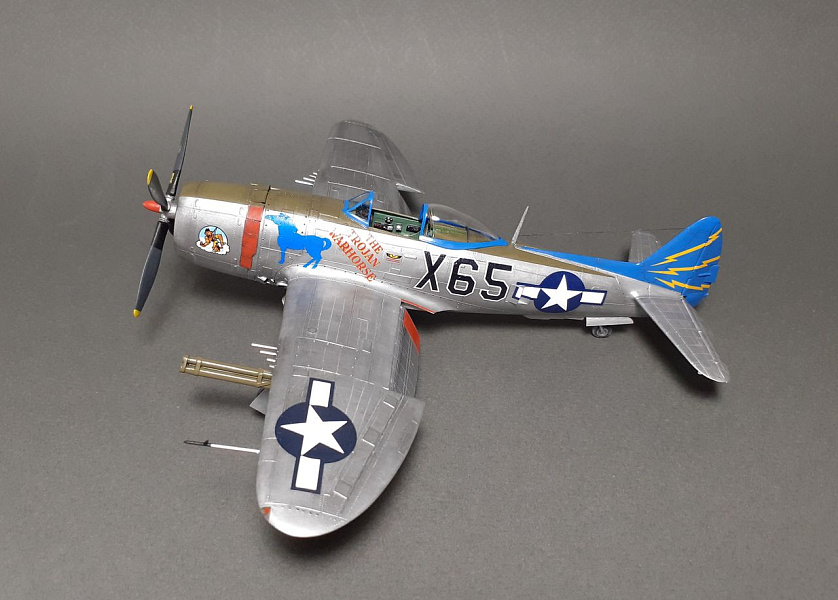
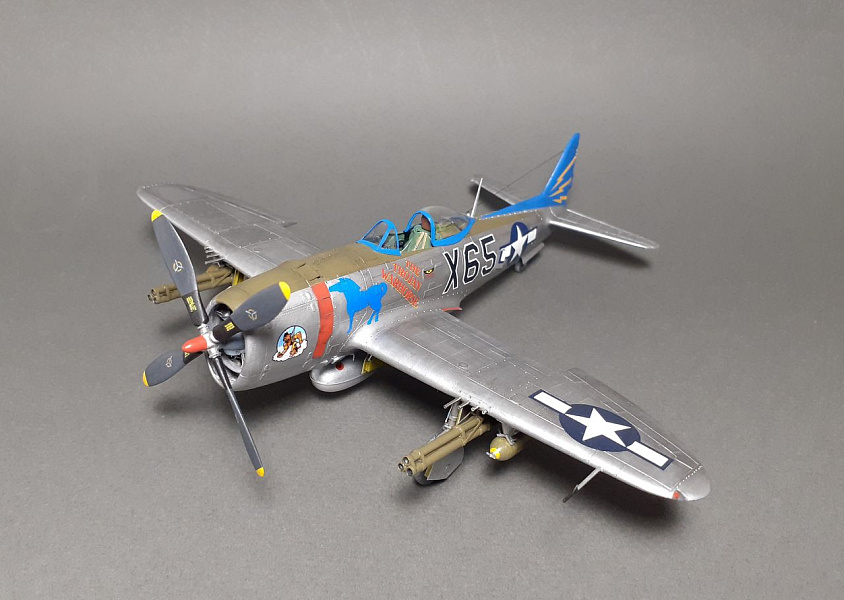
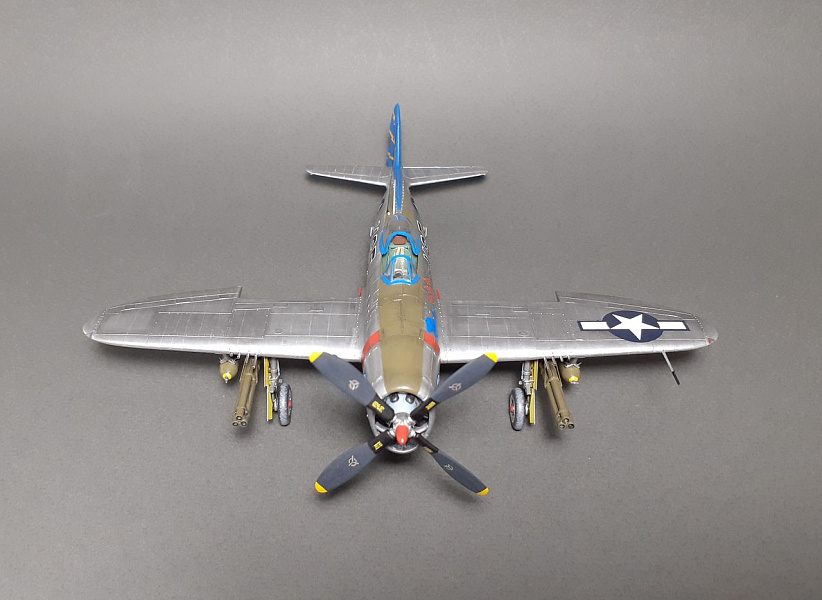
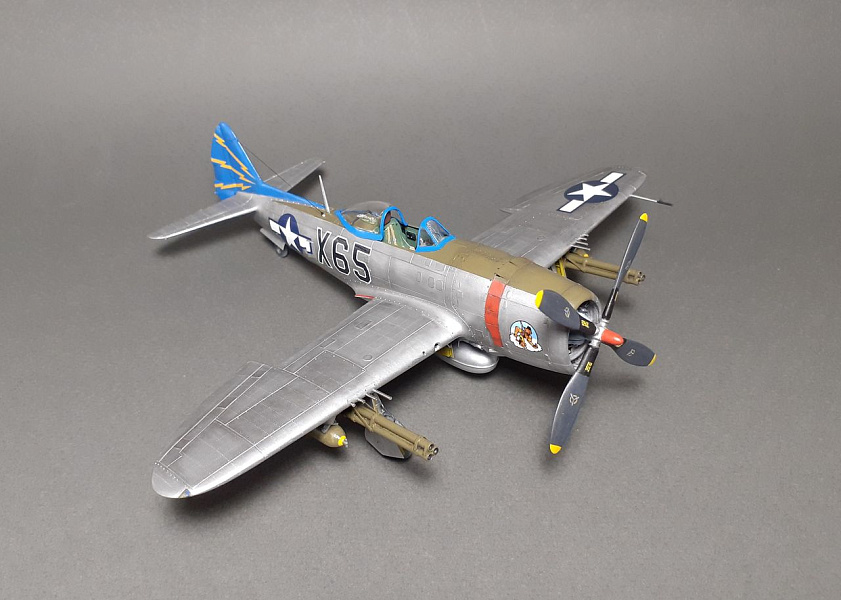
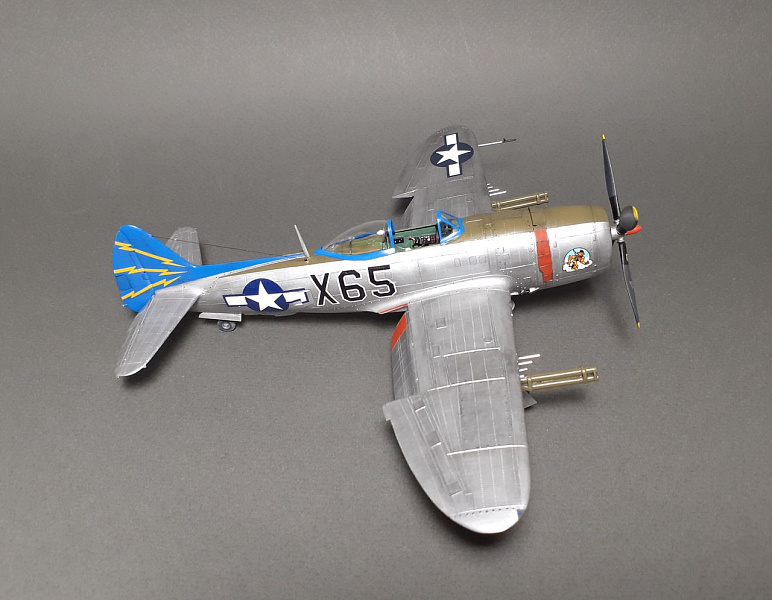
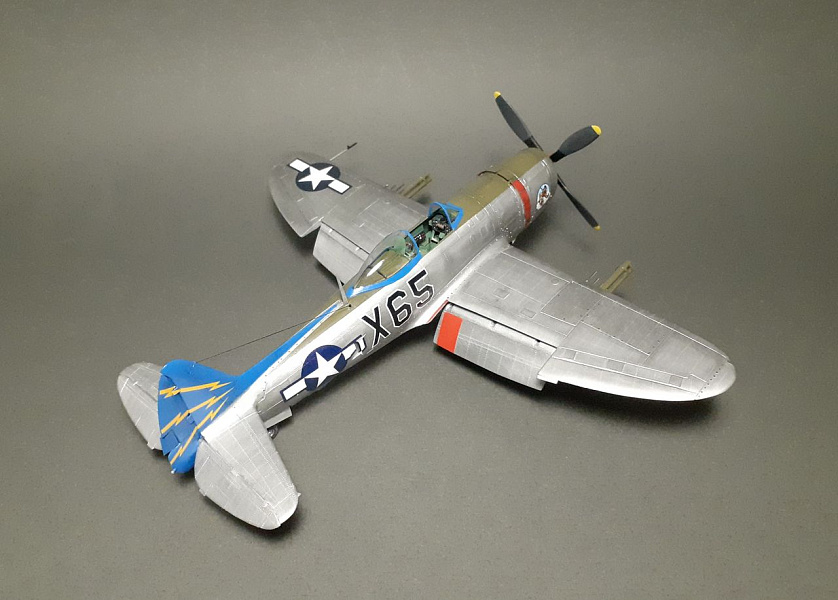
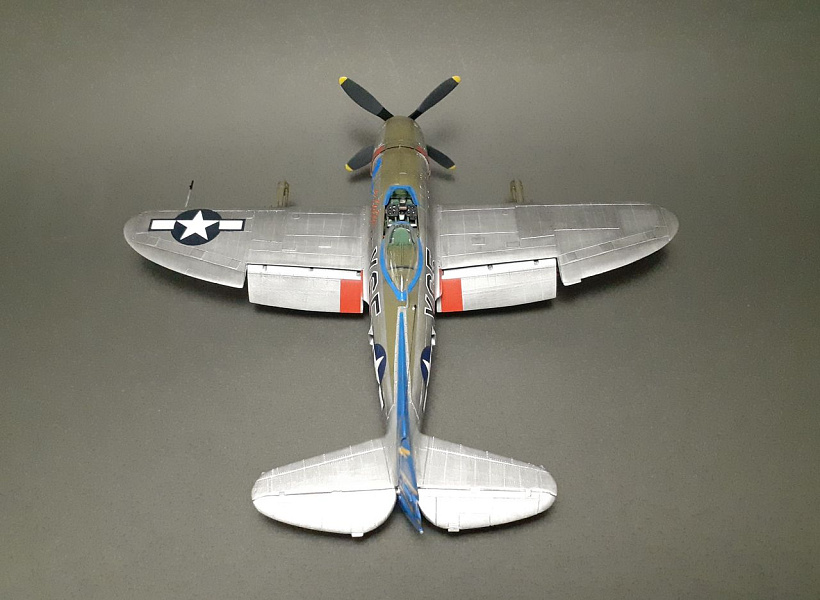
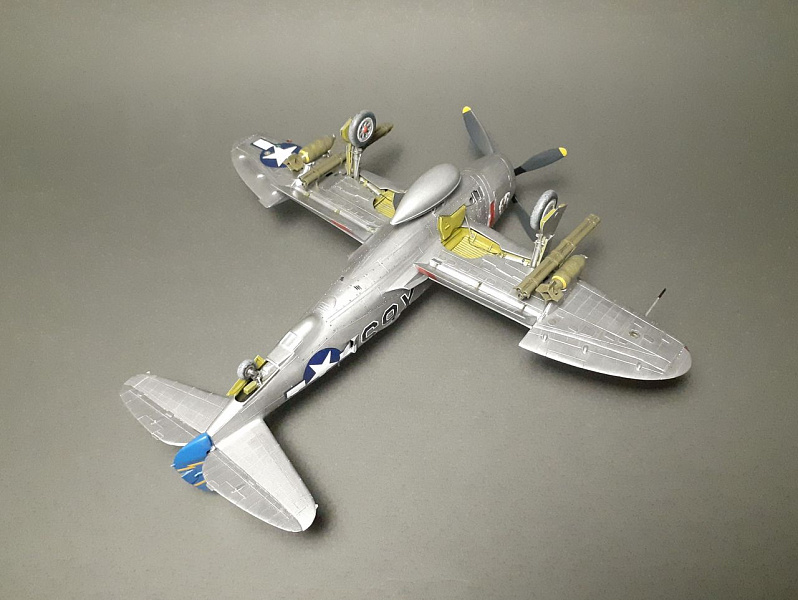
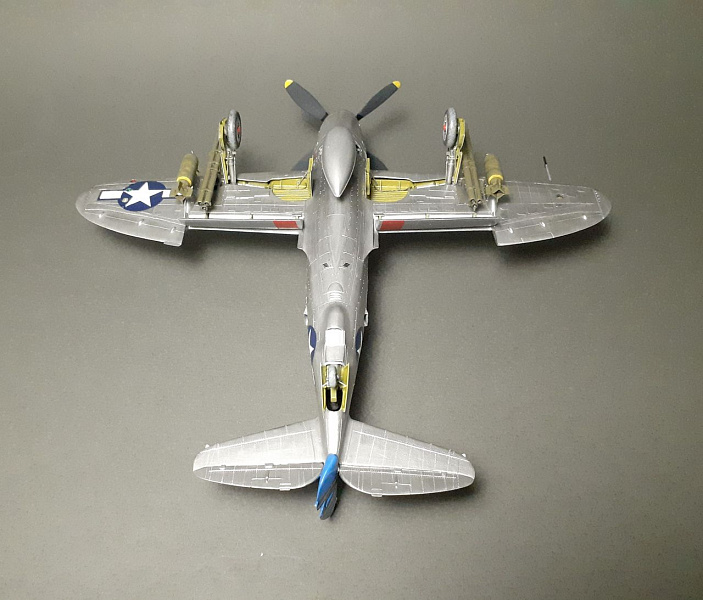
I open this year with the namesake warhorse, which in the final stages, gave me a few surprises in the painting and skinning. But let's not speak of sad things, the tasks have been solved more or less successfully and Thunder has proudly taken its place on the shelf. ) The aircraft (86th FS, 79th FG USAAF, Italy, 1944) (''The Trojan Warhorse'' code X65). I will list some of the manufacturing and refinements: - cockpit and mechanics of the shifting canopy, - visible part of the engine, - exhaust systems, - outboard tank with catches, - bomb pylons, - niches, struts, fore/aft landing gear flaps, - BANO, keel BANO, traffic light and headlight, - RAP, - cowl "collar", - flaps, - antennas, - separated rudders, - stripping and different riveting, - machine guns, - forekill, - tail "cooler"(? ), - hinges and all sorts of hatches. Glazing - Sword, wheels - from Evenger, bombs and bazookas - Revell, decals - Eagle Cal.
Paint and varnish with brushes: GSI Mr.Color urethane-acrylic, PC88 acrylic, Tamiya lacquers, futura, +plain pencil.
Enjoy the view!
-
33
-
-
7 minutes ago, Sky Keg said:
My goodness that is impressive and it`s in 72nd scale no less!!!!!!
 Great results!!!
Mike
Sky Keg, thank you!
-
1
-
-
13 hours ago, Corsairfoxfouruncle said:
Oh I like it.. Ive got one of these on the way and was trying to figure out a scheme. You made the decision for me.
12 hours ago, Old Man said:Nicely done, Sir.
Whatever might be said of the kit's accuracy (and trust me, there's lots) this old Heller kit is so superbly engineered I would far rather build another one than any of the new modern ICM kits.
Great model.
10 hours ago, Vince Blackburn said:Oh my what a fantastic scheme you have done there. Great job.
10 hours ago, Learstang said:Excellent job on that Chaika! Some of those early Great Patriotic War schemes were quite interesting!
Regards,
Jason
8 hours ago, Remus389 said:The party honors your stahanovist work, comrade MicTroy23 🎖️
7 hours ago, Epeeman said:wonderful work - excellent rendition of this unusual camo scheme too.
Regards
Dave
4 hours ago, GiampieroSilvestri said:Beautiful Polikarpov I-153!
Saluti
Giampiero
Colleagues, thanks for visiting and for the feedback!
-
1
-
-
Greetings, comrades!
A new addition to the shelf and one of the iconic planes has been painted. I think there is no point in telling about the kit, it has been known to many people since the old days, it looks fine to me... Since the decals in the kit were fictional, I decided to train in painting by choosing a prototype I came across a long time ago.
Model modifications: made cockpit, door, sight glazing, finalized engine cowl (intake, machine guns, flaps, coupler, nozzles), finalized propeller, made landing gear recesses, finalized struts and wheels, made PVD, swashplates, BANO, aileron and tail loops.
Painting: GSI Mr.Color urethane-acrylic, Tamiya lacquer, futura, +plain pencil. Decals from kit.
Enjoy the ride!
-
26
-
-
On 12/3/2021 at 6:55 AM, Natter said:
Very nice.
On 12/3/2021 at 7:54 AM, stevehnz said:Nice one, that has come up wonderfully well.
")
Steve.
On 12/3/2021 at 7:57 AM, Bandsaw Steve said:Colourful little thing isn’t it! 👍
On 12/3/2021 at 1:53 PM, Wulfman said:Lovely work to enhance a simple kit !
Wulfman
23 hours ago, Vesa Jussila said:Really nice "Murjaani" and really colourful.
19 hours ago, dogsbody said:Well done!
Chris
18 hours ago, Dennis_C said:Fore sure that is a nicely modelled and quite unusually looking aircraft. Of course it is not very obscure - but one does not see that often. It was interesting for me to look at the details.
Colleagues, thanks for visiting and for the feedback!
-
2
-
-
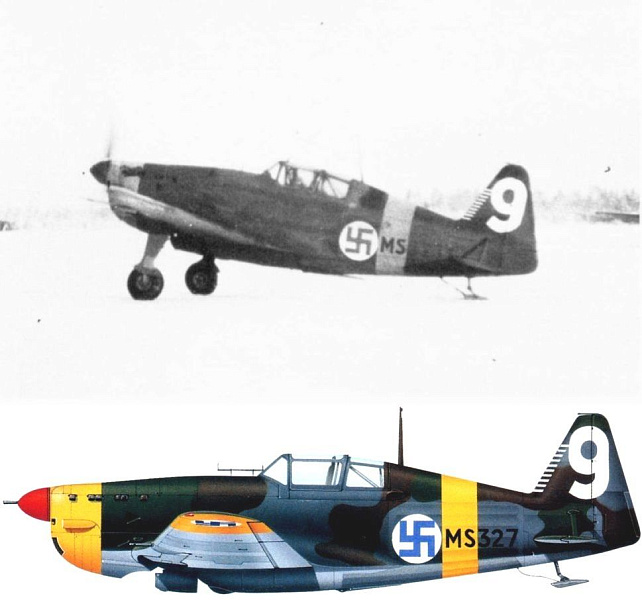
Greetings, comrades!
On the "rubber" shelf has been added!) A Frenchman with Finnish nationality from the EaseKit set. The kit, by the way, is quite acceptable. Slightly reworked of course, couldn't resist. And so, what's done: redesigned a little the cockpit (the lantern is thick, you can not see much), corrected the geometry of the nose of the bonnet, finalized the propeller (the geometry of the wingtips and cannon), finalized VZ etching, made a bonnet sight, back and under the fuselage antenna, finalized the tail, the tail guard (restored the lost and cut the unfinished one), riveted, finalized the landing gear recesses and struts, manufactured the landing gear flaps, finalized the ski rear support crutch, manufactured the headlight, wing machine guns, the airfoil. Painted with brush and sponges: GSI Mr.Color urethane-acrylic, PC88 acrylic, Tamiya lacquers, futura, +plain pencil.
Enjoy the view!
-
16
-
-
1 hour ago, Seahawk said:
As the English saying goes, "many a fine tune played on an old fiddle". I built this kit in the 1960s: I remember it as crude but with superb fit of parts. You have transformed it into something that can hold its head up next to its modern competitors.
1 hour ago, perdu said:Better by far than excellent, this is outstanding.
Thank you for showing it to us.
Colleagues, thank you very much for the feedback! I've loved FROG-NOVO kits since childhood and will try to keep building them in a new hypostasis. I am currently working on the Republic P-47D Thunderbolt.
-
2
-
-
On 11/7/2021 at 11:00 AM, Remus389 said:
I love that the wing can be folded. Interesting model of an interesting, rare aircraft.
This would stand out at any modelling competition, high chance of winning a prize.
Thx! 😎👍
On 11/7/2021 at 12:17 PM, Mig88 said:That's really outstanding work on those old moulds. And with folding wings
 !!!
!!!
Miguel
On 11/7/2021 at 12:59 PM, Samuraiwarrior said:Fantastic model.
I remember building one in my youth and not happy with the results.
Just goes to show what can be done to end up with a beautiful looking model. Your skill, patience and ingenuity abounds.
Respect.
On 11/7/2021 at 1:35 PM, Roberto said:You have done a mega work on this kit, and the finalt result is nothing short of a stunner!!!
Thank you very much colleagues for visiting and for the feedback! Sorry for the late responses, I don't visit the site often...
-
1
-
-
On 11/2/2021 at 7:20 PM, Martin1962 said:
Can I just ask what colours you used please? I am about to start the Revell 1/72 and have a folding wing kit to use. The instructions are a bit vague on colour scheme for the RN version although it looks like sky at the bottom and a dark battleship grey on top. Would the grey be the same colour as the slightly later RN colour scheme (grey top, white underside)?
Lovely model by the way!!!
Martin1962, thank you! No special paint has been applied. I mixed the shades of paint myself, looking at the photos.
On 11/2/2021 at 10:37 PM, Shorty84 said:Wow, your work on this old kit is nothing short of amazing. Really impressive
 I guess all the modifications/additional details are scratch built (самодел)?
Cheers
Markus
Shorty84, thank you! Yes, all the modifications are homemade...
On 11/2/2021 at 10:49 PM, Linus said:Compliments, really great job!!!
On 11/3/2021 at 6:23 PM, David Womby said:Absolutely amazing work.
David
Linus, David Womby, colleagues thanks for the feedback!
-
On 13/10/2021 at 11:25, Noel Smith said:
Very nice model. Captures the lines very well!
On 13/10/2021 at 15:41, Tokyo Raider said:Wow... very cool!
On 14/10/2021 at 05:12, Kampartiger said:Such a lovely replica of the most beautiful flying machine ever created.
Colleagues, thanks for visiting and for the feedback!


Gloster Whittle E28-39 Pioneer (FROG / NOVO / ARKmodels 1:72)
in Ready for Inspection - Aircraft
Posted
Hello colleagues!
I have completed a multi-task construction from FROG / NOVO / ARKmodel kit to restore and improve an old model. Work on the model was started last year, but due to the volume of tasks, I only recently completed it. A lot of things are homemade. Made: cockpit, extruded and divided cockpit hood, left door, nose air intake, front and main chassis recesses, front and main chassis, chassis flaps, bonnet cover, engine and all underhood stuffing, antenna, exhaust, stabilisers and keels, PVD. Worked on the fuselage and wing skin panels. Because of the mismatch of the wings to the fuselage, lengthened the wings. Which led to a more believable image of the prototype...!
Paint and varnish, brushes: urethane-acrylic GSI Mr.Color, varnish Tamiya, + simple pencil. Decals to order.
Enjoy your viewing!