


Kiertomäntä
-
Posts
78 -
Joined
-
Last visited
1 Follower

Recent Profile Visitors
774 profile views

.thumb.jpeg.512869d47e412449d69d30d0295c1ae8.jpeg)
Kiertomäntä's Achievements
")
New Member (2/9)
404
Reputation
-
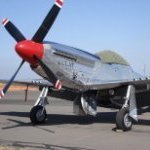
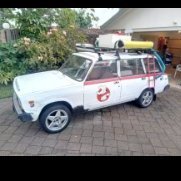
 I've had this same idea for years in the waiting and I'm certain I'm not the only one but you are the first one I've seen trying to actually do this. So far looks great and the body kit seems to complete the overall look. Only thing that I would say is "missing" is those white turbofan discs in the front wheels.
 -
Let continue with the monologue. Although it's been fun to do this so far and it will have the benefit to return to techinques and products used (if described) unlike many of my previous models where I don't have any recollection how I achieved something when it would have been beneficial to this project. Because my original plan with this was to use forced induction the rear half had to be reinforced with this in mind. Original XV1600 produces around 70hp/130Nm which is quite easily doubled with little more pressure hence the original tubular frame would not suffice. New swingarm was found (luckily?) from Yamaha's own production, from mk1 R1 lineup to be exact. Rear brake caliper came conveniently in the same package. This was the original plan anyway before I touched any of the parts. This was quickly turning out to be only hope as I could not make it fit no matter how I calculated it. I didn't want to widen the main frame, I wanted to keep the belt-drive, 180/60-tyre had to have enough room to rotate and I wanted that aluminium frame swingarm... In the end I managed to find the way to fit all these together nearly as I wanted, the frame shown in the pictures is the third version and I already once gave up and started modifying the original frame to fit before deciding that I will get that aluminium frame. The R1 frame had to be widened in the end had to have more splay than original and even then it needed a bit of heat and force to widen it even more. Pivoting tube has been widened 2+4+1mm with evergreen tubing, under reinforceing plate 5,5mm and belt side couple of millimetres more outwards. I didn't make any calculations whether this would actually hold in real life or not but at this point it's enough if it seems to hold. In the same time I wanted to stretch the frame to prevent wheelies in 1/4-mile even if this kind of bike would do wheelies in the first place... Suspension brackets and reinforcements are mainly done from 1mm evergreen plate and welds are 2K-putty. Belt and belt pulleys are 3D-printed although the belt itself will need a quite a lot stretching yet. Original kit part on the foreground in test fitting. Front pulley is lined up with its axle so this visualizises the stretching needed pretty easily. Caliper measurer has been almost the most used tool in this... Original tubular frame in the background and R1 on the front. No memories on which version it was at this point. One of the test welds. About 1mm thick stick of 2K-putty and wrinkles made with DIY tool from steel tube. I don't even know how many test fittings at this point... Original saddle for ideas, I'm really not sure whether to use any parts of that or just do completely new one. Maybe still in this decade...
-
I think those 4 molded-together-pipe-looking-things-with-flash have resemblance to torpedo tubes but I wondered were they supposed to be there as the hole in the main deck where the tubes were supposed to be glued were under the outermost wall of the superstructure. So I thought they were an afterthought or after some modification later in his (these two were referred as masculine if I remember correctly?) career. So it's not that much my comfort of doing that or not, I just didn't know whether I was doing it correctly. Don't hold your breath with this one 😁 Albeit I'm a bit surprised how little boats/ships I have modeled, after all I'm fishing a few days a week through all the 6-7 months the Baltic sea is free of ice. I did the rowboat few years back and now this so next ship might be somewhere around 2028... Function over form definitely. But I have always liked how Germans still managed to make those ships with flowing lines. British for example had quite a lot more going on above the main deck.
-
If the joke of a dog looking at the computer screen with text "I've no idea what I'm doing" is familiar, that was pretty much my feeling through the whole build. I have always been interested in history and engineering however I've never been into military stuff in modeling and therefore techniques etc. are a massive question mark for me. Highly polished and shiny surfaces are my bread and butter but matte finish is once again a mystery therefore this whole (side)project was built more as just pleasure of modeling more than trying to achieve perfect finish. First obstacle was actually recognizing the parts. I don't think I've read the instructions this intensely in the last decade at least. Second new thing was need to glue parts before painting, completely opposite what I've used to. Identification scheme I decided was "impossible" regarding superstructure, I had no idea how the lines could be painted in the way that they form a straight line from the hull through the superstructure so I painted upper decks in uniform gray. Wooden decks are from woodhunter. Apparently this is Tamiya's old kit (1:350) as there were a year stamped inside the hull from 50 years ago. Personally I don't doubt this for a second as this wasn't really on par with current Tamiya quality. Especially conjoining main decks and hull was really hard and didn't completely work out in the end. Most familiar part of this project was actually the woodworking part of the base. Feel free to roast in any way, shape or form as you wish. I think I will do another ship in the future so any tip might help there.
- 4 replies
-
- 12
-

-

-
Fuel tank and front wheel has now been lacquered after some painting and decaling. Lacquer turned out to be half-catastrophe already when spraying as the Iwata itself decided to act up again not just the nozzle. I guess it's beginning to be about time to invest into new paint brush altogether... Managed to salvage most of it this time but the lacquer is very thick in places, most visible in the front wheel spokes. In one of the test assemblies I found out that I had made the first bigger forgetting or miscalculation with the front fork. As the whole fork will be one big puzzle and the mounting point of the brake discs moved from the axle to outer ring of the wheel it narrowed that front axle by 3mm in total. Simultaneously the upper clamp (Honda RC213V) narrowed by 5mm so with quick maths there is (was) 2mm offset within the length of the fork. Fix itself was probably easier than trying to make it symmetrical again as I of course had to take 1mm out from each side while not making the ends crooked. Fuel tank is one of the few parts that will have some other colour than a shade of black and because Yamaha and Japan I wanted the rising sun somewhere as a theme. Original built-up pearlescent red was way too visible for this in overall so I hesitantly decided to paint it all metallic black. However when I did the first mist coat it looked way more what I was aiming for in the first place so in the end I covered it with 80% opacity. Now it looks brownish black from distance and the sun only comes visible in close and under direct light. At this point the upper and lower clamps hasn't been shaved yet. Caps of the reservoirs might end up being used later but otherwise reservoirs won't be used. Handlebar fittings, all hose and wiring fittings and clamps are still to be scratched as well as the removal of the clip-on holders. All this before detailing I mean. Tirpitz cannons in the background are not related to this project (luckily). This was the original colour which I very quickly decided to be unfitting for this project. And this is what I ended up with. Extremely difficult colour for the camera it seems, autofocus is all over the place without knowing what to do. At this point there's around 30 colour coats and it hasn't been polished yet. Some spokebolts are still missing as I didn't found ones to my liking from my stash but otherwise this now waits brake discs and assembly.
-
This build was a privilege to follow and the end result is definitely worth all the time.
-
I don't think I've ever seen ufo-brakes in scale model. Not in picture let alone in real life. Although they were never in large scale production in the first place anyway, I think Audi and Buell were the biggest users of them and even Audi used those in only premium models and not for long. So obviously I wanted to turn Roadstar's original brakes into ufo's. These are made from 0,25mm evergreen sheet, first the center cutout and then cutting the outer circle into shape. Brake caliper carriers I can only do once I see where the discs and calipers set in relation to each other. A bit of colour and it's good(-ish) to go.
-
So far a lot of time has been me just sitting besides the table and trying to work out how to do certain parts. Same time it feels like one decision forces compromise on the next part so this has required a lot more planning ahead than normal. Regarding wheels I wanted MT-01-ish looking 4-spoke ones finished in carbon fibre. If this isn't already hard enough I wanted to make them 2-piece split wheels. In real bikes you don't usually see split wheels mostly due to cost of those but they are sometimes used in show bikes. And since this isn't a show bike it was an obvious solution of course. Starting do these I had no idea which would be the easiest way to make these but this way I at least was sure that the result would be symmetrical. Rear wheels is made with same technique so I won't show it here. Chrome plating was already removed at this point otherwise here is where it started. I tried to find the rough shape before I cut it from the styrene sheet. Used 1mm thick evergeen one. Cut into correct diameter and only the final sanding left. And the finished wheel albeit the axel bushing isn't glued into place here since I've no idea how to make straight. As this doesn't have to be running bike it doesn't need to be balanced but it would still need to be straight in regards to front fork. And as this would need to be glued before painting...
-
By all means take the step if there's any interest in specific model.
-
Audi R8 LMS GT SPA 24 hours 2015
Kiertomäntä replied to danntheman's topic in Ready For Inspection - Vehicles
Definately not bad for the early car model. Shine or colour doesn't look nothing to be ashamed of even if you feel that way. If you used 1K clear polishing can bring more shine in it if you are not satisfied. You wanted some tricks to improve your next model? First (and I'd say most easy and important) is to wash the panel lines. Or take a really thin black sharpie. Doors, fuel filler cap, bonnet etc. will look less toy-like and it will vastly improve overall look. Don't be afraid to use the same black wash in the engine bay for example, really brings depth to it. I know you already know what I mean by this. Other trick I recommed is to paint the edges of the clear parts with corresponding colour. Windows you have done but front/rear lights are not. Take the same colour which you used to paint the surrounding body (red/black of some sort in this case) and paint the edge of the clear parts with that colour. This way you can fade out the thickness of the part. -
Let me know if you get one universal answer for this 😃 I use 1.5bar (around ~20psi) for light tamiya colours and X-2 I'd thin 1:2 paint-thinner and nothing else. Very thin layers, almost only mist layers since clearcoat brings the shine anyway. Edit: since you wanted to know why, I think you didn't dilute it enough. As said previously the paint was already dried a bit before it hit the surface. Gloss paints need more thinner to be able to have time to stay liquid once on the surface to smoothen and become even.
-
I decided to glue everything together in the end. Also added oil return pipe at the bottom of the block which is made of resin pipe connectors, black steel braided line and electric sleeves.
-
I like this in silver. Brings that Sacco design more visible even though I love the original blauschwarz. I'm not sure about the wheels but that doesn't take anything away from the model. Useless fact: If you wonder about that cover on the rear window, the DRM rulebook at the time said that the rear spoiler can't restrict rear visibility so Mercedes' solution was to cover top half of the rear window therefore the spoiler doesn't effect the visibility...
-
I have always the feeling that I can't make another post yet as I don't have anything significant to show. Which eventually leads the whole model being completed in four or five posts. Therefore this post. All the major engine parts are starting to be painted already albeit I haven't glued anything down yet. Apart from littering the entire floor with aftermarket bolts and nuts I've managed to attach about four dozen of them into the model also. Every time you can hear the high-note "ding" from the pincers you can also hear a voice in your head telling "there's another 50 cents out of pocket...". Wax pen is also pretty useless as it seems that the bolt will attach to the glue rather than stay attached to the pen. Couple different shades of black from tamiya and couple different shades of Gravity's 2K lacquer. Seems to be pretty hard to capture with camera sadly. Next job would probably be deciding which details to build at this point and which ones would be better to be left until frame, suspension, engine etc are glued into their final places. I'd like to convert the clutch from wire operated into fluid operated and that's probably what I'm most concerned about surviving all the way to end if I do it now.
-
Well I'm one of those who leave the bags sealed. I open them when I start building and until then they are best protected sealed and in the same time it's the best insurance that every part will stay there through the years. Sometimes years will turn to decades with some kits. On the topic though, looking nice so far I like especially the painting on transmission/engine block.