


Kelscale
-
Posts
273 -
Joined
-
Last visited
Content Type
Events
Profiles
Forums
Media Demo
Posts posted by Kelscale
-
-
16 hours ago, Stef N. said:
What a great start and what a great looking kit. Having read your WIPs I know we are in for a treat and loads of tips that we can "borrow" for our own builds. Nice one and welcome along.

Cheers Stef. I know very little about Tiger I's but thanks to David Byrden's research work I'll try and give some pointers regarding how accurate this kit is and how I found this kit to build up. It certainly looks impressive in the box
13 hours ago, Keeff said:Definately a good start ... this will be a great build! 👍
Keith 😁
Cheers Keith, glad to have you along
13 hours ago, Marklo said:Welcome to the GB. Looks like an interesting kit, the fit reminds me a bit of my Italeri tigers that I’ve started wrestling with today ( some very odd engineering going on there….)
Thanks Marklo. Its a very expensive kit to get hold of these days, I know that much. Like all Dragon stuff these days I guess🙄. Thankfully I've had it the stash for a while and it looks to be worth every old penny I paid for it 😁
I'm assuming you mean the odd engineering is to do with this kits warped lower hull? IF the hull warp was indeed engineered in, and I'm not sure it was, then surely the instructions should, at the very least, point out that the lower hull and front of the roof plate should sit flush. Being already aware that previous builders had found this anomoly and created a relatively simpe solution, I cut my side plates off the sprue to test fit how they were engineered to fit. It was only doing this test fitting of upcoming parts that allowed me to figure out something wasn't quite right and that the lower hull needed pushing out! I would like to think that I would have figured out that bracing the front of the hull would be the solution, but for a relative newcomer it could very well make for a very messy build.
-
 3
3
-
-
1 hour ago, Bozothenutter said:
Careful with that, some allergens are cumulative, and once triggered are permanent.
Yes, I understand. Not at all a good outlook🙄
-
2
-
-
14 minutes ago, Stef N. said:
Funny you should say that. I have been having problems with my nose for ages and have been cutting out different thing to see what was causing it. I have now sadly narrowed it down to one of the glues I was using, which is mostly the excellent Tamiya Thin. I'll now wear a mask if I have to use it for a long session, which is a PITA in itself.🤬
I had similar symptoms last year and put it down to one brand of CA. Changed brands and was OK until this. My mancave is a small enclosed space (6x3m) so Im positive the exposure is amplified. I also think once an irritatation starts it takes a while for it to settle down and I'm 100% sure gets triggered much easier a second time. Mask wearing for me too now 😥
-
1
-
-
On 08/04/2024 at 08:29, Stef N. said:
Don't know if it was linked but I was having some weird dreams. 😬😂
I knocked some Tamiya thin over a little while ago. Onto a brand new A5 mat🤬 Cleaned it up but I’m beginning to think I haven’t dispelled it sufficiently and will have to get a new mat. I’ve defo been getting an allergic reaction ever since if I spend more than a couple of hours in there now! Itchy and irritated nostrils so I get cold like symptoms after 24hrs. Really p*****g me off😖
-
1
-
-
On 01/04/2024 at 17:12, Stef N. said:
My colour profile has the armour but I can't find it anywhere else. Well spotted as it is something I would have chucked them on. That is the only photo with the Roman numerals. I may leave it off as I am not 100% certain at this moment. I found another cool photo though. One to highlight the Knight for @Mjwomack too.

Great camo ref pic too. You can clearly see that its a field applied jobby 😉
-
 1
1
-
-
Lovely work on an incredibly detailed 1/72 kit👌
-
My GB Tiger entry is Dragon kit 6253
This original 2005 boxing Dragon kit is one I’ve had in the stash for a number of years now so I am really looking forward to only my second ever Tiger I build! There have been a few re-releases since, but this is the original with a host of addition multimedia parts. It’s not all doom and gloom if photo-etch is a turn off as there are styrene alternatives. So, let’s pop open the box and inspect what is reputed to be one of the very best of what this manufacturer produced back in the day.
It’s a comprehensive 3 in 1 package in which you can build three different Ausf E variants. A late, a late command vehicle and the final version. There are five frets of photo-etch including track guards, exhaust surrounds, engine grills, command tank aerial and multipart tool clamps to name just a few. There is an additional turned metal barrel and muzzle brake and five different ammunition shell types, metal tow hooks and tow cables and yes, there is a metal bucket.
 There are individual magic track links and the option to build working torsion suspension. There are plenty of options depicting the differences between late and final versions including two turret roof types and final type patterned steel wheels. The box is packed with almost every conceivable extra and was considered back when released, everything you could possibly need. Well, almost everything. Unlike later releases with far less parts and rubber band tracks this kit does NOT have any Zimmerit. Although the inclusion of Zimmerit anti magnetic paste ended in Sept 1944, production of the Tiger I ended in August, so all late and final builds would have received factory Zimmerit. Why this kit didn’t come with any moulded on I couldn’t say. I know Dragon did release kits with it on, but I’m not qualified to say how successful it was. It’s not a massive issue as aftermarket manufacturers released their own not long after the kits release. I’ve gone for a safe pair of hands with the ATAK specific set. This includes two pattern types for the turret and two resin mantlets and turret escape hatches. I’ve also got a set of Friul metal tracks to add some heft to the build.
Knowing very little about the production history of these big cats I’ve turned to David Byrden who helped the manufacturer with technical assistance for this particular kit. Along with a comprehensive history and insight into Tiger I production his excellent website https://tiger1.info/vehicle.html also lists the majority of Tiger I 1/35 scale kits and lists any issues that each might have. For this kit there are no major problems, just a few pointers to solve instruction discrepancies, and some small additions and modifications.
With the choice of three, the first logical step is to choose a variant. I’ve always been fascinated with the Normandy campaign, so I will be choosing a vehicle from one of the heavy tank battalions below. The Tigers that were operating in Normandy fought exclusively, as far as I know, in the British and Canadian sectors around Caen where the German armour was concentrated. Three German schwere Panzer Abteilung fought in Normandy and a few Tigers may (or may not) have been present in the Panzer Lehr Division. Not all of them where of the late type and many had been re-built so a litte further research to find a suitable candidate will be required
s.SS-Pz.Abt. 101 had 45 Tiger I and reached Normandy on June 12, travelling from Beauvais near Paris. Michael Wittmann and the 1st and 2nd Companies famously fought in the well-known battle of Villers-Bocage on June 13.
s.Pz.Abt. 503 was transferred to Normandy with 33 Tiger I and 12 Tiger II in early July.
s.SS-Pz.Abt. 102 was transferred to Normandy with 45 Tiger I in early July. They were engaged in the bitter fighting for Hill 112.
Tiger 232 of SS.Pz.Abt 101. Larger pattern zimmerit on the turret, monocular gunsight and a centrally mounted loaders hatch handle. An MG AA mount is also fixed to the cupola
Beat up Tiger 111. Concave type sprocket, large idler wheel and offset muzzle brake
Tiger 211 of SS.Pz.Abt 102 commanded by Martin Schroif, The second highest scoring Tiger commander with 161 credited victories
Tiger 222 of Schwere SS Panzer Abteilung 101 Towing Tiger 231 towards Caen on Route Nationale 175 out of Villers-Bocage.
The next step was to decipher the infamously busy Dragon instructions. Credit to them they do break down the various differences for each of the three variants at each critical stage, but I still double checked that these were correctly picked out and made notes from the David Byrden website.
CONSTRUCTION
The first steps build up the running gear. The lower hull tub is a one-piece affair to which you first add the front tow hook extensions and individual torsion bars and inner wheels. After each torsion bar has been cleaned up, they fit snugly unglued through the hull, and the workable design means fixing the bar ends as instructed in the grooved slots to the small fixings added on the opposite wall. This system allows the suspension to compress and rebound as per the real thing and it works fairly* well. Although the instructions are not overly clear the track pin return plate is to be positioned slightly differently if the smaller idler is used. It fixes angled down at the rear to operate effectively on the smaller idlers. David Byrden points out that the smaller idler wheel was introduced about a month before the thicker roof so its very unlikely that a larger idler would have been present on any vehicle represented by this kit. I would recommend leaving the idler axle unfixed until the tracks are added to get the perfect fitment. There are two sets of both inner and outer wheels with one set representing those fitted to the final version. There is also a choice of two sprockets. As far as I can tell there is zero difference to the outer face other than the spokes on one are concave and the other convex.
Inner and middle sets of wheels dry fitted *as seen in the images below, full compression isn't that effective. The second image shows the whole structure lifting at the rear, so to display a fully compressed suspension you would either have to add extra weights into the hull or despense with the working system and simply fix them in place. However, individual wheels do articulate seperately well enough to display over slightly uneven ground.
Two lower hull rear plates are included, with one representing the different fixings used on the command variant. Before adding any additional components the ATAK Zimmerit will first have to be added and any location holes it covers, opened up. Any damage is also best added at this stage. There is the option of one plastic or two types of metal tow shackles and pins. I understand the squarer shaped ones were fitted to the final tanks. David Byrden points out two small updates required in step 5. Firstly, the exhaust muffler top guard is supported on pins (parts C3) and these are orientated incorrectly. These are easily repositioned using the guide on his website. Secondly the adapter plate that is positioned between the exhaust sits on two small posts moulded to the rear lower hull plate. These are 1mm too long so reducing their size allows the plate to sit as intended. The exhaust shields are offered in both plastic and pre-formed photo-etch. Whatever medium you choose the shields were actually mounted to small square spacers. This is not a detail added to the rear plate. Again, these are easy enough to scratch build out of plastic card. The jack brackets are offered in both plastic and photo-etch.
Late gun tank rear hull plate fitted
I have read that Dragon deliberately moulded the hull with a slight warp in the hull tub as a design intended to allow for a snug fit with the hull roof and side plates. The rear plate is big enough and strong enough to force the hull sides into the proper alignment, but at the front it requires a little help to overcome the warp. Using the roof plate moulding as a template, positioning a length of sprue or wood or brass etc, cut down to the necessary size, will brace the lower hull to allow the perfect fitment of the roof plate moulding.
Images below taken from David Byrden's webpage to illustrate
Roof moulding and turret shell dry fitted to the lower hull showing how much the lower hull bows in at the front without any bracing
-
5
-
-
Leaving where we we left off it was time to work on adding all the exterior components. RFM appear to have used the same gun box moulding as in their early Ausf G kit, so some features require alteration. The instructions do point out the removal of witness marks for the smoke dischargers, and the removal of four rivets on both sides, to enable the fitment of the Schurzen hangers. They don’t however instruct you to fill the four small holes on the rear. These were to enable fitment of the earlier production rear loaders hatch which was re-designed.
Moving onto the engine deck moulding, this fits perfectly onto both the lower hull and against the back of the gun box, and if you wish, can be fixed in place before any further accessories are added. If like me, you prefer to add the most fragile items once the large assemblies are in place, access to all the added parts shown in steps 25 to 27 remain unhindered if you do.
The Dragon StuG F8 rubber tracks have been added for these next few images just to keep all the roadwheels in line
All the engine hatches come as separate items. Yet another oddity with the instruction sheet is that a small 3D part is to be added just behind the cleaning rods on the rear deck, yet there isn’t one in the kit, nor is it shown in the included parts map! Very odd, as the part shape is both difficult to identify should you wish to scratch a replica, and you are left with a small locating hole on the deck! A more important possible anomaly is the inclusion of diagonally shaped mesh for the engine cooling louvres. Although not conclusively proven it is believed that Alkett produced late Ausf G vehicles were only seen with a square mesh type. Late MIAG vehicles look to have retained the diagonal type, but to muddy the waters further an unmolested museum piece has a combination of both! I don’t think using the kits photo-etched item would be a massive issue, but the square type is available from two aftermarket manufacturers. The kit also includes a multipart photoetch support rail which fits around the outside of the engine deck. As period images showed these vehicles crammed with added stowage and crew gear, I plan to add some aftermarket stowage so that will be tackled at the same time to ensure it all fits together nicely.
As we have seen already, there are a few features that were unique to one or the other of two manufacturers that built the final batch of Ausf G, but unlike MINIART, RFM do not specify which one they are representing. Most features you are instructed to add, do point to an Alkett built vehicle; however, a few others have been confused. If you know what features are particular to each manufacturer then it makes it easier to differentiate, and the inclusion in the kit of almost all the features of both, is a big plus. If depicting an Alkett build, it is worth noting that RFM only include the original round type MIAG installed tow cable brackets. Alkett brackets were a unique square shape and as the kit part is moulded to the tow hooks, they ideally will need to be replaced along with aftermarket copper braided tow cables. Both Modelkasten and Panzerwerk design offer these brackets. Observing the details on the Alkett track guards; the front and rear tubular supports are not quite as faithfully represented as they could be. The shape is not quite on the money. The inclusion of photoetch strengthening ribs improve the overall appearance of the middle two supports. The rear convoy light RFM provide is not one that either manufacturer fitted. It should be of the tube type design. These can be found as spares in many Panzer kits. I believe RFM’s own Panther have them.
RFM have omitted to include the lower hull interlocks at the rear. These are simple enough to scribe in and extra weld detail can be added if required. Likewise the late Ausf G engine cooling extensions also featured interlocks and although these are not quite as prominent, these too were scribed in.
As in their earlier Panzer III and IV kits, RFM have moulded the main part of all the tool brackets to the tools, but the clasps come as photoetch parts. It’s a neat way of keeping the photoetch parts count down, whilst also enhancing the scale appearance of the most prominent feature of the bracket. I will be adding mine towards the end of the build to avoid damage. The inclusion of separate tow clevis brackets in photoetch is also a welcome addition. It is just a single piece but does require careful bending before fixing in place. The base of the Jack has also been replaced and updated to the cross pattern type from the spares box. CA De-bonder will be used to clean up once all the photoetch items have been added.
With both the engine deck and track guards now populated we can move onto the gun box. The barrels for both versions are slide moulded and the seams are easily cleaned. The strange inclusion of a spring between the gun tube and the breech assembly is an odd one. Without it you could display the gun at full recoil. Not an option you normally get but an interesting option all the same. Adding the spring simply allows the barrel to be loaded against the breech but as there is so much movement at the breech end the barrel never really ‘springs’ out to its full extension. Lucky really, and a fortunate feature for RFM as apparently the fully extended visible length including the muzzle brake is reported to be a fraction too long.
As already mentioned, test fitting both the gun breech assembly and the mantlet to the gun box is a tricky affair, but the fitment of part G65 pretty much insures they have to be fixed in place at this point. I wanted to paint the interior, and fixing part G65 as instructed will essentially trap the breech assembly inside, or if not paying attention, outside! A simple fix is to add part G65 to the roof plate (part G110) instead, leaving the roof plate the last part of the gun box to be fixed in place. I sourced a kit specific aftermarket metal barrel, and along with the spring, fixed it to the breech assembly leaving it moveable, so I could paint the whole sub-assembly separately.
The rotating cupola can be built with the small periscope flap open or closed, and if you wish to keep the cupola separate to paint, the clear part vision blocks can easily be fixed in place after. The kit also includes a finely detailed but delicate photoetch engine hatch retaining bracket which connects to the rear wall. The remote-controlled gun mount is easily built up but there are question marks as to whether the shields are of the right shape. Rado miniatures have just release a 3D set should you wish to go all in. As already mentioned, my roof will remain separate until the interior is painted and the breech and mantlet slotted into place. Radio aerials and all the fragile parts will be added as a very last step to avoid damage.
-
8
-
-
Lovely clean building buddy👌
-
1
-
-
Jeez man, you'll be pouring petrol in this soon and firing her up!
Lovely fine work and a joy to watch progress
Los
-
1
-
-
18 minutes ago, geoawelch said:
Kelscale,
Thanks very much for your comment. I’ve actually been reading your Pz. IV Border/Dragon build. Very comprehensive and so much good information for someone undertaking the kit.
Cheers,
George
Cheers George
I've slowly got sucked into the research side of the hobby over recent years. It does fascinate me, but it don't half slow the build time down, and I'm already a leisurely builder🫣 I still enjoy an out of the box build but I do think its important to know whether its worthy of building. The Takom Stug G early Blitz kit is a case in point. It got slammed for a massive dimensional innacuracy when it was released, as has every single kit Takom have released with the same chassis. Apart from the dimensional whopper, it looked like a decent kit and in the UK they are extremely good value. For those reasons alone I figured it was worth a punt. I both enjoyed the build process and think it will look great under paint.
The RFM kits I've tackled so far have been a nice comprimise. They have good levels of detail and accuracy but don't sacrifice simple and effective engineering in favour of crazy parts counts.
Los
-
1
-
-
I’ve built a few Panzer IV recently. All Ausf J versions. I did a twin build of the 2019 Border kit and the classic 2010 Dragon kit. Also, a twin build of both the regular and the Interior RFM kits, along with an ancient Tamiya kit spruced up with aftermarket goodies. I've not painted any of them so far so if I had to rate them it would be the RFM kits and the 2010 Dragon kit up front, The RFM’s are more fun to build, great engineering, but a little soft on detail. The Dragon kit is still up there for accuracy and detail. Just spoiled by their notoriously frustrating instructions and multimedia Schurzen layout. Although the Border kit is way more accurate, I’ve had just as much fun improving the Tamiya kit. Border definitely tried to copy that 2010 Dragon kit in so many ways but fall short in most of them. I really wasn’t a fan of their plastic, I felt the detail was lacking and the fit was also way too sloppy in too many prominent places.
I’ve yet to tackle one of the many Miniart offerings and the only other IV I’ve built is a completed Dragon Ausf H which had moulded on Zim and is nice bit of kit.
As for StuG’s. I had never built any until last year! I am currently on my third. I’ve completed building two so far. Dragon's Italian Ausf F/8 is a lovely kit. A few accuracy issues and typical Dragon part call out errors, but a lot of correct parts are actually spare items on the sprues. I also built the Takom Blitz Ausf G Early. Some big errors dimensionally, but if that’s not super important it’s a nice quick build and will look cool under paint.
I’m currently building the RFM Ausf G late. The instructions have you build up the Alkett vehicle, but a MIAG version can easily be built too. There are a few small overall errors and omissions, but these are easily fixed on the bench. The kit tracks are not incorrect, but the odd choice of open guide horn wasn't common. The two biggest issues representing the Alkett version that you are instructed to build, is that the kit only provides the MIAG type round tow cable brackets. Also the square type engine cooling cover mesh was a typical Alkett feature rather than the MIAG horizontal type provided in the kit.
I notice looking at the recent Miniart MIAG Ausf G kit they oddly only provide the Alkett type square tow cable brackets
 so having access to a few different manufacturer’s StuG kits should help without resorting to costly aftermarket purchases.
-
1
-
-
On 08/03/2024 at 20:15, Matt B said:
There's nothing wrong with Lightroom. I've been using it for years for several types of photography and find it useful.
As you pointed out, the answer does depend on several variables like settings, lighting conditions, subject, etc. I've found presets to be useful when editing a large number of photos with similar settings under the same lighting condition. For instance, I used to do wedding photography and would have to process a large number of photos. If I was taking group photos of the wedding party in the front of the church, I was using the same settings in the camera under the same lighting conditions, so when I went to process the images, I would tweak the settings for one photo, and then lock those presets to apply to every other photo in the series, so everything looked the same.
With modeling, presets may be useful when editing a lot of photos of a single particular model given that your lighting and aperture/shutter speed/ISO were the same for all the photos, but those same exact settings are not going to be able to be applied to every different model you put in the photo both and have the photos come out to your liking. You've already noticed this when you applied Martin's settings to the unpainted WIP kit. That's because the lighting is going to reflect off shiny unpainted plastic different than a flat paint finish like on your finished model. It would be the same reason you would need different adjustments for a natural metal finish plane vs an olive drab plane or tank or what have you, even if they were taken using the same camera settings. So I find that I tweak my settings on the first photo of a series to what works best, then use a preset to apply those same settings to the rest of the photos in that same series as a baseline and adjust if necessary. I don't mind tweaking individual photos, but that's probably because I'm used to it from years of landscape and wildlife photography.
Cheers Matt, some great advice. Can you offer how you would go about acheiving a perfectly white background?
-
On 07/03/2024 at 11:13, Rob G said:
The best advice about using Lightroom is... don't.
You're much, much better off using Bridge and Adobe Camera Raw, and Photoshop for pixel wrangling.
For more details, see here:
https://damiensymonds.net/bridge-30-day-challenge/
I highly recommend Damien's classes, but at the very least, stay away from Lr.
I don't have an issue with it but thanks for the recommendation, I'll take a look
-
I also built and finished that Tamiya Tiger II too after I started up the hobby again in 2012. It was only my second attempt, and I was still feeling my way around.
Three years later this build was the one I was really proud of at the time. It is a Fiat 626 by Italian manufacturer Model Victoria. These vehicles were utilised by the Wehrmacht in numerous theatres of war. I still look at it as a groundbreaking moment for me. For quite a few reasons too. It was my first resin kit, my first-time using CA glue, my attempt at using a primer base coat, my best efforts to date with both the hairspray technique, chipping, and pin washes. In fact, my best attempts at any type of post paint weathering. It was just really an enjoyable time at the bench. It built up without incident, the paint went down largely without issues and all the small fiddly photoetched parts like the front window catches actually managed to fit perfectly just as they were designed to do.
It's since had a damaged Opel passenger car dumped in the back and is now displayed in a post Normandy battle vehicle graveyard.
-
14
-
-
12 minutes ago, Jasper dog said:
I'm thinking it needs something, doesn't have the "thing", whateverthat might be....🤔
Contrast, I think it needs more contrast to be interesting. Not sure I went light enough or specific enough to do achieve what I'd hoped.
Or, I could just be over thinking it and need to see it under better lighting.
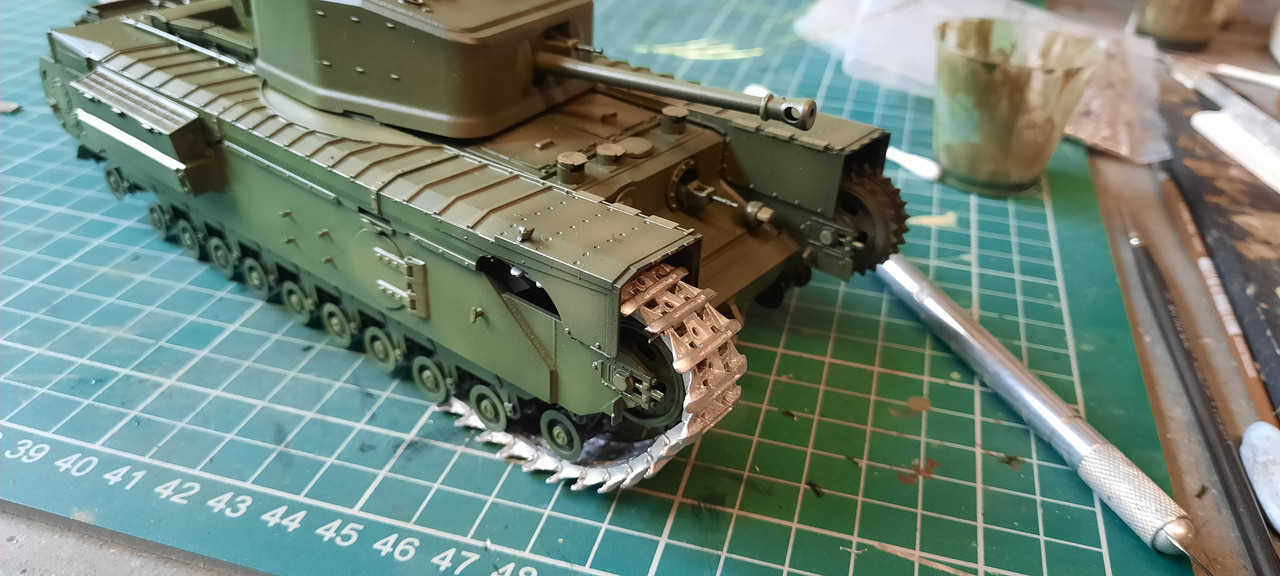
In the mean time I've put a few track links together, a few spots of CA are needed to hold some pins in situ but otherwise.... it's a set of Fruils.
Sat in front of the telly last night with the good lady wife to watch Hunted, she's full of a cold so I guess it's only a matter of time...

I think it's the robustness and articulation I like about metal links and of course the weight.
Ttfn.
Looking good. Can't beat a set of Friuls. Instantly transforms a plastic kit into a paperweight😃
-
1
-
 4
4
-
-
I’ve recently updated the operating system on my home PC and along with a new remote hard drive, I have been compiling images and archiving as many of the kits I’ve attempted to build since I first started sticking my fingers together in the mid seventies. It’s been a fascinating look at the progress I’ve managed. There is a recurring theme, and that is they are amost exclusively WWII axis AFV builds. Why that is I really can't explain! In 2012 I hadn’t purchased a kit or built a military vehicle since 1982. I had no tools and absolutely no idea how to start all over. The hobby had obviously come a long way in the intervening years, but I had no idea at the time how it was going to suck me in and captivate me again.
As I would imagine a fair few fellow modellers on here have, I loved the LEGO and built model kits as a youngster, and incredibly I do have some surviving remnants. Amongst them is a late 1970’s Tamiya Tiger I (I must dust it down and snap some pics of it) and some Airfix 1/32 figures, along with a motley assortment of other 1/35 chaps. Sadly, the countless 1970s Matchbox 1/76 kits I built have sadly long since vanished! There were a few surprises looking at these old builds after all these years. For one, although I still remain intimidated and have yet to paint a figure since, looking at the figures I finished back in the late seventies and early eighties they really wern't that bad! The Tiger I however, was finished in a pretty shocking glossy Austin Alegro beige colour

My good wife bought me a large-scale Tamiya Yamaha bike and a few white metal fantasy figures in the late nineties and early noughties which I did finish, but they didn't suck me back in. In 2012 all that changed. Killing time in a WH Smiths bookstore I picked up a modelling magazine and ending up purchasing a few publications to take home. Some of the work on show was incredible and it inspired me to give it another go. My first kit was the cheap and cheerful Tamiya 1/35 Panther G, and it was a blast to build. Painting it was a little more complex. I didn’t have a dedicated space, so some lovely Tamiya rattle can olive green and dark yellow was liberally cascaded about out in the confines of a dimly lit shed! I was pleased with it but it looked absolutely nothing like the finished articles in the magazines. Kit two was again a Tamiya kit. This time I had a go at the tri-tonal camo scheme on a Tiger II. Using rattle cans once more, you can imagine how that turned out. Did it deter me? Not one bit. My next mission was to absorb as much online info as I could and give another one a go.
The Scratchmod and Little Norway online sites were the first that I encountered, and I joined a few online modelling sites too, most of which are now sadly history. I do remember I received some really great encouragement for a newbie starting out. Sadly, something I rarely witness on FB these days. I really did appreciate the assistance and help I received, much from senior modellers, many of whom are no longer with us 😥 Although I don’t get nearly as much time to browse the tinterweb as I used to, it is definitely the reason I still like to be involved with existing modelling forums such as this.
Scratchmod Rob created a lot of abandoned and wrecked vehicles and for some reason that really appealed to me. He also cited the Panzerwreck series of publications, and this was the first time that it dawned on me that many of the modellers in magazine articles were re-creating actual vehicles from period images. This encouraged me to spend a little more time on researching the vehicles I was creating.
I still love an out-of-the-box build just as much as a more absorbing re-creation project and I’m still absolutely terrible at starting new builds before finishing up on existing ones. I really do wish I could focus on one project from start to finish without getting distracted, but it really is only social media and a local hobby club that reminds me to get my man-cave in order every now and again. I’m having fun so who cares.
Looking back at the year-by-year incremental improvements has been rewarding. I really didn’t have a clue when I started out on my journey again to where it would take me, or indeed how much time I could devote to it. I’m not getting any younger, but it’s been a wild ride and have met some genuinely nice folks along the way. I’m so glad I still get amazed, enthused and inspired by fellow modellers work and company.
Please have a chuckle at some of the many creations I’ve started and occasionally finished. * Some older model pics captured in RAW have since been updated in Adobe Lightroom
Airfix 1/32 German Infantry vignette built around 1979
Some of the many 1/32 and 1/35 scale figures that have survived from the late seventies and early eighties
Metal fantasy figure
Tamiya large scale bike
That very first Panther G kit from 2012 ( still used occasionally as a painting and weathering mule) The Tamiya rattle can dark green remains on the lower hull sides
Tiger II again painted with Tamiya rattle cans. Pretty sure i used masking tape forming up the camo
My first two attempts at artillery pieces
Scratchmod Rob influenced my decision to mash up this new (but fortunately inexpensive) Tamiya Opel kit. I can still remember the dust clouds🤣
Tamiya Schwimmwagen photographed in natural light
Zvezda L4500 still languishes unfinished after ten years!
I think this is the Dragon kit. Rubber tracks, much like Alan Partridge's running shorts, have long since perished 🫣 Hint of a Tamiya Sherman too
My first Tamiya Steyr 1500 build with a pile of aftermarket stowage. Recently re-mastered in Lightroom minus its steering wheel and half a width indicator
A Dragon 251 variant. Looks like tiny individual links on this one! Those width indicators must be brass to have survived this long😉
ICM's Opel kapitan. First dabble with Mission Models paints if I recall
AFV Club Pak 40
Tamiya's Opel Blitz that looks to have been driving on some chocolate cake!
Bronco Opel Kadet, which now sits in the back of a Fiat 626 on a small vignette
Dragon Panzer. IV Ausf H. I left this too near a blower heater and the bow plate has a big kink in it! Pretty sure this is the first time I came up against serious photoetch. Pigments and salt too by the looks of it
Second Tamiya Steyr 1500 attempt. Looks like I had discoved green stuff!
Another wrecked kit. This time AFV Club's Sd.Kfz.11
Cyber Hobby Kugelblitz. First attempt at hairspray technique using Vallejo paint didn't turn out great with big chunks randomly peeling off! Rubber band tracks don't look too shabby though

ICM Ford V3000 and an Italeri trailer. First competition I entered. OnTrack in Folkestone 2014 or 15
Tamiya's ubiquitous Citroen Traction
Model Victoria Fiat 626. My first resin build and what a lovely kit it was
Quick out of the box Italeri Sd.Kfz.10/4 . Look how thick that Notek light bracket is

I was obviously on a roll with the Flak guns. Tamiya's Mobelwagen
Cyber Hobby Sd.Kfz 251 Ausf C. If I recall this had a Verlinden interior set (way oversized) and was my first time using Friul tracks. I also went a bit daft with the scenics!
Two Sd.Kfz.8's Both by Trumpeter. First is an early DB9 variant and the second is an armoured DB10 prototype (my oldest shelf queen)
Another Flak. This time Trumpeter's armoured cab Sd.Kfz. 7/2 with an exquisite little 3D printed trailer
Another unfinished kit. This time Riich Models fugly but excellently moulded and engineered RSO-Radschlepper Ost
Tamiya's tiny little Marder I
Wiener Modellbau's Sd.Ah 56 resin Flak ammo trailer. A bit crude and bendy in places.
Azimut cargo trailer. Very basic so went to town on the camo

Another shelf queen casualty. Tried out some colour modulation and oil rendering and still unsure where to go with it.
Yet another shelf queen. Meng panther A. Took for ever for the aftermarket zimm to arrive. When it eventually did I popped a base coat on it but then the mojo took a dive!
Another Meng kit. Jagdpanther G1 has been on and off the bench for the last four years. Needs some love again
Kitty Litter dio. Abandoned Panther A kit with oodles of aftermarket including Atak zim, Masterclub tracks etc etc. My first real multi-media build and it took forever to complete😳
-
28
-
-
On 02/02/2024 at 14:59, Keeff said:
That is just amazing ... 👌
Keith 😁
On 02/02/2024 at 17:57, Cruelsword said:Wow. Wow. Just lost my words. Stuning. Amazing...
Martin
On 02/02/2024 at 21:23, Longbow said:Awesome job !!
On 03/02/2024 at 08:00, Mpfiend said:stunning
Keith.
On 03/02/2024 at 08:39, Bullbasket said:That is a superb looking model. One of the aspects of the build for me is the crumpled right front wing. If you don't mind me saying, with damage such as that, there would most likely be some bare metal on show.
John.
Thanks John. I am hoping I can replicate that effect in stages yet to come
On 03/02/2024 at 09:18, edjbartos said:Beautiful work, tremendous detailing and weathering...
Ed
On 03/02/2024 at 13:14, Stef N. said:That is so good. Brilliant modelling.

Thanks for the kind words fella's. I'm really looking forward to pulling all the elements together soon.
-
2
-
-
29 minutes ago, Keeff said:
The kit looks very good .... and the buildlog information is superb!
The RFM kits are very good and well detailed, but they do like teeny tiny parts!
Keith 😁
Cheers Keith
I really like how they tackle the tool handles with a 50-50 approach of using PE just for the outer portions. It is the part that looks most notably overscale on solely plastic moulded handles. Parts fitment on all the RFM kits I have built to date are amongst the best I've witnessed. I'm sure some of their kits will have some issues but I've not come across any howlers as yet.
-
2
-
-
3 hours ago, Bullbasket said:
This is just a wild guess now but, do you happen to like Stug's?
Excellent work so far, and a great review of this kit. I might even be tempted to get one for myself.
John.
Thanks, and I think the answer is, I do this year😃
They are great kits. Far less parts and overly complicated engineering than any that Miniart offers. I belive the RFM kits that I have built so far sacrifice a little detail in comparison, but we are not talking to Tamiya levels. Its a winning combo IMO
-
3 hours ago, Jasper dog said:
An excellent start and build review of the RFM kit.
Looking forward to seeing it progress.
Cheers
Darryl
Thanks Darryl
-
1
-
-
5 hours ago, Milan Mynar said:
Great work. Very nice and high-quality kit, worth the money. It is better to buy a quality kit for more money than a cheap one and buy a lot of accessories.
Thanks Milan. TBH in the UK they are relatively inexpensive but they are thin on the ground to find here.
5 hours ago, Stef N. said:Agree with this. A really handy guide as I have one in the stash. Nice one Los.👍
Cheers Stef. They are great kits IMO and enjoyable to build
-
1
-
-
9 hours ago, Maddoxx77 said:
Great to read such an exeptional buildlog on this kit! Great work so far.
Cheers fella
-
1
-
-
5 minutes ago, vaoinas said:
That is a lovely build and pointing out the various issues
is a thankworthy addition. I myself also have found T-Rex material
to be brittle side in many occasions so yeah... be careful with these...
Cheers!
Kristjan
Cheers Kristjan
It has put me off investing in anymore until I try some alternatives. I understand the Panzerwerk Design track pins have a ridge that enables it to 'lock' inside the link. I'll post up a report when I build them up
-
2
-


Pz.Kpfw. VI Ausf. E Sd.Kfz. 181 Tiger I (Dragon 1/35 late Production 3 in 1 kit)
in Panzer VI Tiger STGB 2
Posted · Edited by Kelscale
Still looking for a Tiger subject to model I came accross this write up. https://erenow.org/ww/tigers-in-normandy/1.php If you are big into Tiger I & II info and involvement in the Normandy battles this looks to be a worthwhile read. I already have Daniel Taylor's Villers-Bocage through the lens book which I really enjoyed reading. If anybody can recommend any other Tiger in Normandy reference material I would be grateful.