


British Army Platforms
-
Posts
166 -
Joined
-
Last visited
Content Type
Events
Profiles
Forums
Media Demo
Everything posted by British Army Platforms
-
Challenger 2 MBT - RAC
British Army Platforms replied to British Army Platforms's topic in Work in Progress - Armour
Your very welcome. I have received a great deal of help on here so it’s the least I can do to give my bit back at this stage. All the best with your tracks.- 152 replies
-
- 2
-

-
- KFOR
- TES Version
- (and 1 more)
-
Challenger 2 MBT - RAC
British Army Platforms replied to British Army Platforms's topic in Work in Progress - Armour
Small update on the regular RFM CR2. I took some time to hand-paint some details on such as the black parts of the gun, smoke grenade caps, antenna stubs and rubber parts of the roadwheels. Other details painted include break lights and the GPMG. I also had an attempt at painting the black parts of the camo scheme onto the tank base (The turret I will do next time). I used a pretty basic technique which allowed for slight rougher edges to the pin that can be seen on less show-room ready challys: Left to do is to paint the tracks and add some final parts such as the cage around the rear lights, apply decals and weather the whole model. I'm sure other things will crop up along the way to finishing it too.- 152 replies
-
- 4
-
-
- KFOR
- TES Version
- (and 1 more)
-
Challenger 2 MBT - RAC
British Army Platforms replied to British Army Platforms's topic in Work in Progress - Armour
@Stef N. I Did one section of track today from my TES model and have taken some pictures so I can run through my method: Firstly, RFM have a good system in place for making the tracks and following the steps in instructions is useful enough. One tool are these track jig's - on mine I have glued all 8 from both my RFM challenger kits: I mentioned before that it is easier (faster) to build the tracks keeping the links in their sub sprues of 7. You can see my indicating where to snip. I used a sharp scalpel to remove the other side of links from the main sprue: ] The clean up takes place before and after making the tracks, removing the remaining parts of the main sprue left on the links is also easily done with a sharp scalpel. I found it easiest to remove the rubber pads also with a scalpel: cleaning them up with sponge sand paper and any remaining flash with the scalpel. Tedious but worth it: Finally all the parts are ready for assembly. I prepared all the links from 2/4 of the tank track sprues and 77 of each the top and bottom half of the track. I will leave a link hanging out either end of the track and then cut out the final 78th tread part when I finally fit it to the tank. 78 Treads allow for a tighter track: I find putting as many as I can of the bottom parts (rubber pad parts) into the jig easier as there are more in place ready to be glued; I could do 64, but if you only have one CR2 you'll only be able to do 32 max at a time. Its not a problem as you can just move the track along the jig once some parts are done. I just wanted to make it efficient. You'll see below how the 7 linked links fit nicely on top of the pads in the jig. MAKE SURE THAT THE BOLTS ON THE LINKS ALL FACE DOWN (Smooth side up): Make sure to have one link overhanging as above^, to make sure you don't have to break up a glued tread with no link in! As seen below it is easier to orient the links of 7 alternating like so. This works, however if you wish for the tread to be 100% accurate, make them all line up with the sprues as each side of the link is slightly different (this is pointed out in the booklet/instructions). I did not do this as I was not too concerned with the indents in the side of the links as it is such a small detail. Then its a case of gluing the top part of the tracks on. DO NOT GLUE THE LINKS IN IF YOU WANT MANOEUVRABLE TRACKS! You just need to glue the top part of the track to the bottom. The best way to apply glue is as show below (Filling the recesses with pools of cement and a small dab in the middle): The once you have glued all the tracks together and they have dried, you can easily remove the remaining subsprue with no clean up, unlike the other side: Finally to make sure the tracks stay together as some torsion can split the links, very cautiously apply some cement on the sides of the tracks to hold them together without gluing the damn links in! You can see above how every 7 tracks there are holes or no holes in the links. This is what I was referring to above. You will see however all the links face the same way with the bolts facing the same way as the rubber pads. I hope this was useful for anyone doing RFM CR2 treads.- 152 replies
-
- 4
-
-

-
- KFOR
- TES Version
- (and 1 more)
-
Challenger 2 MBT - RAC
British Army Platforms replied to British Army Platforms's topic in Work in Progress - Armour
Will document the tracks tomo! (Disclaimer to anyone else, this will be what has worked for me - may not be the best, just one option aha) Thank you. Yes I had a bit of trouble with the tow cables! Was able to rectify them. Thank you for your help- 152 replies
-
- 2
-
-
-
- KFOR
- TES Version
- (and 1 more)
-
1-35 Accurate Armour/Tamiya CrARRV conversion
British Army Platforms replied to Kallisti's topic in Work in Progress - Armour
Will it ever come down 🥲?- 13 replies
-
- 1
-
-
- CrARRV
- Challenger 1
- (and 3 more)
-
Challenger 2 MBT - RAC
British Army Platforms replied to British Army Platforms's topic in Work in Progress - Armour
Finished base coat for the build Challenger 2..... Can anyone guess what scheme I might be doing!- 152 replies
-
- 4
-
-
- KFOR
- TES Version
- (and 1 more)
-
Here are the shots of my finished first model. There are a few things I am not entirely happy with, but please don't hesitate to comment on spaces I can improve on in the future as I only wish to improve! My first concern is regarding the painting, I used Tamiya 100ml Spray Cans (Rattle cans for my friends across the pond) as I cant justify investing in an Airbrush and Compressor just yet. Having used the spray cans - 2 colours in fact - to try and recreate the Helo Drab colour, I think I over applied the NATO Black colour I used and the model is less grey than I would have liked. However, convincing myself this should be an Op Herrick Apache, I was liberal in EuroEarth pigment to suggest It has endured a sand covering. This fortunately has made the model less black and in some good lighting looks more Helo Drab Coloured. Another concern worth noting is that I decided to remove the masking from the canopy windows before applying Decals and the subsequent sealing of them using a matt clear coat. This clouded up the windows hiding most of the precious detail I put into the cockpit early on! Lesson learnt. However with a little thinner, being careful not to ruin paint - you will see this change in later pictures - the windows now look as if they are also dusty and need of a clean after the proposed dust covering. Perhaps a happy accident, really just some situational saving. Anyhow, for my first model I am extremely pleased with it : My Favourite photo of it above^ Cool Shadow/Reflection behind. Not very scale accurate but interesting nonetheless.^ Somehow made its way from the granite surface of Afghanistan to Snow? Ex Clockwork...? The Box - It was a Hasegawa 1/48 Scale British AAC Model. Message me if you are in UK and need this kit. As it was rather hard to procure.
- 9 replies
-
- 11
-
-
Challenger 2 MBT - RAC
British Army Platforms replied to British Army Platforms's topic in Work in Progress - Armour
@Stef N., having just naughtily ordered the Tes version, if I happen to get the tracks before you do yours, I will document the process in more detail for help on this page.- 152 replies
-
- 2
-
-
-
- KFOR
- TES Version
- (and 1 more)
-
1-35 Accurate Armour/Tamiya CrARRV conversion
British Army Platforms replied to Kallisti's topic in Work in Progress - Armour
How is the project moving along now?! -
Challenger 2 MBT - RAC
British Army Platforms replied to British Army Platforms's topic in Work in Progress - Armour
In purchasing some colours to paint my now complete CR2, I have fallen into the trap of good deals. Having found some good eBay listings, I am hoping to expect both the TES, and KFOR versions too. A convoy is coming.... might even use this as the base for a Street Fighter model.... might have to give it a miss though as I don’t want to go up against this amazing competition! http://ptearsenal.blogspot.com/2020/03/challenger-ii-street-fighter.html?m=1- 152 replies
-
- 3
-
-
- KFOR
- TES Version
- (and 1 more)
-
Challenger 2 MBT - RAC
British Army Platforms replied to British Army Platforms's topic in Work in Progress - Armour
Have finished the main build with rather a few parts let over. Am going to check for further instruction points that I may have missed. Some certainly does seem optional, ie a variation of a piece there is only one place for. Ready to order paint but haven't decided which colour scheme I want to do yet! 😂 I do rather like the gold and grey look without paint aha, if I could convince myself that realism doesn't matter then I would save money not buying paint. There are a few things I may adjust, ie length of cable and adding the optional skid plate under the tank. We shall see.- 152 replies
-
- 10
-
-
- KFOR
- TES Version
- (and 1 more)
-
Challenger 2 MBT - RAC
British Army Platforms replied to British Army Platforms's topic in Work in Progress - Armour
Not too bad actually. The link rods are best kept in their sub-sprues of 7 and to place them in. If you are careful with removing them from the sprue then there’s really no clean up. Once you get a flow it’s pretty easy. :) be careful with cement obviously if you want it to flow.- 152 replies
-
- 2
-
-
-
- KFOR
- TES Version
- (and 1 more)
-
Challenger 2 MBT - RAC
British Army Platforms replied to British Army Platforms's topic in Work in Progress - Armour
Made allot of progress with late night track building last night and allot of small details such as the hooks and hinges near the exhaust ports today. Also allot of photo-etch which was very welcome too. The tracks are held together by a dud link I made so they can be removed for painting easily.- 152 replies
-
- 7
-
-
- KFOR
- TES Version
- (and 1 more)
-
Challenger 2 MBT - RAC
British Army Platforms replied to British Army Platforms's topic in Work in Progress - Armour
Made some more progress this morning: For those who have the kit and wish for there to be more suspension action; first observe this tab which slots into the suspension bogie then how it is removed: In gluing only the sprue that connects to the centre support inside the hull, the torsion of this sprue creates a suspension like spring. Do not glue the part where the tab used to be, as then the suspension bar wont move at all:- 152 replies
-
- 8
-
-
-
- KFOR
- TES Version
- (and 1 more)
-
Challenger 2 MBT - RAC
British Army Platforms replied to British Army Platforms's topic in Work in Progress - Armour
Here's some pictures from the start I made on the kit.- 152 replies
-
- 6
-
-
- KFOR
- TES Version
- (and 1 more)
-
Here are some preview pictures of the final assembly. I will make a topic of the finished model shortly.
-
British Army GTK Boxer 8x8
British Army Platforms replied to British Army Platforms's topic in Work in Progress - Armour
Have done some research as to which model (1/35) Will best act as the transplant recipient. Firstly again here are the plans kindly provided by @GMK of the boxer i wish to recreate: The first contender is HobbyBoss' Mrav Version. (vote with the 'haha' reaction for this model to be chosen) Pros: the command module will only need the top plate replacing with the (3D Printed? not sure yet) Donar part to replicate UK's command module variant. Cons: As stated by @viper-30 and as you can see by comparing plans above with bellow, out of date. (pre production model) The next contender is the Revel sgSanKfz Ambulance module varient (Vote with the confused reaction) Pros: Unlike hobby boss this reflects the same detail on the drivers section as seen on the British command boxer. Cons: The nature of the large ambulance module means some of the rear section would have to be cut and some pieces left out for the donor roof to fit. The third choice is Revels GTFz variant (Vote with the 'Thanks' reaction Pros: The codule at the rear can be left without side pod attachments to make a perfect receiver to become the British command module. It also (mostly) has the same design / detail and would also better reflect the British Boxer variant. Finally the 12.7mm MG or 40mm GMW could be used to replicate the "12.7mm L1A2 Heavy Machine Gun or 7.62mm L7A2 General Purpose Machine Gun" as seen on the prototype spec's of the British orders which the union jack boxer sports. Cons: There would have to be some more part donating to make the 12.7mm MG into the Remote Controlled WS variant. Anyway, there's allot of food for though. I may end up just painting a normal kit with the union jack and call it a day. 😂 If anyone is interested in reading about the development of boxer, the Brits' 'Hokey pokey' in out participation and what variants we've ordered, the bellow page is very long and informative with some good discussion the the comments too: https://www.thinkdefence.co.uk/boxer-armoured-vehicle-british-army/ -
having tried to do my best with the 100ml spray cans from tamiya, here are some spoiler photos of the paint job with a few decals on. I’ve yet to weather it, but hopefully this should keep propel undated before the final reveal. Have a few other adjustments I’d like to make as well as weathering. This is only a short topic.
-
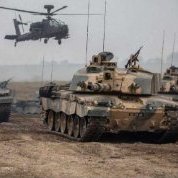
Ah wow, super jealous! I’ve only had a few random encounters with them. The only time I’ve been near any Ah Squadrons they weren’t up aha! Here’s some clips from the two times I encountered them:
-
British Army GTK Boxer 8x8
British Army Platforms replied to British Army Platforms's topic in Work in Progress - Armour
Your very welcome, I probably won’t be building for some time. But I’ll keep you posted. Feel free to ask anything -
British Army GTK Boxer 8x8
British Army Platforms replied to British Army Platforms's topic in Work in Progress - Armour
Oh really that’s a bummer. Are you trying to replicate one of the Brit command modules? -
British Army GTK Boxer 8x8
British Army Platforms replied to British Army Platforms's topic in Work in Progress - Armour
...wow thank you so much. Feel like I’ve just been handed a golden ticket 😂how did you get hold of these?! -
Prepped model and applied first base coat, using olive drab and then coating with a thin layer of NATO black to try to create a darker Helo Drab.
-
British Army GTK Boxer 8x8
British Army Platforms replied to British Army Platforms's topic in Work in Progress - Armour
@viper-30 / @Foxbat After having done some research early this morning I come to see what you mean. The NL Command module shown in the 1/72 size is absolutely what I need! The problem is id like to do it in 1/35 to size it up next to my CR2. Now instead of waiting until the Boxer is well established in the British Army and then possibly a model coming out, I think I may follow @GMK 's path of trying to upscale the command module part of the 1/72 model. His work I have previous experience with Solidworks but not really the time nor software anymore to tackle that right now. Given I have a few more projects to finish first maybe I'll be able to in the future. Perhaps in the mean time I will let this topic germinate and see if anything comes up. Perhaps I may heckle a friend of mine who's doing allot of modelling during his engineering degree. The 1/72 boasting the command module id need. -
Challenger 2 MBT - RAC
British Army Platforms replied to British Army Platforms's topic in Work in Progress - Armour
Oh right, so its using new tech but sporting old colours. I definitely think this or the black and white striped RTR paint job are best looking that are achievable with my skill. Have you some experience with the platform or just very knowledgeable about the CR2?- 152 replies
-
- 1
-
-
- KFOR
- TES Version
- (and 1 more)