


NIK122
-
Posts
239 -
Joined
-
Last visited
Content Type
Events
Profiles
Forums
Media Demo
Everything posted by NIK122
-
Fuel line?
-
Without wishing to state the obvious, they are definitely hoses connected to something as unless I'm mistaken you can see the jubilee clips. Glad I could clear that up for you!😆Sorry
-
Thank you to everyone who followed the build and for all the great feedback. It's always appreciated 😎
-
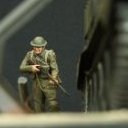
Hello everyone. So here is my latest completed model. A captured T34/85 in Seoul. The T34/85 kit is from Italeri and needed a lot of work to build it up as an accurate Zavrod 183 pattern vehicle. As discussed in the build blog what's depicted on the Italeri box art isn't what's in the box. Running gear and tracks replaced with MiniArt, later type spider wheels and the turret remodeled to a C type roof with traverse bulge and reinforcing welds added with stretched sprue. The reserve fuel tank brackets are from Aber and the smoke generator brackets are from the kit but modified and scratch bands added. Tow cable from Eureka models. The figures are from Def Models. They're nicely molded but I didn't enjoy painting them to be honest. I'm still finding figure painting outside my comfort zone. the figures though add a little life to what was otherwise a fairly bland scene. I like that they give context to the scene also as the tank has no visible markings in the photograph I used for reference. Thank you for looking and Happy Easter
-
T-34/85 Factory No 183 (RFM 1/35) Polish People's Army WWII
NIK122 replied to Tom W.'s topic in Ready for Inspection - Armour
Wow! A superb job and really nice weathering 😎 -
Ok! No flattery this time. Only sincere praise. Bloody brilliant 🙂
-
Awesome work+all of the above! Will there be a base for it?
-
Really nice work. It's going to look great once painted 😎
-
Here's a link https://images.app.goo.gl/MqSXbv5ZpNm93eXd9
-
Sturmpanzer II - Ark Model - 1/35
NIK122 replied to Nenad Ilijic's topic in Ready for Inspection - Armour
Beautiful job!😎 -
Good evening. A small update this time now that I've got some paint on this model. It's been primed with Tamiya matt black first. This was followed with Ammo Mig Russian green base, light base and highlight respectively. There is a dark base green in the modulation set but I personally don't see the point when priming in black. I haven't mastered the forced shadow method of modulation although I understand the principle. I tend to start with the medium shade of green and work towards the lightest shade. For instance the loaders hatch shows the initial colour in the center, airbrushed thinner around the edges, leaving the black showing through to create some shadow. The lightest shade of green is only applied to flat surfaces, in a random pattern, or used to create the lighter streaks down the sides of the tank but not any lower than the running boards. I'm still in two minds about the cast texture but its a little late now. It is too regular I think. It doesn't help with the glossy surface at all but once it is hit with flat varnish I think/hope it will help. There are very few details to pick out on this build with a paint brush other than the exhausts and headlamp. Pretty happy with how the reinforcing turret welds turned out. It was worth the effort. Below for comparison is the model after a black oil pin wash. I'm not sure how obvious it is but hopefully you will get the idea. It goes a long way to harmonizing the overall effect as I tend to not remove all of the excess oil paint at this point but work it over the model and add dark streaks whilst I'm at it. The running gear. The road wheels were airbrushed black and then the centers airbrushed using a home made mask. If you haven't invested in a compass cutter then save yourself some pennies. They generally come with every wheel size out there. I painted each wheel separately before assembling which is possibly a waste of time. The outward face and face to the hull would have probably done but I figured that with so many holes being in these road wheels chances were you would be able to see something. They were then gloss varnished prior to weathering pastels, with the edges of the wheels in contact with the track wiped with a damp cotton bud and then sealed with matt varnish. The tracks were again, black primer, a coat of Tamiya gun metal, guide horns picked out with Tamiya chrome silver and a track wash from AK. Varnished and then AK track rust pigment was applied and sealed in with matt varnish. The rust pigment is a lot more realistic without being sealed in but when handling the model it gets everywhere. I will apply more just before fixing the model to its base. Although unclear in this picture I weathered the hull sides with Mig dry earth acrylic mud. Not the best picture to show variation on the track as my light source seems to wash out a lot of the colour. Still the camera on my new phone is leaps ahead. I've started some chipping but maybe more of that next time. Below I've started to work on the dark area behind where the reserve fuel tank would have been. Looking at the reference photo, posted earlier in the thread, I am not sure if it's a burnt area or a fuel spill? Any thoughts welcome. Still a way to go so until next time......... Thanks for looking
-
Firstly, are you a moonlighting watchmaker?....................Sorry I couldn't resist. Your skills are enviable. Each improvement (well researched), is a work of art that would make a fine book on modelling the subject. Just a thought. If you have already seen and are aware of the images below then no worries but I thought you might be interested. Looking forward to your next post😎
-
1/35 Mk 1 gun carrier scratchbuild
NIK122 replied to Model Mate's topic in Ready for Inspection - Armour
Congratulations on finishing this mammoth build. All of the above! Fantastic stuff 😎 -
Thank you Tom. I'm glad you approve. I've shot the model with black primer and tweaked a couple of spots that looked too smooth from sanding and it doesn't look too bad at all. It's maybe too uniform if anything but once weathered I think it will stand up OK. I will post again shortly.😎
-
Thanks Graham. I completely agree with your sentiments when it comes to the element of scratch building. I've got a love, hate relationship with photo etch. It's invaluable sometimes and completely kills the pleasure in the hobby at other times, in my opinion. There is great satisfaction in making details from odds and sods. I would though like to see aftermarket offering a mix of photo etch and more complex printed parts in sets. Just a thought.
-
All of the above. Just great!😎
-
Good morning all. Here is a little history and shots of my latest build. Since Christmas I've been working on the Italiari Korean war T34/85. The kit, which was a gift, is OK and at first glance I was hoping to build the model straight from the box. After a little research though this wasn't going to cut it as what is depicted on the box isn't what you get in the box. The vehicle depicted in the artwork is a T34/85 Model 1946 production (Zavrod 174) and the kit is a T34/85 Model 1944 (Zavrod 183 style), as far as I can tell. Personally this hasn't bothered me too much as I've got to exercise my modelling skills but as a major manufacturer I find this particularly lazy at best and sloppy at worst. If I can find out with a little investigative work on line, why can't Italiari? The main and obvious discrepancy is the turret. The choice was to either remodel the turret or change the running gear to produce something more accurate and as Miniart produce a T34/85 late type running gear set this was the path that I chose. The running gear provided with the kit is the early type dish road wheels which I was able to find one historic photo of in Korea and is possibly a little bit of a moot point as most types can be found on Korean T34/85's but the most common type appears to be the full spider type. The overall plan is to build an example of a T34/85 captured in Seoul during the war using the reference picture below. The kit and aftermarket. The plan was to try and build the model only using things to hand and to not spend a fortune on aftermarket. Pah! Oh well the thought was there. I was initially going to model the hatches open as there is some internal turret detail but this fell by the wayside. Below is the work needed to model the breach which wasn't included with the kit!? for anyone who's interested. Looking for other builds of this model on line I found one chap who had built the kit ( sorry I can't remember his name), who altered the engine vents with stretched sprue. A great tip that I copied. Before at the top. The side vents were the trickiest and needed thinning on the back until wafer thin before adding the stretched sprue. I think it was worth the effort. Small alteration to the bow machine gun mount with plastic tube. I've omitted the machine gun as the model will represent a captured tank. The spare track mounts added by drilling holes in a strip of plastic before cutting the strip into squares. I had to drill out and add the greasing points? on the front plate. Removing the mud guards wasn't particularly easy due to the chunky kit engineering so a fair bit of work was required to model the interlocking plates on the front quarter. My previous SU122 build was good practice. Hinge carefully cut out and drilled out. The shape and bolt detail on the Italiari exhaust covers isn't great so thankfully the Miniart running gear set provided some replacements. They are just tacked on here whilst I got the positioning right. The kit exhausts looked too skinny to my eye so I remade them with sprue. The curve in the pipes was achieved by cutting a section out of the corner of two of the kits main sprues. And drilled out the end. The brackets for the smoke generators needed a little reshaping. Squeaky bum time with these as they are so delicate. The bands for the smoke generators were made from beer can tin. It's good to recycle. The reserve fuel tank brackets are from Aber'. I wasn't happy with the position of the exhausts at this point and they were both repositioned. At this point I haven't photographed every stage so the next shots are the completed model prior to paint with alterations and additional details explained. Headlamp conduit and cable added with fuse wire. The tool box lower came with the kit but the lid was added from a Tamiya kit as the detail was better. I've knocked off and bent some of the photoetch detail by the looks of it! All of the reinforcing welds around the turret have been added with sprue and then sanded back. The clamps holding the tool box to the fenders were improved on with plastic card. The welds are a mixture of Perfect plastic putty around the base of the turret and Milliput for the rest. The top cover for the mantle was replaced with thinner plastic card after damaging the original trying to thin it to scale. Not the best photo. The mushroom vents needed repositioning and joining together contrary to the kit instructions to make them accurate to the type of turret. The cast numbers were added from the GreenStuff brand. The bulge for the turret traverse motor was included with the kit but wasn't in the instructions. Glued in place it looked like an afterthought so it was blended and the welds were added. The cast texture on the kit is horrible but I am in two minds as what to do about it. After a thin coat of primer I will decide whether to tackle it with Mr surfacer. Maybe under paint it won't look so bad!? The brackets weren't as bad as I had expected to assemble using the kit tanks as a form for the radius. Having fitted them though the second tool box wouldn't fit so it's been omitted and the mounting points added with plastic rod. The mesh on the engine deck is from the Aber set as it is finer than the Italiari offering and allows more detail to be seen. In conclusion would I recommend this kit?!..................Having followed Tom W's superb ongoing RFM T34/85 build maybe that would be a better purchase. As ever thanks for looking
-
Sorry, I should have paid attention to the scale!!!! Good luck with it😎
-
You could cut the area where the vents are out completely and then add thin spaced strips to form the vent openings?
-
Beautiful job with the paint!😎
-
I don't know if it's possible with this kit but when removing delicate parts from the sprue on previous builds if it's possible I remove the section of sprue around the part with it still attached and then the part. I hope that made some sense!? Good luck with your build
-
I'm building a T34/85 at the moment and was wondering the same thing. Fuel lines for the auxiliary tanks or conduit for electrical cables!? I'm intrigued to know what your dad says!
-
You've done a superb job on this😎
-
Thanks! & a happy new year to you too 😎
-
Thanks John 😆. Talking of missing teeth I've just realized that I need to add the aerials!!!!!! One step forward two back 🙄. I will post a couple more pictures shortly.


