


APA
-
Posts
1,148 -
Joined
-
Last visited
Content Type
Events
Profiles
Forums
Media Demo
Posts posted by APA
-
-
On 4/14/2024 at 9:37 PM, edjbartos said:
That looks tremendous, unbelievable detail work, I keep looking back at what you have done, just superb...
Ed
Thanks Ed really glad your liking the build 👍
On 4/14/2024 at 9:54 PM, Keeff said:Outstanding work! This just keeps getting better and better .....
Keith 😁
Cheers Keith 😀 still plenty to go wrong 😂
Cheers all
Andrew
-
 2
2
-
-
Excellent result Keith. Big scale done very well. I'm impressed 😁👍🏻👍🏻
ANdrew
-
 1
1
-
-
Very impressive Ned. You have mastered subtle weathering to an art👍🏻.
Andrew
-
Flippin' 'eck!! thats a bit detailed for a 1/72!! Better than some 1/35 and so many sprues!! Great start and good luck 😁
Andrew
-
Nice one John 👍🏻 Should be a cool build. Hours of fun working out the correct bits for a Mk1 🙄 and that paint scheme looks damn cool. Good luck with it! As for the spare tracks. Who knows! Could be welded but more likely a field bracket of some sort as with a Matilda?
Andrew
-
1
-
-
Wiring and a few odds and sods this weekend.
Done the loom and all the wiring I can do without the engine in place.
Horn cable

Seat springs and brackets sorted (Springs just placed hence wonkyness)
Cable for rear light
First cable to the regulator and the dangling cable is for the battery positive. Also added a rubber boot on the alternator. All the restored versions have bare wires going in but they originally had this boot.
Loom and additional wiring coming out of the headlight where most of the electrics are.
I do believe that the next step is to crack out the airbrush!! 🫣
Cheers all
Andrew
-
16
-
-
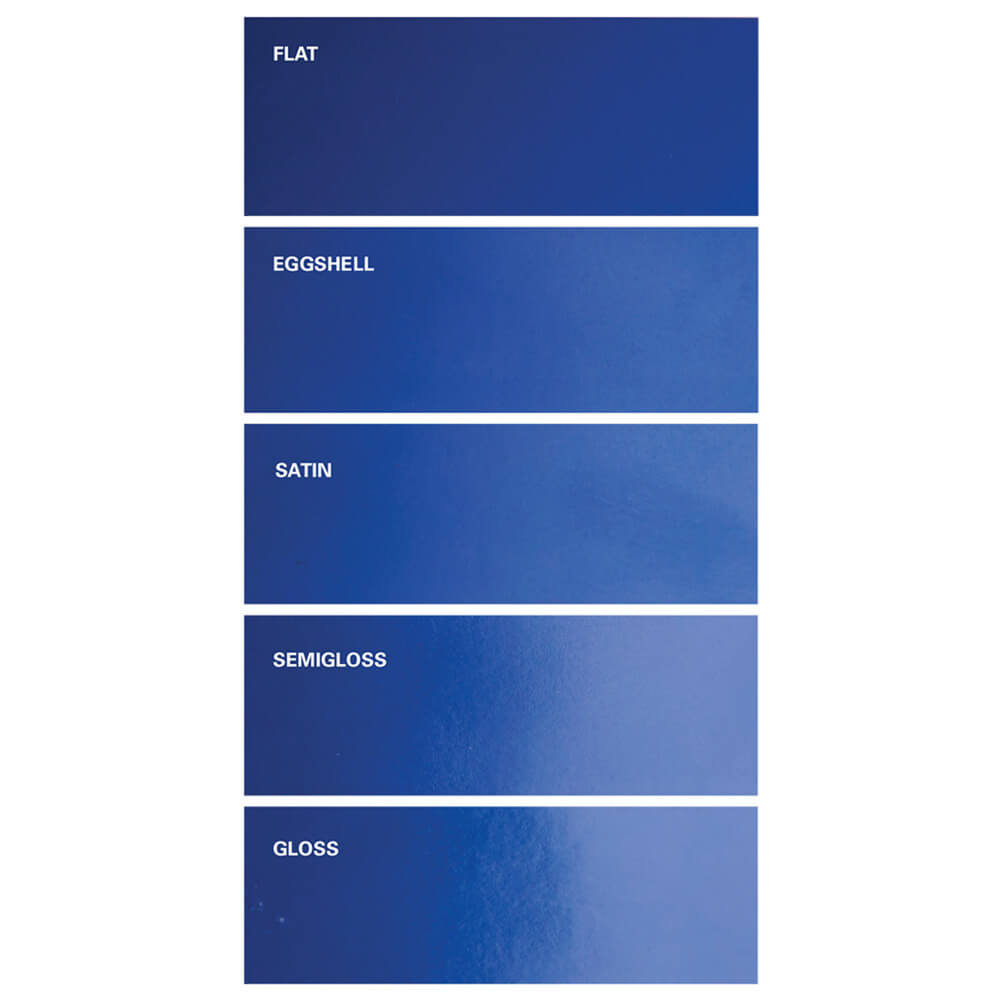
On 4/5/2024 at 7:55 PM, JackG said:
Was just thinking the same about the contradicting description. Usual finish chart in NA though for house paint. Matte is sometimes included with Flat, can appear between Eggshell and Flat, or as in this example not included.
That is a pretty good chart to show off the various sheens. Egg shell or maybe between eggshell and Satin is where I'm aiming at the mo. Thanks for this.
On 4/6/2024 at 2:10 AM, Kingsman said:In 1/9 you perhaps have a bit more latitude with sheen. I suspect we were all assuming 1/35.............. IIRC, somewhere on here in the past @Mike Starmer has posted a picture of a motorcycle tank he believed to be still in original SCC2 paint, but good luck finding it. If he is listening in perhaps he could re-post it here.
Ah is that unconscious bias? 😉 I was collating the raw data to be analysed. 🧐 And it looks like Mike was indeed listening 😁👍🏻
On 4/6/2024 at 2:38 AM, Troy Smith said:IIRC you are using Vallejo? Or have done? I find Model Color does not always dry dead flat, and one cured can be 'buffed' up, I brush paint, and little flow improver also gives it a slight sheen.
and I also find Windsor an Newton Galeria Matt does not dry dead flat, it has a very subtle sheen. To get dead flat for figures I now mix in a little talc.
So you may find that W&N Matt maybe give the effect you are after, as with every new technique, have a play on scrap first and see what works.
You can also mix matt and gloss varnish in varying proportions to get desired sheen, you can get satin, but if you have matt and gloss just mix your own, keeping note of the ratios.
HTH
I am indeed mostly using Vallejo which does give an almost Matte finish. If you apply it thick it then gives an almost eggshell but it does have to be very thick which would flood the detail. I will indeed be mixing vallejo matt and satin to get that soft eggshell sheen.
Interesting that you should mentio0n buffing because I am intending to buff the sides of the petrol tank where the legs would rub and give a slight shine. At 1/9th it should be effective. Thanks for those other tips btw. Will be noted for future reference 😊👍🏻
On 4/6/2024 at 5:30 PM, Mike Starmer said:The motorcycle KG3 finish only had a very slight sheen since it was very smooth paint. Not what I would call satin by today's standard.. The 1939 helmet I owned was identical The disruptive colours in BS.987 1942 all have a very slight texture. Certainly enough to look matt in daylight when horizontal and viewed from immediately above. This due to the addition of very fine silver sand in the paint. A very slight sheen is noticeable when viewed obliquely towards daylight. To add to Paul's contribution, The specification for BS.987C 1942 has this:-
3. Opacity, colour and finish.
A single coat of the paint when applied in the manner indicated on the container, to a non-absorbent surface of a colour not widely differing from that of the paint, shall be opaque and shall closely match the standard pattern in colour and finish.
The finish may approximate to that known as 'egg-shell-gloss'.
Hi Mike 😁. Been a while, hope you're well? Thank you for the confirmation on the sheen. It does point me more to a sheen between eggshell and satin. I have Matte and Satin varnishes so a play with various blends should bet me to where I need to be. Interesting that you say it is a very smooth finish. I often find an airprush can give a textured finish so I'll have to watch out for that!
While your here.............. The colour has been troubling me. These bikes where made between '41 and '45 so, reading your book for France & NW Europe 1936 - 45 SCC2 became the official base coat for all vehicles in May '42 and SCC15 being introduced in April '44 therefore I would assume that the vast majority would have been in SCC2 and unlikely to have ever been repainted unless needed since they were class B vehicles.
Would that be a fair assumption?
On 4/6/2024 at 7:50 PM, StuartH said:Egg shell finish armoured eggs

🤣👏👍🏻
11 hours ago, dogload said:Is the one on the right one of the legendary Beuteeier?
If I were to make a British version, would it be in original OD or SCC15? 😉
Depends if easter is early or late in which case it may be Khaki Green No3 or SCC2 😁
Cheers all
Andrew
-
1
-
-
Big day today. First full dry fit of almost everything.
Suffice to say, and you won't be suprised, there are a lot of fit issues. I'm going to have a lot of problems with this and it may turn out a bit bent!
I wrapped the seats with some tin foil from an easter egg which had some very subtle texture which hopefully will look a little like the leatherette type material used. I also added a bit of sag to the main seat. (See above pic)
Apologies for the gratuitous knee 😳
Still got a few kit parts to add and a few scratch bits before I start painting. Probably more than I think 🫣
Cheers all
Andrew
-
17
-
-
On 4/5/2024 at 9:06 PM, fikolo said:
very nice .😃
Thank you fikolo
On 4/5/2024 at 9:38 PM, Farmerboy said:This has become a ‘tour de force’ of modelling, brilliant work.
Ha ha! appreciated FB
On 4/6/2024 at 6:43 AM, Bullbasket said:I don't think that Italeri ever envisaged this kit turning out like this. Brilliant work Andrew.
John.
Hi John, no I doubt it too. They gave it a half assed shot back in '72 😂
On 4/6/2024 at 9:50 AM, echen said:If Italeri put this much fabulous detail in you'd need a mortgage to buy one!
I agree echen. Imagine if Gecko, Riich or Miniart tried their hand. Now that I would definitely buy 😉
9 hours ago, robgizlu said:Agree with everyone else - you’re taking this to another level, only wish you’d been around to help out when I had my old Trail bike!
Andrew, what did you use for the grips? I’m looking for something similar for a project……..Thanks
Rob
Thanks Rob. I wouldn't know one end from another on a real one 🤡 My big brother, on the other hand, used to have a couple of Trials Bikes back in the day. A lime green Kawasaki with a diamond shaped tank springs to mind but I was about 12 at the time 😊
The grips are wrapped with some random material I've picked up along the way. It's very elastic. I suggest you go rooting through Mrs robgizlu's sideboard draws with a pair of scissors for inspiration 😉😎😜
Cheers All
Andrew
-
4
-
 1
1
-
-
13 hours ago, Keeff said:
There is some very impressive work going on here! It goes to show how inaccurate the kit is ...
The tyre looks great .... just enough 'bulge' in the walls 👌
Keith 😁
Cheers keith. There's not a lot of it left 😂
Andrew
-
Thank you all. In the real world a satin sounds like a good approximation and yes I understand about scale however the reason I'm asking is for my 1/9 scale triumph 3hw motorbike. I'm assuming at that scale I have the canvas to play with the sheen? Perhaps a satin varnish cut down with matt to just give a hint of "eggshell gloss" 😂😉
Andrew
-
For a change this isn't about the colour but about the finish. Pretty simple question, what was it? Matt, Satin or Gloss. I've seen various period photos which would suggest all three at some point! I would imagine true matt was pretty hard to do and there would be at least a bit of a sheen. Haven't seen him on here for a while but @Mike Starmer might be able to help?
Cheers all
Andrew
-
Great little build and well done on the early camo scheme.
Andrew
-
Great build as always john 👌 just need the kitchen sink to go with pots and pans 😁
Andrew
-
1
-
-
Great work James 👍
Andrew
-
1
-
-
Always impressive Paul. Keep on keeping on ☺️👍
Andrew
-
1
-
-
First class work howard. Great detail which is showing the benefits now 👌
Andrew
-
1
-
-
Great stuff simon. Really enjoying following along. Looking cuter every day 😂
Andrew
-
1
-
-
On 4/1/2024 at 10:37 PM, Gogser1 said:
Superb work, I continue to be amazed by it 😊
Thanks Gogser. Really glad your enjoying it 😁👍
On 4/2/2024 at 1:20 PM, Stef N. said:Fantastic work and a massive thumbs up for the tyre. Looks spot on to me. 👍👍
Cheers Stef, much appreciated and thanks for following along 😀👍
Cheers all
Andrew
-
1
-
-
Finally!! Starting to see the end of the tunnel. Bit the bullet and powered through the front forks.
All dry fitted for now. Actually starting to look like a motorbike now 😊
Started on a couple of cables
Replaced the kit handlebar grips with more appropriate ones including the accelerator thingy.
Also thinned out the brake and clutch handles. Cit version for comparison. The real things are quite long.
New headlight blackout visor. The small round hole will have a white acrylic lens in it.
Had a go ate weighting the tyres and it seems to have worked. I Proxxon'd out the solid inside and slipped in a piece of plasticard to spread the side out.
And flattened the tyre bottom.
Subtle but does the job I hope.
Not a great deal to do now. I think it's just the wiring loom and cables. I need to put everything together just to make sure they all fit !! 🙄. Wish me luck!! 🤞🏻
Cheers all
Andrew
-
18
-
-
Sorry for the delay!
The most obvious and simple correction is the half circle on the front of the 'bonnet' should be a full circle. The example in Bovington, which this model is based on, has a simple plate put on which they didn't bother to cut the other circle half out. This hole is for a filler cap of come sort which should be easy to add. I didn't find this out until I'd finished mine 😁
The frames on the side and rear which hold the wooden block shoes for the tracks are a bit chunky and can be easily replaced with thin strips of copper if you have any around.
Some additions which you can do to add some interest are:
Storage boxes and hand rails were a common addition on the rear
Handrails at rear
They also came with canvas mudguards which weren't used much but still cool. You can just see them on the pic above with the storage boxes either side. Those metal angles sticking out on all 4 corners is where they were hung from by 3 springs each end
Finally the exhaust silencers werre often wrapped in asbestos rope which can be easily replicated by good quality cotton thread.
Hope this helps and happy building 😁👍🏻
Andrew
-
1
-
-
Love it. Great subject and excellent weathering 👌👏👍
Andrew
-
1
-
-
Well I can confirm it's green 😁👍
Great start to a great kit. You've got passed the hardest part of getting the top hull and 'cabin' square with no gaps, another 👍
There are a few easy fixes to make it a tad more accurate and a few additions to jazz it up if your that way inclined?
Andrew
-
1
-
-
1 hour ago, ivan-o said:
Don’t think so mate they all have them they have been in service a few good years now.They are only classed as armoured when all the TES kit is put on.
Hi, no I didn't mean this is a prototype I meant prototypes have the red triangle as well because they are not armoured.
Andrew
-
1
-


British paint - Matt, Satin or Gloss
in AFV WWII
Posted
Good point Pete and that's exactly what I'm going for with variation from matte to shiny depending on ware etc 👍
Are you suggesting I go for a pimped up sparkling example from an over zealous petrol head pre greaser dispatch rider? 😎
Minty fresh and looking more like a bad build than most real builds 😂🤔
Cheers all
Andrew