


Hayden Northcott
-
Posts
65 -
Joined
-
Last visited
Hayden Northcott's Achievements
")
New Member (2/9)
182
Reputation
-
 Thank you. Are you getting the same F-RSIN model & decals from Old Model Decals? Wellington can be an interesting place to fly in & out of on a typical day!
- 67 replies
-
- 1
-

-
- Air New Zealand
- ATR
- (and 1 more)
-
That kit looks familiar! Yes, lots of flash, but I think that made it all the more rewarding. It was quite a nice plastic to work with too.
-
I've made a start on the decals. Here also is the bus and the fuel truck. The air-con cart can be seen in the background. Adding decals really makes the model look so much more complete
-
What would be some other options for the silver rings around the cabin windows?
-
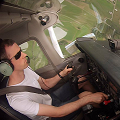
I suppose the more trials the greater the reward? Here it is a little zoomed out. I've hand-brushed some silver around each cabin window. On reflection I wish I hadn't...! Any tips on what else I could have done? Maybe I should have made up some test pieces to practice on! Close up of the cockpit windscreen. I've painted the pillars. To do these, I used a bit of a dry-brush method, and have only painted the outer surface. I did this so to not risk painting anymore then I should. Up next will be decals
-
Next up was to do the cabin windows. These were quite easy to do I used Microscale Kristal Klear. With a toothpick, a glob of the glue is spread around the window frame. Not pictured, but the cockpit window/s was also gluded into place using the Kristal Klear.
-
Sad to say, but the results were disappointing when I removed the masking tape. To add to my disappointment was the mismatch between the spray can and the jar of paint... I had looked at the colours online, and they looked very similar. I don't know why Tamiya don't match their spray cans and pots... I decided to brush the whole red area with the X-7 mixed with Tamiya retarder, and that worked out okay.
-
Next up was masking up for the leading/trailing edges, and the engines. Initially this area was sprayed black. And then brushed silver with a Tamiya acrylic mix. The mix was mainly X-11 Chrome silver, with a touch of X-2 white and X-21 flat base. Possibly an aluminum coloured paint would have done the job...
-
Time to mask the crown of the aircraft & spray the black line. The black sprays on very easily. It's starting to look like a BEA aircraft
-
I worked out the order that I wanted to paint the fuselage. Here I've masked up the bottom of the black line, but will first paint white. I was a little stuck with how to mask up the curve at the nose. In the end I used Tamiya's curved masking tape, and both sides ended up being fairly symmetrical. The tape did tend to fall off a bit, possibly from the tighter curve. A bit of normal masking tape on top held it in place fine. While masking, I found that the cockpit windows, cabin windows and entry door did not line up as expected. I'd re-scribed some panel lines, but found I'd made them too deep.
-
Time to add some colour! I'll paint the whole wing red initially. I've used TS-49 Bright Red which looked like the closest match to X-7 Red. I do find it interesting that Tamiya don't make spray can versions of a colour they sell in a pot, and vise-versa. It would make painting a bit more straight forward... Not that you can see it in these pictures, but the different greys of the primer ended up showing through the red. It should work out okay in the end, as a decal goes pretty close to it, so it should distract the eye.
-
Here's the Comet with a coat of Tamiya primer. Having a coat of paint gives the model quite a different feel! I ended getting a finger print on part of the aircraft, and needed to respray it. I thought if I taped off a spot to hold it would make things a little easier. Happened to be that I needed to start on a new can of primer, and it turned out to be a slightly darker colour... This would be okay, however, my plan was always to use the primer grey for the belly of the aircraft, and I've got some grey primer as a touch up paint which now will look too light...
-
With the wings now glued on, I've made some wing fences. It took two attempts to make these. The first ones I made were too tall. To make these I cut a cardboard template that I was happy with, then transferred this to plastic card. Various areas have also been puttied.
-
That's an easy sounding idea! I had a needle that fitted, but that was lost somewhere...
-
Part of the fuselage has had putty applied, and with the wing halves now glued together, it is time to attach them to the fuselage. I received this Tamiya Cement as a freebie with an order, previously I was using a Revell one, but that was a bit of a pain where the fine needle would become blocked easily.
