


Jur
-
Posts
198 -
Joined
-
Last visited
About Jur

Recent Profile Visitors


Jur's Achievements
")
New Member (2/9)
871
Reputation
-
Heya, I have taken a bit of a break from modelling, I'm quite busy with lots of other things at the moment. I may still start the kit at a later date, perhaps too late for this GB. I wish you all success with your builds!
-

Porco Rosso - Curtiss R3C, Fine Molds, 1/72
Jur replied to Jur's topic in Ready for Inspection - Aircraft
Thanks everybody for your nice comments! They were fun to build and I'm happy how they turned out (even though there is always room for improvement!) -
Porco Rosso - Curtiss R3C, Fine Molds 1/72
Jur replied to Jur's topic in Work in Progress - Aircraft
Thanks guys. The model is now complete: More in RFI: -
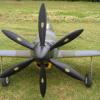
Here is my Fine Molds Curtiss R3C in 1/72 scale from the animated movie Porco Rosso, the perfect companion to my earlier Savoia-Marchetti S.21. It is not very big: Build thread here: And both planes together: Nice kits and definitely worth checking out if you're a fan of the movie.
-
Porco Rosso - Curtiss R3C, Fine Molds 1/72
Jur replied to Jur's topic in Work in Progress - Aircraft
Nearly there now, I glued everything together, then applied the decals and the more internal rigging wires (from steel guitar string) and finally gave the whole thing a coat of matt varnish: All that is left to do is add some further rigging wires that are more on the outside. I left those for last because they could easily be damaged by handling. Oh yes, the prop is still loose too. Will be fixed. The stand is a bit too small to display both planes at the same time, they are practically flying into each other. I will use it to just display the Curtiss on its own. Perhaps I can fabricate something a bit larger for both planes together (but it won't be a great ape this time ) -
Airfix Hawker Hurricane Mk.I Has Passed on!
Jur replied to dogsbody's topic in Work in Progress - Aircraft
Looking very neat! -
Porco Rosso - Curtiss R3C, Fine Molds 1/72
Jur replied to Jur's topic in Work in Progress - Aircraft
Yes, I do have it but for some reason I used the ordinary Tamiya tape here. Note to self: think before masking -
Porco Rosso - Curtiss R3C, Fine Molds 1/72
Jur replied to Jur's topic in Work in Progress - Aircraft
Thanks guys for all your nice comments! This is a nice little model (and little it is, it literally fits in the palm of my hand) and I'm enjoying the build. Today I sprayed the blue topcoat. As always, my masking was less than perfect. The wing bands came out ok, they are basically flat, but the fuselage band had some overspray near the spine. With multiple curves that is a difficult area to mask. Also the floats, these are compund curves that beat my masking tape, but the damage is on the underside and if I don't show a picture here, nobody is going to see it Even so, things are not too bad and I have touched up as good as I can. -
Airfix Hawker Hurricane Mk.I Has Passed on!
Jur replied to dogsbody's topic in Work in Progress - Aircraft
I think your mask looks fine, and if there is any overspray you can tidy that up with a cocktail stick. You could give it another coat of interior green but I don't think you'd see much difference when all is completed. For fiddly work like cockpit masking I use one of those magnifying lamps. A brilliant piece of kit that I couldn't do without these days. -
Porco Rosso - Curtiss R3C, Fine Molds 1/72
Jur replied to Jur's topic in Work in Progress - Aircraft
I masked the wings and floats for the yellow and gave them a first coat of dark blue. I also gave the fuselage band another coat of white for better coverage, and then glued on the machine guns, the top wing, the empennage and the chin radiator: The fit of the parts is very good, I may use a bit of filler on the radiator sides but otherwise no problems. Tonight I'll mask the fuselage band and varnish the edges to (hopefully) prevent bleeding. Tomorrow I should then be able to spray the overall dark blue and give the wings and floats a second coat. There is some cockpit detail but not much of it will be visible once the Donald takes his place: So far this is a quick and straightforward build. I had never heard of Fine Molds before I came across their Porco Rosso kits and I must say they are excellent quality. Here is a nice picture of Jimmy Doolittle with his Curtiss: (By LARC/photographer unknown - Great Images in NASA Description, Public Domain, https://commons.wikimedia.org/w/index.php?curid=510366) I'll have some rigging to do! -
Just to warm up a little I worked my way through some of my Heller stash.... For the GB I will stick with my plan to build the Pinta. I just ordered aftermarket blocks.
-
Porco Rosso - Curtiss R3C, Fine Molds 1/72
Jur replied to Jur's topic in Work in Progress - Aircraft
I think that Donald (no, not that Donald) came out ok: -
Porco Rosso - Curtiss R3C, Fine Molds 1/72
Jur replied to Jur's topic in Work in Progress - Aircraft
First steps have been taken, for starters I primed everything with Stynylrez grey. I found the Fine Molds plastic of the S.21 kit very 'slippery' so hopefully this will help the top coats come on better. Next I sprayed white over the fuselage band and the areas to be painted yellow, and I sprayed the struts Intermediate Blue. Once that was dry I assembled the floats. There are plastic 'weights' included to be glued inside the floats, I presume to prevent tail-sitting. Next I applied a coat of yellow on the undersides of the floats, the rudder and the wing bands. I have given these areas a coat of gloss varnish before I will mask them in the hope of lessening the risk of taking up the paint when I remove the masking tape. Once this is dry I will get on with the cockpit and assemble the fuselage and top wing. -
Hi Mikey, I'm not all that much into Startrek (blasphemy!!) but perhaps I can give you a few small tips: for flashing lights you might want to check out the model railway scene, there are vendors who sell such things for use in railway crossings and the like. The other thing I would recommend is that you paint the inside of the model black if you go with lighting, because otherwise it will be somewhat translucent which will spoil the effect. To be absolutely sure I would give it two coats.
- 58 replies
-
- 2
-

-

-
- USS Enterprise
- NCC-1701D
- (and 1 more)
-
Having completed (and very much enjoyed) my 1/72 model of the Savoia-Marchetti S.21 flying boat from the animated film Porco Rosso, I ordered the companion kit of the Curtiss R3C, also by Fine Molds. This is the plane flown by Porco's adversary, the brash American Donald Curtiss. It is an 'unauthorised' version (according to the instructions) of the well known racing floatplane from the 1920's - 'unauthorised' presumably referring to the twin machine guns mounted on the fuselage sides. Apart from those, and the addition of a beefy chin radiator, the plane looks quite faithful to the original. The plane in the film looks like this, here flying side by side with Porco's S.21: And here we see Donald Curtiss himself standing next to Porco (Marco Pagot): =============================================== The kit arrived from Japan in a sturdy box, with on the lid a brief explanation of what this aircraft is all about: This is also pretty much the only English text in the kit since the instructions are almost entirely in Japanese. However, this is not a complicated kit and I don't think I will have problems following the diagrams. If the parts fit as well as they do on the S.21 I will have a good time. There are two sprues, a dark blue one with most of the parts of the aircraft, and a grey one with parts for the beach trolly and the flying display stand. The stand can be built to accommodate not just the Curtiss but also the S.21, something I will try out. There is also a tiny pilot figure, we'll see if I can manage to make it look like Donald Curtiss! There are decals for various liveries, I will opt for the one with the yellow bars on the wings. As an alternative, skull symbols are included if you want to show the plane as one of the 'Mamma Aiuto' Air Pirates fleet. A second decal sheet contains yellow decals for the undersides of the floats and the bars on the wings. You could opt to use these and not even paint anything and you'd get a reasonable representation of the original, but I will try to spray the various colours myself. The overall colour is a very dark blue (Midnight Blue?) with Intermediate Blue struts. Colour call-outs are given for Gunze paints but I will use Vallejo equivalents. So far I have just washed the sprues and ordered some paint. I'll make a start with the interior soon.