


Ruttman
-
Posts
12 -
Joined
-
Last visited
Content Type
Events
Profiles
Forums
Media Demo
Posts posted by Ruttman
-
-
On 20/08/2021 at 14:17, Ade H said:
You have a good grasp of fine dust on skirts. Perhaps you could expand a bit about your method.
Can I make a constructive suggestion though?
My second thought was that there seems to be some unweathered upper surfaces which look stark and monochromatic. I have had this problem myself, when I wanted to strike the right note with parts which needed to look comparatively clean, and ending up foregoing them because I wasn't sure how to tackle them subtly. It was only photographing my models which revealed things which I hadn't seen or considered. I always remind myself that there is almost no such thing as a completely clean surface on a used vehicle.
Thanks, I’d have to agree with your recommendation for the upper surfaces. How would you recommend making it more dirty? It has to be quite subtle as this scheme has never been used in war and so won’t ever have been left long enough uncleaned for too much grime to accumulate. -
Hi all,
I’ve linked below pictures of my most recent armour completion, a 1/35 Rye Field Models Challenger 2 in Berlin brigade camouflage.
I decided to keep weathering to a minimum as such a scheme has never been used in battle so could never get too dirty.
Any critique would be welcome. I haven’t done many armour models so there’s still a lot of room for improvement.
Thanks
Luke

-
 30
30
-
 1
1
-
-
32 minutes ago, beefy66 said:
Hi Luke
When rigging my KGV I used a similar method to Rob but I did not use the buckles I use a small dab of CA on the point where the line is to go and attach to mast or railings and then you can paint over to add extra contact at the joint.
HTH
beefy
thanks for the advice.
Using CA Sounds like a good idea, I think it’ll be easier than buckles so I’ll have a smaller chance of messing it up.
Thanks
Luke
-
49 minutes ago, robgizlu said:
Hi Luke - since no-one else has picked this up I'll have ago.
Lovely, lovely build BTW.
It's probably too late now but it's worth thinking about usinig https://www.bobsbuckles.co.uk/ Bob's buckles that are tiny loops that you place in pre- drilled holes. The WW1 boys use us them for Biplane rigging but they translate perfectly to ship modelling. Threading your infini line through them probably requires an optivisor but it's a secure means of anchoring your line. Working with Infini or Uschi /Mig ammo etc lycra threads has made rigging so much easier because it's elastic and will adhere to CA (superglue) comparatively easily.
I use Loctite "Powerflex" Gel which is a lot easier to apply than the liquid variety. You can use a cocktail stick to "place" the glue but a far superior method is to buy some acupuncture needles https://www.ebay.co.uk/itm/Altra-Plastic-Handle-Acupuncture-Needles-0-20-x-30mm/293638374266?hash=item445e36037a:g:CyQAAOSwyotfAwKS that make the placement sooooo much more precise. One box will last forever. I cut the end off ONE so that t's blunted and that delivers a slighlty larger "Glob".
The secret is to bring the thread to the glue and if possible allow it to touch end on ONLY once. (easier said than done!) Get some good quality tweezers, you cant go wrong with this ..."PIXNOR Precision Tweezers Set - 10 PCS ESD Tweezer Set, Anti-Static Stainless Steel Tweezers Kit Curved Tweezers for Craft, Jewelry, Electronics, Laboratory Work" from Amazon (thanks to Crisp @Ex-FAAWAFU) Put a little tension in the line but NOT a lot (It's VERY stretchy). When one end is attached take it to the "insertion" (bit of anatomy training coming out here) point and attach end-on under minimal tension. If you can whilst it's touched move close and breathe out on it forcibly - the Glue bonds quicker under moisture. Where attachment is really problematic you can use a CA accelerator that really needs a third hand/person to gently "touch" the joit with cocktail stick or Accu needle dipped in the accelerator. If the atachment doesn't work first time, it's worth lopping a small piece of the end of the lycra thread because it sticks LESS well if it's already got CA glue on it.
Lastly you need snippers.. These will do https://www.amazon.co.uk/Amtech-R0278-Curved-Micro-Scissor/dp/B00LQPZ170/ref=sr_1_3?dchild=1&keywords=curved+Micro+scissors&qid=1603532202&sr=8-3 or something like them - whilst keeping some tension and stretch on the thread cut as close to the "joint" as possible. yo can use a fresh scalpel blade but the scissors are altogether better
Lastly it's worth getting a second "weight"/thickness of thread to add variety throughout the rigging. For practical exampleos of all of the above, particularly using Bob's Buckels check out my HMS Kent Blog - you'll see how comparatively easy it was to do complicated Funnel stays by first having good anchor points
Sorry this is so long - and that's it from me - all my knowledge small as it is. Seeing what some of the WW1ers achieve is mind boggling!!!
Best
Rob
This for the advice Rob, I think it’ll help a lot.
I think it’s a brilliant idea to use Bob’s buckles but I’ll probably give it a miss for this model as it looks very fiddly and I expect I’ll end up either losing/ruining all the buckles or wrecking the masts with dodgy holes.
I think I’ll buy all the other recommended products though.
Your HMS Kent looks brilliant by the way.
cheers
Luke
-
1
-
-
Hi all,
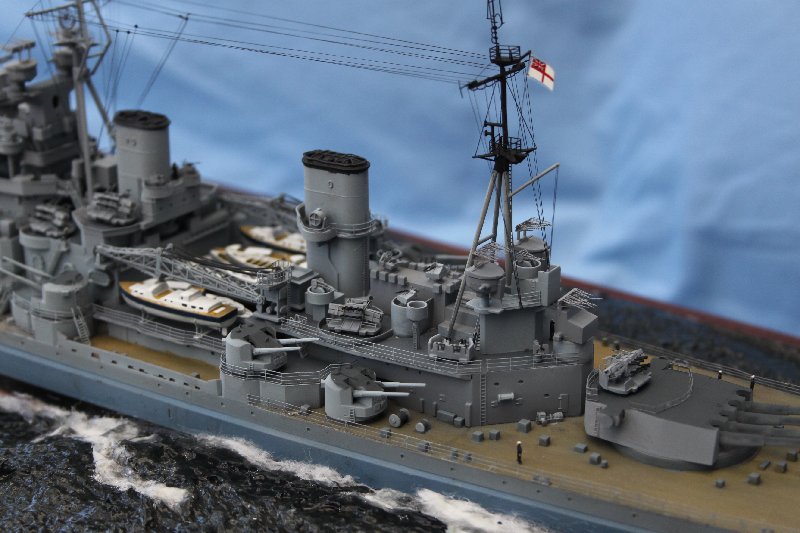
This is my first ship model, a 1:350 scale HMS King George V.
I've pretty much finished now but I'm not quite sure how to start the rigging.
I've bought this infinity models lycra thread (linked at the bottom) but I'm not quite sure how to attach them
Any tips would be appreciated.
Cheers
Luke
b
-
1
-
-
thanks, I have since added black tops to the funnels
-
18 minutes ago, magpie1832 said:
Looks great. The KGV the scheme you have done is painted over light grey, the paint will have worn and chipped on the blue and dark grey so you could create some chipped areas with a fine brush and and light grey.
I tried to replicate on mine.
Chris
Thanks Chris
I’ll have a go at that at some point soon.
thanks for the advise
your KGV looks brilliant
thanks
Luke Rutter
-
1 hour ago, Chewbacca said:
Luke,
I think the key phrase I would use for weathering ships is "less is more", certainly in this scale. It's very easy to overdo it.
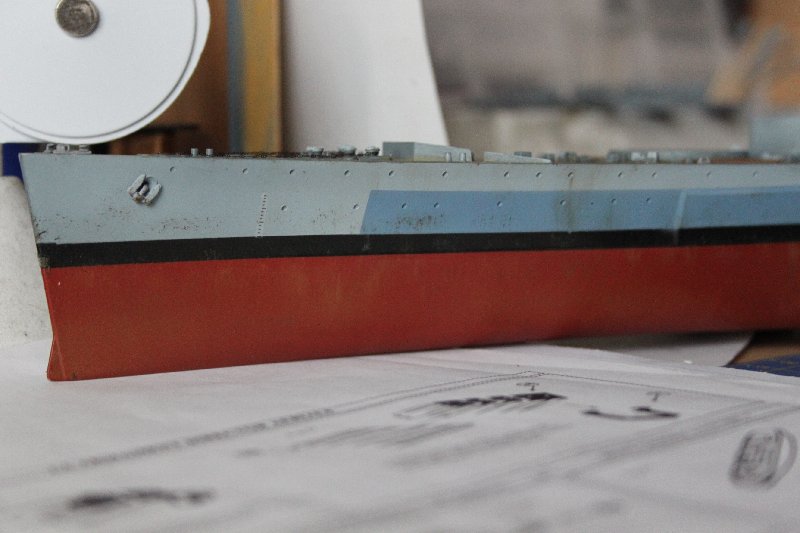
Look at contemporary photos to see where the rust is likely to be - hawse pipes are classic but bases of vertical structures as well often have a little rust where water has been able to build up and if the paint has cracked this can allow the water through to the steel.
Ok thanks,
I’ll certainly bear that in mind
-
18 minutes ago, beefy66 said:
Hi Luke I see you have started on some weathering of the hull sides are you using oils for this and if so then I would recommend you try and thin it out a bit more with turpentine or white spirit try and use more than one colour to give a contrast to the hull colours i use various ones white yellow and blacks to give a very fine filter to the streaking effect i also use a sponge to apply some of the oils as a form of chipping I did this with my KGV.
Your build is looking go BTW
beefy
Thanks for the idea, I’ll have a go at it later.
your KGV looks brilliant too.
Thanks
Luke Rutter
-
1
-
-
Hi all
I’m almost done with my first ship build, the Tamiya 1:350 HMS King George V. It’s been a brilliant build so far, but due to my relative inexperience In the World of ship modelling I’m not really sure how to go on from here in terms of weathering and finishing the model.
Could anyone give me any tips as to how to continue from here?
Cheers
Luke Rutter
-
3
-
-
I’m in!
I’ll build the upcoming Airfix Vulcan at some point after Christmas-
1
-


Challenger 2 in Berlin camouflage
in Ready for Inspection - Armour
Posted
Thank you. I’ve built quite a few aircraft so I have decent experience with painting and masking; it’s the heavier weathering on the lower hull and side skirts of tanks which I tend to struggle with on armour