Andy I
-
Posts
90 -
Joined
-
Last visited
Content Type
Events
Profiles
Forums
Media Demo
Everything posted by Andy I
-
Thank you for all the very kind comments. The kit is fantastic, just falls together.
-
- 13 replies
-
- 50
-

-
Several thin coats of matt varnish have been applied and a number of washes and pigments on order. On all of the reference photos that I can find, these don't look that muddy, so I'm thinking less is more to begin with.
-
As someone who has only ever built aircraft, I thought I'd break the habit of a lifetime and build a tank. Subtle hints to the kids for a birthday present and a Trumpter AS90 arrives. Not quite a tank but to my kids, it has tracks and a gun therefore it is a tank! I didn't post anything on the build as it could have turned out to be a complete disaster and a hint to stick to aircraft. After several months of stop start progress it is almost complete (I'm sure there are many improvements that could be made but as a first step away from my usual subject I'm quite pleased with it). My issue, that I am hoping the collective knowledge and expertise of this forum can help with, is how to turn my it into something that looks a little more realistic, mud, dust, dirt, etc. I am a complete novice when it come to doing this with armour. I have left the tracks off at this stage as I wasn't sure if it is better to tackle them separately. Many thanks in anticipation of any advice.
-
Unfortunately I don't know the exact ratios, it was a lot of trial and error and scanning. But the base was AK PRU Blue with added XF-8, XF-50, XF26 & XF2. I still have a big jar of it left over.
-
The custom decals have arrived... The carrier film was very thin, fragile and was in a single piece across the sheet that required the decals to be cut to shape. It took a couple of goes with the 'C' but very pleased with the result.
-
The proof artwork for the custom decals is in, just need to wait for them to be printed and sent across the Atlantic.
-
- 35 replies
-
- 10
-
-
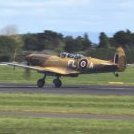
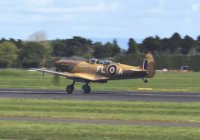
After much trial and error I have a colour that looks about right. The photographs are really effected by the light source. Much darker under artificial light than sunlight. The true colour to the eye is somewhere between the two. After a coat of varnish and application of decals I had available. I'm now waiting on delivery of some larger roundels for the wings and some custom printed ones to finish it off. A company called Bedlam Creations (found via Google) are printing 'Rolls-Royce' for the cowl and the 'C' and PS853' for the fuselage. It will be interesting to see how good they are, may be a few weeks to wait.
-
Doing a little research into colour for the landing gear I came across a few photos that show the blue I had is not the right colour.. My original photo must be off, a much brighter blue required. Back to the drawing board... The plan is to start with Pru blue and gradually add royal blue until I get somewhere close.
-
So it turns out that Pru blue is not the right colour. After several trial efforts I came up with this, not exact but close enough - a mix of Pru blue, royal blue, yellow-green and white.
-
I've ordered AK real colour PRU blue, have found their colour to be very close in the past so we'll see.
-
So far this kit has gone together like a dream, no filler or sanding anywhere. Attaching the wings to the fuselage has given a few small gaps but nothing major. I did make one school boy error. The pilot is too tall for the canopy to fit! Some head shaving to come 😲
-
The pilot only needed a minor amputation of toes to fit in the cockpit!
-
Cockpit all assembled, unfortunately most of the detail will be hidden shortly.
-
In order to avoid fitting the propeller prior to painting, I've build a retainer that will allow it to be fitted later. A few pieces of card, drilled to fit. The prop just needs the tips painted...
-
Final assembly of the various cockpit parts
-
Really looking forward to building this one, underway with the cockpit. Add some cockpit green... some detail colour... and glue it together...
-
I've been wanting to build this for some time but the kit has been impossible to find, so when it popped up on ebay last week it was impossible to refuse. The plan is to build as the Rolls-Royce owned aircraft.
- 35 replies
-
- 18
-
-
Pictures of the completed model, probably one of the best I've built. What to build next?
-
Thank you, I have some on order.
-
Just need some red paint. The decal instructions call out XA1031 which doesn't appear to exist.
-
Having unmasked the entire model, I realised that the white on the canards does not come from the decals but needs painting! 🤬 Cue more making tape... followed by some white paint Jump forward a few days and decals added Unfortunately the decals aren't quite the right size leaving a white strip on the trailing edge. It may be possible to paint or I may just leave it as is? I've also just discovered that the red on the top of the fuselage and the tail needs to be painted as well (this time it was in the instructions so my fault for not reading them properly) matching the red could be interesting!!
-
Black Primer & NATO black Masked for grey, there is a Typhoon somewhere under there The fully painted result