

Stickframe
-
Posts
627 -
Joined
-
Last visited
Content Type
Events
Profiles
Forums
Media Demo
Everything posted by Stickframe
-
Hello dio builders, I am going to restart a project I started in 2016, then got sick of working on. At the time, I realized, the timeframe of Bladerunner was pretty close to the actual date - which made me wonder how I might interpret the film, but in the context of current time. I was pretty fired up to give it a go - so, first up, some inspiration: A few images from the movie, an MATV in an urban setting, and the alley behind the office where I worked - perfect and enough to get going. And several process images: This involved lots of scratch work - which was fun - it also has lots of figures, which became too expensive - so for big background groups, I used printed cardboard cut outs - Short of going on and on, you can see plenty going on here - but, parts of it left me unpleased. The story got convoluted - and the street crowded - some of which is fine, but in the end, I just lost interest. Another annoying attribute of the project is that it is completely internalized, which is fine, but when viewing from the outside - it looks awful. As my real job is a bit slow right now, I decided to get on this again. Here's where it sits today: First up will be stabilizing the base - this is all heavy, so now it flexes which I don't like. As the plan is to reconceive this, I decided to pluck several figures and vehicles off the base - and rethink what the story is and what I want to show. Next - to fix the "outside" - you can see the stunningly beautiful card stock backsides of buildings and wiring - yeah, not great. Some good news is that I didn't destroy too much of the model as it sat collecting dust for the last few years, and the wiring still works! So, plenty to do. I want to finish something I'm working - a model truck that needs paint......😴 but, I put a lot of work into it, so should wrap it up - then back to this. Thanks for having a look, Nick
-
 Hello gents, I recently finished this, a build of an RG-33 SOCOM AUV: I must say, this turned into much more of a project than I expected and enjoyed it completely - Cheers Nick
- 37 replies
-
- 24
-

-
So a guy went ahead and "did the right thing and ignored the fifth wheel and cab interior"? 😄 ..... The way you saved both is remarkable as they look great - in fact, this whole build looks great! Very nice work indeed, all around - wow - what a beauty! Cheers Nick
-
RG33 SOCOM AUV - a big MRAP truck
Stickframe replied to Stickframe's topic in Ready for Inspection - Armour
@Keeff, @stevehnz, @Muchmirth, and @Bullbasket, Thanks very much for the positive words, I really appreciate it. As you have gathered, and maybe experience yourselves, this type of project can become something of an obsession - that can either drive you crazy, or, as I chose, becomes something to do aggressively and finish! This might seem obvious enough, but I have had a few projects that just go on and on - and they become a burden, which can easily be left in the proverbial dust. I posted some images of this in the group build area, and a fellow asked to see some detail pictures. Today was sunnier than the day that I took the indoor photos before, so I shot a few more images - ha - as these are giant, I can say for better or worse: The good, and the less good - with giant photos come truth in model building 😄 This was a very enjoyable build, and I'm happy with how it worked out - I went ahead and added bolt heads, plumbing etc in the fender wells - which you can (not) clearly see - unless you tilt the model. I enjoy doing it anyway - Funny, if you look close enough, you can see I used photo-etch padlocks on the tool boxes. I realized they would go largely unseen, but, always wanted to use them on something. So there you have it - the RG curtain call 😄 The next project, well, I want to convert a Scammell Pioneer 6x4 to a Scammell Explored 6x6, but for civilian use. I'm not sure about posting here or in vehicles? Likely vehicles as I'm planning to use a Cummins engine and Eaton transmission and transfer case, and I'd like to keep the front axle pivot, set up like a modern three link, and yes, I'll say it, left hand drive, mostly informed by the limited choices for something that looks close to a Cummins L10 engine. Thank you all again for having a look, and happy model building, Cheers Nick -
@dnl42 and @JeroenS, thanks for the nice words and for following along. I really enjoyed this build. I decided that before it makes its way on to a life of collecting dust, I would take a few more pictures, and share a few more of those with the rig "in use" - lol OK, some detail pics: For better or worse! 😄 The last bits added were several sensors located on the visor - I do not know what they do, but they are there! I added several details under the fenders - alas, never to be seen again! And for fun, a few more "outdoors": Ok, time to move on! Thanks again - and happy model building! Cheers Nick
-
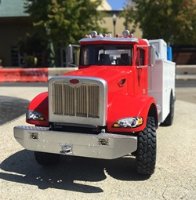
Hello gents, I'm pleased to share these images, of a project which I started as personal challenge, as I tried it once before - with, well, what you'd expect from a guy with 10 years less experience! 😄 Here is the build link to the current build: This time tho, we have some good results - please have a look: On the left, first attempt - while ambitious, not that great. The project involves a few kit parts, and lots of scratch work. The new version, on the right is a much better representation of the truck, and turned out to be an interesting and complex build. A small victory is getting the front fender right this time - in real life, they are indeed majestic and big! as you can see on the right. While if you look at the truck on the left, well, a guy tried.... If you look at the WIP thread, you can see how it came together. With it painted up, I decided to take her out for a test drive: She's a beauty and a beast - I'm really glad I decided to try this again - fun project. There is a lot of scratch work here, some of which will make me rethink what I do in the future, as much of the body, and various smaller parts, like the CROWS is scratch and while a bit of a headache, there's no reason I can't do the same on future builds. Thanks for having a look 😀 Cheers, Nick
-
Hello gents, and thanks! A guy is calling this one done! It turned into quite a project, which I enjoyed - even with various (multiple!) challenges along the way! So, here you have it: And you just know I had to take her out for a run: What a treat! a real brute! If you're interested, I eventually made up a work thread in the AFV section, and have a few more pictures in the ready for inspection section Thanks for a good reason to start a fun project! Cheers Nick
-
Scratch/Kitbash SOCOM RG 33 6x6 AUV MRAP
Stickframe replied to Stickframe's topic in Work in Progress - Armour
Hi Keith and Pete, thanks very much, Yes, I decided this needed something in the bed. It turns out LiveResin makes a really nice quad, but, when I looked for it, all I could readily find were fakes/copies. So, instead, started with Bronco's British Quad, and converted it to the newer, US version. The Bronco kit is pretty nice, but at this point, I've done a lot of scratch work anyway, so went about the conversion. Pete, you caught me just in time - I have two pics of the version in the truck, and well, now, a version with primer: The little "tails" are PE straps - and I went ahead and made some little ratches straps. I figure it's easier to just build and paint them all at once, then glue them into the truck bed. And yes, I'll sand off the little nugget on the trailer! The objects in the bed of the trailer are folding, loading ramps - nice detail from the kit! Thanks for your interest! Cheers Nick -
What a fine looking rig! Very nice! Cheers Nick
-
Well guys, looks like it's time to paint! I think I caught the details that are visible - added a few sensors and odds and ends to the visor, lots of bolts and on and on - I'm calling the build-part done! I'm sure I've missed some "things", but for this project, which has been a lot of fun, I'm not adding anything else! Cheers Nick
-
Scratch/Kitbash SOCOM RG 33 6x6 AUV MRAP
Stickframe replied to Stickframe's topic in Work in Progress - Armour
Hello gents, Looks like it's about time to put the knife and glue down, and start painting: Since I last posted, a few other bits were added - specifically some parts over the visor, and lots of other parts lost in it all: This has turned out to be quite a fun project - from a big chunky beast to a big chunky beast with lots and lots of bits. A good project all around. As for the antenna on the left front, I might try and bend it straight - or might not, my guess is I'll snap it off and I don't want to go about fixing that - not sure just yet! Thanks for having a look - Cheers Nick -
Very fancy interior! looks great - Cheers Nick
-
Hello model builders, I haven't posted in a while, but have been working on the big truck. As I mentioned, I have a thorough set of walkaround images of this, which has turned into something of a mixed blessing. I can of course see what details need to go on, but that means I can also see what I have done wrong. And, one of my goals for this project was to do a better job this time, than the last time. A particularly sensitive subject for me is the front fenders and the louvers, which I did not do that well first time through, so I tried to build them to look better this time, and: The image on the right is how the fenders looked until yesterday afternoon. This was much better than my first try, but, I really didn't like seeing the flat wall plane behind the louvers. A simple fix would be to just cut out the opening, except, what you can't see here is that there is a structural frame inside, which is used to support the overall form. Nonetheless, I didn't like the look. So, I carved the brass etch off, and added a separate base etch grill, then added the brass back. While it's a but hard to see in the picture on the left, it looks much better now and I am satisfied that this part is now done. On to other problems. The first has to do with the lower hull: As you can see above, the lower hull has a step upward, just behind the driver's door, which I didn't exactly tune in on before. I figured out it's importance as I began detailing this area. There is fold out storage deck (brass remnants cut up and reshaped) which went on pretty well - then on to the fuel cap door - which wouldn't fit....why not?? well, I didn't make this area tall enough for it to fit - so, now it does! Turn out, this happens on the other side too - but, under the forward passenger door. And a variety of other odds and ends have been added: Details from grab bars to bolts keep going on - and from the top: The roof is now pretty filled up with parts. And, happily along the way I faked in an engine, which in the right light, you can actually see! And the last bit of awkward construction for this post, the mirrors. Like the rest, this turned into quite a project: I held out some hope that I could use the mirrors and mounting hardware from the M1083 kit - which I couldn't. I used the mirrors, some evergreen, etch and wire, and now, we have matching mirrors. My thought on this was doing it later in the build would make it less likely that I would snap them off along the way. What I didn't count on was that this build would wind up with so many added details, which in turn, makes it hard to hold without....breaking off parts. So - much time and frustration later, we are calling this task done! I still need to add many bolt heads and a few other bits, then, off to paint. Thanks for having a look! Cheers Nick
-
Looking back at your images, the use of "U" bolts for the U-joint end caps is pretty interesting. I haven't seen this type of connection before, and am more familiar with the type that bolts flush onto the yoke. This looks very good, as does the entire driveline and axle. Cheers Nick
-
Scratch/Kitbash SOCOM RG 33 6x6 AUV MRAP
Stickframe replied to Stickframe's topic in Work in Progress - Armour
Hello model builders, @PeteH1969, I have only seen this truck in the desert sand paint scheme. I've searched via Google for images of this truck and they are hard to come by. The publicly available images I have seen are from the manufacturer, so moderately helpful for this project, but not too comprehensive, or with any variety. It would certainly be interesting to see this in a camo scheme! I have big collection of walk around photos, which I have heavily relied upon. On to today's update. I have spent some time in the last couple of days working on the front end. I think let this area languish because I mistakenly thought it would be relatively easy to do and that would be that. I was wrong, as the parts that need to be made are a bit tricky and the kit is getting big and awkward to hold without breaking something somewhere. New parts include the "boxes" on the front bumper that house marker/direction signals, grab handles, various bolt heads, more antenna mounts, and an etch cap over the grill. Please have a look: Ha - I have to laugh at these "giant" photos - you sure get to see the good and the less good! The etch "boxes" are from a Buffalo 6x6 set, while the bezels are sliced and reassembled bits from a T55 detail kit. You can just see the cut lines. In this photo, they look to be pretty big, but in reality, they are not. You can also see the piece of remnant etch used to cap the grill. For the etch, I have no idea what it was originally intended to be used for, but it includes a seam, so I used that to make the grill overhang, then cut the ends, so they, and the top would rest flush with the truck. As it is a long piece of etch which I believe could easily snap off, I drilled holes on the ends, so I could place resin bolt through and into the truck This was a bit awkward to do, but I achieved the goal, and there are bolts there on the real truck. I don't like making grab bars in general, and this was no exception. Again, just holding the truck while attempting to drill holes....😓 no fun. You'll also see I sought out bits of remnant etch to use as flanges. In retrospect, I think for the next time I might make a simple jig for bending these. Here, I just estimated the size and bent them with pliers. This works, but no two are exactly alike, which to view is fine, as you can't really see the difference. But, this also means each hole drilled in the truck is located/separated a little bit differently than on the previous set. More good times. For the etch on the side steps, I also ran resin bolts through. And on and on - I've since added bolt heads to the antenna brackets - oh, and as you can see above, the front of the truck also features two, step rungs, installed on braided wire....perfect, and they received the visual equivalent of flanges too. I've also modified other parts of the left/drivers side of the truck, where I noticed - the "boxes" in one area are taller than the rest, and there's a fuel cap cover, and a foldable storage tray of some sort. So, a segment of my boxes are now taller! As I have lamented, while this appears to be a big clunky brute, it also has what has become a deep well of nuance! What a celebration! haha - as I don't have any drawings of this, none of this comes to light until I am working in a key area, reviewing pics and discovering - Shoot...I didn't notice that....either 😄🤪 Ok gents, thanks for having a look - Cheers Nick -
Scratch/Kitbash SOCOM RG 33 6x6 AUV MRAP
Stickframe replied to Stickframe's topic in Work in Progress - Armour
Hi guys, Thanks for having a look - @Bandsaw Steve, hi Steve, thanks very much. You know, I built a model of this truck once before, maybe 8 years ago - the approach I took was a bit like this, some kit and some (mediocre) scratch work. I was less experienced, and apparently wildly optimistic about my own skills! 😁 😁 I can say with some clarity, that well, while not a complete disaster of a build, a guy didn't do a great job either. Now, with a bit more experience and still liking the looks of the rig, I am trying again. It has turned out to be a really challenging and interesting project, and dare I say, and I know this is a dangerous thing to say in the world of our hobby, but, I like the progress so far 😓 😁 So, if you stay tuned in, you too will find out just how this might work out! @Pete in Lincs, hi Pete, long time (relatively long time I guess 😁) no model talk. I'm glad to see you stumbled across this and left your note, great to hear from you. I enjoy building all sorts of models, and don't really have a favorite genre. I built armor and related dios for some time (and learned a lot about detailing), then went into cars and trucks. I think I enjoy the build if well, I can't immediately figure out how to do it! 😁 As I mentioned to Steve, I recently concluded that I needed to try this one again so here we are. This time through I'm taking a pretty rigorous approach, as I have lots of pictures of the real thing, and even a few key dimensions - the rest, well, like your Sci Fi work, have been making some effort to demonstrate convincing realism! 😁 on we go - @Keeff, thanks very much! I appreciate it! This has turned into quite a project, and I have been taking a fairly methodical approach - it's close to looking pretty good and I don't want to get lazy and screw it up! Cheers Nick -
Scratch/Kitbash SOCOM RG 33 6x6 AUV MRAP
Stickframe replied to Stickframe's topic in Work in Progress - Armour
Hello model builders, Rather than going out and buying one of the really nice CROWS kits Live Resin makes, well, I went ahead and made one. This proved to be a real challenge. First up was removing a plastic base I firmly glued to the roof, without destroying all the snappy etch I built surrounding it - then, on to making the CROWS: Like the rest of this rig, there is plenty going on with this unit. Happily I recently installed one of these (a Panda kit part that was not great) on another project, and I have several photos to use for reference. Even with those resources, this became an interesting and challenging build. In addition to the obvious challenges, just holding this along the way was awkward. It was pretty hard to discern if parts were indeed square, particularly the shields on each side. These are mounted to the two towers that hold the weapon, which of course are tapered - and, the shields are canted slightly outward, so no picnic to address. Happily it sits basically square and level, which is a relief. Along the way I imagined this being slightly tilted - which would have really annoyed me! So, in the end, it was a good challenge! and unhappily, yes, I'll clean it up - looking at these pics I can see all sorts of unwanted remnant filings and bits that need to go. I have more to add to the roof, but don't feel like it right now! will instead get after the front end, which still needs attention - Happy model building, Cheers Nick -
Scratch/Kitbash SOCOM RG 33 6x6 AUV MRAP
Stickframe replied to Stickframe's topic in Work in Progress - Armour
@Keeff, ha! perfect for running to the neighborhood garden and lumber store! thanks for the nice words - this has been a fun project, and turning into a real challenge. @Peter2, first, thanks. As for the unusual antenna, I don't know. I have an excellent collection of prototype images which include a few key dimensions,, but no text to go along. So, I can clearly see "it" but had to estimate size etc, and live with its presence. This truck has at least 5 antenna mounts, plus this, so it seems it must have quite a comms center, but as to what each antenna does - I don't know. As to mine/IED detection, that might be the case, except, I have seen the "tall pole" type mounted in the front - sorry about the lack of tech language here, I just can't remember what these bits are called! Maybe someone else can let us both know what that is! Cheers Nick -
What a treat! I always enjoy your automobile builds, but at heart, I enjoy off-road vehicles - and as always this is fantastic! Axles are beautiful! Cheers Nick
-
Hello model builders, I started this a while ago as part of a group build - and as it's turning out to be fairly interesting, thought I might post the WIP here. I'm already well into it. In brief, the RG33 AUV is a 6x6 version of the truck, with a bed in the back. To build it I started with an RG31 MK5 ((4x4) base kit, and some parts from an M1083, but as you'll see, not much of the original kit was used tho, some parts proved essential, particularly the "V" shaped hull rather than a traditional two rail chassis. I won't give a full step by step, but will hit some highlights to get this current quickly. This is a picture of the truck, if you're not familiar with it: Starting with hull and basics: As you can see above, I glued two hulls together, and installed the kit's front suspension. As this is a 6x6 I made up my own rearend. The jig was very helpful, as I made up the walking beams (the truck uses a Hendrickson rear suspension) with the axles located and kept in place as shown. And as hoped, the front axle spindles are level with the rear axles - good. As you can see, this rear end has a lot going on. I did my part to get the Hendrickson rear suspension to look right - shocks, bump stops, torque arms and all.... I'll add bolt heads. Mercifully, it sits level on all six. The hood and front end was a real challenge - while clunky and angular, there is also a clear design nuance - which translates to, this was a lot of work. The grill is made of about 16 sheets of remnant etch, which are both evenly spaced, and sloping....piece of cake 😓 😁 That cab....well, the cab from the kit was too narrow and only had two doors - now it's wider and has four! Those majestic front fenders - well, they actually include two rear fenders from the opposite, rear side of the RG31 merged, and then cut up to reflect this rig. Next up was the bed: This includes bedsides from the M1083, that were shortened, recentered and on and on....The real truck includes these too boxes - Oy - those awful "T" handles - yeah...they've been replaced and look better! As the bed rests on the "V" hull, I made up the substructure to support it. This truck has proven to have all sorts of interesting build challenges - even the rear! On to the cab: For what seems to be just a big clunky truck there is a lot to keep a guy busy! This is where it sits today - hoping to make some progress this week. Thanks for having a look, Cheers, Nick
- 25 replies
-
- 12
-
-
Hi model builders, I've kept after this build, and made some headway, on the rear end, and on the roof. It turn out, there's plenty going on in both. You'll see all sorts of materials used. As this is largely a scratch build, nothing worked as is "off the sprue", but that has kept it all pretty interesting - take a look: Starting with the rear end: The tow bar is the old Trumpeter kit, and the rest evergreen. BTW, I've since removed and replaced the "T" handles on the tool boxes - those looked awful! Still need to add bolts to the rear suspension - - Now, on to the roof: It turns out, there is a lot going on up there - and as this is not a kit, well, required plenty of scratchwork and repurposing old parts - etch and otherwise - anything is fair game! And there you have it. Believe it or not, the roof still needs more added - lol - yep, more to go - Cheers and thanks for having a look - Nick
-
This is really looking good. It seems the kit provides you with enough detail to keep the build interesting, but not so much as to send you into the land of tedium! Looking forward to seeing the tractor come together as I've always liked the look of this rig. At one point I was considering building one of these as a six wheel drive - the idea that the front end is already set up with a three link suspension and it might adapt into a four link with a solid drive axle! Cheers Nick
- 49 replies
-
- 2
-
-
- Thunder Models
- 1/35.
- (and 1 more)
-
M911 C-HET and M747 Trailer ***FINISHED***
Stickframe replied to MRMRL's topic in TLC - Transports, Loaders and Carriers
Ha - regarding the M1000 trailer - yes, take break from assembling tedious bits for a while. The suspension under it....no fun to build, as it involves building several multipart assemblies, in fairness, they basically go together as intended. But, it is slow going and not the ideal task for a one session build - ask me how I came to that conclusion?? 😁 🤪 -
Well guys, I've been working on the big truck Sticking with all that has come with this build, the truck keeps getting bigger - in addition to personnel, you can now see how this truck might carry some cargo, in an appropriately big and hard to build bed: The bed features modification to some key parts from the M0183 kit, and an abundance of styrene....good times. Unlike a normal truck, and like the cab, the bed sits a atop the "V" shaped hull, and not traditional chassis rails, and as my donor kit is not intended for this use, I built a substructure for it to rest on. It's hard to tell from the pictures, but the substructure is tiered with two layers of underdeck framing. I have some pretty good pics of all of this so at least a fundamental understanding of what this is supposed to look like. The bed also features these snappy tool/hardware boxes - which I'm glad I finished, and more glad that only the left side box gets the extra brackets and the two steps. While this would be tricky to build in any event, it was really a challenge (headache!) because construction had to happen with the bed mounted on the truck. Why was this a headache? Well, the truck is big and awkward to hold, and these boxes feature several small, oddly shaped, and fragile parts that need to be installed perpendicular to one another. A joyous time indeed. Adding to the styrene adventure, you can see I went ahead and used some PE for the steps/rungs. I managed to get them cut to fit correctly, and to add some support, hung them on metal rod, which worked pretty well. As for some of the nuance of some of the real shapes, and making a better "T" shaped handle, well - this is as close as I'm going to get it. I was running out of patience on this! I might hit the little "T" handle with a sharp knife, and tidy up the edges, but might not - lol You can see the kit bedrail parts pretty clearly, and how I went about cutting them up to use for my purposes. The bed-deck was shortened, so the rails needed to be shortened too. So, first cut out and then install the central post on the modified bed, then cut the left and right side rails and install them. This would have been pretty easy if the rails were flat panels. As they were not, well, time was spent measuring, making perpendicular cuts, and trying to keep any peripheral damage from occurring while cutting - like a wobbly, or wandering blade pattern. This must sound obvious enough, but to get this to look right along the irregular surface required some patience and restraint - that is, to not happily jump in with a file to clean up any irregularities, because overdoing this, would result in a bad fit. As is, I only managed a pretty good fit, and I am not excited about the prospect of adding putty to fill the gap, which in reality, I might not do. Added putty would be hard to sand off (tight fit) and might look worse than the thin gap. And the back? mostly bare bones for now - this still needs plenty of work. I need to make two more tool boxes, for the other side of the truck, will then come back to the rear, then on to adding details, and finally, adding an abundance of small bolts! So, plenty has been built but we still have a long way to go. OK gents, thanks for having a look - Cheers Nick
-
M911 C-HET and M747 Trailer ***FINISHED***
Stickframe replied to MRMRL's topic in TLC - Transports, Loaders and Carriers
Despite the kit problems, your build is looking good, and from here it's hard to see anything but good results. Seeing all of this reminds me of building the Hobby Boss M1070/M1000 combo, especially the trailer! Many steps, close tolerances, some warped or oddly molded parts, and the need to make several parts (suspension modules) multiple times 🤦♂️ It was driving me crazy! 😄 Cheers Nick

