

Lightpainter
-
Posts
379 -
Joined
-
Last visited
Content Type
Events
Profiles
Forums
Media Demo
Everything posted by Lightpainter
-
Lukgraph Hawker Nimrod MK.I 1/32 resin kit
Lightpainter replied to Lightpainter's topic in Work in Progress - Aircraft
Yes it was and I can still correct the left side too. The part with the metal panels on that side. Who would have thought the interior colours were so different left and right... -
Lukgraph Hawker Nimrod MK.I 1/32 resin kit
Lightpainter replied to Lightpainter's topic in Work in Progress - Aircraft
Hi, I have been working a bit more on the Lukgraph Hawker Nimrod MK.I. The sides of the cockpit were treated now. And I had to restart the right side... I noticed that I made a mistake in painting the right side of the cockpit in wood/red. My own walkaround photographs of the cockpit had misled me because the metal panel on the right side was taken off for servicing. The Nimrod has wood on the left side and on the floor with green metal strips. The part to the front of the green strips on the left side wil have to repainted too where the metal plate starts as I found out on a new photograph I found. The right side needs to be grey since there is a metal panel on that side as I noticed on a couple of photographs I found in my collection and online. Here are some test results of a test fit. Still a lot to do in the cockpit But I wanted to see how it would look.- 43 replies
-
- 12
-

-
HI this is a fantastic build and completely out of my league. But I have a question, I am building the Lukgraph Hawker Nimrod MK.1 in 1/32 scale. Today I noticed that I made a mistake in painting the right side of the cockpit in wood/red as you did. My own walkaround photographs of the cockpit had misled me because the metal pannel on the right side was taken off. The Nimrod has wood on the left side and on the floor with green metal strips. The right side however was grey since there is a metal pannel on that side as I noticed from a couple of photographs I found online.. while the Nimrod is not the same as the Fury there are resemblances. In my research I came upon several cockpit shots of the fury that show the lower right side as metal too because there is a metal pannel to the side of the pilots seat, so not red and not the same structure as the left side but perhaps the restoration is different from the original? Here is an example :
-
Lukgraph Hawker Nimrod MK.I 1/32 resin kit
Lightpainter replied to Lightpainter's topic in Work in Progress - Aircraft
Hi Chris, It is very nice! But as with every resin kit it needs a bit more work than an equivalent plastic kit. But that means its double the fun 😅 There actually will not be a lot to see in the cockpit when its closed but I could not help myself 🙂 -
Lukgraph Hawker Nimrod MK.I 1/32 resin kit
Lightpainter replied to Lightpainter's topic in Work in Progress - Aircraft
Indeed, I saw it the moment I posted. Should be ok now! -
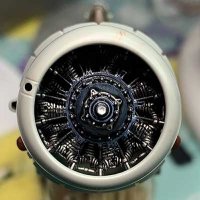
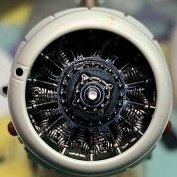
Hi, I started working on the Lukgraph Hawker Nimrod MK I and this is actually my first 1/32 kit in decades and then a resin biplane as well. I actually started building 1/48 aircraft and now 1/32 because 1/72 was getting to small for my eyes… and then I found myself making tiny little bolts out of 0,5 mm alu tube with a length of the bolt of 0,3mm for the gun attachment.… and I lost a lot since I could not see them and lost them. For those interested, there are some shots of what I did in the cockpit till now, as I originally did not plan to do a WIP I did not document each phase. Still I made a couple of shots now and then to show a friend and he asked if I would consider showing them here so here they are. There is some PE in the kit but I decided I wanted a busier office so a lot of scratch building was necessary. Actually, the only PE I used here is the instrument panel but I made the bezels out of Brass tube because photographs show them with bezels and the PE is a bit flat. Since I provided photographs to aid in the development of the kit I have good documentation to refer to. So as usual I started with the cockpit and had to replace 3 parts s of the 3D printed cage that were not fully printed. Oh well, almost everything was either changed a bit or scratch build with different success. Still a lot to do, ammo chutes perhaps and some piece of the fuel tank behind the instrument panel... Just a note, the 3D printed parts show the ridges only when you put primer on them. That stuff is so hard that it is difficult to correct by sanding. The panel behind the pilot seat showed the ridges very clearly. Sanding sticks did not work as well as I hoped. When I put primer on it there were still ridges visible after an extended sanding session. In the end I used my Proxxon tool with a small grinder tool and I finally got a nice smooth surface after passing a last time with a sanding stick. You can still see the 3D effect in the surface of the seat. I did thin the edges of the seat with the grinder in the Proxxon tool. In general the 3D parts are a little rougher than what we are used to with resin but they offer the possibility to ad details in a kit we otherwise might not get. If you look at the 3D printed cage you can see ridges too but it will sit very low in the fuselage zo I doubt it will be visible. The instruments on the outside of the cage are les detailed since you cannot see them because they press against the sides. I will add the Sutton A harness of RB productions later. Not perfect but I hope you like it… in reality it looks better than on the photographs. Parts for the gun mountings
- 43 replies
-
- 15
-
-
Really well done! I have many WNW kits but have not started on one yet. Even have two of this AEG G.IV in the late version. How long did it take you to build it?
-
I build the MikroMir AMP Piaggio-Pegna PC.7 in 1/48 scale so I can understand your problems. There were differences between the parts, the plan and the box art so probably they are al made by different people who never talk to each other 😉 It always can be done... sometimes 😉
- 106 replies
-
- 3
-

-
- Micro-mir
- Schneider Trophy
- (and 1 more)
-
Revell 1:72 Consolidated PB4Y-1 Liberator
Lightpainter replied to Navy Bird's topic in Ready for Inspection - Aircraft
Fantastic -
That looks stunning as always!
-
It is brilliant and I should know since I helped out with walkaround photographs and advice. Lukasz is a very talented man and he put a lot of effort in this kit!
-
Deperdussin Monocoque 1912, AJP Maquettes, 1/48
Lightpainter replied to Bughunter's topic in Ready for Inspection - Aircraft
Beautifull work! -
Thank you, that is very of you to say that!
-
Thank you ,I hope to do some more ambitious resin kits in the future 😃
-
Thank you very much 😁
-
Thanks
-
I almost thought the first picture was of the real aircraft. That is a true testimony to your modelling skills!
-
Thanks a lot 😃 Thank you for your kind words 😃
-
That you Moa I like those racers a lot! I have more resin racers in my stash that I will build in the future. Thank you for your kind words! 😃
-
Thank you 🙂 It is the second resin kit I started but I botched the paint job on the other model twice... Alclad Aquaglos attacked the paint in one spot only on that model and the paint was Tamiya acryl so I never understood why that was... after decapitating the paint I broke some parts so it is in a box till I feel like tackling it again. Thank You 🙂
-
Thanks a lot 🙂
-
Thank you! Indeed it is an unusual machine but that is always what attracts me with a model!
-
Thank you for your kind words!😃
-
Thank you 🙂
