

Beazer
-
Posts
770 -
Joined
-
Last visited
Content Type
Events
Profiles
Forums
Media Demo
Everything posted by Beazer
-

Canadian DH82C conversion of the Airfix 1/48 Tiger Moth
Beazer replied to Tail-Dragon's topic in Aircraft WWII
FYI apparently ICM is in the final stages of a DH82c in 1/48 scale. I have the same airfix kit and was also curious how to modify it until that little tidbit of info crept up on me today. -
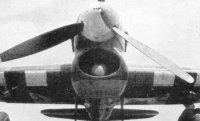
Chockers P-39d 82 Squadron RAAF
Beazer replied to Beazer's topic in Australian and New Zealand Group Build
Shes very close but not close enough. that wheel chock idea is a dandy! Ill find a way to put those on all my bat bottomed girls. -
Chockers P-39d 82 Squadron RAAF
Beazer replied to Beazer's topic in Australian and New Zealand Group Build
Decals then stencils. I'm going to have to redo the pitot, its too short but other than that the end is in sight. Stupid tail sitter. -
Had a bit of orangepeel happening with the gloss coat so there's a couple areas im worried about. Its strange as I had next to no issues with the others I did. Not keen on using that Vallejo stuff straight out the bottle again. Anyways, decaling has begun and next will be the stencils. I like the looks of them but not how time consuming they are. I always wondered if these type of lend lease a/c had them just painted over or if they reapplied them for safety measures and the ground crew.
-
Kingfisher Over Troubled Waters
Beazer replied to Beazer's topic in Australian and New Zealand Group Build
The decals are being applied. I also airbrushed the underside in the affected areas and hand painted the blue on the roundel before glossing. Looks much better. -
Emergency! GB - push the emergency button and vote!
Beazer replied to zebra's topic in 2022 Bunfight Archives
Id be interested, could do a RCAF SAR Piasecki -
I realized today when I closed up the fuselage I installed the gun cowls improperly. Luckily I was able to pop them out with minimal fuss and install them correctly. I also took the time to pop out the exhausts and guns because apparently I can leave off the oil rad and access all that good stuff after paint. Gonna have to fix up the seams shortly .
-
RFI: Tamiya P-38G 1/48 Best Kit in World
Beazer replied to Tokyo Raider's topic in Ready for Inspection - Aircraft
I just cant wait until they release the J Version, need the Droop Snoot! -
Canadian Armored MG Carrier CSM 1/35
Beazer replied to Milan Mynar's topic in Work in Progress - Armour
I wish I could find this kit on old ebay. -
Kingfisher Over Troubled Waters
Beazer replied to Beazer's topic in Australian and New Zealand Group Build
Well, she's back together again. Plenty of touch ups to do but I got the rest of the PE on and primed. I'm debating whether adding the two bomb racks but thankfully all the damage was reserved to the bottom although I hear something rattling inside the cockpit and I'm hoping its not the .30 cal. -
Kingfisher Over Troubled Waters
Beazer replied to Beazer's topic in Australian and New Zealand Group Build
I thought so, until I dropped it for the second damn time! I had two more pieces of rigging and then it was good to go...now I must start again and salvage to see what if any can be done. -
They technically weren't F-5's. They were P-38E's which were converted by the RAAF to approximately F-4A Standard. I primarily use Vallejo paints but I used the N41 Dk Olive Drab and the USAF Green for the colours with Sky Blue underneath. I used USAF Olive Drab and Neutral Grey for the replacement flap. The FS colours are Sky Blue FS 25550, Foliage Green FS 34092, and Olive Drab FS 34088. They replaced the leading edge which was replaced from USAAF stock and furnished in Olive Drab and Neutral Grey.
-
Kingfisher Over Troubled Waters
Beazer replied to Beazer's topic in Australian and New Zealand Group Build
I decided to forego installing the PE stirrups as I did not want to fill the giant holes Revell had in the fuselage. The main float has been a bugger for quite some time but I finally have it superglued to the fuselage however its not perfect. The red stripe I painted made me realize I should have installed the fuselage an additional 1/4' forward but it was too late. Its supposed to warn users of the propellers direction of movement thus being directly underneath the blades. I will live with it and just use some creative photography to pretend I did it correctly. Next I will be applying the underside decals and mounting the side floats, then on to rigging! -
Paint on and touched up. I really wish there was just a paint mask for this kind of stuff. Cant wait to weather this bad boy up.
-
Some intense masking session. The scalloped paint is a pain.
-
Ive got the Bronco so I'm still game for the 15
-
Big Update: Its finally been painted its initial coat of N41 OD. I sprayed the replaced Panels USAF OD and Neutral Gray as well as painted the Drop tanks USAF OD. I figured the drop tanks wouldnt have been repainted. I noticed in some photos that they had a straight demarcation line and I'm thinking if the Aussies had redone them that they would have did them in a similar fashion as the fuselage. Also my original plan was to foil over the gun ports but then again I noticed in some reference photos that the outline wasn't even visible. Therefore I've just been puttying them up closed and will make them smooth. I'm Using USAF Green for the forest green and experimenting with Tyre Black for the rubber. This looks a little too green to me but I'll see how the finished result is. I've been working on the superchargers and need to get them to look a bit more flat as the metallic is still showing.
-
I’ve built two of these so far with this kit (Emperor with the stripes and a USN Nf version) with a 3rd on the way(kiwi black). I replaced the wheels and prop. One spot I had some trouble was the cowling so just make sure you pay attention to that area. Also the “Blue” colour you have to pay attention to as it was really dark but faded quickly in the pacific and you can even get into the debate into the post war blue vs ‘45 blues.
-
Chockers P-39d 82 Squadron RAAF
Beazer replied to Beazer's topic in Australian and New Zealand Group Build
Shes all together now and I’ve started on some weathering. I replaced the pitot tube to the correct version, I raided my p-40 kit for it. -
Kingfisher Over Troubled Waters
Beazer replied to Beazer's topic in Australian and New Zealand Group Build
Anti slip paste applied and going to paint the forward red stripe on the float. Close to attaching the floats and little pieces prior to weathering! -
Ready to move along. The dust looks good considering it would get everywhere.
-
Interior finished. Lots of hassle getting the control panel to fit but I did it finally. Next is to close up the fuselage but I need to get that seat right.
-
I think that’s a great idea, and we can all experiment as well and watch processes. Im in.
-
Kingfisher Over Troubled Waters
Beazer replied to Beazer's topic in Australian and New Zealand Group Build
So, had a couple big spots where the paint lifted. N o clue why it just happened now but I used MIG primer which is supposedly one of the good ones. I'll end up touching up the lower Sky Blue anyways and need to finish the booms and finer details before I do that. -
Chockers P-39d 82 Squadron RAAF
Beazer replied to Beazer's topic in Australian and New Zealand Group Build
Colour looks good and that anti slip paste looks amazing. Definitely going to add that to all my builds going forward.

