

Brigbeale
-
Posts
1,494 -
Joined
-
Last visited
-
Days Won
2
Content Type
Events
Profiles
Forums
Media Demo
Everything posted by Brigbeale
-

A Restoration of an Airfix 1/72 Gloster Meteor III
Brigbeale replied to Brigbeale's topic in Work in Progress - Aircraft
The Meteor after more sanding to clean up the joints. The sprue goo at the wing roots isn’t fully cured yet, so,I’ll have to wait to sand them back. The underside is slowly improving in looks. -
A Restoration of an Airfix 1/72 Gloster Meteor III
Brigbeale replied to Brigbeale's topic in Work in Progress - Aircraft
Right then…I had a couple of spare hours so I returned to the bench (I’ve got my glass topped computer desk back) I went for it and sanded the rivets off both sides of the fuselage. It makes the Meteor look more streamlined IMO. The mess on the starboard side cleaned up well with 240 grit and then 400 grit papers to make it smooth. The panel in raised detail was rescribed with a pin in my pin vice (thanks Chris for the tip) and then followed up with my Tamiya Scriber II tool (which has an Olfa blade in it). More sprue goo was added to the major joints to glue and fill at the same time, and Mr Surfacer 1000 was painted along the fuselage seam and in a couple of other areas where I felt it was required. -
A Restoration of an Airfix 1/72 Gloster Meteor III
Brigbeale replied to Brigbeale's topic in Work in Progress - Aircraft
I think I’ve decided on the colour scheme for the Meteor. It will go nicely with my collection of Navy Aircraft. -
A Restoration of an Airfix 1/72 Gloster Meteor III
Brigbeale replied to Brigbeale's topic in Work in Progress - Aircraft
I looked at it again this morning now the XF-83 had fully dried and I’m still not happy with the result. So I’ve decided that the rivets in that area have to go or at least be sanded down. I might have a go at adding recessed panel lines to simulate a removable panel if it still doesn’t look right. -
A Restoration of an Airfix 1/72 Gloster Meteor III
Brigbeale replied to Brigbeale's topic in Work in Progress - Aircraft
First thing on the to do list today (this afternoon) was to re-join the two wing halves, which I did with sprue-goo. A part of the fuselage has been bugging me - the starboard side behind the cockpit where a lot of unwanted poly glue is present. This is what it should look like And this is the mess I have scraped and sanded it trying to keep the rivet detail. This evening, I painted it with Tamiya XF83 Medium Sea Grey to see what the result was. Not perfect but it is better than it was. The other option was to sand off all of the rivets, but I don’t want to do that. The dried sprue-goo on the wings was sanded back and more added to low spots. I also refitted the wing assembly to the fuselage -
A Restoration of an Airfix 1/72 Gloster Meteor III
Brigbeale replied to Brigbeale's topic in Work in Progress - Aircraft
There are a number of sink marks, on the wings mainly, where too much poly cement was used when ithe Meteor was assembled. I was watching Nigel’s Modelling Workbench on YouTube, this morning where he is building a new release Airfix Vulcan, which comes complete with its own sink-marks. He uses Mr Surfacer 1000 to fill sink marks because, as he says, filler can shrink back over time and create a visible line, especially on seams. So, I went and bought a pot, and tried it out While I was waiting for that to set enough to be sanded back, I decided to work on adding nose weight. The nose gear bay was hardly distinguishable at the front due to the amount of poly cement in there, so I drilled 1.5mm holes around the wheel bay, then snipped between the holes and filed it back to make a better hole. This was to allow me to add nose-weight as far up front as possible. I used what I call string curtain weights packed in with white tac. I couldn’t absolutely load the nose full of weight as I need to make a recessed wheel bay deeper than the original offering. The pilot was persuaded to leave his seat for a while and more weight was added either side of the seat. To work out if there was enough weight, I placed the wings back on and noted the position laterally of the main gear locating point. This was marked on the fuselage and then placed on the side of a 3D printed scalpel handle (which was useless up til now as I don’t have the blades for it). The Meteor was still tail heavy, so a piece of styrene card was added behind the pilot’s seat and more of the same weights were added to the rear of the seat mounting bulkhead. This made the difference on just the marked location, but remembering the main gear wheels are further back than the oleo’s means the Meteor should firmly sit on all three wheels. -
Yes, I am very pleased with it. The Olive Drab and the weathered look on the wings and fuselage turned out a lot better than I was hoping for. The crooked looking canopy looks straight when I look at it in the flesh, so it must be a quirk of the photo - or I need to go to Specsavers!
-
A Restoration of an Airfix 1/72 Gloster Meteor III
Brigbeale replied to Brigbeale's topic in Work in Progress - Aircraft
I have a new tool to help me with the restoration of the Meteor. Some of the raised panel lines on the wings have been obliterated either by the previously applied glue or by the cleaning up of said glue. I purchased it about a few months ago to rescribe panel lines such as these. I tried it out first on and old wing and after a couple of attempts, I felt I had the hang of it. So, tonight, I carefully, as best I could, start rescribing the raised and missing panel lines on the wings using a flexible straight edge. The first one was a bit iffy as I prescribed it first with the back of a craft knife blade, but I don’t know if it was me or what, but the Tamiya Scriber didn’t seem to follow the faintly scribed line. The next line I lined the straight edge against the raised panel line and just used the Tamiya Scriber along the raised panel lines. That worked very well, so I used the same method on the remaining raised lines on the wings and horizontal stabilisers. -
A Restoration of an Airfix 1/72 Gloster Meteor III
Brigbeale replied to Brigbeale's topic in Work in Progress - Aircraft
I’ve not given up on the Meteor restoration- I’ve just been scraping off the excess glue over the fuselage and wings - boy, that stuff is tough. I don’t want to use TET to soften it as it may affect the plastic underneath. So it’s a long job of scraping and carefully sanding back the glue. The air brakes have been bothering me as it appears the recesses were half filled with glue and the brake panels themselves were squished into them. The slots can be made out, but they’re too small to clear out. The only options left open to me were to 1) either leave them in, sand them back level and make decals to simulate the brakes (but where’s the fun in that??) or 2) remove the brakes and replace them with 3D printed items. Guess which option I chose! Yep, you guessed correctly, replacements are needed. At least I should be able to make them a bit thinner than the originals. I scraped the outside edges with the back of a craft blade and slowly sliced small bits out until I got to the bottom of the recess. One was done last night and one tonight. It’s one of those jobs I think Is best spread out rather than getting frustrated doing them all in one hit. I also removed the remaining landing gear cover. That was never going to fall off! - not with the amount of glue between it and the engine nacelle! It took me about half an hour just to get that off. The last thing I did tonight was take a zoomed in photo of the remnants of one landing gear and print it off. I can then measure the actual part and scribble the measurements on the photo for designing and 3D printing. -
A Restoration of an Airfix Gloster Meteor III
Brigbeale replied to Brigbeale's topic in Work in Progress - Aircraft
I don’t know how but it seems there’s two threads on this Meteor restoration. I’m pretty sure I’ve only written one! The other thread with more photos is here -
A Restoration of an Airfix 1/72 Gloster Meteor III
Brigbeale replied to Brigbeale's topic in Work in Progress - Aircraft
I’m thinking wheels down for this one as well, which means some way of getting the weight in the nose either by drilling a hole or taking the fuselage apart. -
A Restoration of an Airfix 1/72 Gloster Meteor III
Brigbeale replied to Brigbeale's topic in Work in Progress - Aircraft
Well I thought this was going to be an easy one. The paint removal via the Dettol bath worked to reveal ……….. A thick coat of paint can hide a multitude of sins. Working out the nose weight needed with a brush roughly where the main wheels would be And finally, the fuselage sat in a printed off plan from Wikipedia albeit an F4 -
A Restored Early Airfix B-25 Mitchell
Brigbeale replied to Brigbeale's topic in Ready for Inspection - Aircraft
Thank you Chris, Steve, Bertie and Hans for your appreciation and comments on this restoration. I’m feeling pretty much as normal as I was before that painful episode kicked off. -
A Restoration of an Airfix 1/72 Gloster Meteor III
Brigbeale replied to Brigbeale's topic in Work in Progress - Aircraft
Some of the photos in the previous post were retaken after work had commenced as somehow they disappeared from Imgur. I found a copy of the original assembly instructions online (Scalemates) and printed them off as this shows me roughly where the parts joint together. I used the back a curved craft knife blade to repeatedly scribe along the joint until it had cut through. Carefully working along each panel joint, the two wings came free. Due to the thickness of the paint, I decided it would be best to remove the paint in the Dettol first to see what condition the plastic is underneath and make a decision from there as to whether it requires further disassembly. It’s odd that the two Airfix kits for restoration one after the other have broken plastics (I do freely admit the B-25 was my fault though). The progress with the wings and canopy off. I managed to get the canopy off in one piece but it may need replacing as it’s got a big blob of excess glue on the inside of it. I will have a go at saving it though. -
Sat in the cabinet was one of my first purchases of to-be-restored aircraft. If I remember correctly, I purchased it with a Vampire (which is almost so bad, I might not bother with it) and the now restored Sea Vixen Each time I selected a model for building or restoring, I kept eying up the Meteor. Its been given a liberal coat of gloss green and grey with what looks like household gloss underneath. but that white gloss coat was hiding a dirty little secret….. The landing gear was just painted gloss black, with the starboard main gear missing and the nose gear weak at its pivot point. Only the port gear is in a reusable condition - maybe, as it’s well glued on but at the wrong angle. All the landing gear doors are there. The decals have had it, but that’s irrelevant as the model’s going into the Dettol to remove the paint anyway. That dirty little secret mentioned earlier is a crack in the lower wing panel (which does both main wings) from the starboard front wing to the wheel opening on the port side. I scraped the paint off to get a better look at the offending crack/break.
-
Sat in the cabinet is one of my first purchases of to-be-restored aircraft. If I remember correctly, I purchased it with a Vampire (which is almost so bad, I might not bother with it) and the now restored Vixen Each time I selected a model, I kept eying up the Meteor. Its been given a liberal coat of gloss green and grey with what looks like household gloss underneath. but that white gloss coat was hiding a dirty little secret….. The landing gear was just painted gloss black, with the starboard main gear missing and the nose gear weak at its pivot point. Only the port gear is in a reusable condition - maybe, as it’s well glued on but at the wrong angle. All the landing gear doors are there. The decals have had it, but that’s irrelevant as the model’s going into the Dettol to remove it. That dirty little secret mentioned earlier is a crack in the lower wing panel (which does both main wings0 from the starboard front wing to the wheel opening on the port side. I scraped the paint off to get a better look at the offending crack/break.
-
I’ve just posted the RFI here.
-
I purchased this model from my usual seller on EBay for about £4 as I remember. It was pretty much intact with a few bits broken off/missing, but on the whole pretty much intact. The fact both propellers were present, albeit with one broken off, swung the decision to buy for me. This is how I bought it. During the dripping/deconstruction process a couple of parts broke - namely the port fuselage half and the port upper wing half. They repaired reasonably well and are only really noticeable to me as I know they’re there (and you now). This is the WIP which was interrupted by more trips to the hospital for complications following my gall bladder removal operation. I finished the restoration last night and I’m happy with the result.
- 9 replies
-
- 35
-

-

-
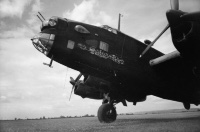
Well, that’s it for the B-25 - I’m calling it completed. Tonight, I made the Perspex tail cone out of the aforementioned Mosquito Mk IV nose cone. It fitted better than I thought. The smaller landing gear doors were added in the open position as the landing gear is down (obviously). Also the two aerial masts were added - made from thinned down 1mm styrene rod, and the astrodome was added - which was made from the head of a clear plastic drawing pin sanded to a shiny finish. Here’s some photos taken outside in the sun this afternoon. And a photo with the finishing touches added Now what to do next???
-
This afternoon, the job I had planned in the garden was put off by rain. That meant I had nothing to do, so I decided to put the decals on. The Techmod decals are very good and went on with no problems whatsoever. Once dry, I gave the model a coat of Matt Varnish, although it will need a second coat. This evening, I 3D printed the adapters for the axles and the main-wheels. The nose wheel was simply drilled through to match the diameter of the axle and The strut needed filing to allow the wheel to slide on. The propellers were fitted to the engines and spin freely. then the engines were finally fitted to the nacelles. I pinched the DF Loop from my Sunderland, filed the base flat and drilled a 1mm hole for styrene rod. A hole was drilled in the top of the fuselage and the DF Loop was fitted in position. The top turret is just placed in. The cockpit and nose canopies were unmasked as well.
- 111 replies
-
- 11
-
-
Well I decided to go for it!! I practiced on the scrap Grumman Duck? It turned out well but it’s a different plastic to the B-25….. I started by marking the size with strips of masking tape No turning back now…. That went well so I did the other side the same way. I filled the windows with Elmer clear glue using a cocktail stick. Hopefully, they’ll be dry so I can start decalling tonight.
-
I did consider that by masking it off and airbrushing gloss black, but would it look like a window??? I’ll try it out on the Duck first
-
There’s not a great deal to report tonight and nothing worth taking photos of. I masked the leading edge icing boots on both wings and all stabilisers and hand painted them on. A couple of touch ins are needed but on the whole they look fine. I also painted the wheel centres Aluminium. They have a bigger hole in the centre than the diameter of the axle in the landing gear, so I’ll 3D print an adapter to suit both. I’m in two minds as to whether I will open up the windows in the rear fuselage in front of the horizontal stabilisers. It seems simple enough but the plastic is quite tough and brittle and I don’t want to ruin the good work done so far. That’s about it for tonight. I did say there wasn’t much to report……
-
Tonight, I looked at a photo (IWM Photo, CL107) of FW130 taken from another B-25 while on a bombing run. I noticed that the most forward white band in the fuselage invasion stripes have a gap which is an Olive Drab section with the squadron code in it. However another B-25 in the same photo has the squadron code painted over the forward white stripe. I remember reading that the stripes weren’t supposed to be painted over the aircraft identification codes so maybe they were repainted back on top of the stripe?? Anyway, I remedied the forward stripe by measuring the height of the decal which goes there and adding 1mm top and bottom. I then cut some tape to suit and applied it over the stripes. Olive drab was then painted over the exposed section of the white stripe and the tape removed, achieving the desired effect. Once that had dried for about 1/2 hour, I applied a coat of Humbrol Gloss Cote ready for the application of the decals. While that was put aside to dry, I started painting the replacement wheels. The tyres were painted the usual Revell Anthracite and left to dry. Unfortunately, the Gloss Cote highlights the repaired crack in the top of the port wing. Hopefully, once the Matt varnish is applied, it’ll hide it better.😕
-
Just a simple one for tonight’s thrilling instalment😆 The white areas were masked off the same way as before fir the addition of the black stripes. They were painted with Tamiya XF-1 Flat Black gradually to show a bit of weathering although not a lot shows in the photos.