


Jered
-
Posts
104 -
Joined
-
Last visited
Content Type
Events
Profiles
Forums
Media Demo
Posts posted by Jered
-
-
A belated Christmas present from wifey (as the original one got lost in the post!)

She knows me very well in that I love complex decals!
-
 7
7
-
-
Merry Christmas all!
I think I've cracked it! I ended up doing a third version of the bottle rack - basically making the bottles separately to the rack in order to paint everything more effectively.
I airbrushed all of it with some dull aluminium and then hand painted the gray and blue. It does sometimes feel like having endless possibilities - part of me wants to 3d print sundries like gloves boxes etc to put on the main cabinet.
Next up on the to do list is the syringe drivers (perfusors)
Enjoy!
Jered
-
7
-
-
Mum got me this for Christmas:
Really fun looking model. Very nicely moulded
-
8
-
-
Evening folks!
After some remodeling, here's the result. Left one was my original, right is my updated version. Spot the difference - do it now before it's hidden away forever inside the bowels of the heli never to seen again... But we know it's there!
I changed the print resolution down from 0.06 layers to 0.03 and I also changed the orientation of the part which has resulted in less distortion (see below)
Hard to see, but the back of the carcasse isn't flat. I think I'm starting to get the hang of proper part orientation to reduce distortion
Below is another batch of Bucher AC70 interior parts
The thing I'm loving about rapid prototyping is how fast new iterations are to do. Here's the non-operator side of the bottle rack
Old one on the left, new on the right. I found a better reference picture of this so I couldn't resist enhancing it. There were a couple of mistakes I noticed after printing so I'll go again with it. I think also making the bottles removable is better as it will make it much easier to paint it.
Hopefully I'll get around to slapping some paint on it this weekend
Cheers!
Jered.
-
6
-
-
22 hours ago, AlxBNE said:
I am in awe of this build.
Absolutely amazing.
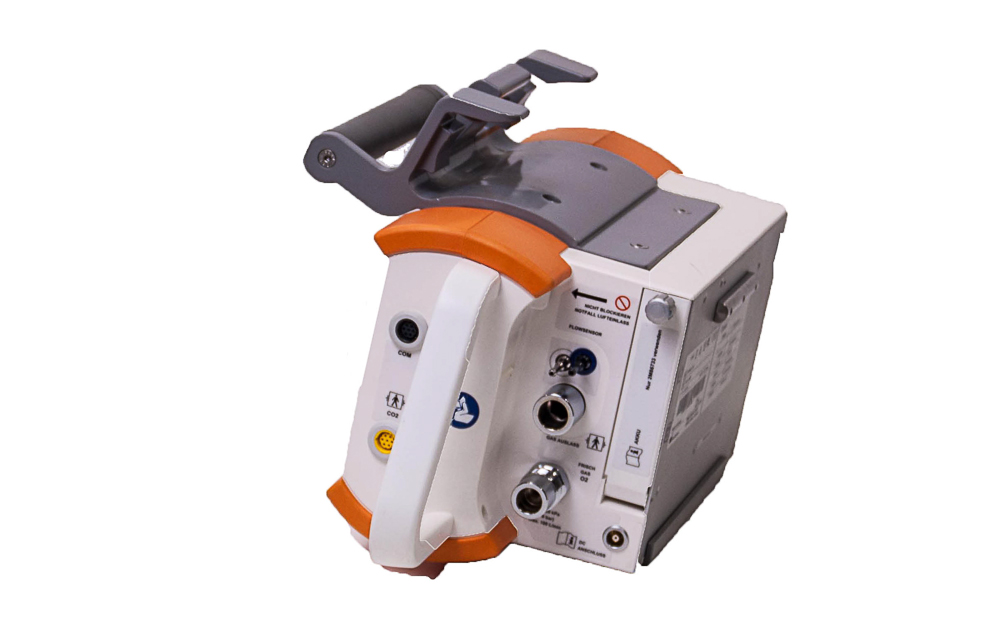
It is sooo detailed and life like I can tell you that the box question is the ventilator (not an ECG) I can even tell you that it looks like a Drager Oxylog to me. That is based on the amazing detail of your model, not any actual knowledge of what the Wales air ambulance uses!
(We use the Hamilton T1 down here in Australia.)
Have loved this thread from the start, continuing to watch in admiration.
Ah that's great info! And thanks so much for the kind words. I'm definitely going to update the the 3D model as I didn't have the input/outputs on the RHS of the unit like the below photograph:
Obviously it's a tiny detail, but it's taken an effort to draw so I may as well make it better.
Does anyone have any suggestions for crew figures? Drawing people is a little beyond what I'm able to draw on the computer
-
1
-
-
Been super busy recently, but here's a mini update:
I finally finished modelling another interior part on the computer. ECG monitor (?) I think. This hangs from the cabin ceiling on linear rails so that it can be moved around for ergonomic use. Not painted terribly well, I might re print it at a much finer resolution.
And here's it with one of the seats:
It still needs the restraints and buckles made for it. The back is really plain but I'll PVA some tissue onto the back to make it look like the cover.
Hopefully I'll have some time over Christmas to really get into it again.
All the best,
Jered
On 21/06/2023 at 23:16, Clio182 said:I would not believe such things were possible had I not just spent two hours browsing this thread. You sir, are quite brilliant! This is obviously a labour of love and the finished article, I dare say, will surely be one of the very best scale models man has ever made.
Please have it done before the type retires 🤣 And please make a video when it is presented to the chaps that fly and work with the real deal.
Too kind! I find this forum to be very inspiring
-
6
-
-
Scampi having a nap
-
16
-
-
Wow, thank you all so much for the kind words, wishes and advice!
I'm glad that the box didn't make Mrs Jered cry during the ceremony as it would have ruined her makeup but she adores it! I'll have to reconfigure the tray to a more practical jewellery box.
The day was perfect and I wouldn't change a thing (especially hiring a London Routemaster bus to get the guests from the ceremony to the reception via a scenic route through Oxford!)
We also had one of the bands my dad was in play which was amazing. Dad is sadly no longer with us since 2018 but it was really cathartic his former band mates were there to celebrate with us.
-
7
-
-
I'm getting married this Thursday and I'm so excited!
As I've always thought this forum a wealth of information, any tips and tricks are greatly welcomed.
I made this ring box for our rings:
It's a star atlas of the evening sky on the night from Oxford where we're getting wed.
The materials are sycamore, ebony, fine silver, mother of pearl, hog suede, cedar and brass.
The music box mechanism is my arrangement of Constant Headache by Joyce Manor which is our song (which was made by N J Dean and Co)
The tray is removable and is currently laid out to hold rings but these can be removed for photos from the day. Or reconfigured for my wife to be's jewellery.
Anyway, I can't wait. A ton of flower arranging tomorrow and then we get to celebrate with all our loved ones the day after.
All the best,
Jered
-
10
-
-
I did 52.5 hours of overtime this month so I felt deserving of a wishlist item!
I also got the Eduard photoetch set to go with.
I must cut down on working too much and do more modelling!
-
13
-
-
Some time later...
Looks like a successful print.
Not too bad. The scaling for the printer id off by a tiny fraction so I think I'll do a calibration board and scale stuff more accurately for next time. It's all within 0.1mm so I'm quite happy to be fair.
The mortise and tenon joints were too tight was the only thing but this can be sanded down a little. The shoulders weren't perfectly straight either so I'll leave a little bit on next time and cut it flush after.
The pattern came out sweet as a nut. I don't know whether to offset the pattern where there's the join in the panel 🤔
The eagle eyed will notice that I've changed resin type. I'm on the Phrozen aqua 8K - tougher and less prone to warpage. Which is a necessity for lots of parts fitting together.
Not much of an update because I'm flat out with work at the moment and also got my wedding coming up in a couple of weeks!
I'll take a picture of a car on them for scale later
")
Cheers!
-
5
-
-
On 11/09/2023 at 21:54, dnl42 said:
This is different, and quite intriguing.

With at least some of the actual lift mechanism apparently present, will this be (quasi-)functional?
I don't want to set myself up for too much frustration, but yes. It won't be actuated but will hopefully be positionable if not, just super detailed (and very fragile 🤣)
Interestingly simple mechanism - the hydraulic ram shortens or lengthens the distance between the pulleys, drawing the ramps up or letting them fall. There's also a failsafe in the mechanism in that if the cable breaks then pins deploy I to the notched bar in the pillars.
One can get very small springs which would be the right size for this but I think I'll just make that part for show (with dental mirrors) I know it's a bit like putting pistons in a 1/24 engine but hey, it's fun!
-
1
-
 1
1
-
-
12 hours ago, rockpopandchips said:
I have read a few Reynolds books but not that one, any good? I'm due a good sci-fi opera after all the fantasy stuff I have been through. Just finished the Twinborn Chronicles by Morin ( not great) and the 5th book in the Malazan epic, these really test the reader.
Oh definitely, shiny chrome ones.....
It's a fun read for sure. It's no master piece compared to some of his other books but still a great book and explores some interesting themes. If you haven't already, then the Wool trilogy by Hugh Howey is blooming marvellous
-
1
-
-
Looks really cool. It reminds me of how I imagined the "Bones" in Alastair Reynolds novel Revenger.
-
1
-
-
Hello all,
I'm taking a little break from my other builds to start another.
I'm mostly using it as a tooth sharpening exercise in 3D printing and learning how to print photoetch.
I thought a 4 post lift would be quite a good one to do as I can use it to display cars in a fun way.
I started out scouring the web for a 3D model of a 4 post lift to save some time which I found here:
https://grabcad.com/library/4-post-lift-1
The model is fantastic, if a little different from it's renders.
But as I say, it's a super piece of CAD work.
I had originally thought to change it somewhat and block parts of in order 3D print the lot, since the wall thickness would only be 0.17mm at scale
But then I figured that it'd be more fun to try to engineer it from 3D printed bits as well as photoetch.
The first thing to change on the model, apart from scaling it, was to make a barley pattern on the ramps which I did by making one barley, laying out a single row of the pattern and then using the Flow command in Rhino to effectively distort and wrap the pattern around the component.
Here are the 3D printed parts laid out, I drew custom supports for the micro parts and then used Chitubox to generate supports for the larger parts.
I was going to try to print the ramps in one go, but I think on balance it's be better to chop them in half and print it that way as it'd be much faster.
Here are some bits I printed already
I'll be using rod and pipe quite a lot in this as it's strong and convenient.
Above will be a test in PE for one of the upright posts. I'm basically trying to work out how wide the score lines need to be and how much to scale the part in order to get the accurate size and it'll need to interface with other components. I'm going to do everything in brass for the PE as it's easy to solder together.
I'll try to up my photo game a bit as I'm aware they're pants!
Anyway, thanks for looking. If it comes out nice I'll make the files available for remote printing or something. My next step is to get my hands on some etching chemicals!
Cheers,
J
-
8
-
1
-
-
Work have been very kind to me today, they bought me a wash/curing station for my 3d printer along with some resin and FEP screens in exchange for me using my printer for work purposes! Great!
-
3
-
-
Reading the sci-fi classic 1984 by George Orwell. Better late than never but it's double plus good!
-
2
-
-
Spotted in what looked like and abandoned garage in Bonnieux near Apt in France while I was cycle touring last week. It looks like a Jägermiester Porsche 934 replica or de liveried race car. Hard to see from the pic but it had a proper roll cage and everything. I'd have liked to have found the monsuir/madame who owned the garage to find out more but I was under time pressure to get on with my ride!
-
7
-
-
2 minutes ago, PeteH1969 said:
That looks excellent are you doing a Gurney for the back of the copter?
Pete
Thanks so much! Yes, that's the plan. However I've not yet started drawing it yet. I may leave it until the end as I'll just be able to position it in place with the open doors
-
After multiple attempts and a little redrawing I think I've cracked it! I slowed the printer right down and dialled up the resolution to maximum. It takes 5 hours to print but I'm a patient man.
I managed to get a hold of a Martin baker maintenance document with some dimensions annotated on which meant scaling a few different elements of the computer model. I was quite smug that a lot of it was within an inch which I don't think is bad considering I was reverse engineering from photographs and 2 point perspective drawings.
There were, however, a few details I'd missed which I added. I had drawn the back cover but I wasn't that happy with it, so I've ditched that for now and I'm going to use PVA and tissue paper to get a more individual look for the backs of the chairs. It's very tempting to just draw and print every single detail instead of blending hand skills with computer skills.
This is V2 of the chair.
And this is V5 of the fwd cabinet.
Here's a shot of a few of the bits in situ
A few bits to ameliorate still. Probably a sharpen up of my cutters to stop the parts getting damaged when taking the supports off. I'm also thinking about rotating one of the seats on its base for added realism
Another small update for now as I'm off to Marseille to spend a week cycling in the Alps tomorrow!
Take care,
Jered
-
4
-
-
Looking smart, what's the kit like to build?
-
http://www.kingsburyracing.com/
Based in Bicester, Oxfordshire.
A colleague of mine had a stint in restoring old cars, I asked if he could ring his old workshop to see if they had any drawings. To which he laughed and said they're like rocking horse droppings! Apparently back in the day, Bentley or Rolls-Royce etc. would sub out all the body-work and joinery to coach builders. Might seem obvious to some but not me. I can imagine how plans and drawings would get lost in the mists of time.
Anyway, his old workshop didn't have any but he said that another restoration workshop over in Bicester currently has one which they restored and now race.
Hope that helps and apologies if that's all stuff which has been covered before.
Jered
-
On 08/06/2023 at 10:21, Vince1159 said:
Great buys but sadly ruined buy putting a certain song in the post,now i'm not going to be able to stop humming the darned thing.....
The Richard Thompson version is better IMO
-
3
-
-
Good morning everyone!
Spoiler alert - everything I've printed is unusable, however, I fully expected this and I wanted to see how I can improve my CAD work and understand the printer's nuances.
Though it is rather exciting to see! I was rushing when I did this otherwise I'd have spotted the crazy number of supports on every down facing rivet!
I'm using Elegoo water washable resin - if anyone has any tips on it then I'm all ears.
There are some parts which are simply too small Vs surface area to print well, such as one of the panels on the tall cabinet, but I can redraw this so that it's photoetch brass sheet instead. It's interesting to see how much a difference part orientation makes to the result too. You'll notice on the chair that I made the mistake of having it too low so that the base of it is melded to the supports! It's also the wrong size, but that's fine - getting it printing nicely as a smaller scale is probably more challenging. That being said, I suppose weight then plays a part to its necessary support structure!
I think increasing the size of the rivets and panel gaps isn't a bad idea and having them chamfered or filleted too will probably help.
I'll try to get some more prints done this weekend.
Take care,
Jered
-
5
-


Printer heat sources
in 3D Printing Chat
Posted
Does anyone have any info on heated mats for printers?
This is my current high tech solution that I feel could be refined somewhat:
I like the idea of a complete enclosure with a heat source. What are other people doing?
Cheers,
Jered