

mark.au
-
Posts
2,737 -
Joined
-
Last visited
-
Days Won
11
Content Type
Events
Profiles
Forums
Media Demo
Everything posted by mark.au
-
Great start! I've a soft spot for these and look forward to seeing how you go on it.
-
I live not far from the AWM and have a few photos of it I'd be happy to share (but there's loads available online too - I'm not sure I have anything unique...).
-
I built this kit three or four years ago and remember it as a good one. Looking forward to following along on yours.
-

Bf110G-4 at Farnborough, 1945. ++++FINISHED++++
mark.au replied to mark.au's topic in World War 2 Twins Mega GB
This one is going to be the Eduard 1/48 kit. It looks fabulous in the box but I've read of fit problems, will see how I go on that. -
WW2 Twins Inspiration Gallery
mark.au replied to Enzo the Magnificent's topic in World War 2 Twins Mega GB
I have completed a few of these lately, you may pick up on a theme 🙂 ... Some great work displayed in this thread! Cheers.- 64 replies
-
- 25
-

-
Just going to put this here and walk away quietly until February when I come back to it... Cheers.
-
1/72 Dallachy Beaufighter TF.X - Finished
mark.au replied to bigbadbadge's topic in Work in Progress - Aircraft
It's coming alive now, nice work on the paint so far, as well as those very well done collector rings and exhausts. -
I'm about to try fishing line rigging in place of EZLine for the first time and shall watch with interest. You boat guys know a thing or two about rigging... The paint looks good, I'm not usually a fan a big contrast in metallics but yours looks good as a contrast between metal and silver dope/paint.
- 100 replies
-
- 1
-
-
- The Finest Flying Club in the World
- Interwar Aviation
- (and 1 more)
-
A win/win scenario is always a good one in a marriage! 🙂 I'm starting to like them 🙂 Major assembly is now complete and I began preparation for paint. This included drilling all of the holes for the rigging. Before I leave assembly comments behind, I must say this one went together very well. I messed up the horizontal stabiliser joins by ignoring what the the kit would have me do - total user error - but otherwise there was little sanding and no filler used in the assembly of this one, rare for me. I used a pre-shade. My thinking here is more artistic than replicatory (is that a word?) inasmuch as I want the paint finish to have some form of texture but it's not going to be a traditionally weathered or faded look. On the one hand these aircraft would have been well looked after, but on the other no machine stored outdoors and well used is going to be a perfectly consistent colour across its entire surface. The pre-shade will build some "mechanical" style modulation and the way I planned to apply the paint [hopefully] achieves the rest. This is a more artistic approach than would probably be appropriate but it's how I want this one to look. I applied the white to the wings over two evenings. The application was with pure white thinned a little more than usual and sprayed in a random swirling pattern to build the density slowly. I used the grey of the plastic to provide the depth by varying the coverage. White is never white in real life, and as mentioned, white paint outdoors isn't white for long. More to the point, applying the paint this way achieves the finish I had in mind more easily than post texturing (as I normally would do), not least because of the absolute contrast between the stripes' colours. Lastly, this application style will also allow for a contrast to the white of the USN national markings. This is the result. I am happy with how it turned out in terms of what I was aiming at but it's hella difficult to capture in a photo in order to show you though, you'll have to take my word for it! I sealed up both sides with a light clear coat in preparation for the masking to come. The wings will be easier than the fuselage as the order in which I paint will be more complex due to the side numbers on the yellow. I think I'll paint the white first, then mask and paint the yellow, and then the numbers. I'll mask over that and cover any yellow from masking misalignment and then paint the stripes. The logic is that that order has the lowest risk of building a paint edge while avoiding having to paint yellow over the stripes. I could paint the yellow first and simply mask it and paint the rest over it but I want to modulate the white on the fuselage the same way as I did for the wings and if I paint yellow first I won't be able to do that where the yellow is. Cheers.
-
Game on 🙂
-
FWIW, I painted mine with a grey tail because the photos seemed to me to show something darker than white. Would be interesting to see it with a white tail! Feel free! I'm looking forward to how yours goes. P.S. I didn't think captured markings were part of this GB? If they are, I've got a 110G in the stash that's going to get the captured treatment.
-
1/72 Dallachy Beaufighter TF.X - Finished
mark.au replied to bigbadbadge's topic in Work in Progress - Aircraft
Coming along nicely, Chris. Nice work on the exhausts, and elegant solution. -
Great attention to detail and superb execution of replicating it. I’ll be following along with great interest.
-
Forgot to address this in my other post; Microset/sol don’t work on Tamiya decals. Tamiya decals are actually very good and melt down as thin, if not thinner than just about any others (including aftermarket) if you use HOT water and Mr. Mark Setter decal setting solution.
-
Thank you gents, welcome aboard… I have finished the cockpit and installed it. There was really nothing out of my usual process to report on except I did a little too much assembly before painting. This of course made the detailing a little more tricky but nothing insurmountable. The fuselage assembly was straightforward in preparation for the cockpit. Unusually, the cockpit is placed into the fuselage after it’s joined together. I used a Yahu Models PE set for the instrument panel which was designed for the Roden kit and required a little trimming to fit the ICM kit I’m using. Since this pic I’ve glued the upper fuselage in place (it’s just dry fitted above) and set it aside to cure. Next I’ll add the tail feathers and finish up the front of the fuselage. The lower wing fit is good enough to allow for painting prior to attachment. It’s almost time to throw some paint around. Cheers.
-
Nice, happy to see this. It seems the trick is knowing when/what to enhance and when/what to accept as the nature of the kit. Looks like you’re hitting a nice - enjoyable - balance so far.
- 100 replies
-
- 4
-
-
- The Finest Flying Club in the World
- Interwar Aviation
- (and 1 more)
-
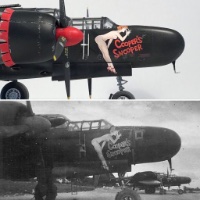
Crikey! Blink and one misses great swaths of progress. Looking very good indeed, Roger. I like the nose art very much, it’s turned out really well and looks the part. Good stuff.
-
Erwin, you’ve completed a wonderful set of models there with great attention to detail and accuracy. It’s been a pleasure following along with them and the excellent descriptions of your builds.
-
Great work, that instrument panel is model building craftsmanship at its finest.
-
1/72 Dallachy Beaufighter TF.X - Finished
mark.au replied to bigbadbadge's topic in Work in Progress - Aircraft
That wagon is amazing! Great work, do you have any limitations at all? -
Justifiably so 👌
-
No one comes up with more last minute plot twists than you, Alistair. Do you write murder mystery screenplays on the side?
-
I’ll add to the chorus of that looks really really good.
-
Great customer service and even better fir - I prefer to paint before the wings are attached but it's a rare kit that allows that. Good to know on this one. Your Gannet looks ready for its party frock over some black underwear; saucy minx.
-
Upping the ante on the detail masking, Roger. I love those mission markers. Great stuff!

