

mark.au
-
Posts
2,737 -
Joined
-
Last visited
-
Days Won
11
Content Type
Events
Profiles
Forums
Media Demo
Everything posted by mark.au
-

P-51 Mustang Inspiration Gallery
mark.au replied to Enzo the Magnificent's topic in P-51 Mustang STGB 5
One of my favourites... I see at least one "LOU IV" already in progress, here's mine (Airfix 1/48). Yes, I'm in the blue camp. A couple of others. 15th FG CO Col. Beckwith's "Squirt" on Iwo Jima, March 1945 (Tamiya 1/48, SNJ for the NMF)) 45th FS, 15th FG "Foxy" Iwo Jima, March 1945 (Tamiya 1/48, Bare Metal Foil for the NMF) What to build for this GB...? Cheers.- 35 replies
-
- 20
-

-
Bf110G-4 at Farnborough, 1945. ++++FINISHED++++
mark.au replied to mark.au's topic in World War 2 Twins Mega GB
It’s not Eduard’s finest work, that’s for sure. I’m a one-kit-at-a-time builder so I don’t get distracted per se, it’s more that I plow on in a rush to get through and make mistakes. Having said that, I’ve tried very hard to take my time. Here’s the results of the glued-on nacelles. Starboard is still worse, and both had a bit more of a gap at the top than I’d expected once I’d glued them in. The lower seams were more or less spot-on and would only need a smear of filler to close. After an initial fill, I taped the high side of the gap to protect the surface detail up there and used some CA glue to level things off. After carefully sanding down the CA glue, I gave both sides a test shot of dark grey to see where things were. On the port wing, the inside upper seam needed filling some more… There were a couple of other fixes needed but they were soon taken care of and I was happy that not only did I end up with some good seams but I’d managed to preserve all of the surface detail, including the fine riveting inboard the nacelle on the upper wing. I was mostly happy that I’d been relatively patient with the whole process. Meanwhile, I also started clean up on the canopy and while dry fitting it discovered another challenge. A short shot, this is the gift that just keeps giving… Cheers. The usual disclaimer about the lack of proof reading. -
Some solid progress going on here. Looking forward to the paint
- 48 replies
-
- 1
-

-
- Fujimi 1/72
- Bf110D
- (and 1 more)
-
Bf110G-4 at Farnborough, 1945. ++++FINISHED++++
mark.au replied to mark.au's topic in World War 2 Twins Mega GB
Yes, it did come out quite well. I wish I'd have used it for the pilot's harness now. I stain the clear coat with a dark grey or even NATO Black type colour. It's a very dilute stain, and when the clear Is applied fairly wet, the stain tends to pool in the nooks and crevices in the same way a wash does. It's easily overdone. I like the overall tone it gives the base colour, too. It's a useful technique where oil dots aren't really practical (plus I'm too lazy to do all that faffing around when I think it gets more or less the same result). I've been plodding along correcting Eduard's errors in this one's tooling. I closed up the fuselage and attached the nose. That was a pain, it really wasn't a very good match to the fuselage. A good fit mind you, but lots of overlap or otherwise not quite where it should have been. The insert at the rear of the cockpit was also not quite as nice a fit as it should have been and required some CA glue to fill a step on both sides. The cockpit looks nice, although not much can be seen now and even less when the glass is installed. This did fit very well and there were no issues in closing it all up. While this was going on, I turned my attention to the engine nacelles and their fit to the wings. The issues are quite clear, even in this dry fit. While the same issue is evident on both wings, the starboard is by far the worst. When offered up the nacelle is too low and cannot go far enough aft to close the gap at the top. You can see the same gap on the lower side in the pic bottom left. To fix it I removed some material from the wing and some from the mating surfaces in the nacelle itself. Even in this unassembled dry fit it's clear that the fit is much better now. I'll need to glue it carefully to minimise the gaps, perhaps even find a way to use a spreader or two, but I think this will go together well now. The port wing is more of the same, but less, if that makes sense 😉 I've been fiddling with the wing joins too, and I'm happy enough with them that I think I can paint this one with the wings off. That'll make things easier. I haven't checked any of the tail yet, but would like to be able to paint that separately, too. That's it for now. This is the part of every build I call the doldrums; not much progress evident at any given time and relatively boring. But, once through them it's all go with the fun stuff. Cheers. At some point it may say "Edited" just under here because I haven't proof-read this at all. Enjoy. -
One swallow does not a summer make.... 1/48 HB Me262A-1b
mark.au replied to jackroadkill's topic in World War 2 Twins Mega GB
That’s a damn shame, the paint and the damaged builds. I can’t offer much advice in the way of clear coat except to say that nothing good comes from mixed mediums. It seems to me that as long as all of one’s applications can be thinned/cleaned up with the same solvent, not much can go wrong. Hopefully all of the repair works go well! -
Fixed that for you. The beau looks good too.
-
I rather suspect that with so much going on in those glassworks that teeny tiny flaw will be virtually unnoticeable.
-
*** FINISHED *** Another B-25 Mitchell - 1/32 Hong Kong Models
mark.au replied to MRMRL's topic in World War 2 Twins Mega GB
This one looks like fun, I’ll pull up a seat. -
Bf110G-4 at Farnborough, 1945. ++++FINISHED++++
mark.au replied to mark.au's topic in World War 2 Twins Mega GB
Thanks for the kind words, gents. Over the weekend I pretty much finished the cockpit. I tried something a little different for me on the seatbelts; while I used the decal for the rear facing seat and its belts, for the forward belts I cut the decal out with the backing paper still on it and simply glued them to the seat. I used a dark wash to stain the edges where the paper was visible. I think it worked quite well. This is all ready now to button up and glue into the fuselage. But first, taking a tip from other builds I want to check the wing/fuselage join, so I have started the wing assembly. I began at the root to ensure the best alignment for the fuselage joint and let that set before working my way around the wing. That’s it for now. Cheers. -
Bf110G-4 at Farnborough, 1945. ++++FINISHED++++
mark.au replied to mark.au's topic in World War 2 Twins Mega GB
Just to prove this isn’t just a creative writing WIP, some progress. There’s nothing very complex here, I’m very much a representative modeller as opposed to replicating. I base painted with RLM66 or 02 as applicable. Next, a thin gloss coat which is tinted a little dirty as I find this creates depth in the same way as a wash does, but it saves a step :). After detail painting (which isn’t finished yet) I dry brush with some SNJ aluminium powder which really pops the details and creates a metallic look to the paint, even where the aluminium isn’t immediately obvious. I used the kit decals in the cockpit but not on the radios/radars as I wasn’t totally sold on the decal look. I will use the decals for the seatbelts though as I’ll be closing the cockpit on this one and they’ll look fine under the glass. I have a bit more to do. The weapons and ammo won’t be included as this is a captured aircraft, which saves a bit of effort in there. As mentioned, still some details to paint as well. Cheers. -
Very kind, John. Thank you for the comment, I'm quite sure yours will more than match my effort.
-
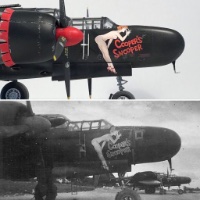
My memory of this kit is quite positive, I have been meaning to get around to building an ETO version to sit with my rendition of “Cooper’s Snooper”. I’ll be following with interest.
-
Bf110G-4 at Farnborough, 1945. ++++FINISHED++++
mark.au replied to mark.au's topic in World War 2 Twins Mega GB
Putting a new model on the bench brings with it a sense of anticipation and excitement to our otherwise somewhat reserved and sedentary hobby. Still in its un-started state, wrapped in crisp plastic, it is still perfect. Our mind's eye can picture it finished. Flawless in our imagination; nothing has gone wrong, no parts lost or broken, the details perfectly picked out and weathered to historic accuracy. All of the PE was installed exactly where it was supposed to go, resin parts unbroken, and there are no globs of CA paint to distract the eye from the replicated part(s) they depict. Everything lines up, there are no visible seams and the paintwork is flawless, in both execution and application. There are no silvered decals, and certainly none are wrinkled or split; all are beautifully rendered to a paint-like application. The perfect canopy masking begot a resultant framing matched only in its crispness by the exquisitely detailed cockpit under it. It is our best work, it looks exactly like we pictured when we lifted the lid that first time, it is [finally] the one where it all came together and was the ultimate expression of our art. I'd better make a start... Cheers. -
One swallow does not a summer make.... 1/48 HB Me262A-1b
mark.au replied to jackroadkill's topic in World War 2 Twins Mega GB
That’s a very fine paint job, nicely done. -
She is, she is very happy with her new striped Stearman and insisted it be front and centre in the cabinet. You are too kind, I’m constantly awed by everyone’s work here. I shall be there shortly. Thanks again to everyone for the encouragement and advice. Cheers.
-
DotEoT is by far his finest work, one of my top four or five favourite albums. The Lysander isn’t bad either ☺️
-
1/72 Dallachy Beaufighter TF.X - Finished
mark.au replied to bigbadbadge's topic in Work in Progress - Aircraft
Superb work. I really look forward to when you apply the flat coat, that’s when your models suddenly jump from kit to replica. -
There’s definitely a positive consensus for using the stainless wire. But… …it did bug me. Buggah, so to speak. All of the metal wires I could find that were the right size were on spools, and so not straight and unstraightenable. I thought about fishing traces but none are thin enough. My original plan was fishing line however, and I had already bought some at 0.23mm OD with a metallic sort of sheen to it. So I tried that. I had already drilled a few holes in preparation but needed a few more. My plan was to the fix the line at one end and then thread it through the wing to pull it tight. Like this… When it was fixed, I cut the line stubs off and repaired the holes. This was much easier. I did the same at the tail. This a bit trickier because I needed to fix the one end and terminate it at the same place. In the pics below, both lines are fixed into the port side, threaded through the port stabiliser from underneath, then through the fin, and then the starboard stabiliser from the top and finally through the fuselage. I then had two ends I could pull to tension the lines while the glue set. The cabane struts were another matter; I was unable to get tension on the crossing lines on each side so I had to use ezline which I then painted aluminium to sort of match the rest of the rigging. Done. The fishing line doesn’t look quite as real as the stainless tube did, but it’s to scale and that works better for me. Most importantly, my wife loved it and I’ve repaid the debt incurred when I sold the first one. Thanks for following along on my third rigged biplane. I’m rather fond of this one and I think have settled on my preferred rigging technique. I’ll put up an RFI in due course. Next up for me is another captured airframe, this time a Bf 110G-4 for which I’m using the Eduard 1/48 kit. That WIP will be over in the WW2 Twins Mega GB, hope to see you there! Cheers.
-
Options sought… I’m experimenting with 0.4mm OD stainless tubing for the major rigging elements (I’m going to use something else, smaller, for the cabane strut rigging). They’re straight, metal, easy to install and a bit oversized. Do they look oversized or do they pass muster? Cheers.
-
A slow progressing Ton's up Lanc !
mark.au replied to corsaircorp's topic in Work in Progress - Aircraft
CC, you have more mojo than most of the rest of us put together, I am quite sure you’ll have wrapped in this one soon, too. 😊 -
Looking forward to the grand reveal of the paint job, always a treat on your builds.
-
1/72 Dallachy Beaufighter TF.X - Finished
mark.au replied to bigbadbadge's topic in Work in Progress - Aircraft
Pics or it didn’t happen 😊 Fabulous work as usual. -
I am, thanks ☺️. I’ll know more next week when I have my follow up appointment with the surgeon. Hi Pete. Glad you’re doing so well mate! Mine was a different sort, it was catheter surgery meaning they went in via a vein in my leg and fed a probe up into my heart from the inside. They used the probe to burn away the short circuit areas in the heart which were causing the AFib. They didn’t need to put anything in there. The rest of my heart is in good shape apparently; no plaque at all in my arteries and all valves operating perfectly. Good to hear, CC. The beta blockers suck, I hate them. I have an appointment next week with the cardiologist and I’m hoping he’ll start weaning me off them now I’ve had the surgery. Thanks for all of the kind comments, I’m feeling better each day and confident that the procedure worked first time for me (it typically has a 70% success rate on the first one, they do up to three if necessary…). Turns out finishing the upper wing join was very easy and no drama at all. And, it fixed the lower wing dihedral. It’s not out of the woods yet as there’s something a bit funky about how it’s sitting, but that’s for another update. I also realise looking at these photos I haven’t detailed the struts at all. That’ll be easy now they’re installed… 🤦♂️ Cheers.
-
You’re a better man than for persevering with this one, Alistair. And so well, too. I think I’d have binned it!
-
Bf110G-4 at Farnborough, 1945. ++++FINISHED++++
mark.au replied to mark.au's topic in World War 2 Twins Mega GB
Yours was the one I was thinking about when wrote that. But, towards the end @Troy Smith linked to thread that provided some great tips on fit management which will come in very handy. 😊

