

Arjan
-
Posts
427 -
Joined
-
Last visited
Arjan's Achievements
")
Established Member (3/9)
1.2k
Reputation
-
Smashing job on the water ! Regards, Arjan
-

Sturmboot 39 Gebirgs-Division Prinz Eugen Herzegovina
Arjan replied to Arjan's topic in Work in Progress - Maritime
Hi Ola, I used this ready made sheet by Heki (35x80cm) : https://www.lokschuppen-berlinski.de/decoratie/wateren/zeefolie-80-x-35-cm-1-stuk/EAIaIQobChMIsZvGz4ObgwMVfIpoCR3iygv4EAQYBCABEgLwh_D_BwE?geo=NL I don't know if these sheets are available in Sweden though. I resorted to these ready made sheets because I don't like working with epoxy resin. For some reason I always seem to mess up when I mix the two components (too little or too much hardener). Regards, Arjan -
I agree with Stuart, Tamiya paint is not suitable for brush painting especially not for larger areas. I suggest using Vallejo Polyurethane Panzer Grey Primer. This Polyurethane primer is not suitable for airbrushes because it tends to clog up spray nozzles in minutes. I found that it is very good for brush painting though. I think two layers should suffice The stuff is also available in larger bottles : https://www.airbrushwarenhuisairo-flex.nl/modelbouw/vallejo-model-air-verf-pigmenten-washes-additieven/vallejo-primers/vallejo-primer-german-panzer-grey-17ml Regards, Arjan
-
I intend to build a diorama based on the following pics : For the foreground I intend to use a 1/35 scale Italeri AB41 and Gebirgsjäger figures, whereas I will use a 1/72 scale Orange Hobby Sdkfz.7/1 and figures for the background. I have built the stock AB41 model and I have made a cardboard mock up of the steel fender plates. I had to shorten the Besa gun inside the turret by some 2mm to allow room for a commander figure. The Italeri gun inside the turret is definitely too long which means not even a contortionist would fit behind the gun inside the turret hatch. I also tried out various Hornet heads to replace the rather awful Dragon ones. Today I have finished three figures , I will finish the metal parts of the shoes once I have removed the figure bases. Arjan
- 5 replies
-
- 14
-

-
Nice work Ola! Unfortunately, deteriorating eyesight is all too familiar for many of us (including myself). I have also built quite a few different Marder kits, my Marder III model with some Dragon figures : Regards, Arjan
-
Looking good Ola ! If you are going to use the standard Dragon figure I would recommend swapping the head for a Hornet one. These Hornet heads really make a world of difference. Regards, Arjan
-
Sturmboot 39 Gebirgs-Division Prinz Eugen Herzegovina
Arjan replied to Arjan's topic in Work in Progress - Maritime
Yes, I intend to copy the tunnel entrance showing the 1/72 scale Sdkfz. 7/1 at the other end. I have built the 1/35 standard AB41 by now (for the foreground) and I should start adding the steel fender plates. At this point I'm still busy painting the Dragon Gebirgsjäger with Hornet heads (which I enjoy more than the other jobs). The rock face is relatively easy to simulate by using pieces of tree bark. In the past I discovered that tree bark looks very realistic. I will start posting my progress in the armour section of this board in the coming days. Regards, Arjan -
Very neat work Ola ! Have you thought about using figures and how are you going to display your model ? Regards, Arjan
-
Sturmboot 39 Gebirgs-Division Prinz Eugen Herzegovina
Arjan replied to Arjan's topic in Work in Progress - Maritime
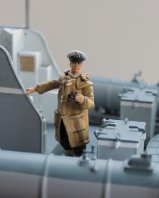
Nice photo, thanks Ola. I may have a head start but your build is progressing very rapidly indeed. Also, I happen to be working on another Balkans item so I have to divide my attention 🙂. Pure coincidence, but this also involves a German mountain division (1.Gebirgs-Division and possibly one or both vehicles of Grenadier Regiment 92) . I have been trying to more or less copy this scene, AB41 (1/35 scale) in the foreground, Sdkfz.7/1 (1/72 scale) in the background. I suspect the scene was photographed in Monte Negro, the AB41 has unusual markings and steel plates fitted to its front fenders. I suspect these plates were used for shoving obstacles/snow out of the way. To return to the Stubo build, these are some other pics I have of Stubos in the Herzegowina/Bosnia/Croatia region. At first I thought the shark mouth boat belonged to 13. SS Gebirgs-Division Handschar because of this photo : I based the pose of my "Steuermann" (coxswain) on this pic : Other pics : Regards, Arjan -
At least some 10 years ago I started building the 1/35 Dragon kit but got distracted by other projects. My aim was to build this Stubo belonging to SS-Gebirgs-Division Prinz Eugen. This unit was involved in what the Germans called "Bandenkampf" or anti Partisan warfare. This SS-unit was notorious for its ruthlessness towards partisans and civilians. Now that I know that decals for this particular boat are readily available I intend to continue with this project. Some pics of the Stubo in question, apparently Johann Lexell didn't know the boat (later ?) also sported the name of the river Neretva, or perhaps there were more boats with this shark mouth : I started by heat stretching the boat in boiling water. I actually inserted some oversized plywood bulkheads into the hull to widen it : I modified the inside of the transom which didn't look like the real thing : Added the two longitudinal slats : Modified the transom : This is what the motor mount should look like : What the Dragon mount looks like : Modifications : A tentative setup before I had started painting the hull : With both Ola's and my own fresh insights I will add some more detail to the boat. Not sure if I will make a new 7- plank floor, depends on how easy it will be to get the present floor out. To be continued. edit: now that I have seen the different pics of the Stubo together I noticed there are subtle differences in the drawings on the bow. So there must have been at least two or perhaps even more Stubos with this particular shark mouth Arjan
-
Good idea Ola to print the letters in a Panzer Grau background. That's how an acquaintance of mine printed decals for my 1/35 RON 35 PT boat (using a colored background). I'm amazed that Johann Lexell already made decals for the Shark Mouth Stubo. I 'm going to order this decal sheet and I will also start a build thread 🙂. Arjan
-
That is looking really good Ola ! If you have access to a good printer you could print your own decals. All you need is a sheet of transfer paper which is readily available online. You must of course also make a file with the right text, the right letter type and the correct scale. Personally I'm no good at computers and I don't have a decent printer. Others who are good at this type of thing usually make the file for me and then I have a decal shop print the decals. A Dutch decal shop : http://www.blackliondecals.nl/customdecals.htm Needless to say, I would also be interested in decals of these labels. However, I would also be interested in some other Stubo decals (other captions and drawings such as croc head and shark mouth ) as well and perhaps Johann Lexell of Star Decals in Sweden would be interested in producing some : https://www.star-decals.net/contakt.html edit: what I forgot is that printing white letters with a normal printer is problematic. This means that printing these decals yourself will be difficult. Regards, Arjan
-
You are quite right that there is an object in the back of the boat that looks like a cushion in some pics but it's definitely not a cushion in the last pic you posted. I think I can make out three button/nut type objects and it's much smoother than a cushion. The same object as in the previous pic, there is also a special Stubo tool box : More pics that are not terribly clear : Looks like the cover of a motor here : A jerrycan here I think : A lot of pics show the early triangular jerrycans. Here early jerrycans on a Stubo trailer, note the detachable fore decks in the fore ground which belonged to "gedeckte"Stubos : Some accessories : A Stubo used for recreation 🙂: Later type jerrycans : Regards, Arjan
-
Hi Ola, good to see you've started a thread here. I only noticed your thread this morning. Your Stubo looks very good and you've made quite some progress since I last saw it. I think you are right about the fenders/floats, no doubt these served a dual purpose (protection/buoyancy). I also think they were probably stuffed with kapok. I'm not sure about the "cushions" inside the boat though. What photo were these in ? I don't think I have seen these in the pics I've got. Perhaps these "cushions" might have been a rolled up tarp instead. By the way, this boat had rope fenders instead of Kapok ones : I wonder what figures you are going to use, if any. I might join you in a Stubo build, as you know I've got a model "in progress" 🙂. Regards, Arjan
-
This morning I noticed to my surprise that Italeri have finally released their 1/35 S-26 Schnellboot kit. This kit was announced two or three years ago and I had lost hope it would actually materialize. This kit has an extra 2cm Flak 38 gun instead of the 4cm Bofors gun which was provided in the old S-38 kit. Italeri have also modified the "Brunnen" (the gun tub in the fore deck), they added some mines and even dodgers : https://www.italeri.com/en/product/3057 Not a ship but an amphibian, I also noticed that Italeri have released a new incarnation of their 1/35 DUKW kit. I think this is welcome news because the 1/35 DUKW kit has been out of production for quite some years. Unfortunately, the wheel well covers are not provided nor is the automatic tire inflation system. The only real advantage of this kit version as I see it is the addition of some new decals for 2 British WW2 DUKW's. https://www.italeri.com/en/product/948#pid=1 Arjan
