-
Posts
670 -
Joined
-
Last visited
Content Type
Events
Profiles
Forums
Media Demo
Posts posted by Sten Ekedahl
-
-
No Trumpeter Wellington in the pipeline? Would be interesting as a comparison.
-
You've just passed third base at full speed. Home plate is clearly in sight, so don't loose your step now. We'll all be cheering when you score!
-
 1
1
-
-
0.3 mm in 1/72, that's 20 mm, or 4/5", in full scale. Negligible in this case.
-
 1
1
-
-
Two weeks ago a pair of pigeons got the stupid idea of trying to build a nest on the top edge of my open balcony door. Some birds are plain stupid! Despite my discouraging efforts they persisted for several days before they finally abandoned the project. Afterwards I had to remove a large amount of twigs from the door, and a lot that had fallen down, both on the balcony and on the floor just inside the door. To be fair, I had some help in scaring them away since both my cat and dog like to spend time on the balcony. The cat was rather p*ssed off because those bl**y birds always sat too high for her to catch.
-
 2
2
-
-
12 hours ago, Navy Bird said:
I've carefully marked out the area where I think it needs to be cut...my issue here is that I seem to have hidden the seams from the turret covering too well - I really can't see where it attached. I don't want to try and break it off (obviously) so I measured about fifteen different ways in order to scientifically determine the proper location for the cuts. In other words, I eyeballed it and drew some lines on the fuselage with a pencil.

However, I am delaying the first cut until a couple of days from now, as I'm off to watch my son in a bicycle race at Watkins Glen. See you soon!
Cheers,
Bill
Bill, I suggest you scrape off some of the yellow paint, you will have to repaint that area anyway, where you think the seam is, so you can actually see it Saves you all that tedious measuring and guessing.
-
 5
5
-
-
On 2018-01-25 at 8:41 AM, Colin @ Freightdog Models said:
High Planes were working on a CAD tail section correction for the Airfix FAW.9, this like my Frog nose for me was a personal project for Christopher Brown at HPM, to date he hasn't finished it but I'm sure it will be popular when he does.
Thanks,
Colin
That's a conversion set, or rather a correction set, I would eagerly buy! Just hope he remembers to cant the exhaust pipes slightly inwards, something both Frog and Airfix forgot to do, since it is a quite noticeable feature.
-
A happy belated birthday from me too. I celebrated mine the day after yours, although I had four more candles to blow out. Didn't make much of a difference though. From memory, that fuselage piece with the turret cutout, didn't fit very well when I did a dry fit test on my kit.
-
-
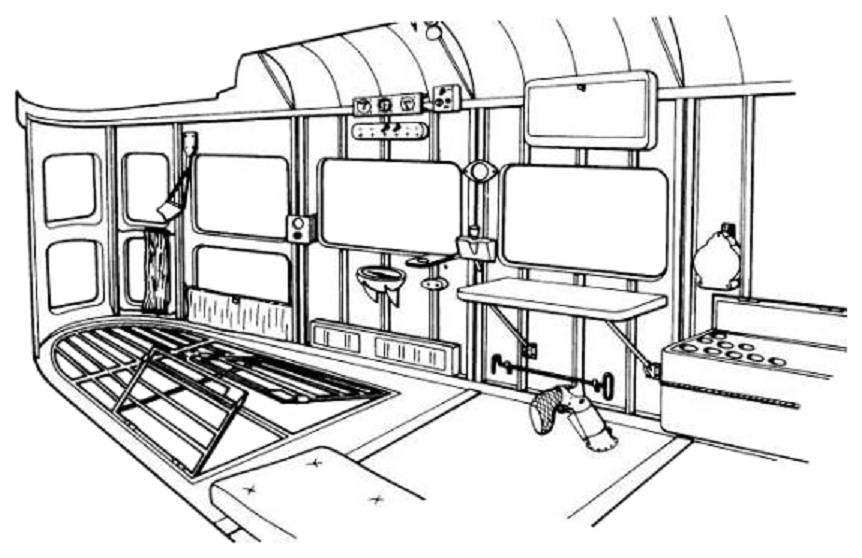
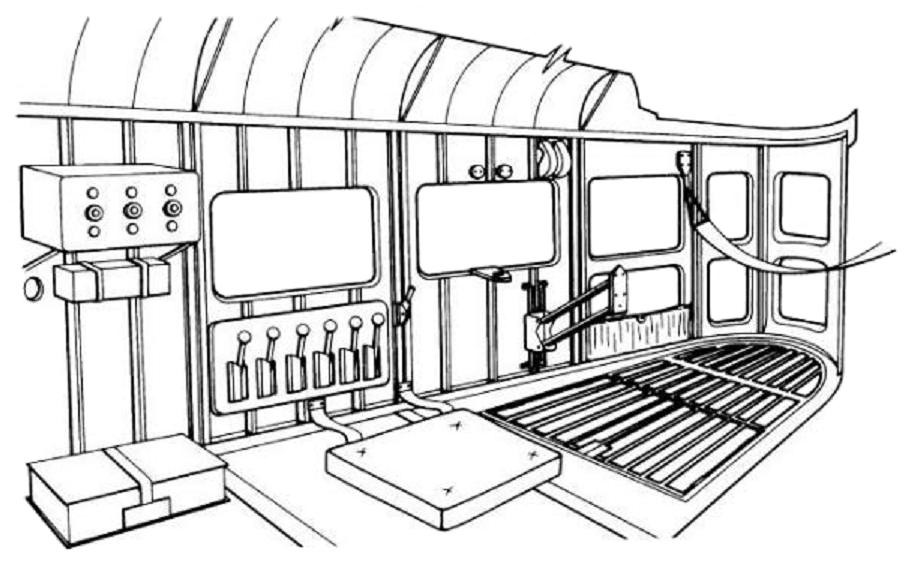
One more question about an interior colour, this time the instrument panel. The easy solution would be painting it black. But was it really? Considering the fact that this aircraft was built in the early thirties, this was at a time when many aircraft still had instrument panels made of wood. so question is if the MB-200 also had this. Looking at the etched IP I have, it looks like main panel could be wood with smaller sections of it made of (black) metal. Would anyone care to speculate further, or even try to answer? Oh, another thing. I sort of got the suspicion that the internal floor in the aircraft actually might have been made of wood. It would be a logical solution to save weight in an aircraft that was rather underpowered. But this is pure speculation from my side.
-
9 hours ago, Bobk said:
Looks to me as if the door of which you speak is hinged along the top edge and when opened lays up against the bottom of the wing so it opens outwards. On page 5 of this subject about Oct 3 2017 you will find two photos that will clear up the question, I hope. http://www.modelforum.cz/viewtopic.php?f=310&t=49106&p=1873039&hilit=MB+200#p1873039
Several photos there that I haven't seen before. Although there were some differences between the Czech and the French versions, I don't think the door differed. And looking closely, I think you're right there. There's even a photo on page one that seems to support this. Good thing then I had not yet constructed the door supports inside the fuselage to mount an inward opening door! An up and outwards opening door simplifies building a great deal. Thanks a lot!
-
3 hours ago, dogsbody said:
I know. I have the same kit.
Chris
Out of curiosity, what's your plan for it?
-
33 minutes ago, dogsbody said:
French bombs: http://www.bombfuzecollectorsnet.com/USERIMAGES/OP 1668 Italian & French Explosive Ordnance.PDF
I would agree on the door situation. Hard to find a good picture, but it definitely opened inwards.
Chris
Very good information on French bombs! Thank you. But typically this proves the disadvantage with good references. The bombs in the kit, being the Czech Air Force version, are very different from French bombs, apart from the 10 kg flares. The shape of the French bombs are completely different. Hmmm... Time to do some thinking.
-
Great! I'll settle in at the back. Actually I have this kit and made a tentative start at it several years ago, but stalled. In fact I started another Anson at the same time, an Aeroclub multimedia post-WWII Mk.19 (vacformed fuselage, injection moulded flying surfaces, plus white metal details). Unfortunately that one stalled too. Will be following this with great interest since I know you'll provide many useful tips.
-
 1
1
-
-
Think I have found a solution for the chamois colour; Humbrol 94 (Matt brown yellow) + white.
Now two more questions:
1. From what I've been able to deduct from photos on the net, the cabin door on the left side, is hinged on the edge towards the front of the aircraft, and opens inwards. Confirmations?
2. What was the normal colour of French bombs? We're talking around 1939 here.
-
Been to Warwick castle twice, first time in the summer. Second time was in November, just a few days after SMW at Donnington. Although a fantastic place, I definitely prefer a summertime visit.
-
 1
1
-
-
On 2018-02-20 at 5:49 PM, wyverns4 said:
No. 7 Light Buff ??? (A gloss colour...)
Possibly No. 74 Linen + No. 26 Khaki ??? (Matt).
Is wentzels still going? and Hobbybook Handeling at 23 Pipersgatan, (spelling...)
Christian, exiled to africa och 10 ar vid Uppsala universitet
Thanks, helps a lot. Yes, both Wentzels and Hobbybokhandeln are still going strong. Wentzels relocated from Gallerian to Gamla Brogatan (four or five blocks away) about two years ago. Sadly one of the owners, Jan Wentzel, passed away from leukaemia some eighteen months ago. Much too early, barely fifty years old. But despite this the shop is doing well. Hobbybokhandels has during the last four or five years expanded their second hand kit buisnes a lot.
-
 1
1
-
-
Thanks for the help. So chamois is the most likely colour. As I use enamels, mostly Humbrol, what would be the closest Humbrol equivalent?
-
Many many years ago a friend gave me the KP 1/72 Aero MB 200 kit. I wanted to do a French aircraft so I found some nice aftermarket decals for it and also some very good PE details for it. But as I started building and at the same time searching for references, I discovered that the front fuselage and the nose gun turret differed between the French and Czech built aircraft. The KP kit naturally portrays the latter. So the kit ended up on the shelf of doom. Fast forward some fifteen years, and I found and ordered a conversion kit that will solve the problem. So I will now resurrect this project. However one big question remains. Since there are windows all over the fuselage, and a large cockpit canopy, a lot of the interior will be visible. However I have been unable to find out what the interior colour was. KP doesn't say anything in the instructions, and Google has drawn a blank. So my only hope now is that anyone out there can help me with this.
TIA
-
Thanks for the answers. My friend appreciated them very much.
-
Very nice photos, but unfortunately they don't provide a good answer to my question. At least I can't deduct the colours from them.
-
Friend of mine has started building the Airfix 1/48 Gnat. He is very puzzled by one of the parts, no.1, which doesn't appear anywhere in the instructions. I have had a look at it myself, but it still remains a mystery to both of us. Any answer out there?
TIA
-
I know this question has been answered before, but I have forgotten the answer. The Whitley interior was natural metal, except the cockpit area visible through the canopy where it was painted the standard RAF interior green. But I have forgotten about the interior of the turrets; natural metal or green? Also Airfix says that the inside of the gear doors should be black, whereas the u/c bays and the u/c legs are silver/natural metal. I would have expected the inside of the doors to be finished the same way as the u/c bays. Can anyone shed some light on this?
TIA
-
Finally received the second Warbirds decal sheet I had ordered. While the first one arrived only six days after I ordered it, this one took more that a month before it arrived!
I'll be using the walkway lines and stencilling from this sheet. Possibly also the canopy frames since they include the white sealant edging the frames. Saves a lot of work instead of having to mask and paint them.
-
No photos this update since they would look very much the same as in my first post. The B-47 is coming along nicely so far. Rescribing is about 50% done, apart from the fuselage which won't be done until it's closed up. So right now it is scribing and sanding, scribing and sanding... Scribing actually doesn't take long to do. It is the sanding that is time consuming since the surface is quite uneven and the trailing edges are rather thick in places. Scribing one wing takes just about an hour. But sanding it to shape, and then to the smoth finish needed, takes another 5-6 hours. So still a lot of work to be done.


Hawker Siddeley Nimrod MR1 - 1/72 Airfix
in Work in Progress - Aircraft
Posted
Good idea to wait for the Alleycat stuff before you close up the fuselage. The instructions for the Alleycat windscreen advice you to insert a thin sliver of plasticard between the fuselage halves just behind the cockpit to widen the fuselage slightly. This will make the Alleycat canopy/windscreen conform to the fuselage width better. Easier to do this when you have the Alleycat part at hand so you can check how much the fuselage needs to widened.