

Kitchen Modeller
-
Posts
990 -
Joined
-
Last visited
-
Days Won
7
Content Type
Events
Profiles
Forums
Media Demo
Everything posted by Kitchen Modeller
-
 Greetings all - hope everyone is doing ok in these strange times - modeling is a nice distraction at the moment so hopefully we’ll see lots of progress all around 😊 Onwards with the hurricane - decals! Good news is that they’re on but took a few attempts to get there. The kit decals are fine - not amazing but perfectly workable... I had a few issues with the custom falcon decals - luckily I had an abundance of them so I was able to get there in the end. They were printed on wet transfer decal paper - so I thought they might behave like the hgw wet transfer decals which I’ve used before - with those you apply the decal as usual but after a few hours, you can peel off the transfer film - so gave this crack : However when I tried to remove the film, it took the decal with it😕 But I wasn’t too upset - I decided to go with a slightly bigger size and the previous decal was easy to clean away with water and a cotton bud. The next attempt, I cut out the decal with a hobby knife, trying to get as close to the edges as possible. Then applied them as per normal. This attempt was more successful. The other slight issue is that the decal is quite translucent- so it’s not as bright and visible as I would have liked. But I actually think it looks kinda cool - almost like it’s been brush painted on - as it’s a unit marking, it’s makes sense it would be a slightly different tone to the other markings. The rest of decals all came out good. I also had a bit of trouble with the gloss coat. Seems humbrol gloss clear behaves strangely with Mr mark settler and softener - where the sealing gloss coat didn’t level out properly in certain areas where I’d applied the decal solutions - however I was able to sand and polish out those areas. So she’s now ready for some weathering...! See u soon chums
- 86 replies
-
- 7
-

-
- 1/72
- Johnny Red
- (and 1 more)
-
Mitsubishi Ki-83, scratch, 1/48
Kitchen Modeller replied to JohnHaa's topic in Ready for Inspection - Aircraft
Amazing work - well done sir -
Hawker Hurricane Mk. I, 1/72, Airfix
Kitchen Modeller replied to Dimiter's topic in Ready for Inspection - Aircraft
Lovely work - the overall finish more than makes up for any minor imperfections - well constructed, great paint job and just the right amount of weathering - well done -
Tamiya 1/72 Bf 109 E-3
Kitchen Modeller replied to Roger Newsome's topic in Ready for Inspection - Aircraft
Nice work Roger once again - looks really good - Looks even better in those new pics - nice amount of weathering- can’t beat a 109 for straight forward model fun😎 You make this kit look very tempting -
Thanks Richard - I’d say the lions share of weathering is done - it’ll get a pin wash plus I’ll do some oil work but don’t want to overdo it either... but these things don’t really get sorted out until I’m doing it - so I usually just work on it until I think it’s there or there’s not much else to do... I didn’t really answer that successfully did I?
- 86 replies
-
- 1
-

-
- 1/72
- Johnny Red
- (and 1 more)
-
I think was metal so you could chip it if desired. This is looking great Sam - lovely work overall - the weathering that you did looks real and convincing... lots of new techniques employed which you executed well - I think as long as you keep trying new things you’ll constantly improve- which you definitely are👍 Well done!
-
Thanks Chris - I feeling pretty positive after alot of problems with this build - still plenty that can go wrong of course! I'm just going to have to be very very careful
- 86 replies
-
- 1
-
-
- 1/72
- Johnny Red
- (and 1 more)
-
So some more progress to show... Before I could apply the gloss coat, I needed to do some touch ups and add a couple of details - first off I removed the masking fluid I previously put on to simulate chipping... I've been getting much better results with this method - this was the first time trying this at this scale but I think it still turned out quite nice. I supplemented this effect with some further chipping using a tooth pick - just apply some light pressure and the top layer of paint comes off easily enough - the silver layer is lacquer so it's quite hard wearing. Next I had to add the fuselage band so that was masked off and I sprayed a mix of Tamiya Sky and White - I used the airplane serial number decal as a guide to size this correctly. Then for the black non-slip surfaces for the wings - I sprayed rubber black - after that, I mixed in a little white and went over it again... I've noticed looking at reference photos, that these areas are never (or very rarely) chipped - sometimes discolored maybe - so I left these unblemished. I think she's looking suitably battered and bruised - now she's ready for the clear gloss coat - then I can start on the decals. The first coat went on (Humbrol Gloss Clear) and while waiting for that to dry, I did a little work on the other bits - Prop assembled and ready for paint - the props come as separate pieces but the fit into the backplate is actually bang on so no worries there. The kit comes with 3 nose cones but I went with this one as it's the closest to what's portrayed in the comic. Finally, I did a little prep on the exhausts - cleaned them up and drilled out some holes: Tricky doing this at this scale - I made the first guide hole with a hypodermic needle, then widened it out with a hobby knife - then put on a little tamiya thin cement to round it off. I'm happy with how it's now progressing - really looking forward to seeing her in her colours which won't be long now See you soon John
- 86 replies
-
- 5
-
-
- 1/72
- Johnny Red
- (and 1 more)
-
Lol - I know right? But 9 year old's rarely got too hung up on the specific details and plot holes. Johnny even had an "frenemy" relationship with one of his German counterparts - Von Jurgen who re-appears in the reboot. It certainly doesn't hurt the story which I suppose is the main thing We don't love Johnny Red for it's historical accuracy
- 86 replies
-
- 1
-
-
- 1/72
- Johnny Red
- (and 1 more)
-
Thanks Richard - yep, it was XF49 khaki that was used in the flat earth mix - and in the green - it’s a nice combo and really allows the 2 colours to complement each other... not sure how accurate it is tbh but it certainly looks good on the model 😎 Here’s what I’ve been using for my Tamiya RAF schemes: Tony Bell's Tamiya RAF Mixes RAF Roundel Red 50% XF7 Flat Red 25% X7 Gloss Red 25% XF64 Red Brown RAF Roundel Blue 75% XF8 Blue 25% X18 Semi Gloss Black RAF Roundel Yellow 95% XF3 Flat Yellow 5% X7 Gloss Red RAF Dark Green 75% XF81 Dark Green 2 (RAF) 25% XF49 Khaki RAF Dark Earth 85% XF49 Khaki 15% XF52 Flat Earth (note: I still prefer Gunze H72 Dark Earth straight from the bottle) RAF Ocean Grey 90% XF82 Ocean Gray 10% X2 White RAF Medium Sea Grey 90% XF83 Medium Sea Grey 10% X2 White RAF Sky 75% XF21 Sky 25% X2 White Hope this helps👍
- 86 replies
-
- 5
-
-

-
- 1/72
- Johnny Red
- (and 1 more)
-
That’s great news Richard - baby steps and all that - always find actually starting a new kit is the hardest part... once you find that rhythm, and get into the groove, you’re away👍 Well the New compressor arrived and I couldn’t be happier- huge difference in performance in my 2 brushes - like they’re both brand new - lovely smooth airflow all of the time - can’t believe I put up with the defective old one for so long... so I’ve really been enjoying myself with this painting stage... So backing up to where we were before the unpleasantness- I put on a coat of mr color silver 8 - then using a sponge, dabbed vellejo masking fluid on the bits where I wanted some chipping - around the wing roots, a little on the leading edge of the wings and a little more on the gun emplacement covers. Then a thin layer of xf 1 flat black. This is the point where things went tits up last time - so carefully mixed up some white with a little desert yellow and started doing some marbling - no guide this time - just eye balled it. Very thin paint - very low pressure... this was followed by the base colour - khaki 4:1 flat earth: Then I did a little post shading - highlights by adding desert yellow and white to the base color and shadows with a mix of black with the base color... again very thin paint and low air pressure- these bits were then blended with a thin mix of the base colour. Then I blocked out the RAF green with RAF dark green 2 straight: The marbling layer for the green was cockpit green, yellow green and white... Then the base color was put on top - RAF dark green 4:1 khaki. I’ll probably go over this again and add some further highlights and shadows but I’ll leave to cure for a few hours - there’s quite a bit of sheen on the model from the amount of lacquer thinner I use - this will disappear in a few hours. Actually quite pleased with how it’s coming which is an anomaly 😊 I’m usually filled with self doubt and despair at this point. Amazing what a new bit of kit can do. So some more touch ups to come, followed by a clear gloss coat. Then I get to find out what she looks like with that falcon insignia on the side😀 Some decent progress at last - the way things have gone, I should change the thread title to straight In and loads of messing! - it always looks bleak for the falcons at this point in the story / but they always manage to win out in the end😉.
- 86 replies
-
- 8
-
-
-
- 1/72
- Johnny Red
- (and 1 more)
-
Eduard 1/48 Messerschmitt Bf 110C
Kitchen Modeller replied to Roger Newsome's topic in Work in Progress - Aircraft
Very nice work Roger - those wing roots and engine inserts looked quite challenging - you did a great job hammering them into submission - looking pretty good from here... hopefully that's the worst over with... fun painting times ahead -
Blast from the Past - Desert Typhoon in 1/48
Kitchen Modeller replied to Christer A's topic in Work in Progress - Aircraft
It lives Hopefully we don't have to wait another 9 months to see the next colour lol - Nice job on the mid stone - I found that it's a very hard colour to photograph - always comes across more yellow than it is in real life... -
Hey all - just a quick update. I made a boo boo - quite a big boo boo. But not bad enough this time to ruin the project. I have had issues. The kit reboot was going a little too smoothly but also I'm an idiot. And unlucky. Here's where I am: I couple of steps back - it's primed and ready for paint (again) - It all started when I had a great idea to help me with the free hand camo I was going to do: This is gloss varnish brush painted on to show me where the pattern goes - clever eh? No, it's actually not - the gloss paint was too thick and very visible when I started putting down the first colour - this was problem number 1. The second problem was the paint - My trusty compressor had been making "sad" noises for the past few weeks - I feared the worst but decided to wait and see what happened before getting a new one - as it was actually still working - when I was putting down the first colour, it was obvious that the compressor was munted - it couldn't maintain a solid flow - the resulting paint was horrible - I was trying to do some marbling work which requires v low pressure and the compressor just couldn't handle it. And the paint just splattered everywhere - it was horrible. So I decided to abort - I put some IPA on a paper towel to remove the paint and the gloss paint where I was at it - this seemed to be working fine initially - however then I noticed that it was actually taking everything off - going right through to the plastic - well that was a bummer - I kept at at but then noticed to my horror that this madness I was engaged in was actually beginning to melt the plastic. So turns out I was using lacquer thinner to clean up with - not IPA! - they're in similar bottles on my desk and in my haste, I grabbed the wrong one. I stopped there before I did any further damage. I was able to sand off the melty bits - then spent a few hours re-scribing the missing panel lines and finally was able to re-prime everything. Still not perfect but good enough to continue? I'm going to say yes. Just after I finished this up, the compressor which seemed to still be able to push out air, finally gave up the ghost. RIP Compressor. We've had many good times together. But now it's time to go to compressor heaven. Beginning to think the modelling gods really don't want me to finish this project. But then they let me re-prime the model and bring it back from near disaster. So maybe they still have my back - so in conclusion, I'm an idiot. A silly bugger. I was tired and not thinking. A tired silly idiot. I've ordered a new compressor. Please check back on me in 5-10 working days. John
- 86 replies
-
- 8
-

-
-
- 1/72
- Johnny Red
- (and 1 more)
-
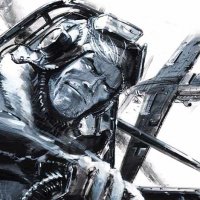
A little more progress. I thought the underside paint was okay but left room for improvement- as It stood it was a little flat as I probably went too hard with the blending coat. I wanted to see if I could liven things up with some post shading. So for this I used mixes of Tamiya flat white, interior green and sky. With very thin coats I used darker tones along the panel lines and lighter and darker tones shot through a brass stencil. It seems to work best if you hold the stencil about 50 mm to a centimeter off the model. I’ve tried using this thing a few times but this was the first time I was actually pleased with the result. I guess I had to find the right method and colours to work with what I was trying to do. I bought the stencil off the Uschi van Der rosten website if you’re interested. With that done I went and masked off the underside bits in prep for the next stage of paint... I mixed up some mr color silver 8 and mr leveling thinner and put that down on the metallic parts of the top side: I really like this paint - looks good even straight onto primer and I like the color. It’s a lacquer and so is v hard wearing and works really well for chipping techniques. Im going to see if I can improve on the masking fluid chipping technique I employed on my last kit (Hurricane trop). It might be quite tricky considering the scale, but I’ll give it a crack. That’s it for now chums... In light of those vintage Johnny Red covers Richard posted earlier, this is the reboots homage to the 80s version:
- 86 replies
-
- 5
-
-
- 1/72
- Johnny Red
- (and 1 more)
-
Never apologize for showing us Johnny awesomeness such as this👍 I remember this story and the insane firepower the B25 had. It would make an amazing model. I’ll just leave this here😂 He is a blooming hard case 😊 That’s interesting about the yogurt pots / I was a fan of these when i lived In Ireland - (the yogurt not the pot - I wasn’t modeling back then) and not sure I’ve ever seen these here in New Zealand. But might see if there’s an equivalent that might do the same job.
- 86 replies
-
- 1
-
-
- 1/72
- Johnny Red
- (and 1 more)
-
Very nice work there mate - looks like you have this technique 100% down It takes a bit of time to this this but I've spent alot of time trying to get kit wingtip lights to fit and ended up not being very happy with the result. The only thing I would do differently next time, would be to try and make the "light hole" smaller as mine isn't very much in scale. Yours looks bang on however That would be awesome wombat - I remember that story well - typical Johnny adventure. The flying gun, I think it was called. It would be a very heavily modified model though - I think @Gazontipede put down a full list earlier in this thread. This is my third Hurricane kit in a row so I'll probably take a break from Hurricanes for a few months after this:) You can buy Johnny Red collected additions on Amazon - or use an app like Comixology - I'd try and start with the earlier strip which had the best stories and art. The quality kind of trailed off towards the end. The Garth Ennis "reboot" is also very good - which is where I've been getting the inserts for this thread - and is the hurricane I'm basing this build on
- 86 replies
-
- 1
-
-
- 1/72
- Johnny Red
- (and 1 more)
-
I’m pretty sure he flew just about every allied aircraft type at some stage 😂. He also flew a typhoon which someone on here might be doing at some point! And of course he was able to out fly those higher spec German fighters - he’s Johnny red!
- 86 replies
-
- 1
-
-
- 1/72
- Johnny Red
- (and 1 more)
-
Thanks Richard - my goal with this is to invoke the spirit of the comic - so I’m happy to lean into the fun and fanciful side of things - with the comic, although it’s based on real events, it takes a lot of liberties with the history- so I’m keen to reflect that... with slightly exaggerated features... if the patches look a little thick I’m okay with that. Saying that, I did sand them down a little😊. I had some time to myself today so was hoping to get stuck into the paint. I had just started on the marble coat on the underside when I realized I still had to sort out the navigation lights. The kit supplies glass for the lights but you have to cut the sections out of the wing if you want to use them. not overly difficult- however I wasn’t able to get a perfect fit with the lights. I didn’t want to continue hacking bits out of the wing so decided to try a technique I saw here ages ago on britmodeler. I can’t remember where I saw it so apologies to whoever it was😊 It’s basically using spare clear sprue to create a wing tip light. So I took a bit of clear sprue and flattened it on one side and shaped it to fit into the cut out part of the wing. Then drilled a small hole which will be the light itself. View from the other side: The hole was then painted with Tamiya transparent paint to simulate the light. The rest of the flattened area was painted interior green. After cutting down the sprue to a smaller size. It was glued into place with ca glue. I left this to cure for about 20 minutes which is probably overkill / if you have a good bond, you can probably start sanding after a few minutes. I started sanding the sprue into shape using sanding sticks - Mostly with a low grit one... This didn't take too long - after maybe 10-15 minutes it was beginning to take shape. A little after this point, I started using higher grades of sanding stick, finishing with a 4000 grit sponge. Almost there now. I then brought out the tubes of Tamiya polishing compounds. Starting with the fine and using the Tamiya polishing sponge I cleaned up the lights to get rid of the cloudiness... I just bought these sponges - they’re ok, but a cotton bud would probably be just as good for this job. I finished with the finishing compound as you do... Pretty happy with that result. The kit lights were quite nice but I think this looks better. The same process was done on the other wing. It’s funny that I only did this as a result of my own ineptitude- not being able to cut the wing light section correctly - but the result ends up looking better had I not messed up in the first place. The lights were carefully masked off and I started again the marbling paint work. I used a very thinned down mix of Tamiya white with a little interior green. Thinned with Tamiya lacquer thinner (retarder type) sprayed at a low pressure. I want this to be a pretty weathered example so left lots of dark areas to simulate wear and tear. I put a little more emphasis on the control surfaces to simulate the fabric covering - I didn’t ‘marble’ the canvas covered rear section either as I want this to have a different look to the metal parts of the fuselage. This was then followed with a coat of Tamiya sky, mixed with a little white. Again a very thin mix. I know that Tamiyas version of sky green is a little dark but it’s light enough for my taste. I think any lighter and you could start missing the green tones. So happy enough with this. I think Johnny would be happy enough too😉 Next up will be the green brown camo scheme... See you soon😊 John
- 86 replies
-
- 9
-
-
- 1/72
- Johnny Red
- (and 1 more)
-
That's interesting - I've heard advice along these lines before but not as detailed as this. Since doing this model, I've bought some Gunze setting solutions - which I used on my hurricane trop - and have to say they seem to work much better than the microsol / microset that I've used up until now. I think the Mr Softener is much more "hot" than a lot of other solutions - it works really fast. I've tried using warm water on Tamiya decals but not as hot as described above. I think I'm a little cross with myself in this case, as to me the way the decals came out on this model were disappointing - they didn't ruin the model for me, but they do take away from the overall finish. The other thing about Tamiya decals is sometimes, they're actually fine - I have obtained some good results with them - but they always seem like gamble - sometimes they work, other times they don't. I have aftermarket decals for most of the tamiya kits in my stash at this point but if I do decide to use the kits ones again, I'll follow this advice to the letter. Thanks Troy
-
Hello all - so I saw this and thought that this looked very cool - maybe unrealistic but love the idea of the quick patch up on the side of the fuselage- maybe done between sorties during a major battle. So got some plasticard - the thinnest I had, and sanded it down further. Then cut into rough shapes and attached to the model. This was a test fit - I sanded them down further but I think this will add a nice little point of interest to the model. I drilled out the gun openings with a hyper dermic needle and enlarged them slightly with a hobby knife. With that she was ready for some primer. I used my usual mr surfacer black primer thinned 50/50 with mr leveling thinner - it went on fine but the primer showed up some issues here and there. Nothing major but I spent a while longer sanding out some imperfections. Final coat went on last night so I can start the paint soon... My abandoned previous kit is now a distant memory 😎
- 86 replies
-
- 7
-
-
- 1/72
- Johnny Red
- (and 1 more)
-
Eduard 1/48 Messerschmitt Bf 110C
Kitchen Modeller replied to Roger Newsome's topic in Work in Progress - Aircraft
Lovely stuff roger - love it 😍 -
Eduard 1/48 Messerschmitt Bf 110C
Kitchen Modeller replied to Roger Newsome's topic in Work in Progress - Aircraft
Nice work so far Roger - really like how you did the office and the pilots ip looks especially nice... 👍 What scheme are we going for...? The one pictured above? Or am I jumping too far ahead? No pressure. WHAT SCHEME??? -
Thanks Richard - me too 😊 just got done priming it tonight - had quite a few bits to sort out and lots of touch ups but got there in the end - some progress pics will be posted v soon...!
-
Mustang dual build: Royal Class box
Kitchen Modeller replied to Holzhamer's topic in Work in Progress - Aircraft
I'm in New Zealand - so maybe it's a bandwidth issue - I know that the lazy loading protocol that Britmodeller started using with the server upgrade has been pretty detrimental to the site performance. Certain image libraries don't play well - I use imgur which is free and seems to work better. It's a shame as I'd imagine alot of people have the same issues with not being able to see photos.