

Kitchen Modeller
-
Posts
990 -
Joined
-
Last visited
-
Days Won
7
Content Type
Events
Profiles
Forums
Media Demo
Everything posted by Kitchen Modeller
-

Tamiya 262A 1-a 1/48
Kitchen Modeller replied to Kitchen Modeller's topic in Work in Progress - Aircraft
Thanks Walter - you’re welcome along 👍 -
Tamiya 262A 1-a 1/48
Kitchen Modeller replied to Kitchen Modeller's topic in Work in Progress - Aircraft
Hi all - hope everyone is surviving their house arrest okay - I am mostly good but as we have small kids in the house it can sometimes be a struggle. I'm able to sneak a little time at the bench each day so I have that going for me. Nowhere nearly as much time as I would like! But you gotta do whatever it takes to keep things ticking along. Thanks Johnny - I was in two minds about using these but I think they can work, especially if they're lining a wall or something - they don't look quite so 2 dimensional So some progress to show... With the gun bay complete, I turned to getting the fuselage half's together which meant some work on the main wheel bay: The gun bay was attached to the metal forward wheel bay that's supplied in the kit - this is a nice addition by Tamiya and means that the model won't be a tail sitter - one less thing to worry about. The fuselage insides were painted with Mr Color Silver 8 - I painted the oxygen tanks with Tamiya Field blue as per the instructions - then it was dirtied up with some panel line wash. With these parts complete, I could close up the fuselage. This was a tricky process as I had to use both CA and cement - CA for where the metal wheel bay joins and CA everywhere else. The fit was very good however so everything went together very easily. The wings where then attached: Again the fit was good - a few little gaps here and there but nothing that can't easily be remedied. I added some PE wiring to the main wheel bay: I still need to glue the wires to the underside of the cockpit tub - and press the PE closer to the wall - I tend to glue these bits in place first at a couple of points first and after a day push the rest of it into place. I'll put a wash on them also so that they're not so clean looking. The nose section was added after I drilled out holes for the gun ports - there was a slight gap which was filled with perfect plastic putty. A small gap on the starboard wing root also got some PPP The join where the wing section meets the fuselage on the underside had a slight issue - there was a slight step - so I put on some tamiya white putty - this will be left to dry for a few hours before I sand it smooth. I'll need to rescribe and rivet this area later but it shouldn't be too hard. Finally I attached the resin parts to the wing for the exposed engine - probably the most ill fitting part of this build but it seemed to fit into place without too much fuss - I'll need to spend some time filling and sanding this area but again, I don't think it will be too hard. So I'll continue with the main construction for now - there are a few problem areas that need cleaning up but it all seems straight forward at this point. I'm aiming to get primer on this week and hopefully start painting soon after that. But it usually takes me a while to get to the painting starting whistle but we'll see how things go. Cheers - see you soon. John -
Tamiya 262A 1-a 1/48
Kitchen Modeller replied to Kitchen Modeller's topic in Work in Progress - Aircraft
Thanks Dunny Thanks Johnny - I did play with doing the airfix kit - I've seen some very nice finished examples - yours was quite spectator - loved the scheme you went with However 1/48 has kind of stolen my heart A little more progress to show. Next up was the gun bay - this will be exposed on the finished model so I wanted to make sure it looked the part. The walls were painted with Mr Color silver 8 - then I painted in some shadows with Alclad Steel which is a dark brown colour - not sure how effective this was but it certainly dirtied things up. I followed that with a a good splattering of Tamiya Panel line wash black with the excess mopped up with a cotton bud. The guns where first painted with Alclad steel - but I wasn't sure on the colour so went over them slightly with Tamiya X10 - Gunmetal - but turns out this is basically the same colour, so that was kinda pointless. So I did a little dry brushing with the Silver 8 and finally a wash of Tamiya panel line black. It's hard to photograph this as it's metalic but hopefully you get the idea - the wall and base sections were also dry brushed to make them look a little more worn and burnished. Putting it all together, I added some of the Eduard PE - some wiring which actually fit well and looked nice to my eye - I've never bothered with the "wires" you often get on these frets - so was surprised when they looked the part. Once this was complete, I tested out the fit with the fuselage. And with the wing section: The fit on this is very nice so far - which is great as I've really struggled on the last few projects - where you need to fight the kit at every step. I don't mind a little complexity when building but if it's a constant battle, it really destroys my mojo. Sometimes a nice shake and bake kit is just what the doctor ordered. So everything looks good so far - the next step will be the wheel bays and then closing up the fuselage. Cheers John -
Eduard 1/72 Messerschmitt Bf110D
Kitchen Modeller replied to SaminCam's topic in Work in Progress - Aircraft
If you’re really unhappy, you can just sand them out but that also means alot of re-scribing and of course redoing the rivets. If you’re careful you can wipe out specific lines - you will sand over lines you want To keep slightly but it’s easy enough to redo them. I went through this process many times on the FW190 I did last year before I realized the rivet tool I was using was actually wobbly 😬 The other thing to bear in mind is that although certain ‘bad lines’ stick out like a sore thumb to you, most viewers will never spot them. I found this out scrutinizing plasmo’s builds - his rivets seem perfect at first glance - but if you really look... not so much! It’s the overall effect that people see - not individual slightly out lines. -
Tamiya 262A 1-a 1/48
Kitchen Modeller replied to Kitchen Modeller's topic in Work in Progress - Aircraft
Thanks Adam - very easy modification to do! Steal away Christer😎 Thanks Johnny 👍 If you don’t mind the scale, this kit is excellent so far and there seems to be lots of aftermarket available for it... I’ve heard the recent airfix 262 is a good choice in 1/72 - Looking at your luftwaffe collection that you posted the other day (which is awesome so far) I did notice a large 262 gap😎 You also need a 190D-9. And maybe a Stuka to round things off 😊 Great that you’re sorting out the 110! I did some more work on the cockpit last night - the mojo is strong at the moment! All that was left to do was paint up the gunsight and control column- install the seat belts and do the final assembly... I attempted to paint up the wiring with Vallejo yellow but that didn’t work very well - even with them primed - Tamiya flat yellow worked a lot better. The eduard seltbelts were nice but needed dirtying up with some Tamiya panel line dark brown. Probably not my best cockpit - I haven’t done a late war luftwaffe cockpit for quite a while so it’s tricky working with that dark grey. The ip could be better too - noticed that some of the decal gauges are slightly out - but still it’s not terrible overall - so I’ll move on the next thing. Cheers John- 54 replies
-
- 10
-

-
Eduard 1/72 Messerschmitt Bf110D
Kitchen Modeller replied to SaminCam's topic in Work in Progress - Aircraft
Looks great so far - nice work on the rivets! -
I would try to dry fit the rest of the cockpit before committing to these parts - it’s a very tight fit even with the kit parts and the tolerance is very low - so you could end up having a hell of a job closing the fuselage. It’s a nice kit but it’s quite unforgiving!
-
Tamiya 262A 1-a 1/48
Kitchen Modeller replied to Kitchen Modeller's topic in Work in Progress - Aircraft
That would have been nice - I’m no expert on resin moulds but seemed strange to do it like that - I’m sure they had their reasons... I’m giving them the benefit of the doubt since the engine was so good 😊 Thanks guys 😎 I’ve been hacking away - doing what I can in the limited time I get these days. But have made a little progress... Next up was the cockpit - I had the eduard PE set which had a Instrument panel - to use this I would have to scrape the detail off the kit part. However, I thought the kit version looked quite nice so decided to have a crack at using this. If I didn’t like result I could always revert to the pe version. So painted this up with Tamiya German grey, and put on the decal. I thought this didn’t look half bad so decided to stick with it. The problem with the pe parts is that they are quite flat - panels were provided for the side consoles too but again I went with the kit versions. I drilled out some holes for the gauges wiring on the back using a hypodermic needle. For the other cockpit parts, I first painted them with Gunze silver 8 - followed by a coat of German grey. I highlighted these by adding white to the paint mix and spaying on the corners and areas I wanted to fade slightly. As I used silver for the under coat, I was able to use a tooth pick to scrape off some marks on the top layer. I used the pe fret to replace the foot-pedals - however these will be quite invisible once covered up. I gave everything a wash with Tamiya panel line black - wiping away the excess with a cotton bud... then painted in some details - buttons and gauges. I added in the IP wiring with .5 copper wire. These will get painted later. I painted up the seat cushion with vellejo model colour paints - I used red leather for the base colour and added shading with lighter and darker colours. So that’s it for now - still lots to do on the cockpit but I should get it finished off fairly soon. More updates will follow shortly. Thanks for looking in! Cheers John- 54 replies
-
- 11
-
-
Eduard 1/48 Messerschmitt Bf 110C
Kitchen Modeller replied to Roger Newsome's topic in Ready for Inspection - Aircraft
Lovely work as usual Roger - if it gave you trouble, you can’t tell from the result. Looks like a very nice 110 from here👍 -
Tamiya 262A 1-a 1/48
Kitchen Modeller replied to Kitchen Modeller's topic in Work in Progress - Aircraft
Thanks Johnny - even nicer now it's finished I hope: I painted up some of the wires with Vellejo Yellow and Tamiya Metallic Bronze - put some more washes down just to tone down some the shininess is places. I'm quite pleased with how this came out - really the quality is in the resin by Aires - It was worth the work to get to this point - hopefully it looks good under that wing I can now turn my attention to the actual kit - work on the cockpit will start shortly... Cheers John- 54 replies
-
- 19
-
-

-
Tamiya 262A 1-a 1/48
Kitchen Modeller replied to Kitchen Modeller's topic in Work in Progress - Aircraft
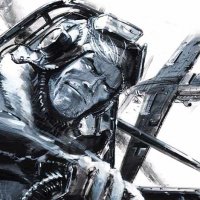
You’re more than welcome Johnny! Thanks for that Marklo - I’ll have to check that out. Garland is a fascinating character. A little more progress to show as I’ve been working away on the resin engine. I glued the main components together with CA glue and attached some wire... I left off the main exhaust tube so I could paint the interior more easily. I then primed the whole thing with Gunze GX2 black gloss. Then gave it a couple of coats of gunze silver 8 - I did some highlights with Alclad airframe aluminum. I masked off the center section and painted that with Tamiya flat black - then used the same paint to simulate some staining on the rear of the exhaust. The front section got a heavy wash with Tamiya panel line black. This acted like a filter, giving the metal finish more of a grey steel look. I wanted to show some heat marks on the main outlet so I mixed up a very thin mix of Tamiya flat earth mixed with some metallic bronze. This was lightly sprayed over the panel lines... I then gave the rear section a wash with Tamiya panel line dark brown - this was more of a pin wash. So that’s where I’m at - next up I’ll do some more detail work, painting some the wires and components - After which it should then be just about done... See you soon😊 John- 54 replies
-
- 17
-
-
Thanks guys
-
Tamiya 262A 1-a 1/48
Kitchen Modeller replied to Kitchen Modeller's topic in Work in Progress - Aircraft
Yep it’s proven very useful for this resin engine so far - couldn’t have a better tool for this job. Or maybe a Proxxon micro mot... mmmm 😋 -
Hi ho folks - straight off finishing Johnny Red’s Hurricane, I’m pretty eager to start a non hurricane related subject / since my last 3 builds have been the same aircraft.😊 So lets wash that type out of my hair with something completely different: It’s Tamiya - apparently it’s a very nice kit so I’m very much looking forward to possibly not having to break the laws of physics trying to make things fit😂 That said I didn’t want to make things a little too easy on myself... I bought some Aires resin engines to spice things up a little. There’s 2 in the pack but I’m planning to only use the one. I’ve also got some PE frets and canopy masks... the pe is mostly for the cockpit though there is some for the gun bays. Lastly, I bought some decals so I can avoid working with the decals from Tamiya... This is also the scheme I’ll be using - It was supposedly flown by Adolf Garland when he was evaluating the type. There’s a lot of discrepancy in terms of the accuracy of the scheme- different sources state different colours but I’ll muddle my way through I’m sure. Anyone with something to contribute in terms of the scheme would be greatly appreciated 👍 Im expecting the kits to be a straight forward build so I decided to get into the resin engine - I’ve never tackled one of these before so there was a little apprehension. I started by sawing off the base blocks off the main components- and sanding them clean - I dipped all my tools into water while doing this and wet sanded the parts in an effort to reduce resin dust going everywhere. Pretty soon I was able to dry fit the main engine parts. The detail on this thing is spectacular to say the least - it’s a kit within the kit and can’t wait to see how it turns out when painted. Most the work here was quite easy however the part that attaches to the wing was not. You can see the amount of material you need to remove from this part - left side shows how the part comes - and after I’ve finished reshaping. I scraped most the material out with a curved blade. With all that done, I was able to dry fit this onto the wing; Not too bad - there will be some filling, sanding and re scribing in my future but I’m happy with this so far. Check back soon for another update on this lockdown build😎 Cheers John
- 54 replies
-
- 14
-
-
I guess it comes down to that tricky balance - if you think the problems are surmountable, and you push through- then the reward is great - plus you know that the kit didn’t defeat you! However, if the problem is unfixable - or requires more effort than you’re ready to give, or means you need to compromise on accuracy or the overall finish, then there’s probably little point in continuing - it’s hobby after all - if you’re not enjoying it, or not getting what you want from it, then bin it - or shelf of doom it. Move onto something else. With this project, the issue was caused by a critical mistake which meant continuing would have meant a big compromise on the final finish. So I knew if I had another crack at the kit, it should be easy enough to mitigate those issues. So I’m glad I was able to complete and that the kit didn’t defeat me😊
-
Thanks Pete! Thanks mate - it’s one of those kits that tests you at every step - I think I’m just relieved now that I don’t have to work on it anymore😊 however if you can deal with the pain, you end up with quite a nice model. RFI pics are up here: Cheers
- 86 replies
-
- 1
-
-
- 1/72
- Johnny Red
- (and 1 more)
-
Yeah, that struck me when I was doing the decals - it does look a little odd but when I look at the comic ‘references’, I’m okay with it! I can’t recommend the comics enough! They’re great fun - if you want to start with the original, start at the beginning as the quality definitely trailed off towards the end. Or just get the Garth Ennis reboot - which the excerpt above is from - it’s just excellent 👍 @(ex)Sgtrafman, @bigbadbadge - thanks guys😊
-
Hi all - hope everyone is doing okay this weekend. I was able to get some bench time between working from home and looking after kids - so I was able to get this project over the line. Johnny Red was a comic character from the British War comic "Battle" which was published in the 70's and 80's - Johnny was a disgraced former RAF pilot who found himself in Russia during the war - fighting with his adopted squadron "The Falcons" against the ghastly Germans in his Hurricane Mk1. The story ran for many years until Battle went out of print in the early 80's. Comic book writer Garth Ennis (of Preacher and The Boys fame) rebooted the character a few years ago which was a retelling of the original story aimed at an older audience. As a huge fan of the original and the reboot - an attempt at doing Johnny's Hurricane was always on the cards since I returned to the hobby - I chose the Arma Hobby kit - built out of the box with some custom made decals for Johnny's Hurricane. I found the kit a challenge - I actually did 2 - the first attempt was abandoned after I messed up on the construction - It's a nice kit but the instructions are quite minimal - with no indications how assemblies should look when complete - so you really have to feel your way round. I wouldn't recommend this kit to beginners. You can read all about my up's and downs onthis project over at the WIP: I'd like to thank my friend Richard @Gazontipede who was a huge help with the design of the decal sheet and very helpful and supportive of this project. Like me, he's a huge Johnny Red fan and has a vast knowledge of the air war in Russia - his enthusiasm for the subject was quite contiguous, so alot of Soviet WW2 aircraft has sneaked into the stash as a result So thanks Richard - this one's for you Painted with Tamiya Acrylics with oils and mig washes for the weathering - Metallics are Alclad and Mr Color - and I scratched up the tip landing lights. Thanks for watching John
- 15 replies
-
- 46
-
-
-
- Hurricane
- Arma Hobby
- (and 1 more)
-
Hello all - Well that was an interesting week - as I’m sure it was for you too... I wasn’t able to get as much time at the bench due to current events but since we’ve been locked down these past few days I was able to bring this over the line. Where I finished last time, I did some oil paint work. Really I just wanted to accentuate what I’d already done, adding a little more depth and wear and tear. So I darkened some areas where dirt might have built up - I used my abteilung oils paints - industrial earth, white and black to make a mix and applied them to some panel lines. I used yellow mixed with green to highlight some other areas... I faded the roundels using pale blue and white. Still not happy with how that turned out. I have yet to weather a roundel that looks convincing to my eye but I’ll persevere. The masking came off the windshield and cockpit - so no blotches or problems there - always a nice moment 😊 Landing struts went in... And I painted up the exhaust stacks with alclad Metallics - aluminum base, followed by exhaust manifold- with some highlights with pale burnt metal. Wheels were painted up and weathered. Wheels were weathered by mixing up some pigments with water and then painting on the mixture - after this had dried, I removed the excess with my fingers. Fast forward to tonight... All the bits have been installed and she’s finished. I’ll get some beauty shots up at some point tomorrow so these are a little preview. I’m pretty happy with how she turned out - however I still want another crack! As nice as this is, I’d like to do another one in 1/48 - maybe with a figure. The last 3 kits have been hurricanes so I’ll be taking a long break from them for a while. Still love the hurricane though. But I won’t be doing this kit again - it’s nice but it was tricky as hell - very experienced modelers won’t have too much trouble but having attempted it twice, it can really throw you in some places - better instructions would probably solve a lot of the problems - without any reference for how things should look, you have to work in the dark a fair bit. So thanks everyone for following along on this troubled build - got there in the end though it was touch and go for a while there - just like all the best Johnny Red stories! I hope you’re all keeping safe and healthy where ever you are. Look after yourselves - and I hope you find yourself with lots of time at the bench...! All the best - John
- 86 replies
-
- 10
-
-
- 1/72
- Johnny Red
- (and 1 more)
-
Thanks Pete - yeah, I’ll fade them slightly- probably with oil paints. @Jon020 Thanks Jon - I’ve built that kit - a while ago now but remember it being quite nice. This one has been a bit of a challenge but once you know where the pitfalls are, they’re easy to avoid...
- 86 replies
-
- 2
-
-
- 1/72
- Johnny Red
- (and 1 more)
-
Rightio folks - so a little more to show, what else am I going to do on a Sunday..? We're on the homeward straight now I think so the mojo is going quite strong. Did a little more work on the bits - painted the nose cone - It was first painted with Alclad Aluminium, then with flat black. For the red, I used a mix of Tamiya X7 red and a little XF 64 red brown - I didn't actually have any Flat red so it came out a little glossy - I then chipped off some of the red to reveal the alclad underneath. Finally, this got a clear flat coat to tone down the gloss paint. I'm quite happy with the colour - it almost matches the red falcon insignia perfectly. Seems to look quite light in the photo but its actually much darker in reality. Painted the wheels - Alclad aluminium, then masked off the rims and painted the tires Tamiya rubber black. The wheels are quite a nice mould with the dunlop stamp visible on the side there. I gave them a a wee wash of tamiya panel line brown just to bring out the detail a little. The prop was also painted - rubber black on the props and flat yellow mixed with a dab of red on the ends. Ignore the little hair on the prop there please Started the weathering on the hurricane with a pin wash on the panel lines - I used Ammo Mig Panel line wash - light grey on the underside and tamiya panel line wash on the top - the grey wasn't very effective on the camo but the dark brown worked fine. When this was dry, I gave the whole model a coat of Testors Dull cote followed by another about 2 hours later. The nice thing bout this stuff is that it really goes to town with the colours - lightens everything up - and you can really see the subtle tones in the paint. Plus it's really really matt - and for me this really works quite well with models in this scale. It's very hot however and can really make a mess of things - one of the reasons I used humbrol gloss clear is that this seems to work very well with it. But if you put in on Aquagloss for example it will crack the previous coats leaving a very horrible mess. (ask me how I know) But this time, all went to plan and I'm really happy with the result. So I'll do a little further weathering with oil paints next - however I'll probably keep this to a minimum this time as I think the paint job does a good job of portraying a battered looking bird. So it will be exhaust smoke, gun smoke, oil stains and things like that. I might add a few more variations in the paint but we'll see. Hope everyone is doing okay - I'm really finding doing a little modelling is very helpful for my head at the moment - hopefully you all have the ability to get some time on the bench. Cheers John
- 86 replies
-
- 9
-
-
- 1/72
- Johnny Red
- (and 1 more)
-
Well, you've got the falcons decal PDF so you have the option of trying different types of decal paper - something that I might try to do on the next falcon model as this batch were a little disappointing - together, Richard, we'll crack this nut Plan is to go for a red spinner :) Cheers John
- 86 replies
-
- 2
-
-
- 1/72
- Johnny Red
- (and 1 more)
-
Blast from the Past - Desert Typhoon in 1/48
Kitchen Modeller replied to Christer A's topic in Work in Progress - Aircraft
I think that will do nicely:) Looks pretty good from here. -
Yep pretty much. Not ideal I know. There is some visible carrier film but only from certain angles. It’s not a perfect result but I’m still happy enough with how they turned out.
- 86 replies
-
- 1
-
-
- 1/72
- Johnny Red
- (and 1 more)
-
Awesome work there Sam - she came out beautifully- like the chipping you did / looks bang on... That 110 looks very nice too 👍