-
Posts
71 -
Joined
-
Last visited
About Spellbinder99
- Birthday 05/12/1961
Profile Information
-
Gender
Male
-
Location
Adelaide, South Australia
-
Interests
SCI-FI, modelling and reading. Video Games.
Recent Profile Visitors
1,655 profile views
Spellbinder99's Achievements

New Member (2/9)
49
Reputation
-
This is the new 1/72 scale Eagle kit from Round 2/MPC. A brilliant molding it is essentially a scaled down version of their earlier 1/48 22" kit. Very precise fit to the point a coat of paint can make it very hard to separate the parts when test fitting. The spine is now two parts, top and bottom and fits really well. the Engine section is a fairly complicated assembly mainly due to the many connection points to line up. Model painted with Dupli-color Diamond White and Tamiya spray cans.
-

Moebius Raptor and Armament Set
Spellbinder99 replied to noelbarnes's topic in Work In Progress - SF & RealSpace
I saw examples of both the Raptor and the add on weapon set in a Collectables shop in Adelaide a week ago so someone is importing them. Pretty pricy though. Cheers Tony -

Beaufighter Comparison Build
Spellbinder99 replied to Enzo the Magnificent's topic in Work in Progress - Aircraft
A valid point stever219, but Airfix themselves quote the wingspan in mm on the kit instructions so converting the real wingspan to that in mm was just easier. Be aware I did the conversion in feet and inches and it still showed the Airfix kit as accurate and the Hasegawa wrong. Cheers Tony -

Beaufighter Comparison Build
Spellbinder99 replied to Enzo the Magnificent's topic in Work in Progress - Aircraft
The overall wingspan of the Beaufighter is quoted as 17.65 meters from several sources online. That is 17650mm. The quoted wingspan of the Airfix Beaufighter off the instructions is 246mm. 17650 divided by 72 equals 245.1mm. Close enough for me if the Airfix quoted wingspan is correct. Hasegawa does not always equal ultimate accuracy. Their Spitfire fuselages are a case in point. Cheers Tony -

Beaufighter Comparison Build
Spellbinder99 replied to Enzo the Magnificent's topic in Work in Progress - Aircraft
Be aware that the much mentioned "bulkhead" behind the pilot was actually a removable armour plate panel with two doors in it. Most in-service RAAF Beaus had it removed apparently for access reasons. It also makes me smile when I see a Beaufighter model builder replace the seat with a fixed bucket style seat, as the back of the pilots seat hinged flat so that he could reach up, grab the overhead trapeze bars and drop straight down through the escape hatch between the wing spars. Thus the seat was a very distinctive design with a pivot in the centre. If memory serves the seat back release happened at the same time the escape hatch swung down so that escape became one fluid motion after the internal release handle was pulled. I only know this because I did it a few times in Moorabbin Mk 21 back in the days it was still parked outdoors on sand so the subsequent fall 10 feet to the ground was a little softened! Ah the silly things we do when young! (and pre-nanny state OHS laws....) Cheers Tony -

1/48 RAAF Beaufighter Mk 1c 30 SQN
Spellbinder99 replied to Harvs73's topic in Work in Progress - Aircraft
That was a Beaufighter Pete, but the quote refers to the turret armed MkII as the turret basket pretty much blocked the pilots escape hatch so access was only possible via the overhead panel in the cockpit. The combination of the Merlin engines and the Defiant style turret directly behind the cockpit apparently was not a winner! Cheers Tony- 40 replies
-
- 1
-

-
- RAAF
- Beaufighter
-
(and 1 more)
Tagged with:
-

Honorverse Highlander Class LAC
Spellbinder99 replied to Niall's topic in Work In Progress - SF & RealSpace
Great work Niall. I have been reading the Honor Harrington series on and off and agree it makes good sci-fi reading. Not to be too bold but would it be possible to get a copy off the .stl files as I would love to try printing this myself on my 3D printer, maybe even in 1/350 scale. Cheers Tony -
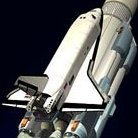
I have seen a couple of online builds that went that way Phil and the Buran is straight forward as Anigrand do a quite nice resin cast one in 1/144. I will be using a set of the Anigrand decals for the Buran Orbiter. The main issue would be that you would still have to scratch build the centre section with the inner two engines and the fuselage stretch is not just a straight cut and splice job. Good detailed drawings of the An-225 are fairly rare as well. The mounting struts for the Buran will basically have to be an eyeball job, helped by the fact that the plethora of bulges on the Myria's upper spine are fairings for them so at least give a starting point location wise. Cheers Tony
-
Yes it is Mark, very much so! She currently has 4 engines on the wing and the 5th about to come off the print bed so it continues to progress nicely. I will post some more pictures once it has all six installed. Still more PSR to do but it looks better every round. Apparently our club will have a tutorial on scribing next meeting which will dovetail nicely with starting that job. Cheers Tony
-
No worries Ryan, I will have it at the club meeting next month. Hoping that this will be my first entry for many years in the model show later in the year. Currently working on the lefthand inboard engine. Cheers Tony
-
I smoothed down the wings enough to attach them and start smoothing the joints. I seriously underestimated how much real estate this model takes up! I have added an old project KC-135/AWACS WIF to give scale. Have to print and clean up the last four engines and then some more smoothing and sanding and attempting to engrave this behemoth! Cheers Tony
-
Smoothed cockpit area and starting on the wings and engines. A point to note is that the tail section is about the size of a 1/144 727's wingspan! Cheers Tony
-
More Putty-Sand-Repeat but I feel she is getting there. Completed printing the left hand tail unit and spent some time thinning and sharpening the trailing edges. You can see the completed job on the left-hand horizontal, vertical and right-hand vertical tails, the right-hand horizontal still need work.
-
I am sure that given your current workbench activity Radleigh I am sure it would fit right in! I am equally sure that I will almost get this finished and Amodel will finally release their much promised (2009) 1/144 kit. I did momentarily consider cleaning up the prints and having a go at resin casting them but sanity prevailed as 3D printing and modelling is enough of a learning curve for now!


