

Brotrob
-
Posts
9 -
Joined
-
Last visited
Content Type
Events
Profiles
Forums
Media Demo
Everything posted by Brotrob
-
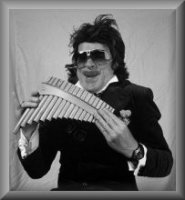
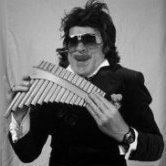 Hi all, After the lessons learned posts on the Albatros DV and the Siemens-Schuckert DIII, it’s now time for the third and final one of my past builds: The Albatros DI of Otto Höhne by Roden, in 1/72 scale. The Albatros DI was the first of the famous line of Albatros Scouts, designed by Robert Thelen in 1916. Thelen was the chief designer at Albatros, and responsible for many Albatros designs. I chose to build the machine of Otto Höhne of Jasta 2, 1916. Whilst Höhne did not accumulate the impressive number of victories as some of the famous aces of WWI (he had 6 victories credited to him by the end of the war), he was the first fighter pilot to score a victory with an Albatros scout. Here’s an excerpt mentioning Höhne from the Osprey Duel 55 Fe 2b-d vs Albatros Scouts “The many duels between FE 2s and Albatros scouts began upon the frontline arrival of the new Albatros D I scout in 1916, which coincided with Germany’s premier ace Oswald Boelcke forming Jagdstaffel 2. A new and permanent unit type, Jagdstaffeln were born from the reformation of temporary Kampfeinsitzer-Kommandos (KeK, or fighting single-seater commands) that were dedicated to aerial interdiction following their equipment with single-seater scouts. Yet for weeks Jasta 2 was burdened with just a smattering of Fokker and Halberstadt D machines, rather than a full complement of Albatros’s new twin-gunned fighter, although Offz Stv Leopold Reimann arrived from Jasta 1 in late August and brought one of the new pre-production Albatros D Is with him. Boelcke used this meagre ‘fleet’ for training during the first half of September, but on the 16th – the day Jasta 2 finally received its first allotment of Albatros D Is, as well as its D II prototype for Boelcke – he led some of his pilots aloft. At 1800 hrs Ltn Otto Höhne shot down his and Jasta 2’s first FE 2b (6999 of No. 11 Sqn).” And here is a beautiful picture of Otto Höhnes Albatros DI D 390/16 in flight: The Roden Kit is of good quality and detail, and part of a big series of Albatros kits, therefore offering many options for different types and sub-types. This versatility does not come without disadvantages though. The top wing is split in three sections, and assembling a perfectly straight wing profile is not straightforward. In addition, the forward fuselage needs quite a bit of work to, but the end result can look accurate. Things I wanted to try with this kit Despite the good finish achieved with the airbrush in my previous kit, my lazy nature made me try once again if I can create a good finish just with brushes, avoiding the dreaded airbrush 🤔 The completed model The lessons learned whilst building this particular kit I can’t create a good finish without an airbrush. Shouldn’t try again! I built this kit without having access to the original pictures. Knowing them now, I believe the wood varnish on the fuselage is probably a bit too bright, and could maybe be a bit darker I should not apply rigging by making a knot around the struts with the thread, but only use through-holes instead The colours of the wings may be inaccurate, as some early Albatros had a three-color scheme for the wings Super-glue creates a grey dusty coat around the areas it is applied to. Maybe avoid using super glue when possible The top wing is not perfectly straight. Should have used a rig when assembling it from the three pieces The finish I chose seems a bit too matte, and should be silkier Building a kit with photographic documentation from the start is more satisfying than building one where the paint scheme is largely based on assumptions or box instructions only This was the last of my youth-builds, and hopefully, I can share my first adult builds this year. Whether they will be any better than my past builds, or much worse, remains to be seen 😎 Best regards, Rob
- 18 replies
-
- 33
-

-
- Albatros DI
- 1/72
- (and 1 more)
-
Ho Roger, How funny! Long after I built this kit I saw the white rudder version, but always thought it was just opinion. Now, that you mentioned it, I had a look at the image of the SSW I posted above, and in its left corner, you can actually see that the rudder was not red. Thanks for pointing this out! It is easy to correct with my spare rudder though Rob
- 8 replies
-
- 1
-
-
- Siemens Schuckert
- 1/72
- (and 1 more)
-
Hi all, After the “Lessons learned Albatros DV ” I’m now showing the second of my past builds: Tokos (Eastern Express) Siemens Schuckert DIII. Tokos SSW kit offers modellers the choice to build an SSW DIII or an SSW DIV. The detail of the kit is outstanding, for 1/72. Unfortunately, the kit only contains parts for an accurately scaled SSW DIV, as the SSW DIII option is not possible to build out of the box without addressing some serious scaling/accuracy flaws, which are: The elevator is too small for a DIII The upper wing us too narrow The spinner is too small To illustrate the inaccuracies, here is a comparison of a spare kit I bought with Dick Bennets 1/72 drawings from 1991: On top of that, the Lozenge decals are not accurate at all, as they are far too bright, and the same for top and bottom surfaces. Things I wanted to try with this kit Despite the kits shortcomings for the SSW DIII option, I chose to build it, in Ernst Udets markings, because it combines a colourful paint job with a prominent ace status of its pilot. Here are some original photographs of the SSW: This was the first kit where I decided to: Make serious changes to the dimensions of major parts of the aircraft Apply Lozenge decals Use the airbrush The completed model I decided to increase the depth of both the elevator and the top wing using an unusual and very lazy method. I folded a piece of simple transparent adhesive tape around the wing and elevator, respectively, letting the folded edge of the tape stand off the original edge of the upper wing/elevator and therefore increase the depth of both parts, respectively. With the paint and lozenge decals added, this solution generated acceptable results. Regarding the bright Lozenge, I sprayed a very thin mixture of black on top of the decals for the top wings, to darken the colour. It looked less bright, but was a) still not an accurate representation of 4 colour Lozenge and b) not applied diagonally. Then, I tried to manually paint some of the hexes of the bottom wing lozenge with colours more typical for underside Lozenge, which looked quite bad in close-ups. Rib tapes were added with a black permanent marker, again out of laziness and ignorance of the true colour of rib tapes. The lessons learned whilst building this particular kit 1. I should just have bought proper Lozenge decals instead of trying to improve the ones from the kit 2. Changes to components can be achieved quite easily, and are worth the effort 3. Airbrushing is worth the effort too, even in 1/72 Best regards, Rob
- 8 replies
-
- 30
-
-
- Siemens Schuckert
- 1/72
- (and 1 more)
-
In 1/144! Wow - it could be a 1/72 and would look decent still. Well done on the rigging and the spoked wheels!
-
Very interesting. I was considering exploring this option, but hesitated. Do you have example pictures of models finished in acrylics using brushes? I'd be very keen to see the finish quality you can achieve with water-based colours. It would be great if it worked really well because I could say goodbye to smelly enamels...
-
Hi all, Having just joined this forum, I thought I'd share 3 builds from my youth, and the lessons learned for each of them before I start sharing current builds. Many many years ago I build the old 1/72 Airfix Albatros DV. The kit is from the 50s, originally, and has been re-boxed multiple times. I got it in this box, many of you might remember it: The plane I chose to build was a Jasta 5 crate, shown in this picture, as it looked so beautifully elegant: Things I wanted to try with this kit This was my first WWI kit I decided to: Rig - I got transparent fishing line and pulled it over a black permanent marker. Paint using masking tape - I cut the star out of tape and painted the green fuselage band around it Angle the control surfaces The model was painted without an airbrush. The completed model The lessons learned whilst building this particular kit Rigging is much less daunting than it seems and adds nicely to the finished model Masking tape works, even with brushes Angling control surfaces is a nice touch and worth the effort in 1/72 A windscreen and propeller decals for the manufacturer logo are also quick wins in terms of added realism A semi-gloss finish looks nice, especially on varnished plywood, but reveals every unevenness of the paint job 😮 A great finish using brushed enamel paint is very difficult to achieve - airbrushing might be unavoidable Best regards, Rob
- 9 replies
-
- 21
-
-
- 1/72
- Albatros DV
- (and 1 more)
-
Hi Stuart, Your Tripe looks excellent, especially the rigging looks very realistic. Do you remember the diameter of the fishing line you used? Was it 0,1 mm (0.039 inch) by any chance? Or did you manage to find an even thinner fishing line? Rob
-
Hi all, My name is Rob, I used to build plastic models in my youth with a particular focus on 1/72 WWI aircraft. Here's Otto Höhnes Albatros DI I built 15 years ago: I am apparently rediscovering my old hobby, and to my astonishment, started to try my not-so-steady-anymore hands on the 1/72 Revell Fokker Dr1 to see whether I still have it in me And so, as I lived in the UK for over 6 years, I thought I'd feel quite at home in this forum, despite the fact that I live in Berlin now. Thanks for having me! Cheerio, Rob
-
Interesting. I just bought the Uschi line, and find that its cross-section is flat. Depending on the angle you look at it, it varies in diameter. Worse, if there is the lightest twist in the fixed line, you can see that it has a flat cross-section from any angle. Did you find a way to overcome this apparent challenge? BTW: I am also suspicious that the Uschi line will lose its elasticity over time and start sagging. I already found that it reacts badly with certain types of paint when brought into contact with it, occasionally. Therefore, I decided to stick with 0,1mm black or transparent fishing line for the moment...
