

RC Boater Bill
-
Posts
514 -
Joined
-
Last visited
Content Type
Events
Profiles
Forums
Media Demo
Everything posted by RC Boater Bill
-
A post on the “Seaways Ships in Scale” site 20+ years ago recommended this book: “CSS Alabama Builder, Captain, and Plans” by Charles Grayson Summersell. Published by the University of Alabama Press, 1985. I found one fairly easily back then, it wasn’t very expensive. It is a well researched, thoroughly documented work. It includes info on the construction specs for the builder. It has a sleeve with plans inside the back cover- printed on heavy, high quality paper. Can be found on the secondary market, but try to find one that still has the plans.
-
FWIW, there were at least two HMS Jaguars, one a J-class Destroyer from early WW2, and a Type 41 Leopard class Frigate named after the first one. (I was surprised that I didn’t find a frigate or 74 gun SoL from Nelson’s time…) There’s also a USS Jaguar, and Armadillo-class Tanker from 1944-1946. Finally, there is a USS Jaguar from the Star Trek (gaming) universe.
-
 Terrific model- you really captured the look of a hard-working tug! A bunch of my friends have 1/96 scale RC warships- Nokomis would be a great addition! One minor note— The U.S. Coast Guard Cutter Taney is the oldest surviving naval vessel from the Pearl Harbor attack. Taney entered service in 1936. The USCG was put under Navy Control in November of 1941. Taney was one of the ships used to patrol the approaches to Pearl Harbor. (USS Aaron Ward was on duty that fateful morning.) Taney was moored at the Honolulu Power plant, she opened fire from there as the planes flew over… I know all this because I have a 1/96 scale fiberglass hull for the Secretary-class Cutters, and am going to do Taney in her Pearl Harbor configuration….. and Taney is now a museum ship in Baltimore, Maryland, where the ship is proclaimed to be the “Pearl Harbor Survivor”. But now I’ll need a Nokomis too— your model will be a great reference!! Thanks for sharing it here! -Bill
 -
Yes!! This fine result deserves to go in a case! Well done!!
-
Terrific build- thanks for sharing it! Like others, I built one of these as a kid. I love all the work and improvements you made—now you have me wanting another crack at one!
-
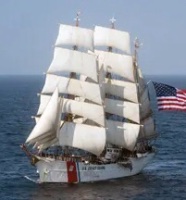
Here are some pics of my 1/144 scale RC model of the USS Guadalcanal, ca. June 1944 at the time of the U-505 capture. I like to build models that blend my two hobbies: Plastic scale and RC scale boats. I had always wanted to build a carrier, and had acquired a number of 1/144 scale aircraft kits over the years. I started with the plans published in Model Boats, and used the book “Anatomy of the Ship: USS Gambier Bay” as my primary reference. The hull is made from balsa, with a layer of fiberglass and resin. The hangar/flight deck is made from foam core board, then skinned with thin styrene sheet. Lots of styrene and brass stock was used to make the island, catwalks, gun tubs, etc., etc. The guns and figures are 3-D printed. The radar antenna and forward elevator are motorized. Three different 1/144 kits were used for the aircraft: - Sweet FM-2 Wildcats (great little kits!) - Minicraft Avengers ( crude kits from seventies- no interiors. I used them to cut up to make the Avengers with folded wings.) - F-toys Avengers. ( Really nice snap kits, they come pre-painted and with detailed cockpits and torpedo bays. The canopies are pre-painted, which saved me from a lot of masking!) A typical Composite Squadron assigned to a CVE would have 10-12 Avengers and 12-16 Wildcats. I built four Wildcats and six Avengers, but I decided in the end to go with a less-crowded flight deck. Here is a 10 second video showing an early test of the elevator mechanism… I spent the majority of my hobby time over a two year period to built it- I would guesstimate about 3-400 man-hours… Took a strong gust broadside during the first sea trials— she heeled over but stopped at this point- she is pretty stable, despite all the “sail area” topside! Turns out the model is true-to-scale: Guadalcanal somewhere in the Atlantic (US Navy photo)
- 4 replies
-
- 16
-

-

-
Collection of 1/72 Fokker Dr.1 triplanes
RC Boater Bill replied to RC Boater Bill's topic in Ready for Inspection - Aircraft
Added two more recently: #11: Smer rebox of the Eduard sprues: Paul Baumer, Jasta 2 “Boelcke”. The white and black markings are mostly painted, the red stripes are decals. Baumer’s plane wore both the earlier Maltese crosses and then later the straight sided ones. Smer gives you decals for the later version, but the painting of the trim and decal placement in the instrucions are a mix of early and late…. (I used the Albatross Aircraft of the Aces book as my guide. ) #12: Eduard kit: Jasta 5 Ltn. Hans Joachim von Hippel. Another Eduard kit, with painted markings. There is a bit of a debate on the color of the tail- it seems the experts are 50-50 on red vs. green. The plane was a hand-me-down from another Jasta, and had a red tail when given to Jasta 5. Because Jasta 5 was soon to be getting new Fokker D.VII fighters, the CO did not mandate repainting the tails in “Jasta 5 Green”- he left it up to the individual pilots. Some did, some didn’t, no one knows for sure who did what. I picked green, as it makes the plane a little more colorful…. -
HobbyBoss P-38L - a quick side project
RC Boater Bill replied to RC Boater Bill's topic in World War 2 Twins Mega GB
Mixed up a slightly lighter shade for the underside- same mix of Tamiya colors, but with a little less dark blue… It is difficult to capture in a photo, but it looks great in person! I won’t be able to get to the bench for the next 5-6 days, but the next steps will be to install the (already painted) gear doors and drop tanks, then gloss coat it to prep for decals… -
Airfix 1/72 B-25B Mitchell
RC Boater Bill replied to RC Boater Bill's topic in World War 2 Twins Mega GB
The main colors are finally done! I haven’t had a lot of time to work on the model, and have seemingly spent most of it faffing about with the airbrush. The Tamiya Neutral Gray went down fine, then I masked and painted the overspray area with Tamiya OD. Then masked and painted some overspray off the gray. Then more OD to touch up gray spots…. round and round we went! The good news is there were no issues with the tape pulling up any paint. I think I am finally ready to start masking and painting the de-icer boots in my next session….. One a more positive note- the top turret looks really nice. ( Better than the photo.). I like the way Airfix engineered it so it can be installed at the end of the build. -
HobbyBoss P-38L - a quick side project
RC Boater Bill replied to RC Boater Bill's topic in World War 2 Twins Mega GB
I am still faffing about with the B-25, fixing OD overspray off the gray, then gray overspray off the OD somewhere else, round and round and round… For a sanity break, I decided to get some paint on the P-38— a base coat of blue. I just mixed some Tamiya XF-8 blue with some XF-23 Light blue about 50-50, to use as a base coat- I like how it looks already! My current plan is to do lighter blue underneath, and then do some post-shading sort of thing with a darker tone on the top…. -
☮️Give Peace a Chance ☮️- 2025 in the bunfight
RC Boater Bill replied to bianfuxia's topic in Bunfight!
…and I’ll save my P-26 Peashooter for the follow-on GB: “Give Peas a Chance” -
HobbyBoss P-38L - a quick side project
RC Boater Bill replied to RC Boater Bill's topic in World War 2 Twins Mega GB
Well that resolution of “no more mods” didn’t last very long…. The Hobby Boss kit is rather simple, so I had long ago decided it wasn’t worth the effort to clean up enough to do the kit decals over a metal finish. So I was planning on using some decals from the stash for an Olive Drab over Neutral Gray scheme. But masking this thing for two colors (or more ) is also not looking all that appealing now. So, tonight I decided to cut away the stumps on the nose that are supposed to be the guns, and fill in the recesses with a little bit of putty. I’m going to turn this model into a photo recon F-5E Lightning, and paint it the overall blue scheme. I’ll make a couple of masks and paint some glossy dark gray or black camera ports on the nose and call it “good enough!”….. -
HobbyBoss P-38L - a quick side project
RC Boater Bill replied to RC Boater Bill's topic in World War 2 Twins Mega GB
The HB kit has an empty shelf in the area behind the seat, so I made some little back boxes to fill the void. They are made from bits of styrene strip, painted black - something representative of what should be there. This will be the end on my scratchbuilding/improving on this kit- OOB from here on*……! (* I also cut the camera pods off the drop tank pylons, but that was before I made the cockpit bit. I also reserve the right to use aftermarket decals…) 😎 -
While my main project is my B-25B, it has progressed to the point where it seems like I am spending a lot of time waiting for the paint to dry… I like to have a side project to work to fill the idle time while waiting for stuff to dry on the main build— I’ve been working on an Airfix 1/72 P-40B (Pearl Harbor) along side. It has been good synergy, sharing the same basic color scheme. But is now nearly finished, just decals to go, so I needed something else as a side project. So I poked around in the stash and found the 1/72 HobbyBoss “Easy Assembly” P-38L Lightning. It was slightly started (years ago), with the cockpit assembled and painted. I re-started work on it several days ago- a few bits at a time, and it didn’t take long to have a basic airframe together! (I am using glue, and not relying on snap fits.) Well tonight it finally dawned on me that this is also a WW2 Twin, so I might as well post it here! (Am I too late? I didn’t think to take a photo before I re-started work last week.) I’ve put about 4 hours of work into it since resuming work. Here is what it looks like at the end of today’s session:
- 10 replies
-
- 10
-
-
Airfix 1/72 B-25B Mitchell
RC Boater Bill replied to RC Boater Bill's topic in World War 2 Twins Mega GB
Yes, and the Stynlrez sticks ferociously to styrene- it never pulls up. My mistake was using a 15-year old bottle of Model Master. It is OK when used in “non masking” situations- this is a lesson I learned a long time ago and just forgot- I was too focused on “shade”, and didn’t pay attention to “brand”… It may well be a blessing in disguise. Because of the way the B-25 was painted, it may be easier to mask the OD to apply the gray, I think…. -
Airfix 1/72 B-25B Mitchell
RC Boater Bill replied to RC Boater Bill's topic in World War 2 Twins Mega GB
I’m still here, still plugging away on the model. It is one of three I’m working on now, so progress has slowed. I primed the model with gray Stynlrez a week ago, gave it a few days to fully cure, then airbrushed the underside with Model Master Neutral gray acrylic. I picked it because it was a little lighter in color than the Tamiya version of that color which was also on hand. BIG MISTAKE!! Tonight, when I started to mask so I could paint the topside with Tamiya Olive Drab, the tape was pulling up the MM paint every time I tried to reposition it. (The Stynlrez is still sticking well.). So I switched to plan B- paint the Olive Drab first. I went ahead and free handed the Olive Drab on the topsides of the model. I see a couple of spots that will need to be fixed and touched up, but over all it looks pretty good already. Once that is finished to my liking, I’ll go and mask over the Tamiya paint and apply the Tamiya gray underneath…. -
I’ll join in- here is my DPC Models 16” span Sopwith triplane: The kit came with green and off white tissue for covering, plus some red and blue for tge markings. (Very “old-school”!). It is my first modern laser cut stick and tissue kit - it was a joy to frame up! The model got this far, then it was carefully packed away on the SoD, while I hunted for a suitable electric motor to replace the rubber power. Never found a suitable one. I recently decided to just finish as a display model, hopefully before the 2024 KUTA kicks off….
-
Airfix 1/72 B-25B Mitchell
RC Boater Bill replied to RC Boater Bill's topic in World War 2 Twins Mega GB
Slowly inching closer to being ready to actually put some paint on! The cockpit canopy is now glued in place, and the forward piece is getting test-fit… I do like how Airfix engineered these pieces. The canopy includes the fuselage forward of the windshield, and it lines up perfectly with the nose piece. -
Amphibians - like a fish out of water
RC Boater Bill replied to Marklo's topic in Groupbuild Proposals 2025
That’s why I guessed the Kingfisher, etc., would be a “no”….. -
Amphibians - like a fish out of water
RC Boater Bill replied to Marklo's topic in Groupbuild Proposals 2025
Question: Do convertible planes, such as the Vought Kingfisher and Curtis Seagull count here? They were convertible from seaplanes to land planes and back. (I’m guessing “no”, but I thought I’d ask , to be sure…) -
Amphibians - like a fish out of water
RC Boater Bill replied to Marklo's topic in Groupbuild Proposals 2025
1/72 I’m onboard with one of these, in 1/72: (1/72 Douglas Dolphin RD-4, Hobartville Hobbies kit) I also have these eligible kits in the stash: 1/72 PBY-5A Catalina (Revell re-box of the Academy kit.) 1/72 Whirlybirds Sikorsky HH-52A 1/72 Atlantis Sikorsky HH-3E Jolly Green Giant (Atlantis rebox of the old Aurora kit) 1/72 Minicraft PBM-5A Mariner -
☮️Give Peace a Chance ☮️- 2025 in the bunfight
RC Boater Bill replied to bianfuxia's topic in Bunfight!
I have a 1/24 Monogram Triumph TR-7 in the stash for this…… -
FWIW, the decals in that kit aren’t very accurate- a six-legged octopus? (A hexopus??) Looks like adding a couple of legs isn’t too difficult….. https://modelingmadness.com/review/allies/us/usn/bombers/ohpv1.htm
-
Angel of Mercy B-25 Mitchell
RC Boater Bill replied to franky boy's topic in World War 2 Twins Mega GB
The work you have done so far on the interior is terrific- love that hatch!! Two thoughts on your noseweights: 1. Over time, bluetack may lose its stickyness and dry out. I don’t know how long you keep old builds, but the day may come where your weights are loose inside the model…? (Maybe reinforce it with something, like a piece of sprue through the middle, anchored at each end, that traps the nut in place?) 2. Adding weight to the roof of the bomb bay isn’t going to help keep the nose down- it is right on the CG/pivot point. ( It will just add to the load the main gear needs to support.) -Bill -
***finished***Stu's Dakota
RC Boater Bill replied to PhantomBigStu's topic in World War 2 Twins Mega GB
The one with a Dakota on one side, and a C-47 on the other!
