

Dereknf
-
Posts
516 -
Joined
-
Last visited
-
Days Won
2
Content Type
Events
Profiles
Forums
Media Demo
Everything posted by Dereknf
-
Another one form the dark corners of the stash. A decent enough kit with one or two awkward fits and some vague instructions. The kit decals were pretty poor, falling apart too easily. I got some after-market decals and finished as a Polish AF example. The best guess camouflage has 6 colours and was good fun masking and spraying. Mostly Vallejo RLM colours were used. 1. 2. 3. 4. 5.
- 3 replies
-
- 11
-

-
 Great stuff. Thanks Duncan
 -
Any news on this project?
-
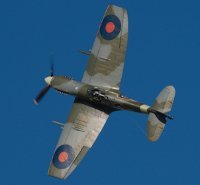
Another couple of 1/32 scale Spitfires. Firstly the old 1/32 Hasegawa MkVb in the "Nightfighter" boxing. Quite an old kit but builds up nicely. Finished in the markings of 111sqn W3848 JU-H based at Debden. Sprayed overall black using salt as mask for the chipped paint. 1. 2. 3. 4. 5. 6. 7. Next is Revell's newish Mk.IX finished as MJ250 UF-Q of 601Sqn based in Italy in 1944. Nice kit but has some odd omissions and errors, no seat armour for example. Revell show this aircraft as having clipped wings, which I have done, but others seem to think it had standard wings. Clipped wings were relatively unusual on Mk.IXs. 8. 9. 10. 11. 12. 13. 14.
-
Last one of this batch and one I've wanted to do for a while. The Italeri kit is fairly straight forward, even more so as I built it with the landing gear up and cockpit closed. It is basically painted gloss white then covered in decals. Two A4 size sheets of them. Fortunately they were very good and only a little over-size, requiring minimal touching up. Anyway, here is. 1. 2. 3. 4. 5. 6. 7.
- 13 replies
-
- 29
-
-
They are indeed the kit decals.
-
A fairly quick build this one. The Tamiya 1/48 A-10A finished out of the box using Xtracrylix colours. Nice kit with decent fit all round. 1. 2. 3. 4. 5. 6. Generate by IceMaster's Flickr BBCode and HTML Generator
- 7 replies
-
- 21
-
-
This is Condor's version of the Heinkel He178, the first jet aircraft to fly in August 1939, There are few accuracy anomalies with the kit but it builds up fine. Finished in Vallejo RLM02and Vallejo steel. 1. 2. 3. 4. 5. 6. Generate by IceMaster's Flickr BBCode and HTML Generator
-
According to the decal sheet, the two kills attributed to 84-0019 were Mig25s. The BT F-15C is the Hasegawa version.
-
I had the exhausts from a previous project and I thought they looked a little better. The kit comes with two full engines that slot in. They looked OK though. It comes with the three tanks, 2xAIM9Xs, 2xAIM120As and 2xAIM120Cs. I've fitted them all!
-
Another F-15C. This time Great Wall's F-15C in its MSIP II guise. The Great Wall kit is excellent and goes together very well, a pleasure to build. I might do another one to have all the hatches and engines open. Rather than use the kit decals I used Caracal decal sheet to finish it as 84-0019, an F-15C of the 493rd FTS at Lakenheath. It is sprayed in Xtracrylix 36251 and 36176. I also used Aires engine exhausts as replacements for the kit items. 20180703_211040_edit by dereknferguson, on Flickr 20180703_211048_edit by dereknferguson, on Flickr 20180703_211100_edit by dereknferguson, on Flickr 20180703_211110_edit by dereknferguson, on Flickr 20180703_211122_edit by dereknferguson, on Flickr 20180703_211131_edit by dereknferguson, on Flickr With the Hasegawa F-15C. 20180703_211158_edit by dereknferguson, on Flickr
- 9 replies
-
- 22
-
-
The latest effort. This Hasegawa 1/48 F-15C Eagle. A very nice kit overall. I finished with Xtracrylix Compass greys with Two-Bobs 48-236 Eifel Eagles decals, in a scheme worn by 79-0053 in 1984. 1. 2. 3. 4. 5.
- 7 replies
-
- 16
-
-
Thanks folks. For scale, with an Airfix Lancaster. 20180604_200139_edit by dereknferguson, on Flickr
- 26 replies
-
- 11
-

-
-

-
Another long-term stash lurker. I think I bought it at a Woodford air show in 1997. Not a particularly difficult build but its sheer size made construction and painting difficult. Careful dry-fitting meant I didn't have too many problem with fit, a bit of sanding and filling but nothing too serious. As it wouldn't fit in the spray booth, I had to wait on a calm dry day to spray with Halfords Appliance White. I ended up with a bit of an orange-peel finish but not too bad. Decals were few and far between and went on easily. Finished as the first XB-70A 62-0001 as it ended up at NASA. Even photographing the model was difficult due to the size. 1. 2. 3. 4. 5. 6. 7. 8.
- 26 replies
-
- 44
-
-
Thanks folks. As far as windows are concerned, the fuselage windows were fine. The top circular windows were less good and I stuck a length of tape to them in case they fell inside the fuselage.
-
Following quickly on the heels of the Albatross, another silver effort. This time Eduard 1/48 Mirage IIIC Weekend edition. Lovely kit that goes together very well. Nice decals as well but I used Berna decals to finish the kit in the markings of "2-EG" EC1/2 'Cigognes' at Dijon in 1967 that appeared the French TV series 'les Chevaliers du Ciel' or "The Aeronauts" as we knew it 20180516_224757_edit by dereknferguson, on Flickr 20180516_224741_edit by dereknferguson, on Flickr 20180516_224726_edit by dereknferguson, on Flickr 20180516_224715_edit by dereknferguson, on Flickr 20180516_224705_edit by dereknferguson, on Flickr
-
Not long released is the Valom version of one of the prettiest aeroplanes ever built. A pretty easy kit to build with no obvious flaws. Sprayed with Revell acrylic silver and finished in the markings of G-AFDJ "Falcon" of Imperial Airways. 20180514_203216_edit by dereknferguson, on Flickr 20180514_203157_edit by dereknferguson, on Flickr 20180514_203145_edit by dereknferguson, on Flickr 20180514_203124_edit by dereknferguson, on Flickr
- 22 replies
-
- 52
-
-
Another long-term stash lurker. Nice kit except for the red plastic. The decals are very "see-through" when first applied so I was fortunate to get a second set of decals so I was able to double up the white markings. If I broke the nose probe once I must have broken it 10 times and I also had trouble with the gloss varnish. It still comes out matt.... 20180427_151745_edit by dereknferguson, on Flickr 20180427_151716_edit by dereknferguson, on Flickr 20180427_151656_edit by dereknferguson, on Flickr 20180427_151641_edit by dereknferguson, on Flickr 20180427_151622_edit by dereknferguson, on Flickr 20180427_151613_edit by dereknferguson, on Flickr
- 4 replies
-
- 13
-
-
Not my normal scale for aeroplanes this size. For a resin kit it was quite easy to put together but some parts were unbelievably fiddly. I did have problems with the cabin windows and with adding enough nose weight. 20180425_205453_edit by dereknferguson, on Flickr 20180425_205443_edit by dereknferguson, on Flickr 20180425_205434_edit by dereknferguson, on Flickr 20180425_205424_edit by dereknferguson, on Flickr
- 4 replies
-
- 13
-
-
Thanks for the kind comments. It's been a long time in the stash that one.
-
Airfix 1/72 B-29A Superfortress
Dereknf replied to Dereknf's topic in Ready for Inspection - Aircraft
I'm glad this one has provoked so many memories. It was an Airfix kit I never built in my youth but 40 years later there it is. I just need somewhere big enough to put it now.... -
Surprisingly, it is almost the size of the B-29A.
-
This my attempt at the Anigrand 1/72 XF-12/XR-12 Rainbow, one of the most beautiful aircraft ever built and the epitome of piston-engined aircraft design. Flown in 1946, the XF-12 was capable of 400mph at 40000ft. Only two were flown before the project was cancelled. The Anigrand kit is in resin and quite heavy so the landing gear has wire inserts for extra strength. Construction was actually pretty straight forward and the fit was pretty decent. The only area I had difficulty with was the vacform cockpit parts. New ones are on order from Angrand.... An astonishing amount of weight was needed in the nose, even in the engine nacelles. I ended up by putting more weight in the nosegear bay as well. Finished in Vallejo silver and aluminium and the rather sparse markings of the first Rainbow prototype. 20180401_192851_edit by dereknferguson, on Flickr 20180401_192837_edit by dereknferguson, on Flickr 20180401_192827_edit by dereknferguson, on Flickr 20180401_192803_edit by dereknferguson, on Flickr 20180401_192758_edit by dereknferguson, on Flickr
-
My effort at an ancient Airfix kit from 1965 and in places it shows. Not too difficult to build although the bomb doors weren't a great fit. Took a fair bit of weight to sit properly. I modified it to represent the Enola Gay as it was in 1945. This involved removing the four remote gun turrets and using a Superscale sheet for the markings. Sprayed using Vallejo silver and aluminum. 20180401_192711_edit by dereknferguson, on Flickr 20180401_192650_edit by dereknferguson, on Flickr 20180401_192639_edit by dereknferguson, on Flickr 20180401_192624_edit by dereknferguson, on Flickr
-
A bit of a disaster this one. The AFV kit goes together very well with excellent detail and fit. The instructions are clear on which bits needed to be painted red and which bits were white. When it came to decal placement I could not get them to settle over the curves, no amount Microsol was helping and the decals ended up disintegrating. So it sat on the shelf of doom for a few weeks while I sourced decals courtesy of an OH models sheet. With hindsight I should have masked and painted the underside cross as it was less than successful. I think my radome colour is too dark as well. Anyway here it is (without photos of the underside) 20180304_111720_edit by dereknferguson, on Flickr 20180304_111716_edit by dereknferguson, on Flickr 20180304_111707_edit by dereknferguson, on Flickr 20180304_111659_edit by dereknferguson, on Flickr