

Marco
-
Posts
170 -
Joined
-
Last visited
Content Type
Events
Profiles
Forums
Media Demo
Posts posted by Marco
-
-
Acrylic paint usually comes off by leaving the kit overnight in water with laundry soap (the powder type).
-
Get an H&S Infinity with a 0.15 needle.
I also recommend using a compressor with an air tank.
-
More work done:
Wings attached:

looks OK:
Nose finished:
Stabilizers and flaps:
The rudder after putty and sanding:
And the fuel tank:
-
 1
1
-
-
If you want a very resistant and very glossy coat, you can go with 1-component Clear Lacquers.
They are car varnishes and there is no need for hardeners. They are easy to use and dry quickly. You can find these in car paint stores.
Use a mask and get thinner for it. Some say it is ready to use but you will need the thinner to clean your airbrush.
Nice and glossy:
If you go for the two-component varnishes you will get an even better result. I would use this all the time if I built cars:
-
2
-
-
I am not an airliner guy but I use PU car paint varnish.
It´s beautiful, glossy and super resistant.
Also it is very cheap and easy to apply
Look for the one that isn´t two-component.
Also buy the appropriate thinner and use a mask.
-
1
-
-
This kit is famous for its undernourished tail.
Here is how it compares to 1/32 plans:
So some plastic surgery is required. I cut plastic card more or less to the size and stuck it on.
Later on I´ll cover it with putty and sand it to shape.
Going to get rid of the silly engraved lines and work on the big ribs.
Thanks for passing by!
-
2
-
-
Then I closed the sides and the engine covers.
The sides fit very well. The engine covers are OK except for a little gap at the front.
-
1
-
-
I build all the interior components and primed them with black primer.
I left the engine unpainted (it´s going to be covered) and painted all the rest with Gunze and soem details with Vallejo.
The PE parts are excelent.
The kit has imperfections, but it is loaded with nice things. Everything here comes in the box.
-
2
-
-
Hi!
I started building this 1/32 109 G-2.
I won´t use the kit decals. Instead, I got hold of a beautiful sheet from FCM Decals for Trautloft´s aircraft.
-
1
-
-
17 hours ago, Andrés S. said:
Very very nice.
Great work with the airbrush in the fuselage !!!Andrés S.
16 hours ago, Retired Bob said:Really nice Bf 109,
 Love the paint job.
14 hours ago, Bangor Lad said:
Love the paint job.
14 hours ago, Bangor Lad said:Love it!
10 hours ago, Vonbraun said:Very realistic!!!
9 hours ago, NoSG0 said:Very nice indeed.
8 hours ago, Luiz said:Belissímo trabalho realizado num dos aviões que mais gosto...brilhante e notável serviço de pintura!
Parabéns!
Luiz.
Valeu, Luiz!! Um abraço de São José dos Campos!
6 hours ago, Lightpainter said:Absolutely fantastic build!
5 hours ago, mick said:excellent work
4 hours ago, ringo said:Really love it! Congratz 😍
4 hours ago, Mig88 said:Well done! Very nicely finished indeed!
Miguel
Thank you, guys! 🙂🙂
-
2
-
-
37 minutes ago, Alpha Delta 210 said:
One of the most impressive 109 models that I have seen here.
31 minutes ago, Duncan B said:That's lovely that is.
Duncan B
25 minutes ago, Wulfman said:Superb build, fantastic finish !
Wulfman
23 minutes ago, Valkyrie said:Immaculate work, superb
Thank you very much!
-
1
-
-
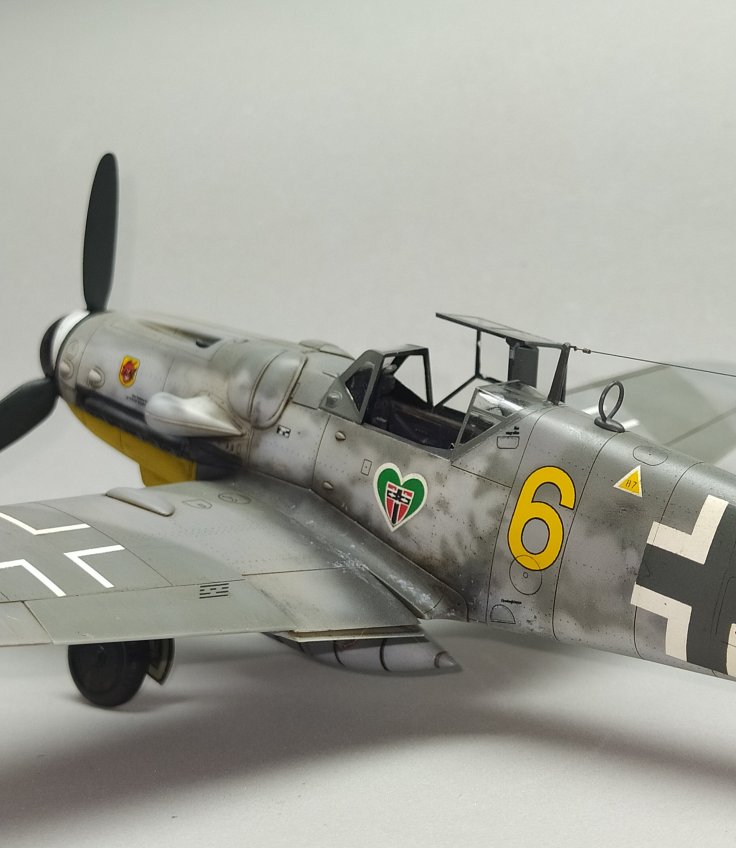
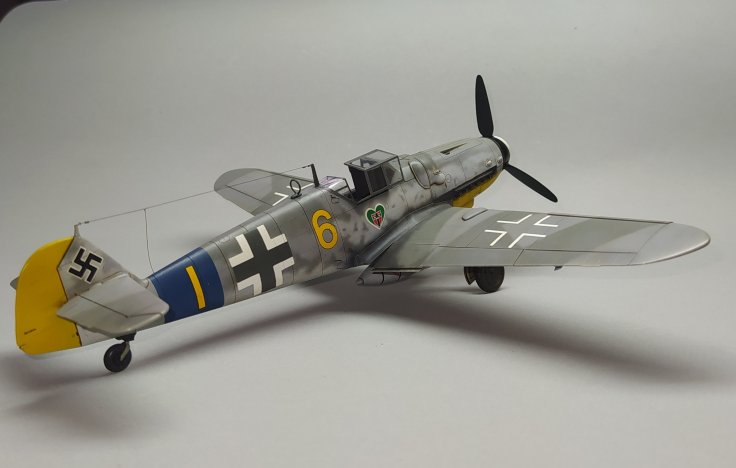
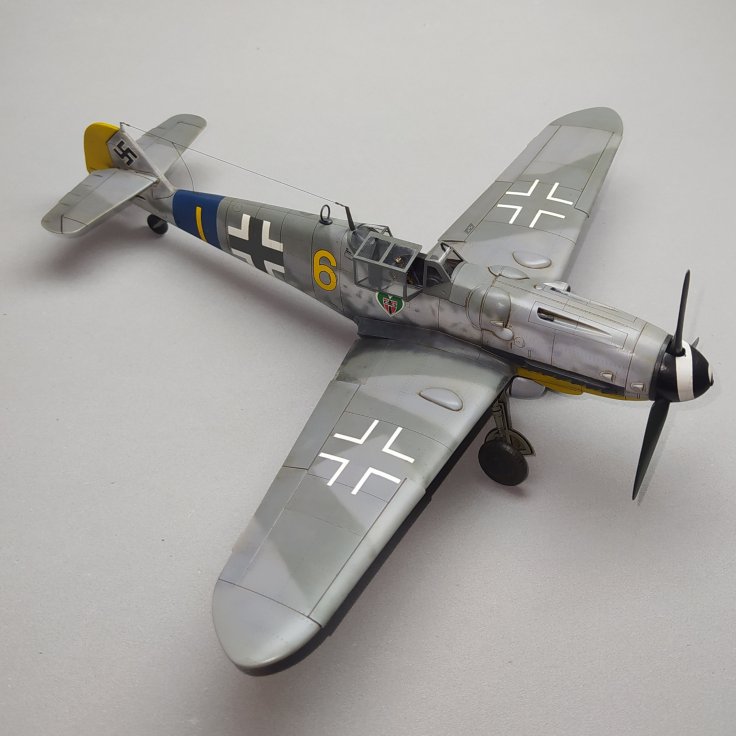
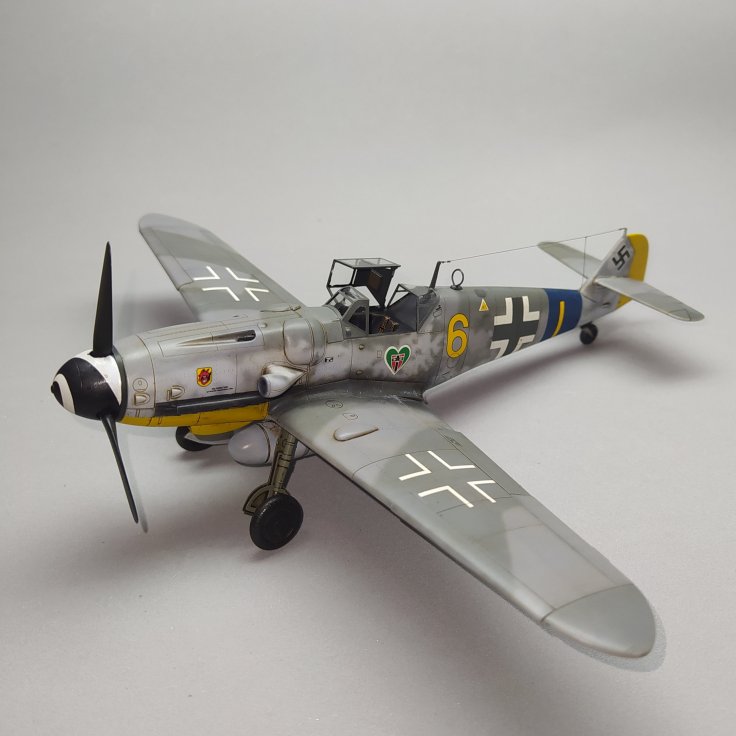
Hi!
This is my latest 109.
I tried to make the paint work look like this picture that comes with the EagleCals decals for Fritz Ungar´s ride.
I lightly riveted the surfaces.
The paints were mixed using acrylics (a local art&crafts brand).
The gloss varnish is PU car paint varnish (great stuff).
And the final semi-gloss is Gunze Acrylics.
Small scratches were made with Noris Club watercolour pencils.
The aerial is 0,10mm fishing line passed through 0,5mm brass tubing
Hope you like it!
Marco
-
48
-
 3
3
-
-
I put on matt/satin varnish because my acrylics lay down with a rather shiny finish.
-
MIG filters are enamels.
To avoid messing up your paintwork, lay down a coat of satin or matt varnish.
Gloss varnish won´t be so good; you need some surface texture on to where the filter can stick.
-
1
-
-
14 hours ago, Troy Smith said:
One additional guesstimate is what plant built the aircraft, and what the typical scheme for that plant was
see here
http://theprofilepaintshop.blogspot.com/2013/10/chosing-correct-wingpattern-for-bf109g-6.html
and then find other examples. @Jerry Crandall is a member, and maybe know more.
It looks like a WNF ... thanks for the link!
-
1
-
-
29 minutes ago, Troy Smith said:
asisbiz has this
not the same plane as above, note the '6' is a different shape, so....
the profile looks to be a good match to the reference photo, I've seen a lot worse. What's wrong with it?
This might winkle out some of the more knowledgeable Luftwaffe buffs too.
Thank you!
I saw that crashed 109 picture but the Yellow Six is much lower than the photo with the pilot sitting in the cockpit. The mottling looks very different too.
The profile really isn´t that bad but I like using pictures specially when I get to see the other side of the plane.
-
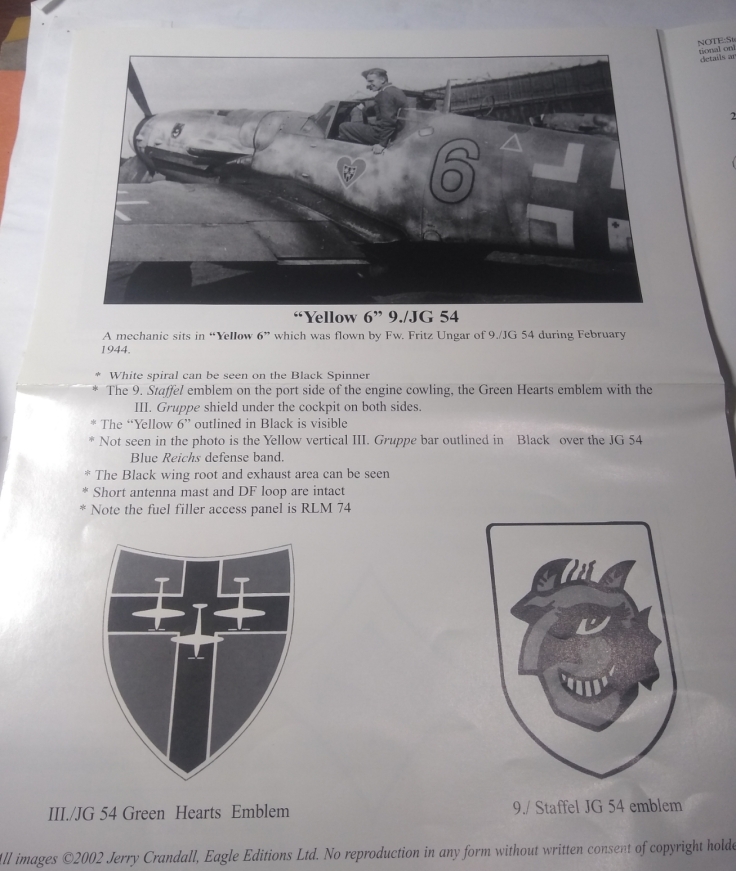
Hi!
I´m looking for references for a G-6 flown by Fritz Ungar. I´ve looked through my books and got nothing.
It´s Yellow 6 from JG54. The only picture I have is in the EagleCals instructions:
EagleCals make excellent decals but their profiles are no good:
Thank you!!
-
1
-
-
I just go down to the paint store and buy a tin of car gloss varnish. It dries rock hard and nothing attacks it.
You can get as a two-part PU varnish or one-part poliester. Also get the thinner (dilute it 1:3).
One-part Poliester
And a two-part PU varnish
-
Waldron punches are expensive.
Here is a good technique for making circle templates using beer tins.
It´s in portuguese but the pictures are self guiding.
Make the circle the size you want by going deeper with the rotary tool.
Then use a sharp blade to cut out the circles on masking tape.
-
1
-
-
1 hour ago, Modelman9912 said:
Can you mix gloss black and flat black acrylic paints to get a semi-gloss black? Or will this ruin the paint?
I wouldn´t worry too much. Paint it black (whatever one) and then use a satin (semi-gloss) finish varnish coat.
-
On 04/05/2019 at 02:44, pbhawkin said:
Thank you!
-
13 hours ago, pbhawkin said:
My website is offline (too expensive to keep going!).
What Nations CMYK values are you after and I could perhaps take a picture of them and upload that here.
Thank you! That would be great.
I´m looking for RLM CMYK values.
-
Hi!
I tried downloading the xls spreadsheet but it seems the server is down.
Is there a new link?
I would love to use those CMYK values!
Thank you!
-
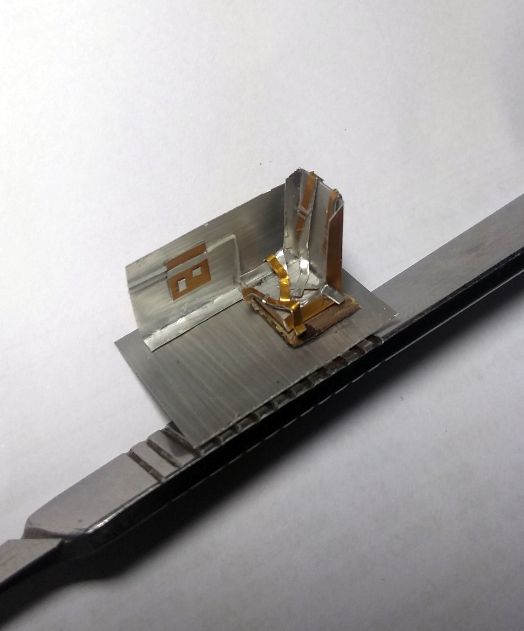
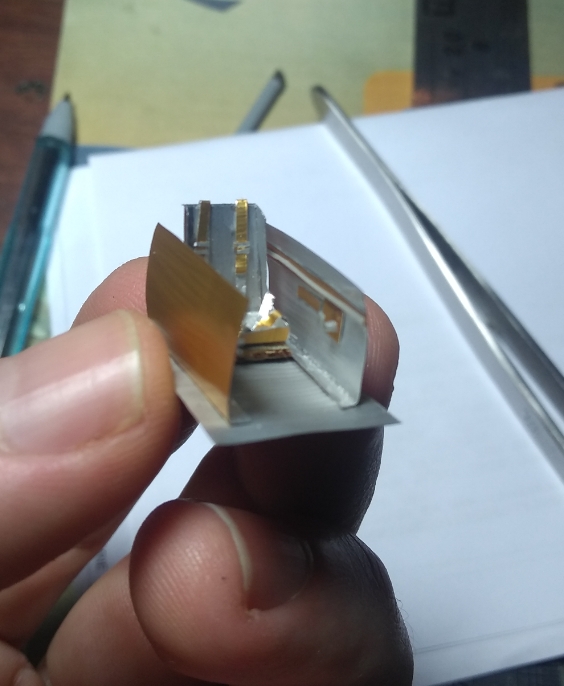
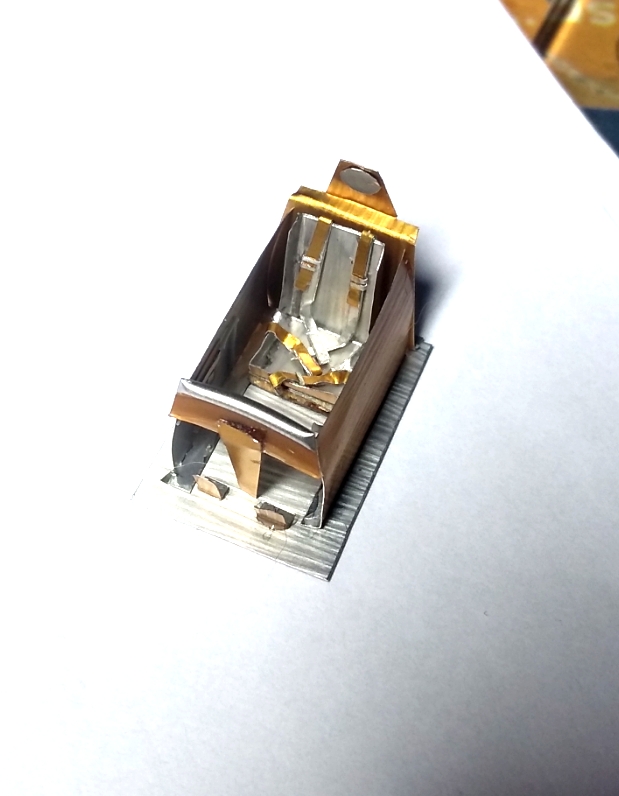
Hi!
The Nespresso capsules are made of thin aluminum.
At first I thought about trying to make some seatbelts out of a capsule. Then I thought they would look nice on a pilot´s seat... and, in the end I managed to make a whole cockpit out of one capsule.
I drew the seat with a ruler and pencil. Cut it out with scissors and marked the folding lines with an Olfa scriber.
The material is really nice to work with. Marking the folding lines makes it very easy to bend straight edges.

The belts are just thin slivers folded and the buckles are even thinner slivers. I guess I could have easily punched small holes to replicate smaller details.
The belts fold very nicely. Much better than Eduard PE belts.
Hope you like it!
-
24
-


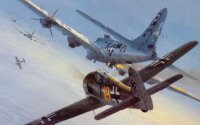
-Friedrich-Ungar-WNr-440180-sd-56FG-P-47s-near-Homfeld-6th-Mar-1944-01.jpg)


Halfords Appliance White question
in Paint
Posted
Just remember this stuff is good because it is almost automotive paint. Not acrylics.
http://www.my-sds.co.uk/auto.aspx?accountid=guest&languagecode=44&companyid=halfords&partcode=5015025708782
Use it in ventilated spaces and wear a mask.