

Guy
-
Posts
99 -
Joined
-
Last visited
Content Type
Events
Profiles
Forums
Media Demo
Posts posted by Guy
-
-
Postman has brought some goodies this morning. A copy of Roger Chenseau's KGV Class Battleships and a set of barrels from RBM to replace the kit ones.

-
 1
1
-
-
First coat of the bottom colour on. There is an awful lot of spraying to do to cover that, is there a technical term for the discomfort of holding an airbrush for too long ? I can think of a couple but definitely not safe for polite company!
-
5
-
-
1 hour ago, Jamie @ Sovereign Hobbies said:
Lifecolor's is based on a chip which is darker than reality, but just don't go too heavy and you can lean on the lighter plastic background to hopefully lighten the result to reality. All of Lifecolor's RN paints are based on out-dated chips now.
Advice greatly appreciated! Always something new to learn.
I went a certain shop to order some paint but sadly they seem to be off for August
 This is my learning one and made do with what I had on the shelf, the next .. well ....
-
Glad to see that the 507A isn't looking as dark as it did when I first opened the pot of paint.
-
A bit of progress for the day, seam removed, new shafts, gaps filled and a coat of primer applied.
-
1
-
-
56 minutes ago, magpie1832 said:
Nice choice. I started KGV straight after finishing this one
That is a striking model, what is she ?
33 minutes ago, Jamie @ Sovereign Hobbies said:So Home Fleet Grey / Admiralty Pattern 507A and March 41 would be a month before her decks were darkened.
")
Well thankyou! You have saved me some work

-
11 hours ago, Jamie @ Sovereign Hobbies said:
Before replacing the shafts, if it's for roundness carry on, but if for the brass look then be aware that these were painted anti-fouling red.
How concerned are you with the camouflage scheme?
Purely roundness, will most certainly be painted over.
Camouflage wise, I am keen on her March 41 scheme - business like and no messing around.
-
2
-
-
12 hours ago, Jerry L said:
You can add the Mk1 Royal Navy upgrade sets if you want to 'improve' your skills!
I wasn't aware of their stuff, but now I have looked .. err ... next model I think .. pretty impressive!
-
8 hours ago, stevehnz said:
I'm sure you're up to any challenge
Up to the challenge without a doubt! One issue I have now that I didn't have when I did the rigging for the Brig was that my eyes are not what they were when I did that, I could tie the rigging without needing assistance. Now that is quite a different matter ... I need to get to the optician to get a better pair of glasses for fine close work.
-
1
-
-
Ha, that ship has sailed already .. all in or nothing, so some Eduard photo etch is on the way and a wooden deck. Have to improve my skills and experience so there is only one way to do that!
-
2
-
-
Not impressed with the moulding here yet, seam lines everywhere, filling to do around the struts and the gap around the prop shaft where the bearing would be.
Shafts will be replaced with some brass rod I have.
-
First job to get rid of the very visible seam lines and get the hull cleaned up, washed and ready for it's primer.
-
The more that I look, I would tend to agree with you. Lacking rails and decent ladders would just end up being more irritating then the 'fun' of applying them.
-
Hello,
New day and a new challenge. Just having finished a Sea Vixen after a series of aircraft I thought I had better dust off a Tamiya HMS Price of Wales that I have had gathering dust and start with a new challenge. I haven't done a plastic ship for many many years so time to make a change. Previous ship building was a wooden HM Brig Supply by Jotika.
However over to heavy metal and my first conundrum is do I do this as per the kit, or do I add in photo etch. I have used some on the aircraft and that is fiddly enough but this seems to be an order of magnitude up from that. Any suggestions over what to use without driving myself to distraction and never finishing ?
-
3
-
-
7 minutes ago, Graham T said:
Niiiiice - especially getting those walkway decals down right. One thing though (not a crtisism & easily remediable if required), I'm pretty sure that on all Sea Vixens with the bulged RO's hatch it was blacked out. A coat of gloss black should do it!
You are right about the coal hole, I just couldn’t face blacking it out after the work on the seat and all 😣 but since I haven’t glued it down, once I have a case for it, I may prop it open and properly black it out.
-
This is the moment of trepidation, putting ones work up for the eagle eyes to spot all errors, flaws and defects but this is a journey where ever model is a step improvement on the last. I am ever on awe of the quality of models that the members here present and learn something from every thread I read.
16 months with a 9 month break in the middle and I am happy to declare this finally finished. The build log is here for anyone who wants to have a laugh
This is a special model for me as my father was met officer on HMS Eagle on her final round the world trip in 1972 and this aircraft would have flow off her then. Great aircraft, lovely lines and I have enjoyed 'nearly' every minute of the build.
Edit to add in details of aftermarket parts:
- wolfpack resin wingfold kit
- Pavla resin airbrake
- CMK resin wheel set
- Quickboost resin ejector seats
- Quickboost resin air I takes
- Eduard photoetched cockpit.
-
52
-
Finito !
Well the ladder will be added later once it has recovered from a reverse Ikea experience having built it and then clumsly put something down right on top of it ... Dummkopf!
-
7
-
-
That is indeed a sad sight, but a clean up and a fresh coat of paint and she will be looking all shipshape once again.
-
Vixens on HMS Hermes - South China sea 1967.
HMS Eagle
-
2
-
-
5 hours ago, Brigbeale said:
A beautiful Sea Vixen.😍😍😍
I’ve got a 1/72 version which requires restoration -I saw it on eBay and had to have it although the paint underneath and the panel gaps, especially around the tail booms, are terrible.
I’m sure it depicts the same aircraft.That sounds like a fun challenge, I hope we will see a restoration log !
This aircraft I chose as being part of 899 Squadron onboard HMS Eagle on her final round the world deployment in 1972. My father was onboard as a Met Officer and I have a faint memory of meeting her when she came back to port. I suspect the Vixen had flown off by then but it is nice to do something that had a link.
-
1
-
-
1 hour ago, Martian said:
The other thing you could try is to hang a store of some sort on the middle pylons and fill them with some weight, that should tip the balance.
Martian 👽
The solution was easier then expected, just forward of the front wheel still in the wheel well., you can drill a hole upwards and into the nose. Insert a few lengths of solder and now she is sitting as she should.
-
1
-
-
A bit of a break over lunch and inching closer, however I was sure that I put the requisite number of grams into the nose but she is a tail sitter! I am sure that the real ones didn't go round propped up by an oversized bottle of Gorilla Glue so I need to see about getting a bit more weight into her wheel bay.
-
4
-
-
1 hour ago, CJP said:
Great job on the Sea Vixen mate - you are inspiring me to get mine out of the stash - also that photo link on the Vixen is very useful and saved to my favourites
CJP
Thank you - far from perfect but improvements with each new model build. Hopefully this evening the wings will go on then just a bit of fettling around the wingfold and she will be done.
As far as getting yours out of he stash - to quote Mrs Doyle 'Ah, go on .... '
If these are of assistance here are some of the additional references I used:
-
 1
1
-
-
Finishing off the wings ready to mount I realised I hadn't dealt with the pitot tubes and it got me looking at two different brass ones that I have.
The ones I mounted are the Air Master AM-48-099 set which look to me much closer to the scale that I can see in the photos here: http://www.gengriz.co.uk/images/Sea Vixen References/vixenphots.htm
Also I had the ones supplied in the Wolfpack wingfold kit which look quite oversized, did the Vixen sport different sized pitot tubes during it's life or is the brass one in the picture just made too large ?
There are some decals I have only just applied which I had also forgotten about, so over to the Micro Sol to see if I can get rid of the silvering.
-
4
-


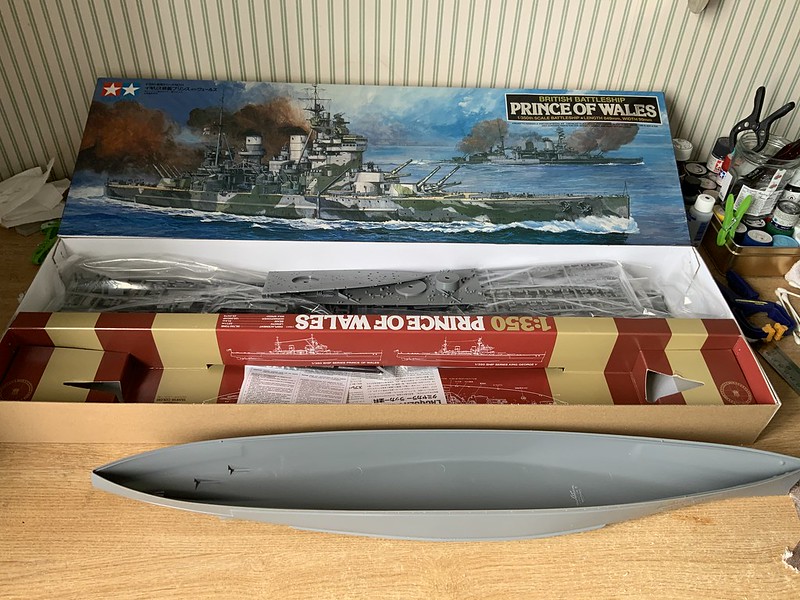


HMS Prince of Wales Tamiya 1/350
in Work in Progress - Maritime
Posted
Final coat on the bottom now, hopefully not a million miles away from where it should be colour wise. Using what I had on the shelf and Tamiya's mix of 2:1 XF-7 red and XF-10 brown, I found that it came out more of a brownish purple, so increased the red by about 30% to end up with what I have here, that looks to be a 'closer' approximation of what Jamie has published in this thread https://www.britmodeller.com/forums/index.php?/topic/235034309-hull-red/
It will do for this model, the next I will move over to Sovereign's rather than making do.