

AliGauld
-
Posts
8,101 -
Joined
-
Last visited
-
Days Won
74
Content Type
Events
Profiles
Forums
Media Demo
Everything posted by AliGauld
-
 Thanks Mark. The undercarriage does look both fragile and fiddly. Could be fun. Cheers, Alistair
 -
I will admit I've been putting this bit off until I'd done a bit of research and practice on Lifecolor paints. So mixed 50/50ish with Lifecolor thinners and sprayed in light coats. The neat trick I learned online was to hit each layer with the hairdryer and then spray the next one. After 4 coats. Happy with that. Other bits for the bulkhead also got painted. These will be glued shortly and meanwhile I'll get on with the undercarriage, which, unfortunately, has to be fitted now. Thanks for looking, Cheers, Alistair
-
All the bits have been glued together and the fit is rather good. There was a bit of dry-brushing, chipping and I used some pigment for a bit of a dusty, dirty look towards the rudder pedals. This was followed by a dirty brown oil wash. Then a dry fit to the starboard fuselage. I'll get a move on with the engine bulkhead/ wing spar bits now. Thanks for looking, Cheers, Alistair
- 88 replies
-
- 11
-

-
Thanks, So far the engineering and fit has been excellent. I'm just about to apply some glue so that will be the clincher. Cheers, Alistair
-
Sorry to hear about your bereavement. It's always a rough time. Beautiful work on the brass. Cheers, Alistair
-
FAA builds, 32nd Hawker Nimrod ,Seafire now finished
AliGauld replied to bigbadbadge's topic in Work in Progress - Aircraft
Nice work on the seafire chris, The 1:1 job looks pretty good too. Cheers, Alistair -
Thanks Roger, I had forgotten the wheel bay should be the underside colour but I was looking at the instructions...... I know , and they reminded me before paint was involved. Cheers, Alistair
-
Thanks Roger, The exhaust collectors do make a difference. Cheers, Alistair
-
Thanks Simon, It's all falling together so far. Thanks Chris, We'll see how it looks after glue. Thanks Mark, So far so good. Glue involved tomorrow so that should let me know how it fits together. Cheers, Alistair
-
Thanks Simon, The Infini cutting board makes life a bit easier on occasions like these. I just cut a thin strip of tape to get round the shape and then normal tape fills in the rest. Cheers, Alistair
-
It does have the option to open just one panel but there is a PE fitment that goes in which would stop the possibility of having the panel loose. Cheers, Alistair
-
Airfix 1/48 De Havilland Chipmunk T.10
AliGauld replied to AliGauld's topic in Ready for Inspection - Aircraft
Thanks very much, That is extremely kind of you. Cheers, Alistair -
Various bit and bobs for the cockpit area have been painted and PE'd through the day. The internals of the fuselage were painted up too. That lot can settle and will be subjected to glue tomorrow. Thanks for looking, Cheers, Alistair
- 88 replies
-
- 11
-
-
Thanks Roger, I'm in two minds about the gun panels. It would look cool to have them open but I really don't want to spoil the lines of the airframe. I'll need to have a thunk aboot it. Cheers, Alistair
-
Thanks Chris, Oh trust me the scalpel was out too. Cheers, Alistair
-
Airfix 1/48 De Havilland Chipmunk T.10
AliGauld replied to AliGauld's topic in Ready for Inspection - Aircraft
Thanks very much Alain, Most kind. Cheers, Alistair -
Airfix 1/48 De Havilland Chipmunk T.10
AliGauld replied to AliGauld's topic in Ready for Inspection - Aircraft
Thanks very much, They were a joy to fly. Cheers, Alistair -
Thanks Simon, They are Cartograf so I knew I'd get them down eventually it was just a matter of how long. Colourcoats Insignia red sprayed and the unmasked. I'll take that. Thanks for looking, Cheers, Alistair
- 235 replies
-
- 10
-
-
Foxy Lady, Mig-25 RBT "Foxbat B" Revell 1/48.
AliGauld replied to Spookytooth's topic in Work in Progress - Aircraft
Paint arrives and you're off like a train. Looks flaming good. Cheers, Alistair -
Arma Hobby 1/72 Hawker Hurricane Mk.IID
AliGauld replied to AliGauld's topic in Ready for Inspection - Aircraft
Thanks so much. Cheers, Alistair -
You have a lot more confidence in my abilities than I do, that's for sure. Cheers, Alistair
-
Thanks Mark, There were a lot of lumps and bumps to settle over. I've popped the wings off as idiot features here had forgotten to paint the insignia Red on the exhaust collectors. All masked up and ready for paint now. Cheers, Alistair
-
After 5 rounds of Ultimate Extra strong softener. Now I'll need to get a clear coat on this and make a start on with the various underside doors and get them painted for the weathering stages. Thanks for looking, Cheers, Alistair
-
Thanks very much Mark I think you do too. Cheers, Alistair
-
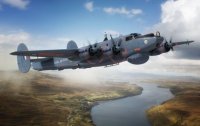
It is a tad closer but isn't held in a museum with a Lancaster . Cheers, Alistair

