


Yvan S
-
Posts
44 -
Joined
-
Last visited
Content Type
Events
Profiles
Forums
Media Demo
Everything posted by Yvan S
-
Hi T-21. Yes, the red is insignia red however my local hobby store does not have the largest selection of paints, so I had to settle with a very bright red Vallejo shade. While it may not be truly realistic, it gets the job done anyway. Thanks for the kind words!
-
Sincerest apologies to everyone following this topic for not posting in 3 months. However I got extremely busy with school (it is my final year after all) and have only found some time to put into my B17 now. Primed her yesterday And added the red touches today. The computer does not render how bright of a red it is, but I love the brightness it brings. Those Americans must of been some level of cocky to use such vibrant hues on their "Flying Fortresses". Nonetheless, I respect it. Will be updating more this week so stay tuned! Now just have to let her dry for the night.
-
Most certainly!
-
Sorry all for a lack of updates in the last two weeks. I've been busy with school, and that of course comes as the number one priority. This is where I've gotten to: On its left is a P-51 Mustang to give a sense of the size of these birds. As of now, I just have to fill the gaps in the fuselage and a few in the engines, and I'll move on to priming and painting!
-
Pz.Kpfw.IV Ausf.D and crew - 1/35 Dragon/Platz
Yvan S replied to PlaStix's topic in Ready for Inspection - Armour
Greetings from the aviation department. Beautiful tank you've got there! While the finish is of course amazing, I personally love how you weathered it. Everyone knows that weathering is what makes a tank most realistic, and you've done an admirable job. Regards, Yvan -
My second conversion - Eduard 1:48 Eduard Tempest V to II
Yvan S replied to SimonL's topic in Ready for Inspection - Aircraft
-
Hi Steve, If you are making holes in your plane, I suggest heating a sewing needle and pushing it through whichever part of the aircraft you want perforated. I have experimented with it before and it works quite well, so long as you don't get carried away. One thing to remember with this technique is that a small plastic mound will appear on the side you first stuck the needle in, imitating 'swollen' metal. As such it is important to make sure you are starting to pierce in the right place. Cheers, Yvan
- 146 replies
-
- 2
-

-

-
- a stalled thres
- to be continued
- (and 1 more)
-
I would definitely recommend it, it looked complicated at first but turns out it combines detail with relative easiness. Overall an absolute pleasure. Thank you mate!
-
Confederate Air Force eh? I may just need to do a bit of research on the topic. It would most definitely be a memorable experience, and I have never been to a WW2 airshow before. As for the wheels, it doesn't seem that Revell included a 'wheels up' option. So I would assume you simply glued them into their cavities. I would like to do the same and I have found this to be quite disappointing. Your support is very much appreciated! Yvan
-
A most remarkable and accurate analysis. I would have to agree! Those damned cameras. Cheers, Yvan Thank you neighbour!
-
I am now finished with what seems to be the longest section of the B-17 build. It is quite depressing to think the inner detail will all disappear never to be seen again. Interesting technology with the ball turret, very smooth turning which will definitely be accessible on the final product! Quick snapshot of the complete inside of the fuselage. This time I decided to pre-mask all the clear parts, it took a VERY long time but I have seen good results on other builds. While this does occasionally give headaches, it normally gives a better finish then painting the lines with a brush. Fuselage is now closed, however there is a sizeable gap on the underside of the nose. This seems to be due to a misplacement of the floor in that area. Hopefully some filler will do the job. Stay tuned as I move onto the wings!!
-
1/72 North American B-25H-1 Mitchell, Hasegawa + Big Ed
Yvan S replied to Fuad's topic in Ready for Inspection - Aircraft
WOWOWOWOWOWOW. What a cracking build. Is there a WIP to go with it? Cheers, Yvan -
Hi Nikolay, I unfortunately do not have the expertise or the materials necessary to accomplish such a thing. However I plan on experimenting weathering on the outside, especially because this bird flew quite a lot! The work I did not put in on the inside will be applied to the exterior instead. Your support is also much appreciated. If you have any tips for me, please send them my way! Cheers, Yvan
-
Interior detail is almost complete. I dread the moment when I will have to connect the fuselage halves, hopefully I will have enough rubber bands and clamps. Everything glued in very well. One recommendation for attaching the bombing bay however is not to glue the bulkheads, simply to place them in which permits them to slide up and down within their 'rail'. When placed in, they must be touching the bottom of the aircraft otherwise fitting issues occur. I really tried to do the least possible amount of work on the interior as it is almost entirely hidden once the fuselage halves are sealed. I am sure it will give an adequate effect once seen from the tiny windows. As of now I must only assemble a few turrets, then I will be able to finish the fuselage and move on to the wings. :)))))
-
Well that's a shame, seems like I will have to waste some more paint on those sections, especially considering one can see inside the engines! I very much appreciate your input there Neil, definitely will put it to good use.
-
A mix of circumstances have made it possible for me to begin a new model. Considering the amount of time I will have on my hands, I have decided to try something a bit more difficult, yet not without pleasure : the Revell Boeing B-17 in 1/72 scale. I've read a lot of articles about how nice of a build it makes and I was curious to try it out for myself. Hopefully, with the help of my little workshop and some 'forum assistance' I'll be able to successfully recreate something worthy of As of now it is clear that there will be lots of detail present on the interior. Very unfortunate that it all becomes mostly invisible when the two fuselage halves are connected. As such I'll focus on the cockpit area and the bombardier nose section, it will require enough effort anyway. With gathered information I painted the interior wall surfaces (thanks Tom Probert!). 'NMF' finish everywhere with the exception of the cockpit. The green is a zinc-chrome instead of a bronze but I didn't have any in stock, and with the -30°C outside at the moment it isn't really possible to go to my local hobby store. I'm sure it will do the trick overall. The bomb bay. Unfortunately the actual pieces should've been painted green, I misinterpreted the instructions. At this point I will either have the bomb bay closed or with the bombs falling out, as to draw attention elsewhere. Floors and the inside of the reactors also painted in green. At this early point I'm pretty happy about how everything is coming together, I've mostly built Airfix so I'm engaging on some new terrain here. Clearly Revell makes some more advanced models but I'm sure I'll get by. Stay tuned for upcoming updates, they shouldn't take long to arrive (hopefully).
-
Airfix Bf109e3 1/48 Werk Number 5057
Yvan S replied to Adam Poultney's topic in Ready for Inspection - Aircraft
Hi Adam, What is the plan for your future eight Bf109e-3s? Curious towards your motivation. Cracking model by the way, the weathering is superb. Regards, Yvan -
Airfix 1/48 North American P51-D Mustang
Yvan S replied to Yvan S's topic in Ready for Inspection - Aircraft
Much appreciated! -
Airfix 1/48 North American P51-D Mustang
Yvan S replied to Yvan S's topic in Ready for Inspection - Aircraft
Thank you sir! Ironically in this situation the decals separated into multiple pieces anyway, which made it easier to apply just with a more awkward result. Definitely a trick to keep in mind though! Had it been a single stripe I would have painted it on, as the round decals always seem to become a problem on all the models I've built. -
Airfix 1/48 North American P51-D Mustang
Yvan S replied to Yvan S's topic in Ready for Inspection - Aircraft
Much appreciated! Thanks for the tip too -
Airfix 1/48 North American P51-D Mustang
Yvan S replied to Yvan S's topic in Ready for Inspection - Aircraft
Thanks mate! Also good tip, hopefully next time the backing paper won't roll up into a tube like they did on this one. -
Airfix 1/48 North American P51-D Mustang
Yvan S replied to Yvan S's topic in Ready for Inspection - Aircraft
Much thanks mate, I certainly hope so! It was a definitely confusing at moments trying to build this, and I most surely would have benefited from an article similar to this to overcome some of the problems I mentioned. -
Airfix 1/48 North American P51-D Mustang
Yvan S replied to Yvan S's topic in Ready for Inspection - Aircraft
Thank you sir! -
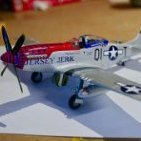
It's been a while since I've posted anything, and as I am off of school for a week (exam breaks are a blessing as long as there aren't too many exams to be written!) I thought I would show off my latest build. Also considering that I have not found a SINGLE ARTICLE online about this specific model I wanted to go in depth so that anyone looking to build this one in the future would be able to use this material for inspiration. First off a few photos. I built the 'Jersey Jerk', a plane that operated on the Western/Central European front for the 8th Air Force. There is a debate on radio wires existing on P51-Ds. I eventually found out that 8th Air Force planes did not have them. A small yet important detail which I hope will reduce wasted research time for any of you looking to build Mustangs. The quality of the molding is really amazing. I've seen however that there is a lot of controversy about rivets on Mustangs, so if one would prefer to get rid of them a bit of putty and sanding would most likely do the trick. Personally I did not have sufficient time to orchestrate such a strenuous procedure, and I also lacked funds for the required materials (the problems of being a teenager 😓). In the end it is up to preference. There is plenty of online reference material for other versions of the Mustang model if one would be interested to do so. There were few issues during the build, however a couple particularly stood out. the first one is the positioning of the machine guns. Airfix made an 'interesting' decision and decided to include them as separate pieces rather than mould them to the rest of the wing structure. Much sanding was required to make it fit and I am still not quite pleased with the result. Careful placement is most likely key to successful fitting, and this is not a part of the build that should be taken lightly, especially considering that any error will be visible later on. the positioning of the tail is also an awkward step as it comes in two pieces that are separate from the fuselage. The key here is lots of dry-fitting before the two fuselage halves are connected together. Here it is CRUCIAL that the tail is placed BEFORE sealing the two halves, doing so afterwards will be very complicated because the existing space is slightly too small to insert the tail pieces properly. I placed them as I was gluing the fuselage and it worked out pretty well. for some reason the dihedral of the plane came out as crooked for me, and substantially so. I only noticed this when it could no longer be fixed, but I am almost certain that the reason for this misalignment is how I glued the left side of the landing gear bay at the very beginning. I appeared to have not placed it in perfectly which resulted in a large space being created between the two surfaces. As a result the wings are not parallel to the ground, with the tip of the left wing being slightly higher than the right tip. Not a very noticeable problem, but still disappointing for me. Once again care should be taken. the decals on this model were very problematic. This was perhaps only an issue on my specific kit, but when I placed a decal in water the paper would bend which resulted in the decal being 'cut' into multiple pieces. This occurred on the larger decals such as the 'star' wing and fuselage logos and the QI-T lettering. Luckily I just had to place the pieces of the decals separately to achieve a normal-looking result. The blue diamond decal on the nose was an absolute nightmare to place as it separated into literally a billion pieces. It also caused a ridiculous amount of silvering which I was able to counteract with gloss coats before and after application, as well as a bit of red paint. I know that it clearly says on the instruction booklet to "take care when applying this decal" but I honestly think it is rather difficult to separate this decal from the paper in one piece. To anyone attempting, I wish them much luck. It must have taken me well over an hour to accomplish. The black lines that go across the wings and rear fins are too long on the bottom and on both sides of the fins. This is very easy to take care of though, one must just place those decals as they are and remove the excess once they are securely in place. I'd recommend waiting 24 hours before undertaking this procedure but it worked very well on mine. Finally the circular red decals on the propellor are a bit of a hassle, especially the ones closer to the tip. Trying to make them perfectly parallel with even spacing is difficult, personally it drove me crazy. So once again, patience and caution is necessary here. Otherwise this model was a dream. The newer Airfix creations are certainly on a high quality standard, building them is an absolute pleasure. For paints I used the Vallejo airbrush range, specifically the Chrome (71.064), NATO Black (71.251), French Blue (71.088), Scarlet Red (71.003) and Green Zinc-Chrome (71.094). The blue could be considered a bit light but once again this is up to personal opinion. In the near future I will be tackling the Revell B17-G Flying Fortress, so stay tuned for a progress build article.
- 13 replies
-
- 25
-
-
-
Oh it's definitely a pain, I got no information so I'm just going to the store and searching until I find something that satisfies my eye. Next time I will just disregard the issue, it sparks way too much conflict, and besides it's impossible to be 100% accurate, especially with any shade of blue.