


Modelling Mushi
-
Posts
152 -
Joined
-
Last visited
Recent Profile Visitors
1,726 profile views

Modelling Mushi's Achievements
")
New Member (2/9)
125
Reputation
-
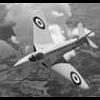
Back now, so here's the pics of the finished products. Its a straight flying surfaces swap and then sticking to the schemes in the box. First up, an F-16A with F-104G flying surfaces, out of box decals and blue on white color scheme (look for the crazing in the Gunze Blue) and some stores from the spares box: Second, the F-104 with F-16A flying surface, out of box colours and markings (including nightmare decals). Both of them on Airfix stands - didn't want the extreme hassle of the undercarriages - and I am pretty happy with them. Until next time, with something totally different Caio
-
Hello all Last installment (for a while) on the crossbreeds. I'm off for a work trip for a few days so hopefully by the time I get back the varnish should have dried and I can post some pics. The donor kits (and I use the word 'kit' very losely) are the following wonderful , early, Academy offerings. If you are ever thinking of buying these - for a heavy discount - do yourself a favour and buy a square block of resin instead and carve out the aircraft! It would be easier and also look closer to the real thing. Small list of issues: Shapes all wrong on both - terribly wrong on the F104 Mis-mouldings - the ventral strakes on the F16 are totally different sizes, as are all the weapons (fins short shot etc) Decals - ARRGH! Nothing like the box art for the F16. For the F104 the ink ran under a coat of Passt (Aussie Future), under Tamiya gloss, under Testors Semi- Gloss (all acrylics mind you), ran like all heck under Mr Mark and Micro-Mark products. It all does not fit - split F104 fuselage in half dry fitting the efflux; F16 intake looked like it had a goiter, shaved off a ton of plastic and it still does not look right. On top of this I dropped both a few times, misaligned some underwing stores, and sanded out a few fingerprints. Worst of all I am converting to acrylics and for some reason the Gunze blue on the F16 crazed even though the Gunze white dod not - this after 2 weeks hardening and using Passt which is the single most benign clear coat I have ever come across [you can drink it and live - just ask my stupid cat]. At the end I am pleased with these though. If this is all that goes wrong modelling wise for the next 12 months I will be a very happy camper. These two builds are not as subtle as my F16 - Mirage F1 crosses that I have previously posted - I think some may have thought these were only paint jobs, but no, twas more. Until later in the week Ciao
-
Bear Professional Painters Masking Tape = Tamiya Tape?
Modelling Mushi replied to Modelling Mushi's topic in Paint
Hello all It's been a while now and I have given this stuff a good workout so I know what it can (and can't) do. First off, don't throw away your Tamiya tape if you use it! Advantages / What it can do [li]Dead cheap. So that helps.[/li] [li]Low tack. Tried it over paint applied by brush and airbrushed on unprepped, washed bare plastic, and washed / prepped / primed painted surfaces in acrylic (Gunze & Tamiya) and enamel (MM and Humbrol) and no lift off at all. Left it on for 3 days after spraying, no lift off at all, no residue.[/li] [li]Clean edge. Applied, added a slight hit of Future / Paast and then sprayed over it, left a nice clean edge with no bleed through.[/li] [li]No bleed through. Sprayed and brush painted to 'Moses flood level', no bleed through the tape at all[/li] [li]Flats and gentle contours adheres well. Stays put on flat and mildly undulating (wings, fuselage, bodywork) plastic.[/li] Disadvantages / What it can't do [li]Tight curves. Lifts badly if left to its own devices on very curved sufraces (jet intakes, wheel edges, missile bodies[/li] [li]Can be a bugger to cut. Caught me out this one, but it can be a bit tricky to get through with scissors. No issues with a knife.[/li] How I am going to use it Works best when I use Tamiya or a similar proprietary tape to define the edges, then use this one the fill in the gaps between the Tamiya tape boundaries. A quick run over with Future or Paast on the tape helps it adhere well to the Tamiya and gets no lifting. It has replaced my usual 'bulk filler' mask (post it notes, Tamiya tape or thelike) and replaced any masking at all on flat surfaces. Hope this is helpful, Ciao -
OK, lets try this again. Crossbreeds, F16 to F1C. All flight surfaces flipped, both done in hypothetical agressor schemes. Hand painted. 1/72 scale. This post - the F1C.
-
Crossbreeds Part 01 OK, lets try this again. Crossbreeds, F16 to F1C. All flight surfaces flipped, both done in hypothetical agressor schemes. Hand painted. 1/72 scale. This post - the F16.
-
"Man Cave" WIP...... FINISHED:-)))
Modelling Mushi replied to RNoAF Aerobatic Team's topic in What-if
Ahh, yeah GR you did .... Like BB Im always looking for ideas for man cave model den fitouts .... -
Nlhbap, it's going slowly, VERY slowly . Apart from nightmares in the cockpit (fixed now) swmbo has had me making a cat skyscraper so thats sucked a bit of time. Hopefully in the next month I'll make more headway. Ciao
-
Came across this stuff at Bunnings yesterday: I've had a quick look and for all intents it seems the same as Tamya tape; same feel, tack, paper etc. I bought this roll (36mm x 50m) and a second (24mm x 50m) for $10 to $15 each, so I figure it's abit cheaper than the Tamiya stuff. Will be using it in the next month or so, will let you know how it goes. Ciao
-
F-105D Thunderchief HobbyBoss 1/48
Modelling Mushi replied to Sobby_23's topic in Work in Progress - Aircraft
Sobby, you should be happy, it's a good looking paint job. Looking forward to seeing the beastie finished! -
Nice, very nice. Welcome to the dark side (it's much more fun over here)
-
Some sort of annual whiffery award (THE RULES)
Modelling Mushi replied to raptormodeller's topic in What-if
I am hoping like heck that awards are named the "Kuts" and not the "Wallies". Hate to be even nominated as Wally of 2015 -
Very quick BB-8
Modelling Mushi replied to Haggis9444's topic in Ready for Inspection - SF & RealSpace
10/10 and I love the base -
Excellent, a real menacing look ti it.
-
Hindenburg - "oh, the humanity!"
Modelling Mushi replied to Canadian Pirate's topic in Ready for Inspection - Aircraft
Very nice and well done! Looks the part ... what's next? -
OK, back after a fair break away from everything. Some small progress with some detail added to the weapons bay doors and bay centre divider, plus turbine faces atached to blanking plates. Thanks for looking in.
