


Hamiltonian
-
Posts
580 -
Joined
-
Last visited
Content Type
Events
Profiles
Forums
Media Demo
Posts posted by Hamiltonian
-
-
2 hours ago, GordonD said:
Is it just me or does the box seem much larger than it needs to be for the amount of plastic inside?
They seem to use standard blank mailing boxes of various sizes, and paste on their own labels. I think everything I've ordered from them had a void filled with expanded polystyrene "peanuts".
In contrast to the Moebius "Discovery" kit, in which all the sprues, and the metal support rods, were precisely tailored to fill the box from side to side and top to bottom. It was a thing of beauty, and almost a shame to start hauling stuff out.
-
No useful illustrations of the TMA1 excavation in either Taschen's "Making of ..." or the "2001 File", beyond some concept art that doesn't match the "real" thing. That set seems to have little in the way of surviving documentation, unfortunately.
-
 1
1
-
-
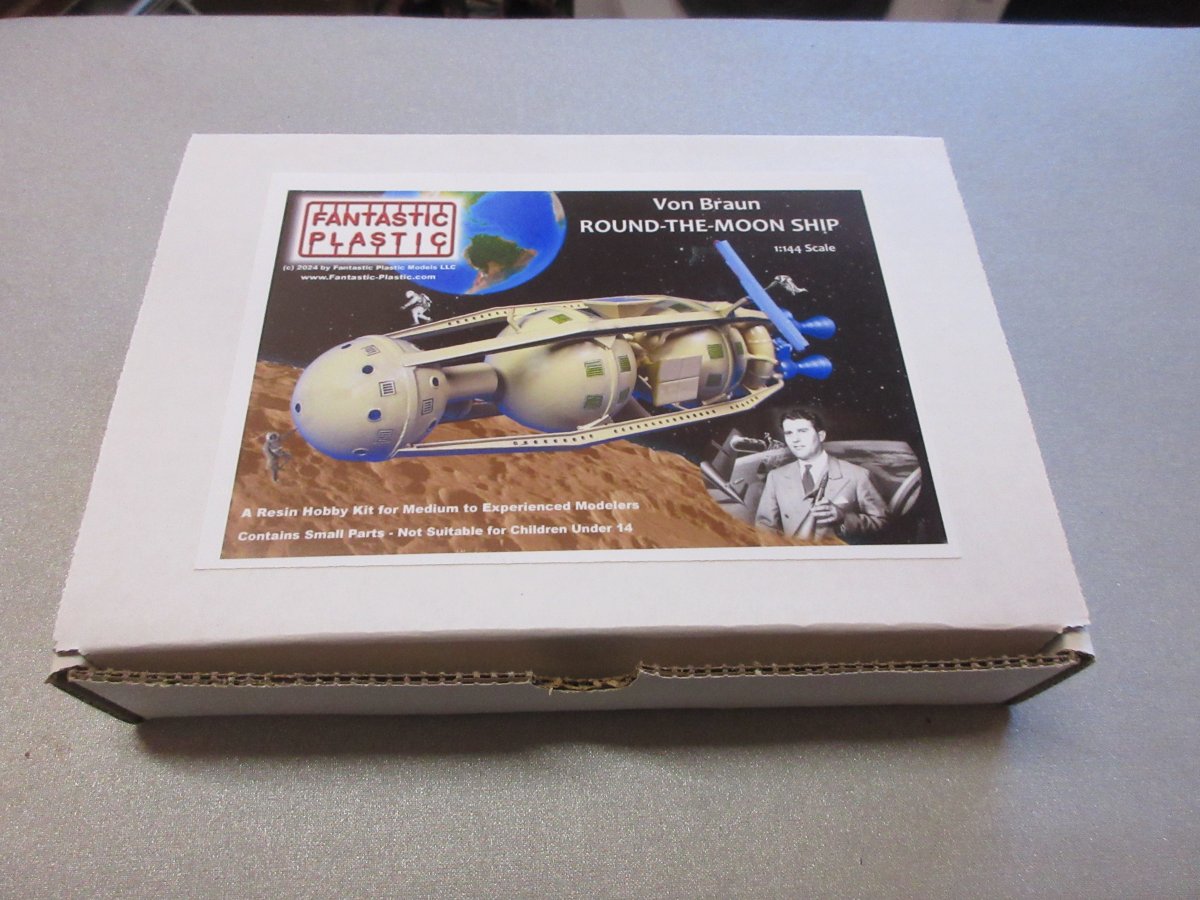
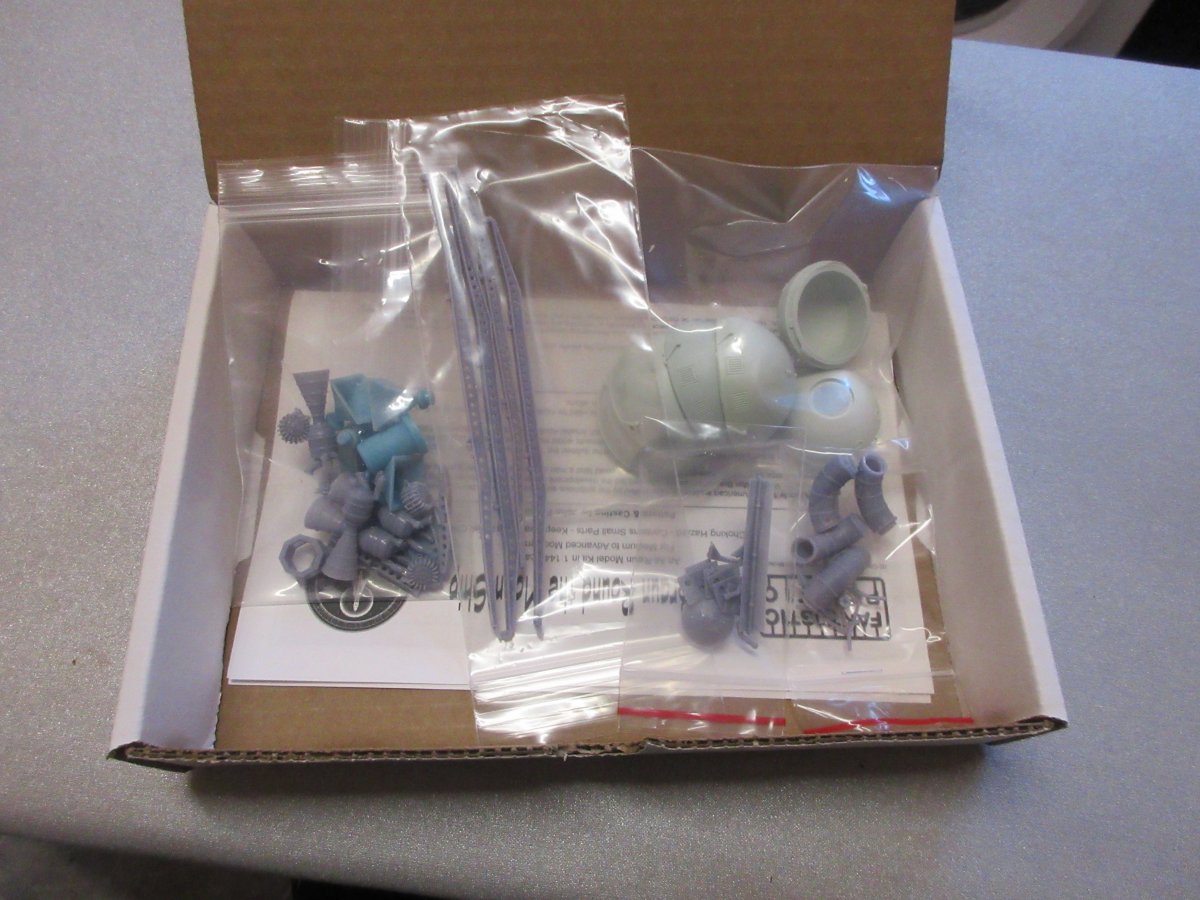
Well, it arrived:

A quick inspection suggests it's the best moulding I've seen from Fantastic Plastic.
-
1
-
-
19 hours ago, starseeker said:
I've always wanted to follow Mat Irvine's build from his space modelling book, but to get the Plastruct/EMA parts here in Canada would be about $75US. Sigh. That makes this tempting, but if they used the dimensions shown on that drawing on the Fantastic site, the thing would only be 7.7" tall. Also Fantastic's shipping to Canada is often nearly as much as the kit itself. Sigh.
I was charged just $10 for shipment to the UK, which was a bit of a surprise---I kept expecting to get a request for additional funds, but (at least according to PayPal) the order has now shipped without demur.
-
1
-
-
13 hours ago, Jeddahbill said:
Thank you for posting this new release from Fantastic Plastic. Very pleased to see this subject finally in kit form after many decades of being neglected. A larger scale would be nice, but this does appear to be accurate to the original 1952 concept. Having done a semi scratch built version I probably will not purchase this kit, at least for now.
Yes, your build was excellent. Mine, not so much, being just a partial revision of the Lindberg kit---so I'm keen to replace it with one of these. I'll look into what's available in the way of 1/144 astronaut figures, since the bit I think worked well in my build was the EVA astronaut, and I don't want to lose that feature in a new build.
-
 1
1
-
-
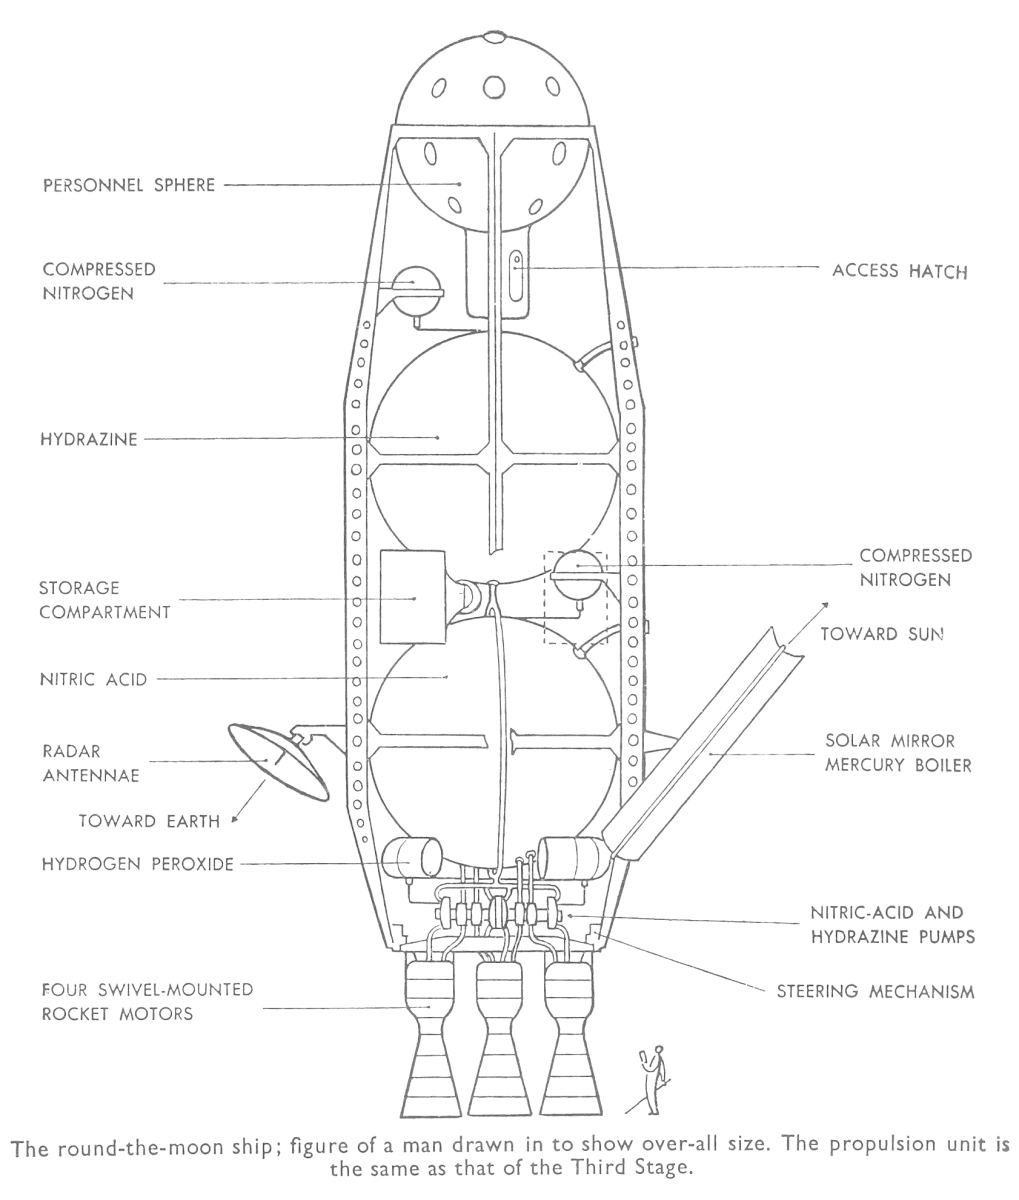
Not sure if this counts as RealSpace or not, given it's a 1950s concept craft. But not Science Fiction either.
https://fantastic-plastic.com/von-braun-round-the-moon-ship---catalog.html
It looks to be reasonably faithful to the original plans and Bonestell painting.
.
Certainly a great improvement on the ancient Lindberg kit, which required extensive modification to get a halfway acceptable version of the "real" thing.
-
5
-
-
Sorry I'm late to this thread, but I notice some comments about carbon dioxide that don't seem to have been addressed.
I don't know about Russian systems, but exhaled carbon dioxide on the Apollo missions was removed my chemical scrubbers of the sort that caused an informal engineering problem during Apollo 13 (trying to get CM scrubbers to fit LM systems, IIRC). The ISS captures the carbon dioxide reversibly on zeolites, which are then cleaned by exposure to vacuum.
So if everything's working fine, the carbon dioxide concentration in the cabin atmosphere is kept very low, and storing and recycling this in an airlock system wouldn't be a problem.
On the topic of carbon dioxide being required to stimulate breathing, it's the CO2 in our blood that does this, by stimulating chemoreceptors that in turn alter the rate and depth of breathing. The more carbon dioxide our tissues produce, the harder we breathe. We don't rely on atmospheric CO2 for this function, and can happily breathe tanked air that contains no CO2. A significant level of CO2 in our breathing air is in fact counterproductive, because it makes it harder for us to dispose of waste CO2.
-
1
-
-
5 hours ago, VH-USB said:
Although the Khee-Kha Fairchild 71 kit has been discontinued it can be found on eBay.
There are 2 there right now and at half the price of the Aeroporto Modelos resin kit.
(personally, I much prefer vacuform over resin)
The floats you can still purchase from Khee-Kha.
And the Pacific-Alaska decals can be purchased from Arctic Decals.
Thanks for looking. There are none listed on ebay in the UK. On ebay.com I found one closed offer and one seller who doesn't do international shipping. I'll keep an eye open for other offers, though.
-
48 minutes ago, CarLos said:
The kit is discontinued, I'm afraid.
Yes, but I have hopes for the Aeroporto Modelos 72 resin kit, pointed out by Mika.
-
47 minutes ago, Mika Jernfors said:
Thanks Mika! I've registered for a notification when it comes back into stock.
-
24 minutes ago, KevinK said:
... and I think that's why there's no definitive answer, once you get away from the original company. Each successor and especially different countries will follow a different path.
All I can say is that the original company seems to have used the traditional English (well, Norman French, really) way of presenting the family name. After that, ....?
Yes, it looks like "de" or "De" are defensible, according to context. But the "all-one-word" renderings seem to have no support.
-
1
-
-
13 minutes ago, KevinK said:
That's not really a direct successor company, though. The original company was subsumed into Hawker Siddeley, later BAe, etc. The De Havilland Aviation company dates from 1988 and is "Jet Heritage" renamed, a warbird maintainer.
Ah, thanks. I should have followed the link to the associated Wiki page, before I posted. It seemed like a strange departure from the classic DH logo. So it's a different company that has chosen to capitalize the "de".
BAE Systems seems to like the capitalization, too. But Boeing Australia goes with the lower case.
-
1
-
-
8 hours ago, Orso said:
Just to confuse everything we have the data plate at the bottom of this site: https://www.dhc-3archive.com/DHC-3_75.html
Another issue is that company logotypes are sometimes different from how they prefer to appear in plain text. (The classic example is Toys 'R' Us, who sensibly don't require us to find a reversed R on our keyboards.)
So the "script" typeface on the old data plate is trying to suggest a personal signature, I think. But fashions change, technology improves, and that sort of thing looks very out-of-date these days. Wikipedia has an image that it claims is the logo of De Havilland Aviation Ltd., which features the capital D. So unless that's some sort of misrepresentation, on the strength of the company's own current usage (on logo and website) I'd go with the capital D when referring to the current company, the small d when referring to the family, and otherwise follow the usage of individual affiliated organizations (like the de Havilland Museum).
What's certain, I think, is that any rendering that runs the "de" into the "Havilland" is wrong for this family and company. That sort of construction tends to appear in American family names with origins in Europe (DiCaprio, for instance, which would be Di Caprio in modern Italy). I've always assumed it was one of those things that happened at Ellis Island, where immigration officials notoriously respelled the names of new arrivals to fit with their own preconceptions. But I might be wrong.
-
1
-
-
I think it depends on whether you're writing the surname or the company name. While "de Havilland" is correct for the surname, the initial small "d" is a bit odd in a company name. So the company website writes, for instance, "The DHC-515 FIREFIGHTER™ is a new production amphibious firefighting aircraft developed by De Havilland Canada", consistent with the DH in the company logo (not dH).
Whereas it's the de Havilland Aircraft Museum in the UK.
-
5
-
-
3 hours ago, VH-USB said:
Lars Opland at Khee-Kha Art Products produces a beautiful 1/72 vacuform kit of this very plane...
Khee-Kha Art Products (opland-freeman.com)
Unfortunately, it's now OOP.
Perhaps you should email Lars and ask if he has plans to reissue this beauty.
Oooh, thanks for that link. I see he also produces Isobel's other plane, a Bellanca Pacemaker, though I'd need to bodge together some skis and a tailskid.
-
1
-
-
5 hours ago, Orso said:
My first thought wa a Fairchild F.71. I know that PAA flew them. I think that the white part behind the engine is the exhaust sytem.
Many thanks! Can't think why that didn't register with me as a complicated exhaust, so thanks for putting me right.
-
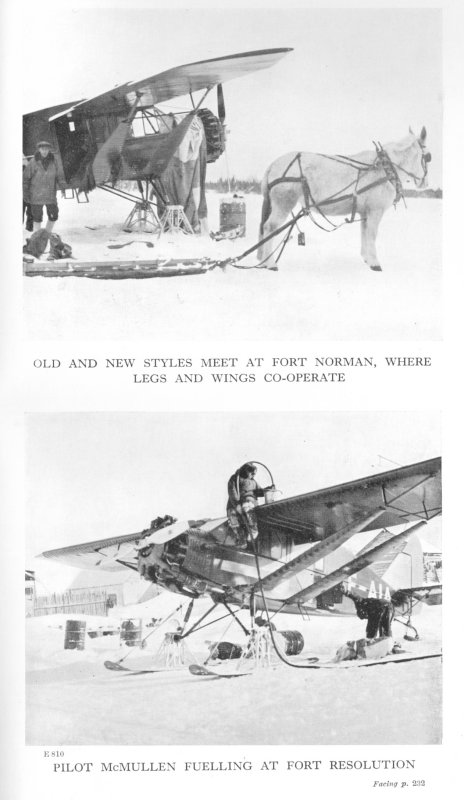
I've been reading Isobel Wylie Hutchison's "North to the Rime-Ringed Sun", an account of her travels by rail, boat, plane and dog-sled in Alaska and the Yukon in 1933-4. One of her flights was from Fairbanks, following the Yukon as far as the little settlement of Nulato, and then cross-country to Nome on the coast.
She includes a photograph of her transport, drawn up on the shore at Nulato.
Can anyone identify the aircraft for me? (And perhaps explain what the white dangly thing draped behind the cowling might be.)
-
1
-
-
4 hours ago, Jeddahbill said:
Very nice work! I would like to do a 1/32 version of the LM at some point. Where did you get the gold foil and what glue did you use?
The foil is advertised as "candy wrappers" and comes in packs of 100 sheets. I picked them up after searching Amazon UK, so I've no idea if they'll be available where you are. The lighter gold is from Heyu-Lotus, and came from China to the UK via a company called Krety; the darker gold is described as "Brussels08 Orange", and comes from a Chinese company called Vocayle. Both kinds are easy to work with.
I used cyanoacrylate, but I wouldn't recommend it. It takes a bit of time to set, particularly between two layers of foil, and so is in principle repositionable. But it also lifts the yellow pigment off any foil it's applied to, so any repositioning has to involve moving the upper layer forward, over a new area, and never having to slide it backwards. To a lesser extent, when you apply the CA to the back of a sheet of foil, it slightly softens the pigment temporarily. So you can gently flatten the foil by rolling over it with a cotton bud, or pressing down vertically on it, but if you try to make smoothing motions with your finger, you end up with a yellow finger and silver foil!
I'm sure there's something more suitable out there, but once I'd learned the rules of the game I managed to muddle through with the CA.
-
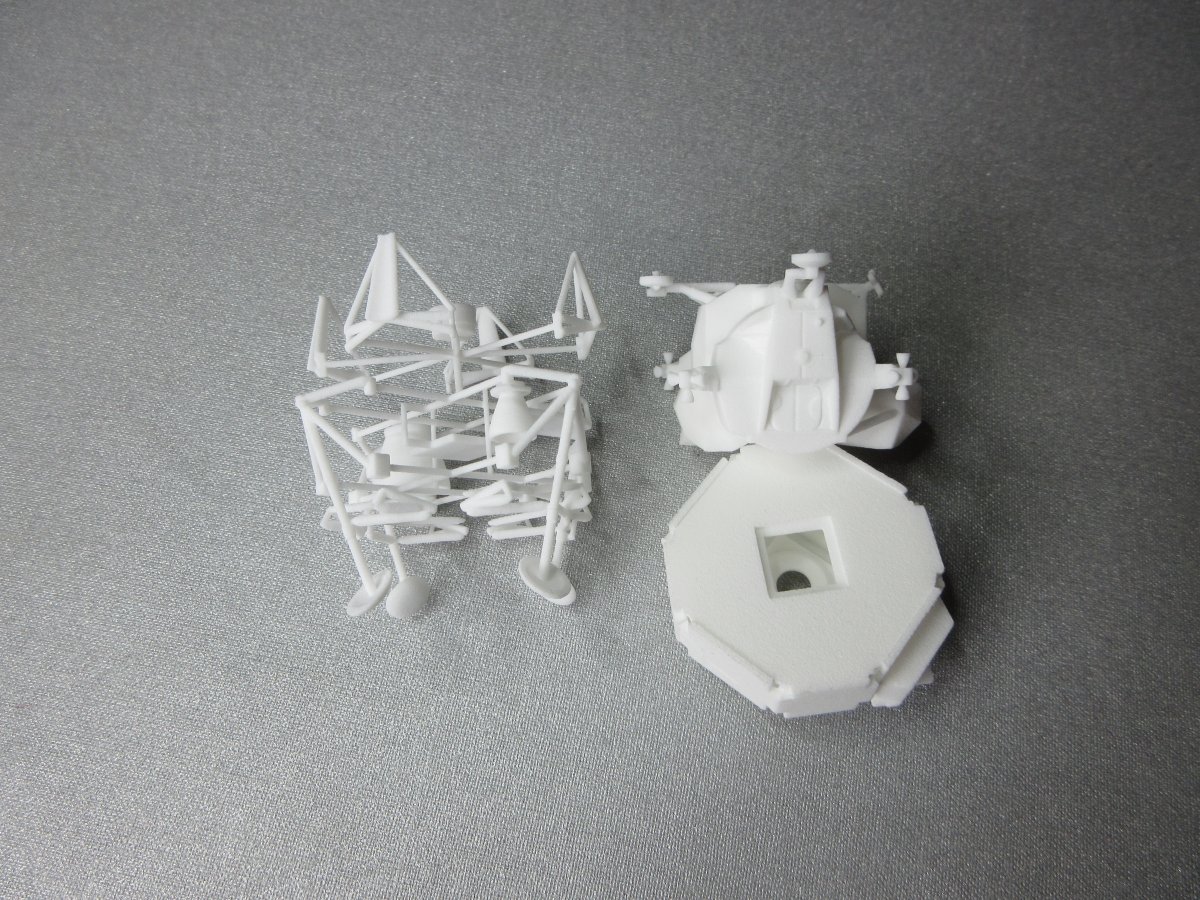
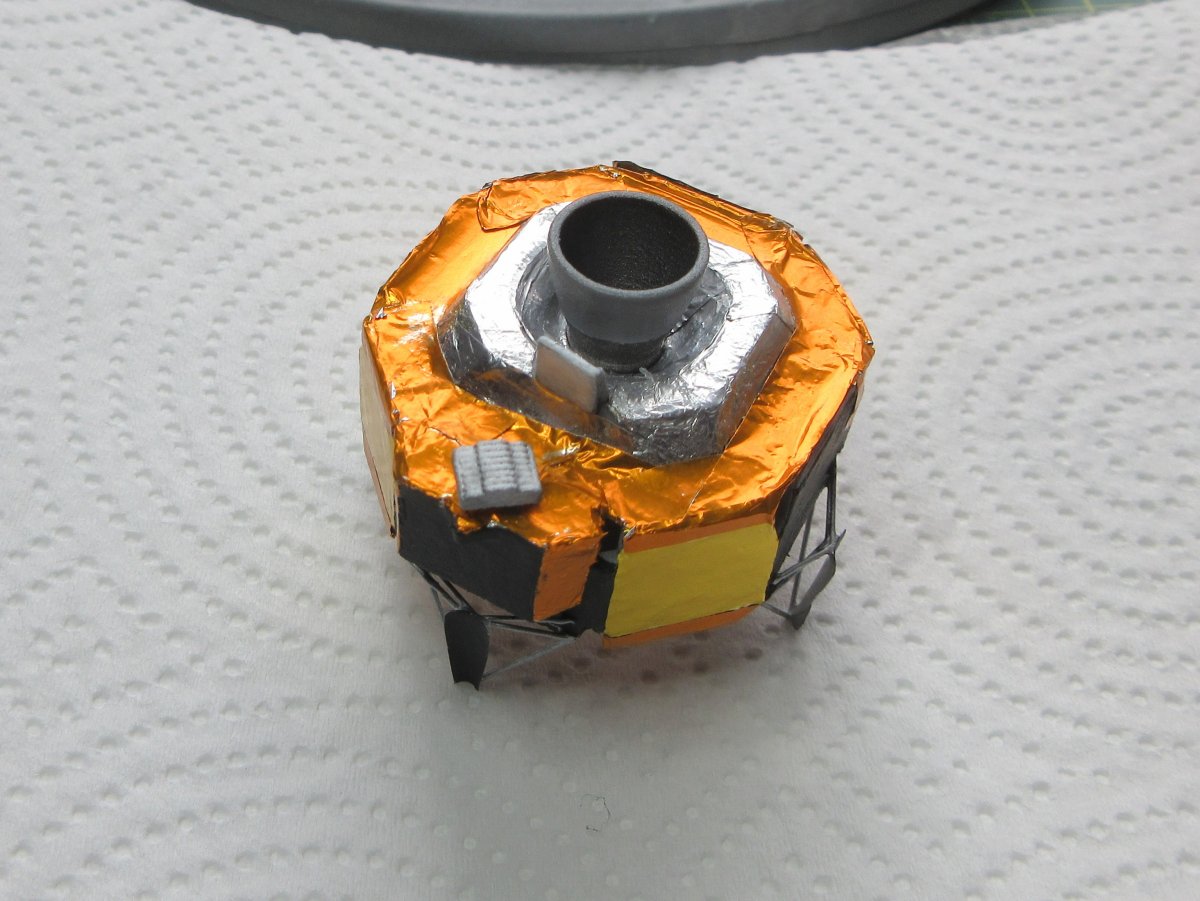
Having (after many tribulations) finished my 1/96 RealSpace CSM with 3D printed detail from The Aerospace Place, I thought I'd move on to a 1/96 LM, to replace the truly horrible version that comes with Revell's 1/96 Saturn V. Here's what arrived from Shapeways.
It's made of slightly rough plastic, but mostly this won't be a problem.
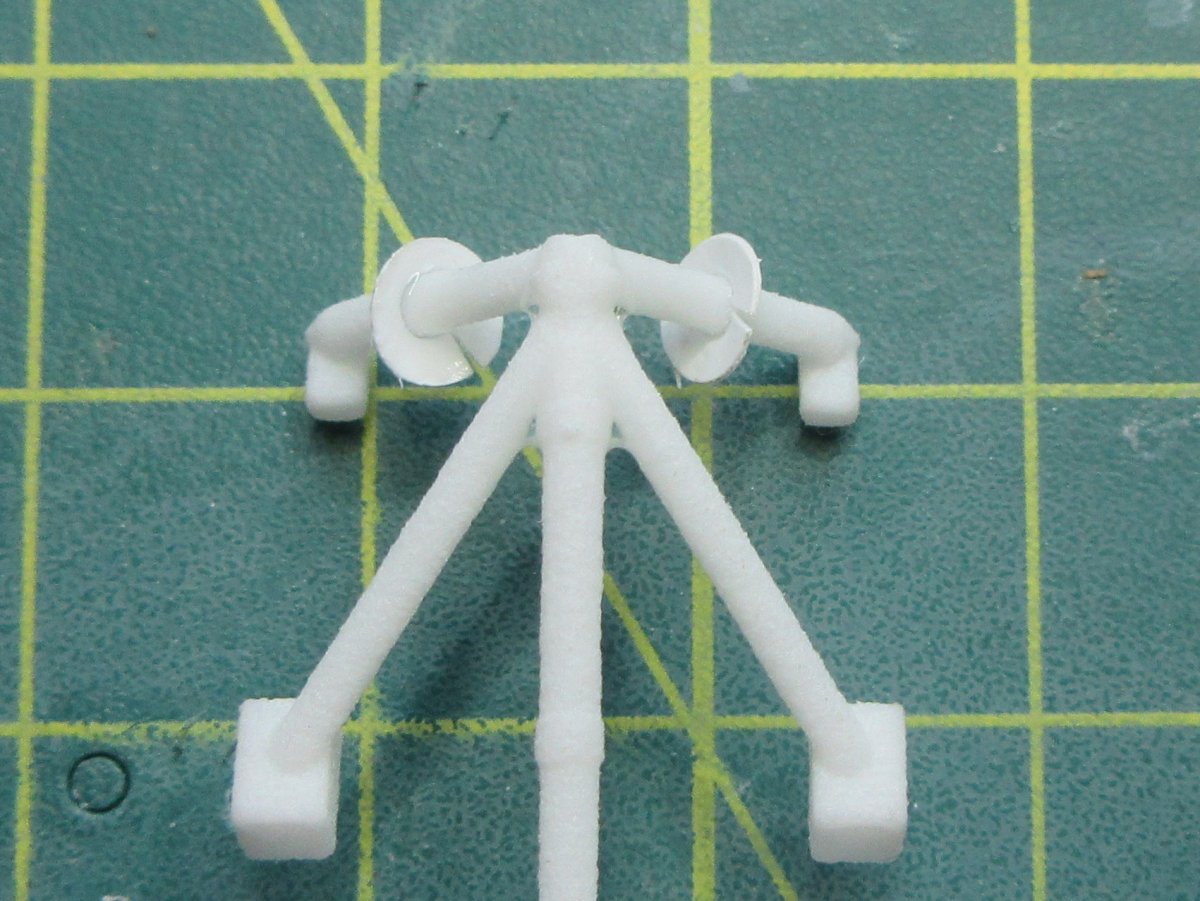
The Ascent Stage is missing a couple of RCS thruster nozzles, which I found loose in the packaging and reattached. The whole thing is a much better shape than the Revell version, and contains more detail, though some of it is quite chunky.
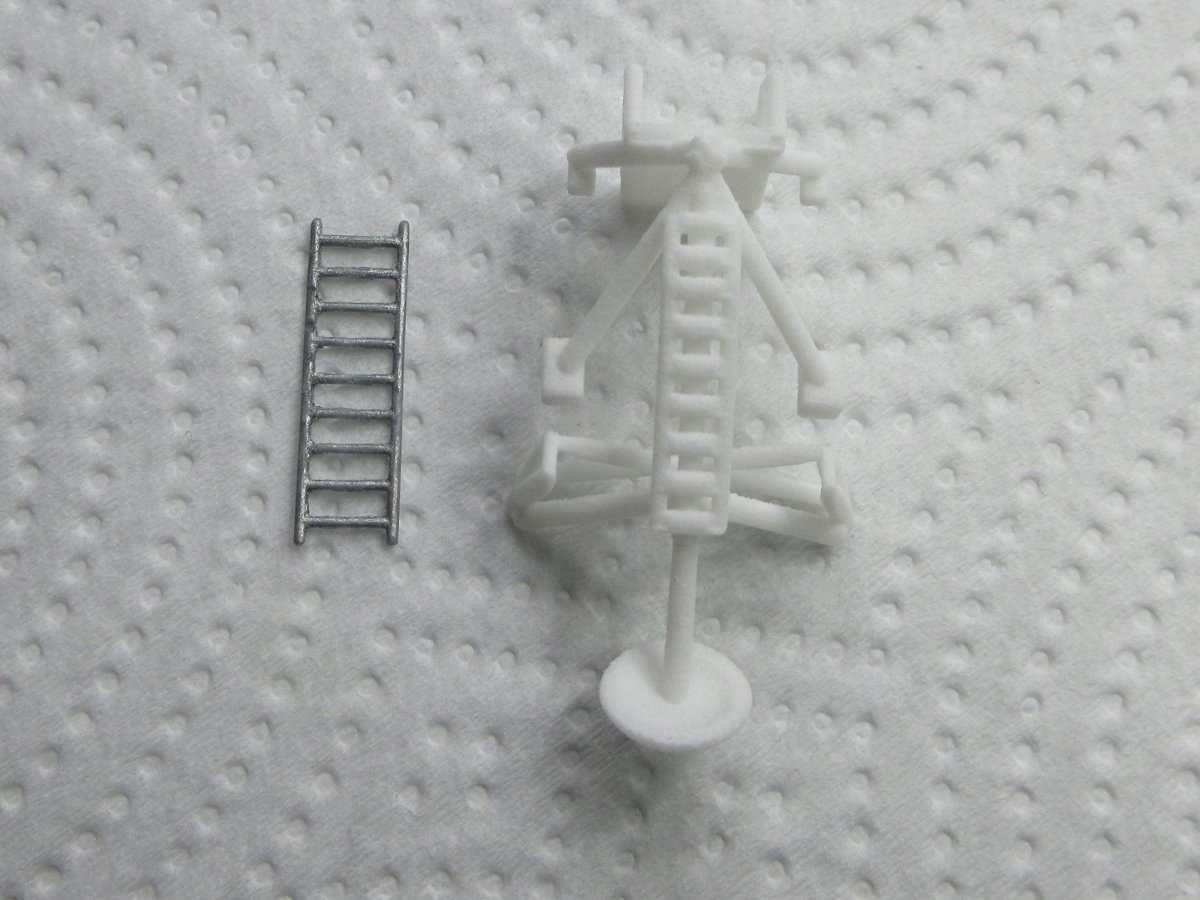
One problem is the ladder, which is printed thicker and much narrower than the real thing. Scratch building such an object was beyond me, so I cut the Revell ladder off the kit part, and then removed the 3D printed version. Here's a comparison of the recycled Revell part and the Small Scale Shop version.
I'll mount the ladder on the landing leg after I've wrapped the leg in foil.
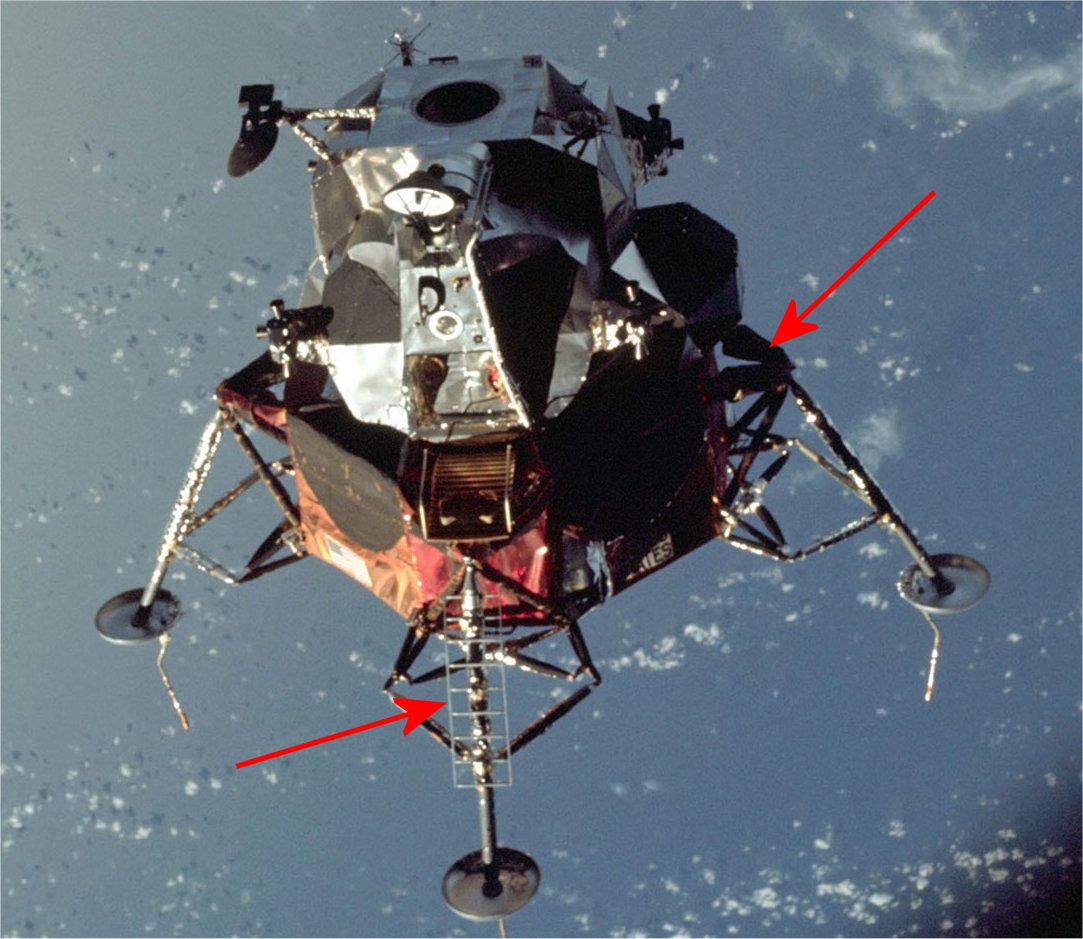
For reference, here's the Apollo 9 LM (a detail from NASA image AS09-21-3183):
You can see that the Revell kit part, though still chunky, matches the ladder dimensions better.
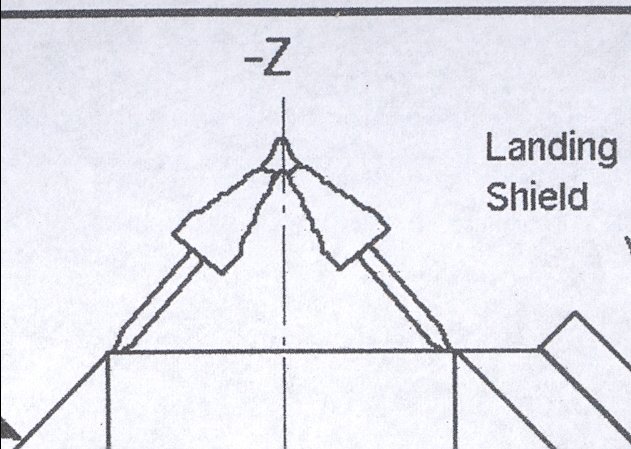
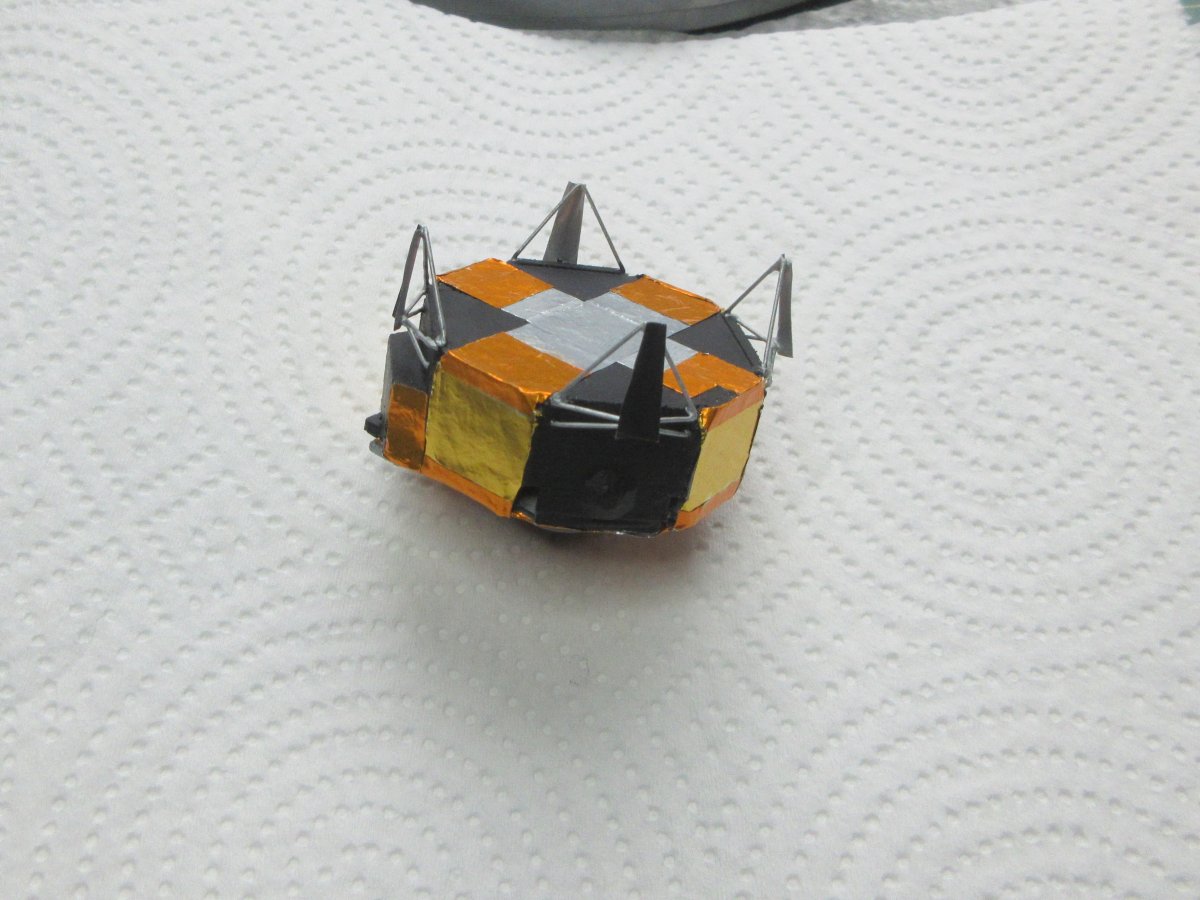
Also arrowed (and the reason I chose this photograph as reference), is the chunky, roughly conical shroud around each of the paired upper landing-leg struts. (These are difficult to see in most pictures of the LM, where they're seen against a black sky background.) David Weeks's drawings make them look nice and neat:
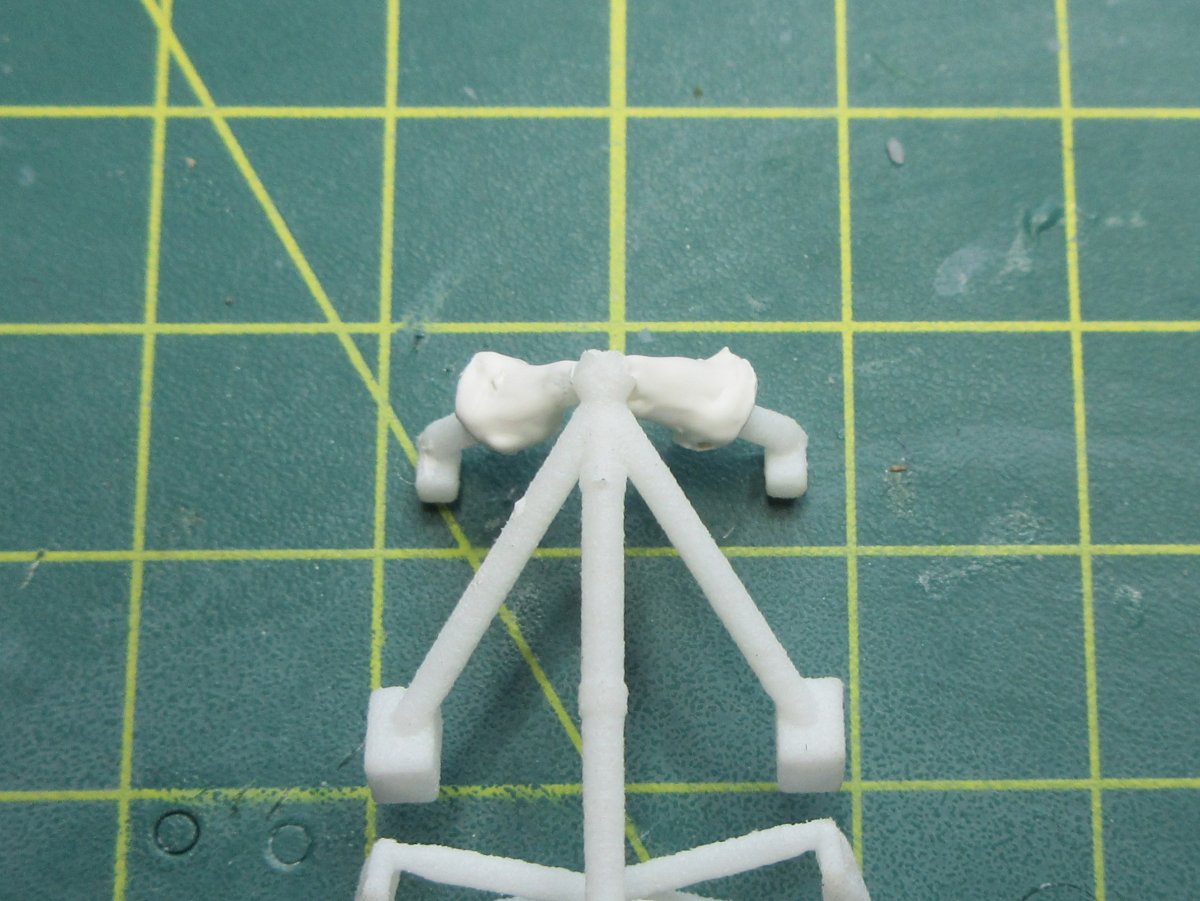
But after peering at various Apollo 11 images, the black foil wrap seems to be quite lumpy and irregular, and the rear and front leg wraps (-Z and +Z) seem to be more extensive than those on the two side legs. I've no idea what these are, but they're absent from the Small Scale Shop parts. So I thought I'd model them as best I could. First a slipped some appropriately sized sheet styrene discs on to the struts:
Then I built up the lumpy cones with filler:
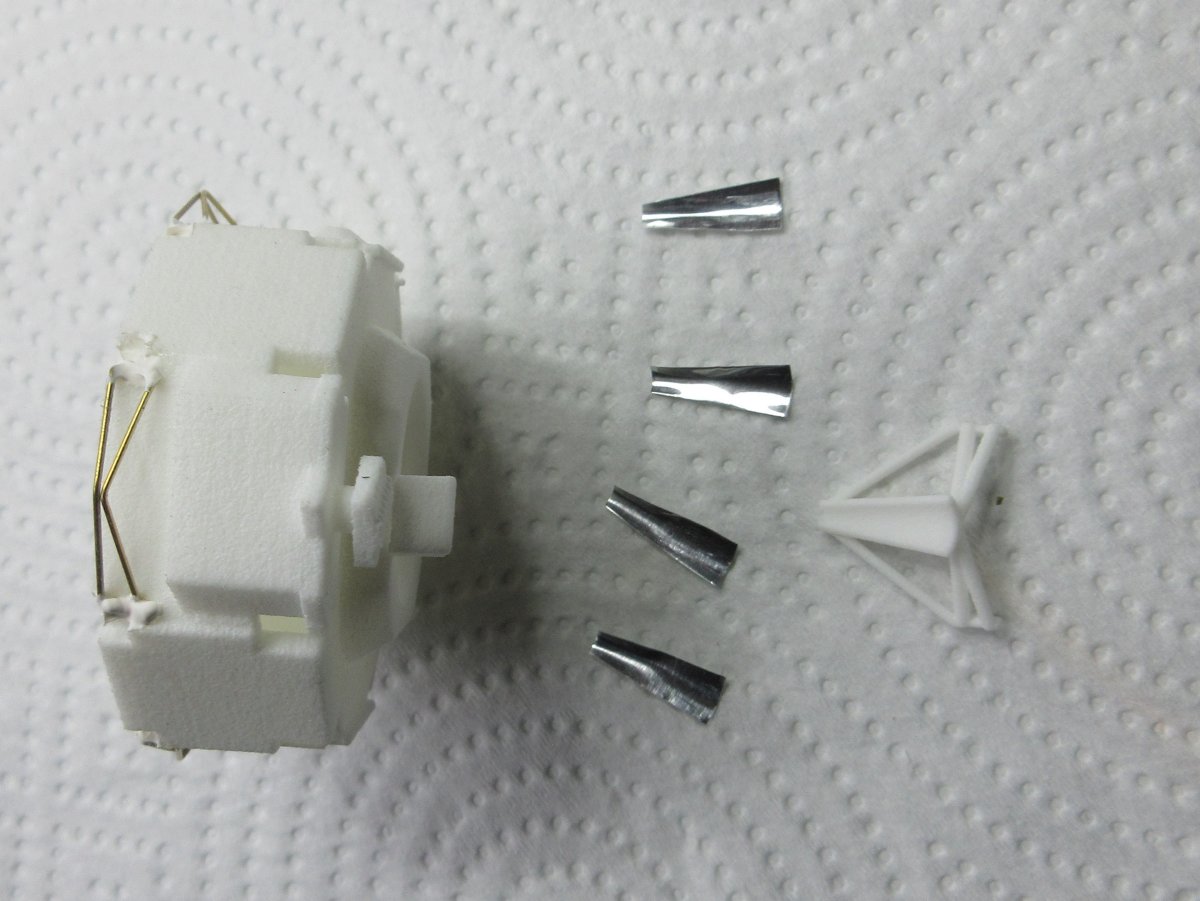
I also decided to address the chunky plume deflectors, by scratch-building them from 0.5mm brass wire and thick aluminium foil. The original printed part is at right, for comparison:
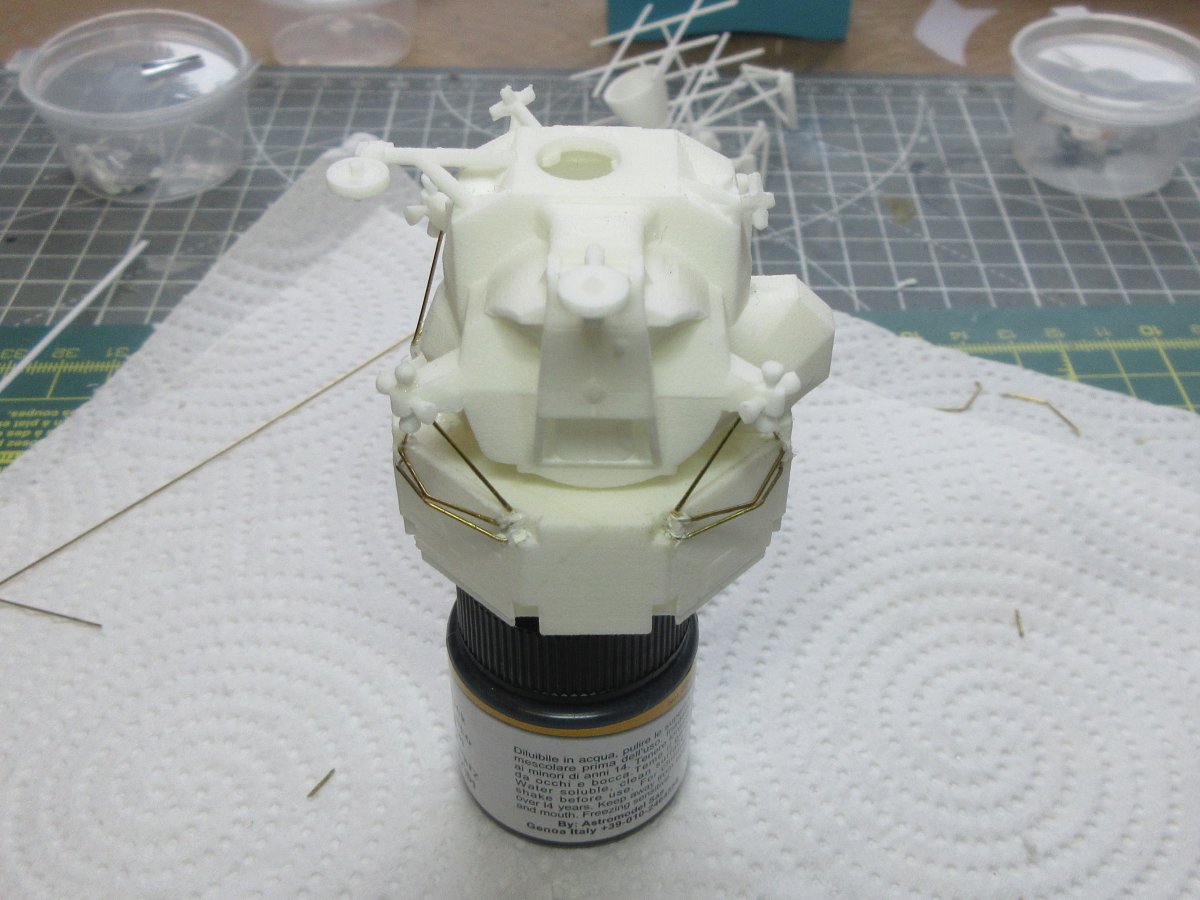
To positioning the vertical plume deflector struts, I temporarily glued the upper stage in position, so that I could get the height and position correct:
After a bit of tidying up of the filler, I gave the whole a coat of Tamiya grey undercoat, and brush painted the necessary surfaces black with LifeColor matt black, which is my go-to paint for a good matt finish. Then it was a matter of cutting and gluing two shades of gold foil, to simulate the two thicknesses of gold Kapton foil, and some bright silver kitchen foil for the Nickel 600 foil. Here's what I ended up with:
Next job will be to get the landing legs painted and foiled.
-
7
-
-
Yes, the wiring run for the rear cameras disappeared behind the bottom rear corner of the sliding door in the Apollo 11 recovery configuration, and was plastered in place with a lot of yellow tape. With the door open, more yellow tape was visible running along the edge of the frame---I don't know where it all ended up.
There was another camera tucked under the sponson support, aimed backwards, connected to another yellow-taped cable run up the rear edge of the window above. I've never managed to find a decent reference image for the camera itself, but it seems to have been a less elaborate arrangement than the rear cameras.
-
3
-
1
-
-
8 hours ago, Peter Browne said:
I am looking at doing exactly the same. Studied this blog:
https://oikofuge.com/hasegawa-1-48-sh-3h-apollo-conversion-1/
And thought I'd see if anyone on this forum had done similar...ah well..it seems to be the bees knees in conversion write-ups for this aircraft!
Peter
Thanks (I think). That's my blog. I post here contemporaneously with the build, and the blog posts then trickle out over a period of months thereafter, as I get around to it, interleaved with my other topics.
-
I'm another one who can't believe it's at 1/72 scale. Wish my 1/48 efforts looked as good. Lovely.
-
1
-
-
8 hours ago, Planebuilder62 said:
Very nice job Mr Hamiltonian.
Finding good references and nice space model kits is a challenge compared to a lot of aircraft modelling. You have made a very nice job of showing the different NMF finishes. BTW, how long is the finished model compared to someting more familiar such as a 1/72 plane for comparison?
Regards Toby
Thank you.
The CSM is 11cm x 4cm at this scale. I don't have many 1/72 aircraft to offer as a comparison, but since I see you're in Norway, here's the 1/96 CSM next to my 1/72 Junkers F.13W, flown by pioneering Norwegian aviatrix Gidsken Jakobsen.
-
4
-
1
-
-
On 7/25/2023 at 2:56 PM, Jeddahbill said:
A difficult journey, but the results look very good indeed. Much excellent information on this kit provided by your photos and descriptions - a really helpful resource for anyone attempting this build.
Will you be doing a LM?
Thanks.
Odd you should bring up the LM:
Necessarily quite clunky at this scale, so I think there will be some scratch building with fine brass rod and thick metal foil to replace some of the parts. The plume deflectors in particular look like they've been built by a Soviet blacksmith for agricultural use. But it's a much better basis to build on than the abomination from the Revell 1/96 Saturn V.
-
2
-
 .
.


Apollo Saturn V and LUT
in Ready for Inspection - SF & RealSpace
Posted
I've not been around much recently, so missed this thread until now, and it seems I also managed to miss your entire build log on this one.
That's a heck of a build---absolutely gorgeous and beautifully detailed. Bravo!