


RiotRolo
-
Posts
103 -
Joined
-
Last visited
Content Type
Events
Profiles
Forums
Media Demo
Posts posted by RiotRolo
-
-
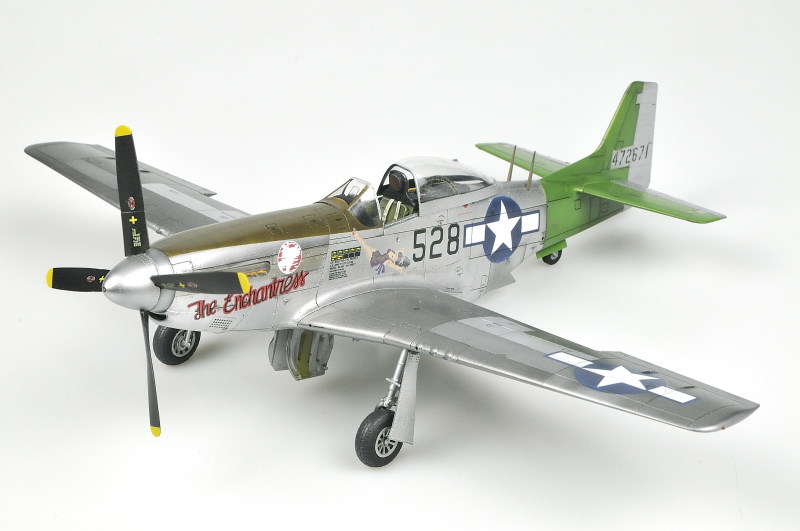
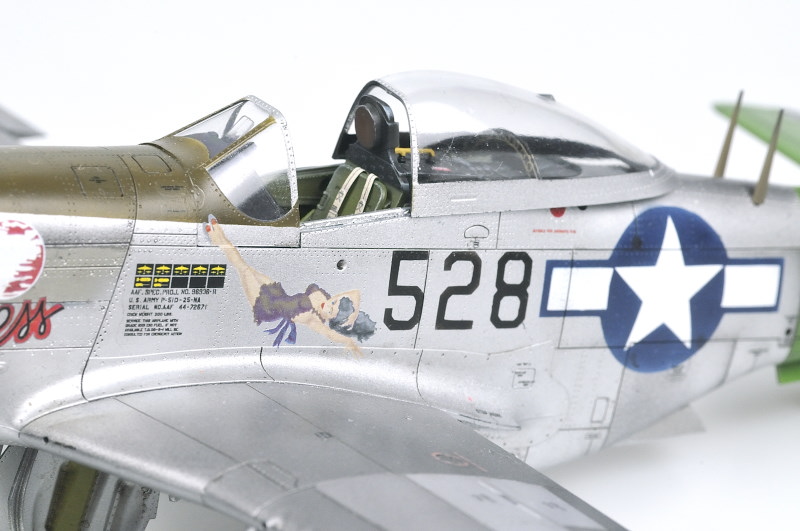
Hi everyone
Its been a while since I last posted a finished model, even though I finished this one about a month ago now, I hadn't got around to posting any photos.
I picked this model up for a really good price and decided that due to price I paid for it, it would become a bit of an experiment with dirtying up my aircraft a bit; seeing that this warbird server in Papa New Guinea I thought it only fair I turned it into a 'jungle weathered machine' which is where I dedicated most my time to throughout this build through pre and post shading panels, mixing paints to get various shades of drab and also venturing into highlighting with oils which was actually quite a good bit of fun (even though it's not a technique I am that great with).
The cockpit was detailed quite a bit through scratchbuilding, even though its difficult to notice unless you're close, this is something I was filming with the idea of posting to Youtube for a bit of fun, its safe to say unless people want to watch a 20 minute video of my hands, it'll stay off Youtube 😅.
I have always loved Eduard's weekend editions, sometimes I find the Profipack's a bit too much effort for a result im only kind of pleased with and so the weekend edition is usually my go to. This one was no exception, it went together really nicely, all but having to crack a piece of the finished fuselage to get some more weight in a pretty tight space which isn't exactly Eduard's fault but more the fact I rush into things too often. It was a really nice change to try something 'dirty'. I learned a lot from that that I can apply in the future, such as, it's very easy to over chip leading edges and giving off an out of scale look as well as refraining from putting sooooo much mud effects on the wheels. Other than that, I like the result, even though im sure it wont be to everybody's taste.
Hope you enjoy guys.
All the best,
Ryan

-
 12
12
-
-
I've just come across this thread after noticing this on my 1/48th Spitfire. I wish I knew this sooner, I looked at the Eduard instructions and there is no mention of this but I managed to find the edge of the transfer and off it peeled.
The results are really something else, its given the model a look as though I've painted them on. Hopefully the other Eduard kits I've got are like this aswell, its a pretty nice addition.
-
On 3/24/2021 at 12:15 AM, LaurieS said:
Very right Carius the history of the Long Range dessert Group is very interesting.
Alot think they were blowing up this & that but they were a renaissance squad. Feeding information back to command headquarters.
Not to be mixed, but there was affinity, between them & the SAS. Neither just to add were the SAS gungho. Their exploits, there are loads of books, were superbly planned.
Laurie
My girlfriends great uncle 'Charlie' was part of the Long range desert group, sadly I never had the chance to meet him but from what I've heard he had a crazy time of it. The exact reason is unclear but he was the only survivor in his group after an explosion losing a leg during the ordeal
-
-
Definitely worth the watch
-
Your representation really captures the look of these jets, and the colour scheme looks great
-
 1
1
-
-
I've been lucky enough to see one of these up close, and this is really reminiscent of the real thing. Great work
-
1
-
-
22 hours ago, Rémi said:
Hi
This is my second Eduard P-51D
This time I choosed the green tails of the 457th FS
I didn't add the two long range fuel tanks because I prefer a plane without it
Some other photos in the link bellowBeautiful work, I totally agree they do look really sleek without the fuel tanks
-
The level of detail is amazing, especially how you detailed the underside colours and the topside colours. This would probably have been something I would have forgot to add.
-
1
-
-
Great metal finish, especially with the contasts in the panels
-
Your work is amazing, I'd love to do a scheme like this in the future. Cricut machines are a proper handy piece of kit!
-
1
-
-
Incredible work, cant wait to see the final result!
-
1
-
-
On 4/4/2021 at 9:21 AM, ilius said:
Thank you RiotRolo
I had a Revell kit with standard grey scheme decals. So, I had to order custom decals for this variant from one modeller. He printed it on a very thin decal paper.
Stencil decals I used from the Revell kit. And finally I used decalfix from Zip-market for all decals and I didn't have silvering problem
You can make same. Or, You can searching decals from CaracalThanks mate, perhaps when I decide to come back to it I'll use the kit stencils too, as these were what I had an issue with. I've actually just been looking at mine though and there are a number of rough patches so im guessing I was being a bit lazy before applying decals 😅
-
Faultless
-
1
-
-
Beautiful build, nice to see something a bit different to the usual finished models
-
On 3/28/2021 at 12:41 PM, ilius said:
This is my Eurofighter Typhoon FGR4 Revell 1/48 - aircraft from 29th squadron RAF in paintwork in honor of the 75th anniversary of the Battle of Britain. The scheme of camuflage is the same as the Hawker Hurricane from 249 squadron.
In general, I built it out of the box. I made the exhaust of the APU, added wires and tube lines in gear bays and on landing gears. And I used custom decals and "Removes" from Eduard
Your model is stunning, I've found this scheme fascinating since I saw it on the 1:72 Revell box. Did you have any issues with your decals? I started this kit early last year and had some major silvering on the decals which, alongside the fit issues of this kit, saw me abandoning it for another time.
Cheers
-
The intakes are a hassle, mine is now sat half built on a shelf because of this. Your finsihed model is faultless though and really impressive!
-
On 2/4/2021 at 2:32 PM, redleader said:
Great job, chipping is just right IMO. What's your technique? Wish Tamiya would do a 1/32 Mk I.
Hi mate
I've been using a lot of Vallejo product as of late, they're a lot cheaper than some stuff out there but I found that they have to be thinned down with their own brand thinner, I think maybe this comes down to a lot of their products not being polyurethane- acrylic mixes; im sure someone will correct me if im wrong! In any case, once I started to use their own thinners, I started to get some pretty nice results with them.
So for the chipping, I slapped on a bit of Ak extreme metal paint, some of the Vallejo chipping medium and then the normal painting process. They reccomend activating it with some water however usually its easy enough to scrape the areas with a toothpick to get the right look.
Still a bit of practicing from me to get it spot on, but its getting pretty close now.
I'd love to see a 32nd Mk.I, I reckon the weathering possibilites on that would be really fun!! I bet it would have a pretty heavy price tag being a new tamiya kit 😅
Sorry for the late reply, hope you are well.
Cheers,
Ryan
-
2
-
-
-
3
-
-
Thanks for all the comments guys, really appreciate it.
I've just gone and bought five Eduard spitfires. Turns out Eduard's website for weekend editions and overtrees are cheaper than what i can get them for anywhere else. Even with the postage cost!
-
Hi everyone
Here are a few photos of my latest model I built, its another Tamiya Spitfire, they're the kind of model I decided to build when another project has lost my interest.
I've been trying a few different things here and there, specfically pre- shading through marbling and chipping effects; sadly my phone camera hasn't really picked the marbling effect, even whilst I look across at it now its pretty faint. So perhaps next time ill go a bit heavier on it.
Not really much to say about the build, we all know how nicely these Tamiya kits go together, however im still not a huge fan of the decals with the white base for the roundels. I was going to airbrush them on with stencils but as I wanted to finish the kit before Monday I decided against this.
Hope you all enjoy
Thanks,
Ryan
-
41
-
-
On 1/13/2021 at 12:21 PM, Spitfire madman said:
Hi the roundels were a pain to go down, there are holes in the decal for the vortex generators to fit through which isn’t to much of a problem but there is another prominent feature that the decal needs to conform to and here is where I had trouble which need loads of decal setting solution but both roundels still split on me so just had to touch up with paint 👍
Thank you mate, ill make sure to keep an eye out once I get to the roundels then!
")
-
1
-
-
Really great work mate, its beautiful!
I have this in my stash that i'd like to get on to soon; how did you go about the roundels on the top section of the wing? To me the first thing I noticed was how to go about getting the roundel decal to fit over the vortex generators?
-
1
-
-
Good morning everyone, hope you are all doing well!
Rather than waffling on too much about what went well and what didn't with this model I will just post a few photos and a rundown of the build.
So, this is another one of those kits that i've had for a few years now. Im pretty sure alongside Eduard's 1/48th Spitfire Mk.IX this was one of the first kits I build and used an airbrush on when I was around 16; I actually had this model built somewhat broken in a box so dug it out to compare as im 21 now so its been 5 years. I have to say, even though this kit can be a bit tricky to fit together in some places its an amazing kit and so even the one I build when I was 16 holds up okay thanks to Eduard opposed to my lack of modelling skills starting out. Lets just say if it was an Italeri kit I decided to go for first, it probably wouldn't have still been kept.
I honestly loved every stage of this build, im not a huge fan of photo etch sometimes and have to be in the right mood to build a kit with PE parts but this didn't put me off this time as I knew I wanted to build the kit in my chosen scheme and also wanted to test a couple of new airbrushes even though there wasn't all that much mottling on this model its the first time i've used an airbrush freehand for the camouflage which is really fun.
Now this kit is done, im hoping to move onto Tamiya's F15C before making a start on some trickier jets.
I hope you all have a great christmas and a happy new year!
Thanks,
Ryan
-
16
-


Eduard 1/48th Spitfire HF Mk.VIII
in Ready for Inspection - Aircraft
Posted · Edited by RiotRolo
Hi everyone
This is my most recent build, which I finished Sunday afternoon. I love Spitfires, and I think this might be one the only spitfire I have kept for myself. The Eduard spitfire is possibly my favourite model to build, its one of those where you can choose to speed through it and still get a nice result or to detail it till your hearts content. I decided to settle for a middle ground, and finally decided to build a model methodically rather than jumping into it and fixing mistakes I could have avoided.
Although its worth mentioning, I thought I could get away with my old bottles of Hataka paint... this turned out to be a horrible decision, in my opinion these paints are worth staying away from. Instead I switched them out for the Vallejo tropical pack, I've been really enjoying using Vallejo paints at the moment and think in future I'll continue to use them where I can.
The only one real mistake I made building this was with the Vallejo paints, being that my usual method of two tone RAF schemes where I cut pieces of Frog tape out to mask off the first layer left a step in the paint, thinking I had sanded it down enough I continued and was left with a small step between the two camouflage schemes. Nevermind, its not too obvious.
I also found out through an error that these Eduard decals have a carrier film over them, I was trying to mask off a small section on the model and pulled a bit of it off which I feel makes the decals look really realistic.
Not too much to say about the build other than that, I kept the weathering minimal in contrast to my previous build. I wanted this Spit to look nimble which I hope is reflected in it being cleaner. I have also just noticed that I forgot to paint the fabric over the machine guns, im not too fussed about fixing this though.
Thanks,
Ryan