


Murray
-
Posts
157 -
Joined
-
Last visited
Content Type
Events
Profiles
Forums
Media Demo
Everything posted by Murray
-
Thank man! I was starting to wonder haha...
-
Airfix 1/48 Junkers Ju87B-1 Stuka - the new one
Murray replied to Jeff Wilson's topic in Aircraft WWII
Finaaaaaaally, a detailed cockpit, rivets and engine as standard. Excellent! -
Hey! I use clear 0.05mm clear nylon thread. I would use something artificial before any sewing thread type as I think the fibres show and it subtracts from the effect
-
I did some more research and had a gander on eBay, CMK also produce a resin Merlin 2 for the hurricane. I'm sure I'll be able to get that work. Thanks for your help!
-
Hey! Having built that kit, I would say the safest bet would be to try and scratch build it. There's a lot of perspex in the front of that kit that I think would foul the resin. And also, since the tooling is a billion years old I think the plastic side wall are about 2 inches thick so to thin it all out to the point where aftermarket resin could be used could be really difficult! Good luck with whatever you do!
-
Hey guys, So a while ago I noticed that Airfix hasn't got a new tooling of a Mosquito in 1/72nd scale (I'm sure they're working on it) I thought this was a pity so I wanted to use their old tooling (more than twice as old as I am), then scratch build a half way decent interior and kit bash some aftermarket into it. I used a bomb bay set from CMK meant for the Tamiya Mosquito, a CMK Merlin engine meant for a Hasegawa kit, an Airwaves photo etch fret that is horrendously inaccurate but it has a pretty nice dashboard, and a set of resin wheels from Squadron. In addition to that I plan to scratch build the wheel wells, the landing gear, the cock pit and the nose machine gun bay. The Airfix kit is pretty rough and lacks a lot of detail, the clear parts and the decals have been updated at some point and are both quite good in contrast to the rest of the kit. This is purely an exercise in seeing if I can scratch build something of this magnitude, I know there are of course much better Mossies out there but I had some free time and wanted to give it a bash. I quite like the idea of revamping old kits. It's been fun so far. Here are some screenshots I took from the footage I've been compiling on the build, I'll upload to MURRODELS, once it's eventually finished. Theres a couple other videos on there already, do have a look, there's a bunch more on the way... Part of the bomb bay that fits surprisingly well Getting rid of the horrendous interior wing roots, this was before I thinned what would be fuselage skin, as it was very thick and would horrifically out of scale. The pilots chairs, I made the frames from thin plasti-card and used two part putty for the cushions (Green stuff) This was just a test fit using tape so it looks a bit rough. The CMK plastic is incredibly hard and very difficult to cut/sand A bit of a long term project to say the least but it'll get done one of these days... or weeks, more likely years. All the same, it'll be put up onto Youtube ( MURRODELS ) and leave updates as they come on here. Any tips from anyone who might of tried something like this?
-
Hey guys, I was wondering if anyone had any decent reference imagery/schematics to the Boultan Paul's Merlin XX engine? I was thinking if there are any decent plans I'll try model it in Autodesk with the intention of 3D printing it. Could be interesting... Failing that, I was thinking about picking up CMK's 1/72 resin Merlin XX up and kit bashing an engine mount and plumbing together. Would this be correct in a BPD? (In particular a MK 1) What do you's think? The engine in question.... Cheers! I'll record whatever I do and upload it to MURRODELS where you can also see a couple other videos I finished. Theres a bunch more on the way!
-
Hey guys, So i'm working up to a build here for when I get back, I'm gonna do the Revellgawa 1/72 He-111 H6. I wanted to do something a bit different so I got the Xtradecal set for it, annoyingly, for the scheme I want to do there's no paint guides and I can't find anything online. I was wondering if you guys could give help? That is the old kite I want to do. I am totally fine just winging it with some artistic license on the top surfaces of the wings but if anyone knows of any decent reference photos I would really appreciate the help! Cheers
-
Hey guys, just wanted to say a massive thank you to everyone that watched/liked that video. Its had a crazy number of views in under a week - I'm baffled! I'm editing a couple video builds together right now whilst I'm away (Erasmus exchange in Germany and I couldn't fit a compressor, airbrush, tools, glue, paint, stash in my hand luggage ) But there is more video content coming!
-
I think they come out of revell starter sets, no? So handy haha Thanks man! Appreciate it
-
Haha, it's effective!
-
Hey guys, I posted pictures of my Fw-190 D9 a while back, I just finished editing the accompanying build video together. Do take a look! Thoughts/critiques/comments? - Cheers!
-
Hey! Thanks man, I used Tamiya paints. For the fuselage I started by painting it the normal harrier two-tone grey and green, the grey (dark sea grey) being XF54 (+ a bit of white as it was a bit dark) and the green being XF-26 (deep green). After this I applied maskol by Humbrol with a corner of sponge, to give the chipping. Then I sprayed it with XF-2 (white that I added a smidge of grey to, to make it slightly off white) Lastly peeled off the chipping, which was surprisingly effective. Then for the roundels I used XF-7 (field red) and XF-4 (yellow green) to lighten it up. I then added a couple drops of grey to make the whole color flatter as that was the problem with Airfix's decals, that they popped too much. Then using the other part of the mask this was XF-18 (medium blue) with a drop of XF-89 to again darken it down and make it flatter. Thanks for the question, I've been recording all of these steps on video. If you're interested check my other video builds where I'll be putting this little beaut soon, so be sure to subscribe to not miss it, cheers!
-
Cheers!
-
Zvezda's 1/72 MiG 21bis for UKscalemodeller's group build
Murray replied to Murray's topic in Work in Progress - Aircraft
Thanks man! That was my plan, to go heavy on some post shading. I was very tempted to brush paint it, bust out my stash of my thousand year old humbrol enamel tinlets. Cheers!- 11 replies
-
- 1
-

-
- MiG
- group build
- (and 1 more)
-
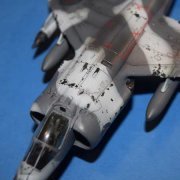
Hey guys, Made a bit of progress on the Harrier. Got some stencils on, amid some debate about whether white wash covered over markings but I saw a couple photos where they were visible, and also, they'd be easy enough to spray over so I fired them on. I'm in the process of making a video for this build, I'll upload it to my youtube channel, MURRODELS I also painted a couple roundels on, I'll need to paint the ones on the sides on next. I wanted to paint them because the decals that come with the kit, although very nice, would look too bright and glossy for this scheme I think. What do you's think? Making the roundels... Cheers!
-
Zvezda's 1/72 MiG 21bis for UKscalemodeller's group build
Murray replied to Murray's topic in Work in Progress - Aircraft
Hey guys, working on the MiG. Managed to get a lick of paint on it. But before I had finished my airbrush (Sparmax SP-20x) decided to stop being an airbrush and started being a massive pain in my ***. So I had to tackle the daunting 4 tone camo with my old airbrush (the kind that you get in bundles with compressors) So using Ol' Spluttery, heres what I came up with... Still needs some touch up but I'm going to need to wait until I'm back from my Erasmus exchange mid February as the replacement nozzles arrive when I'm away. What do you guys think? - Cheers!- 11 replies
-
- 4
-
-
- MiG
- group build
- (and 1 more)
-
Hey guys thanks for your replies. I heated it up under a tap and a cocktail stick did work. Got some replacements of eBay. Thanks for your help.
-
Hey guys, As the title suggests, the nozzle in my Sparmax SP-20 just sheared when I was cleaning it, (was only finger tightening it?) Anyone know how best to get the nozzle threading out from the brush? Or should I just return to sender and have them replace it? I'd understand if the brush was old, I've not even had it a month. Thoughts? Cheers! Ugghhhhhhhh
-
Thanks! Just uploaded my first video to youtube yesterday, been posting a fair bit. Cheers!
-
Hey guys, finally got my MiG together. The Zvezda tooling is actually turning out to be quite nice, although looking a bit rough around the edges. The kit is quite nicely detailed. The instructions and decals are awful, they don't include all the parts and the decal sheet includes no stencils and are about as thick as the box it came in. The only problem with the plastic that I have encountered is that there are no discernible roots for the wings or stabilisers so setting them correctly was tricky. Other than that only a minute amount of filler at the base of the tail and wing roots and the kit's a cracker. Seeing as the decals are as rough as they are I'm going to try wing it, and paint a scheme I seen online. This MiG is for UKscalemodeller's group build on Youtube. Ill be uploading this build video to Murrodels Thoughts/tips? Cheers! The new scheme, I roughed up what I'll paint on the kit's examples... About half of all of the wee bits...
- 11 replies
-
- 4
-
-
- MiG
- group build
- (and 1 more)
-
Hey guys, I just uploaded (more of a re-upload as I had attempted to upload through the night but this morning I unknowingly clicked on Youtube's own option to stabilise the footage, I've had my camera in a tripod and obviously just moving the model. It had interpreted this as a shaky camera for some reason and tried to account for it by moving the camera with the plane that was also moving against the background. I was going to just leave it but after a couple minutes it made my head spin so thought best to re-do it) my finished videos of an Su-2 I built (started about 7 months then only came back to and finished recently, when I was rookie at airbrushing, and also recording things) I published some pictures on here a while ago showing the finished model. I am reasonably happy with how it came out, here's the rest of the build! Your thoughts? Cheers!
-
Hey! Thanks man! Would recommend, also it's this one...
- 4 replies
-
- 1
-
-
- Fw190
- butcherbird
- (and 1 more)
-
Hey guys, Finished this guy last night. A Focke Wulf 190 D9 of Jagdverband 44, it's iconic striping serves to distinguish the plane by friendly AA gunners as it was employed to cover the Me 262 when it was vulnerable during take off and landing (I think). I am quite happy with it. The kit is very good, nice crisp moulding, standard Tamiya. The plastic is maybe overly soft if I was to be really picky, but good to work with all the same. A small kit, still relatively well detailed for it's size even with everything being on one sprue. Also the decals are pretty thick (All except the crosses on the underside of the wings that are apparently very thin and I wish I had just painted because the white is still a bit visible) I painted the striping on, started with a white base across the whole underside, then with thinly sliced Tamiya tape (using the decals as reference) to mask the white stripes (this plane should be the band's logo). Then with the red, I was careful to under thin the paint for spraying so it came out quite thick and thus didn't run under the tape (It actually worked! I know I was surprised as well) Apart from that it was just a pretty standard little Fw! I recorded the full build of this which will also be posted along with the SU-2 and Norwegian Harrier GR1 that I recently shown on here to my Youtube channel as soon as they're pasted together (MURRODELS) Thanks for reading, what do you's think? Hope you's catch the videos once they're out, cheers!
- 4 replies
-
- 7
-
-
- Fw190
- butcherbird
- (and 1 more)
-
Thanks man! I'll see how noticeable the mutant seat belt is once the canopy is on, maybe take a dremel to it and sort it out. Good luck with your GR3